Blacksmith forging project thread idea (pic heavy)

This is a place to share about tools and workspaces
Post Reply
User avatar

Topic author
Florida83FSJCherokee
Posts: 196
Joined: Sat Mar 09, 2013 7:53 pm
Location: Lakeland , Central Florida

Re: Blacksmith forging project thread idea (pic heavy)

Post by Florida83FSJCherokee »

Well...I shived myself...lol...

Im stuck at home at least untill tomorrow so im bored...

I was going to post this later when i finished the other knives im working on but since its finished ill put this one up now.

only have one arm for typing so gonna be mostly pics today. if you want to know how stuff is done look back through the thread and its all there...

first! the injury!
Hoof knife for trimmig the soles of horses feet...slipped trimming the frog and BURIED! it in my forearm...1.5" of blade to be exact...Apparently i cut into the muscle that extends your arm and fingers so they arnt working very well at the moment... should be fine...just hurts...

Image

i never go to the doctor...i stopped and got guaze and some steristrips...my wife laughed at me as i tried to close the gapping hole...Dr. laughed when she was told the story...so my wife and hot lady dr. both laughing at my idiocy..:sad:


So i have a few christmas orders ive been working on and heres one of them.

Guy wanted a big, heavy, utility knife with a burnt oak handle...

id say i nailed it..:thumbup:


Image

Image

the stuff Aggies dreams are made of...
Image

Image

Image

Image

Image

Image

Image

maybe someone can explain why the stripes in the oak burn faster than the rest??? works cool for me because it tiger stripes it, but id like to know why...

Image

Image

Image

Image

Image

Image


heres a 6" chef knife that i should finish sunday if i get the all clear...
ill get into the explaination in another post but this ones differentialy hardened.

This is the straightest ive achieved to date... basiclly the cutting edge is hardened while the spine remains softer. alowing for more flex to be achieved in different parts of the knife while the edge stays hardend and retains the cutting edge...
Image

if you look closly the blade still shows the density line change after the final grindwork... i find this stuff to be very cool...
Image


repeat photo but it shows the handle..Bocote wood is Rad!
Image


Allright, back to being house bound...

Ill get the other projects up once im back in action.

JP

"Shop of Solitude"
Image
User avatar

Topic author
Florida83FSJCherokee
Posts: 196
Joined: Sat Mar 09, 2013 7:53 pm
Location: Lakeland , Central Florida

Re: Blacksmith forging project thread idea (pic heavy)

Post by Florida83FSJCherokee »

Despite my metalurgical set backs. (i think i just made that word up :thumbup: ) I mananged to finish the final christmas order and remake the chefs knife I am giving my uncle for christmas.

This post has the butcher block process documented as well, since alot of folks seem to be interested in that process also.

The blade work is basicly the same with the exception of the Differential Hardening/quenching technique that I have begun using on my Kitchen style knives.


So to start we have a massive Butcher Block cutting board that was ordered as a christmas gift from a gal in Georiga.

I wasnt super happy with this boards looks upon completion but she designed it, and approved the layout before hand. This is a definite case of "the customer is ordering for there taste, not yours".

Its a Cool concept and with the exception of the oak and poplar stripes it is one of the nicest boards so far. I just would have switched the oak and poplar for another row of walnut, but ...thats just me.


The main wood in this build was Ambrosia Maple with Walnut and Bloodwood accents and spacers. There is some purple heart added for color and the oak and poplar i mentioned before.

To start I made a jig/stopper on the miter saw so I could cut each board to 2" without having to measure each one. Once these were all cut I played with the pattern until I was happy.
Image

The next part involves moving the little jig/stop up to the blades edge so i can trim each boards edges evenly. In theory( at least in my mind) if i set the trimming to 1/8" then my overall spacing wont change and the symetry stays the way it was before trimming.
Image

Here it is cleaned up
Image

Since the edges of the board are not uniform I need to trim it down so that my clamps can pressure each row evenly. I use a square and basiclly trim the outer boards to the marked line
Image

With everything evened up I can compress it to see if there are any obvious issues. As long as the seams are close the clamps will do the rest. This is a good time to cut your side boards. I use soft pine for these so that any slight uneveness can be pushed into the soft side boards and not mess up my uniform contact.
Image


I use cut out 3/4" plywood as the top and bottom pressure plates. These keep the board from curling up or down (pringleing)

In order to keep them from becoming permanent additions wax paper sheets are layed under them. No matter how much over spill comes from the glue I have never had the wax paper stick once the boards were removed.

Image


On a board of this size the gluing takes a little while so save time where you can in the process of compression by allready having your clamps together and roughly set.
Image

As Aggie has pointed out numerous times its best to stagger your clamps. Once they are all on I tighten them in the same staggered manor.

Remember to go back after your done tightening the sides and put a little extra twist into the top and bottom clamps to relly enusre this thing stays flat.
Image


I let my boards sit overnight and usually its the next evening before i can work on them again. So as a general rule 20-24 hours curing time in the clamps. It may be overkill but I like to let it sit unclamped for a few hours as well. Sometimes the over spill isnt totally set and letting it finish curing keeps from clogging the sander

Unclamped and down right ungly...but...Its flat!

Image

The 3x21 craftsman sander with 36grit belt is the tool for the next job. Clamp it and start working it until any high spots, glue, and lowspots are removed.
Generally it takes me about 30-45 min to finish both sides. I didnt photo it but I run a level across the top and it will show you where you need to keep sanding and where to aviod. If you follow its lead you will end up pretty darn flat for a "by hand" job.
Image

Image
User avatar

Topic author
Florida83FSJCherokee
Posts: 196
Joined: Sat Mar 09, 2013 7:53 pm
Location: Lakeland , Central Florida

Re: Blacksmith forging project thread idea (pic heavy)

Post by Florida83FSJCherokee »

Now, these butcher blocks need to be seamless. Especially if they have been paid for and people are expecting a clean finished product.

This one was fairly neat in the seams, but it had one corner that was really bad. Im always amazed at how an entire board can push together perfectly but one seam manages to illude the clamps.
Image

Never fear! I have a fix.
Gather up some of the saw dust from the sander, and some good quality, clear finish, super glue (this is a case where a little longer set time actually works in your favor)
Image

Pack! the crack with saw dust. Im talking grind it in! you want it solid.
Image

Then take the super glue and run a bead over the entire crack. Move slowly so that it can soak in.
Image

Go do something else for an hour or two and then complete the sanding process. The glue bonds to the sides of the wood and also hardens the dust into a solid making a permanent fix to the issue.
Image

To finish the sanding I use a 60 grit belt on the 3x21 and then move to a 6" DA air sander. The DA runs 80, 120, 220 grit to complete the power tool portion of the process. The final sanding is done with 400 grit and a hand block. I dont go crazy with the 400 just enough to help smooth out the end grains.

Its at the 80 grit point that I do any edge work if needed. rolling them slightly keeps them from chipping and it helps hide any un-squareness you might have.

1st coat:

Once home and away from the dust in the shop I apply the sealer
Image

Image

Image


The last step is to lightly sand the first coat with 600grit. This takes care of any uneven grain popping issues (especially the walnut). Then apply the second coat of sealer and let it cure for 24 hours

Here is what you should get.

Image

Image

bottom side:
Image


Allright, thats an updated "how to" on the Doghouse Forge Butcher Block approach. I love the one I made a long while back and its what we use every day in our kitchen but I think the workmanship has imporved a little since then. :thumbup:

Gonna work on a post for the most recent knife builds this evening so that on it way...

Thanks!
JP
User avatar

Topic author
Florida83FSJCherokee
Posts: 196
Joined: Sat Mar 09, 2013 7:53 pm
Location: Lakeland , Central Florida

Re: Blacksmith forging project thread idea (pic heavy)

Post by Florida83FSJCherokee »

So the other part of this order was a 8" chef knife. She wanted it rough forged with the Hunter Drop to the blade and a copy of the laminate handle I made for a knife a while back. Since this was to be a proper cooking knife I didnt contour the bottiom of the blade like I have done in the past. It has a slight rocker to it but its basicly a flat bottomed chef knife with a different top line.

I also needed to build a traditional chefs knife for my uncle's christmas presesnt. He is a special guy, and has been a great role model for me. He taught me to ride a bike, shoot guns, what to do with the ladies :thumbup:, and most importantly to duck hunt.

He is a professional Chef so this knife needed to be correct! and functional.

I really forged alot of these knives blades design. the general shape was cut and ground but the taper was almost completly forged. Since my uncle and I enjoyed our duck hunting I made the handle of his knife to mimic the shape of a shotgun stock. I think it turned out pretty cool.

for anyone who's missd this part (recap)
Image

Image


heres the general shapes coming together.
Image

blades are almost completly forged into the finished taper
Image

Handles ground but still no need to grind on the blades since the thickness isnt an issue after forging.
Image

after some work on the belt sander.. Im not positive but its probably up to 80grit at this point
Image


I was really liking the profile of this "shotgun Chef"
Image


At this point they are ground pretty close to the thickness I wanted and ready to be hardend.
Image


Now, Im gonna change things up a little bit with the quenching. Instead of dunk quenching the entire blade I want to only harden the cutting edge and at the same time soften the spine even more. This is ideal for a kitchen knives because of the flexibility you achieve while still maintaining a super sharp and maintainable cutting edge.

To do this I take an aluminium roasting pan and fill it evenly to the level at which I want the blades to be hardend to.
Image

Then I use the torch to selectivly heat the blade from about half way down to the tip of the cutting edge
You achieve this by passing the entire blade back and forth through the heat. Leaving the knife in one position scalds the steel and if its to close to the fine side it will cut through it. (been there, F'd that one up bad, cussed alot, threw it against the wall)

Check for non magnetic and set it evenly into the water, oil, or brine.

(differentially tempering/hardening air hardend steel requires other thechniques, like the use of clay to insulate sections of the blade while the other are exposed to the air and harden faster. )

Image

Image

when you pull it back out, let the rest of the knife cool slowly to get as much softness from the residual soaked heat the rest of the blade pulled in while the edge was hardend.
It will developes a hardening line or point. Its very clear to see and can be seen after all the finish is done if you know its there
Image
User avatar

Topic author
Florida83FSJCherokee
Posts: 196
Joined: Sat Mar 09, 2013 7:53 pm
Location: Lakeland , Central Florida

Re: Blacksmith forging project thread idea (pic heavy)

Post by Florida83FSJCherokee »

So with the hardening done I do the standard tempering at 500deg for 1.5hours x 2

after the final grinding I decided on the special laminate burl I had from a few months back for the "Shotgun Chef" and the order got the last of the exotic laminate. The Burl is comprised of Blue redwood burl, purpleheartwood, and walnut.

Image

from here its the standard dry fit and pin
if you look at the burl laminate you will see i snapped it at the top when i was pushing a pin through. It popped right at a walnut junction so in the next photo you can see how I fixed it.
Image

Image

clamps and let it sit overnight. Rushing this will cause your handles to seperate during the shapping process due to the heat transfer.
Image

out of the clamps and roughly ground
Image

here are the handles about 120 grit in the process
Image

and finished but not sealed
Image

got some sealer on the exotic laminate
Image

and both handles finished and polished
Image


here are the final knives. Im really happy with them. The rough look isnt my ideal, but it seems to be what people want so Ive been leaning to that direction for a while.

The 8"chef
Image

Image

The "Shotgun Chef"
Image

Image

Got the balance right on the money!
Image

I had fun making these and luckily didnt have any of my "Quench Crack" with them either....wheww...the knife I posted a week or so back that is pictured in the differential quench example photo got the cracks and I had to grind almost half of it away...

So this is the final christmas order
Image

and with that the Doghouse is closed for a while so I can work on my jeep!

Thanks for checking it out

JP
User avatar

Topic author
Florida83FSJCherokee
Posts: 196
Joined: Sat Mar 09, 2013 7:53 pm
Location: Lakeland , Central Florida

Re: Blacksmith forging project thread idea (pic heavy)

Post by Florida83FSJCherokee »

I apologize for not keeping this more current. Just been stupid busy...

So there are a couple pages of updates that I added tonight and it catches the FSJ thread up to where it should be.

Im gonna start back into the sheetmetal on the Cherokee this week so hopefully I can finish the body work by spring time when its good painting temp.

Untill then Ill update this when I can and add any new projects.


Thanks to the original home of the Doghouse Forge Blcksmithing Thread...

JP

bigun
Posts: 1250
Joined: Sat Jun 11, 2011 8:20 pm
Location: Mountainair, NM

Re: Blacksmith forging project thread idea (pic heavy)

Post by bigun »

OUCH!!! Who would have thunk a hoof knife could do that?
User avatar

pyro
Posts: 811
Joined: Sat Sep 15, 2012 8:01 pm
Location: Tampa, FL

Re: Blacksmith forging project thread idea (pic heavy)

Post by pyro »

i need to get one of those blocks!
'81 J10 Laredo 258/T176
'82 Cherokee 258/TF904
'84 CJ-8 258/T176

Florida FSJ's Click Here!!!
User avatar

Gumby
Posts: 1433
Joined: Sun Jan 29, 2012 10:20 am
Location: Tucson, AZ

Re: Blacksmith forging project thread idea (pic heavy)

Post by Gumby »

Man I must tell you, you do some fine metal work but that butcher block is just plain sick. I may have to get with you for some stuff for my wife one of these days. Also love the balance on the blade too. You are mastering a dying art.
1984 GW 360/727/208.... 4"/ 31"
2004 CRD QC SRW 3500 4X4 (DD)
1983 "project Dubya" (long term)
User avatar

90supra
Posts: 175
Joined: Thu May 02, 2013 7:13 am
Location: Los Alamos, NM

Re: Blacksmith forging project thread idea (pic heavy)

Post by 90supra »

Amazing work. I love looking at this stuff. May have to try and get one of those knives at some point...
The Fleet:
1967 J3000 (258/T18/D20, MC 2100)
1972 240Z (heading under the knife :evil:)
1978 Corvette (wife's HS project)
1987 Grand Wagoneer (Howell TBI 360 HEI, Thorley headers, Edelbrock intake, 727 NP208, Rustys 4")
2013 Subaru WRX
User avatar

Topic author
Florida83FSJCherokee
Posts: 196
Joined: Sat Mar 09, 2013 7:53 pm
Location: Lakeland , Central Florida

Re: Blacksmith forging project thread idea (pic heavy)

Post by Florida83FSJCherokee »

bigun wrote:OUCH!!! Who would have thunk a hoof knife could do that?
Yah, normally the "hook" on the end of the blade would have stopped it from going that deep but i snapped it right below the hook when it broke, so it had a nice clean straight edge to work with.
pyro wrote:i need to get one of those blocks!
"You'll get nothing and like it Spalding", :mrgreen: If your not fluent in "caddy shack" that will make zero sense...
Gumby wrote:Man I must tell you, you do some fine metal work but that butcher block is just plain sick. I may have to get with you for some stuff for my wife one of these days. Also love the balance on the blade too. You are mastering a dying art.
Thanks Gumby, I didnt really like this particular block. Its basic design is nice and the Ambrosia is really cool, but i messed up the allignment of the spacers and it really bugs me. i also think instead of the oak and poplar is should have had walnut repeated instead.... Oh well, Im going to be making a counter top for an electronic cigerette store. (never would have thought) but ill document it and hoefully I can use some new techniques Ive learned to adjust some of my issues. Its going to be a cool counter. Its out of The ambrosia wood like in the board, walnut, and Padauk(orange) wood accents. The whole thing gets bored out for these wierd canister things to sit in so we shall see.

90supra wrote:Amazing work. I love looking at this stuff. May have to try and get one of those knives at some point...
Thanks man, much appreciated.

JP
User avatar

REDONE
Posts: 2678
Joined: Tue Sep 13, 2011 5:48 pm
Location: Lakewood and Bailey, CO

Re: Blacksmith forging project thread idea (pic heavy)

Post by REDONE »

I just saw a banner ad a little bit ago, it just said "Make Your Own Skillet", and before my brain registered that it was for Denny's I immediately thought of you, haha! Hope your arm is healing up right and to see more of your fine work before too long. :-bd
79 J-10 (Honcho Mucho) KE0LSU
304/Performance Fuel Injection TBI/MTA1/SP2P/Magnum rockers
T18/D20/D44s&4.10s/33" Mud Claws
Grizzly Locker Rear
4" front spring drop, 5" rear shackle flip
Chevy style HEI (ECM controlled)
Dolphin "Shark" gauges in a fancy homemade oak bezel
3/4 resto, rotting faster than I've been fixing it.
User avatar

Topic author
Florida83FSJCherokee
Posts: 196
Joined: Sat Mar 09, 2013 7:53 pm
Location: Lakeland , Central Florida

Re: Blacksmith forging project thread idea (pic heavy)

Post by Florida83FSJCherokee »

REDONE wrote:I just saw a banner ad a little bit ago, it just said "Make Your Own Skillet", and before my brain registered that it was for Denny's I immediately thought of you, haha! Hope your arm is healing up right and to see more of your fine work before too long. :-bd
Ask and you shall recieve my FSJ brother! lol


So hope everyone had a happy holiday,

Its been a wild january so far around the Doghouse. A local store in downtown lakeland asked to carrry my serving boards and cutlery. I agreed to the serving boards, but not to the knife stock they requested. Instead I agreed to building a knife set for display in their store front that could be special ordered by clients. The labor involved in creating enough inventory for a store display that can be refilled immediatly just isnt an option for me at this time.

So aside from Farriery the saws have been humming and the sanders have been running in order to get the Brooke Pottery Order completed.

Heres a link to their web site. It will give you a feel for the type of store. The previous cutting/serving board maker retired so the time was right for me I guess. Judging by the fact that everything cutting board related is sold out, thier eagerness is understood.

http://brookepottery.com/

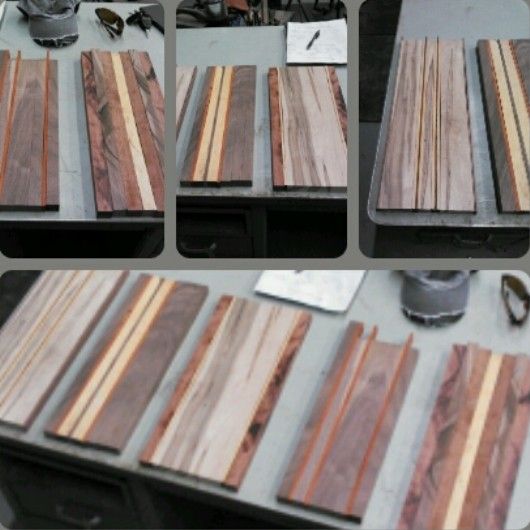
Serving board factory aka Doghouse Forge...
Image

this is taking the "Aggie method" to a whole new level!
Image

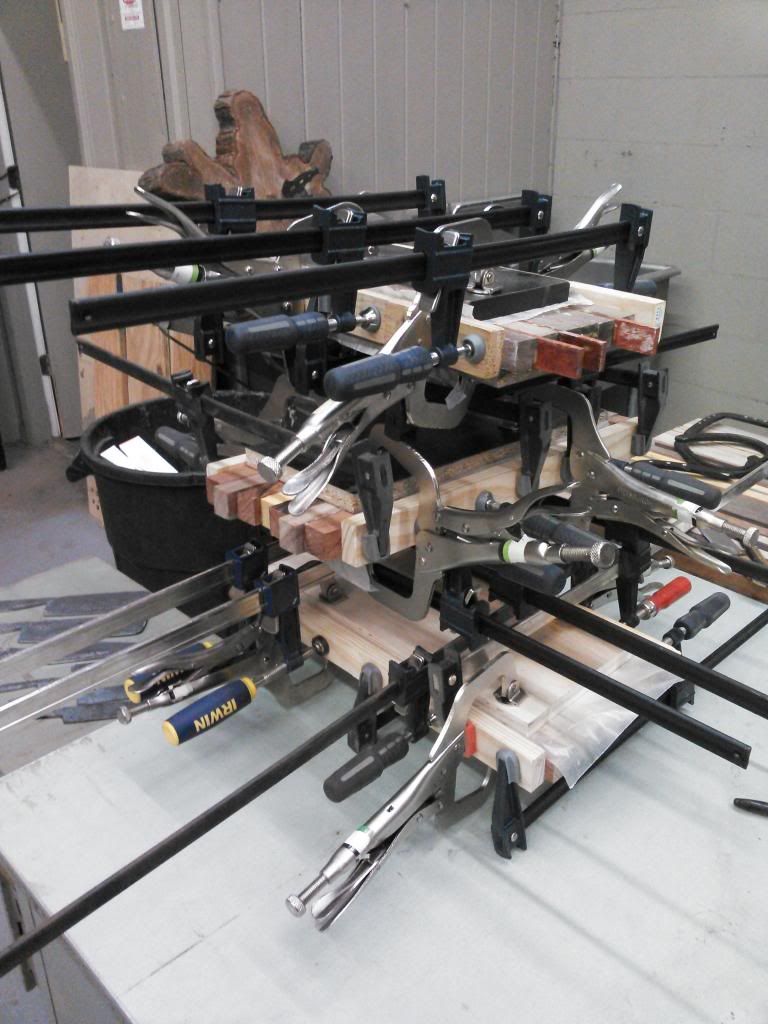
It's kinda sad...I got a bunch of gift cards at christmas to use on my jeep restoration, and spent all of it at HF on clamps...Bitter sweet...bad side is I dont have any "free" money left, but the up side is I can clamp 4 boards at a time now. Before I could only do one per day basicly, so this helps alot!


So the knife set is going to be traditional but very "doghouse" at the same time. Im using some amazing wood (no pics untill later , sorry...cant spoil it..:) )

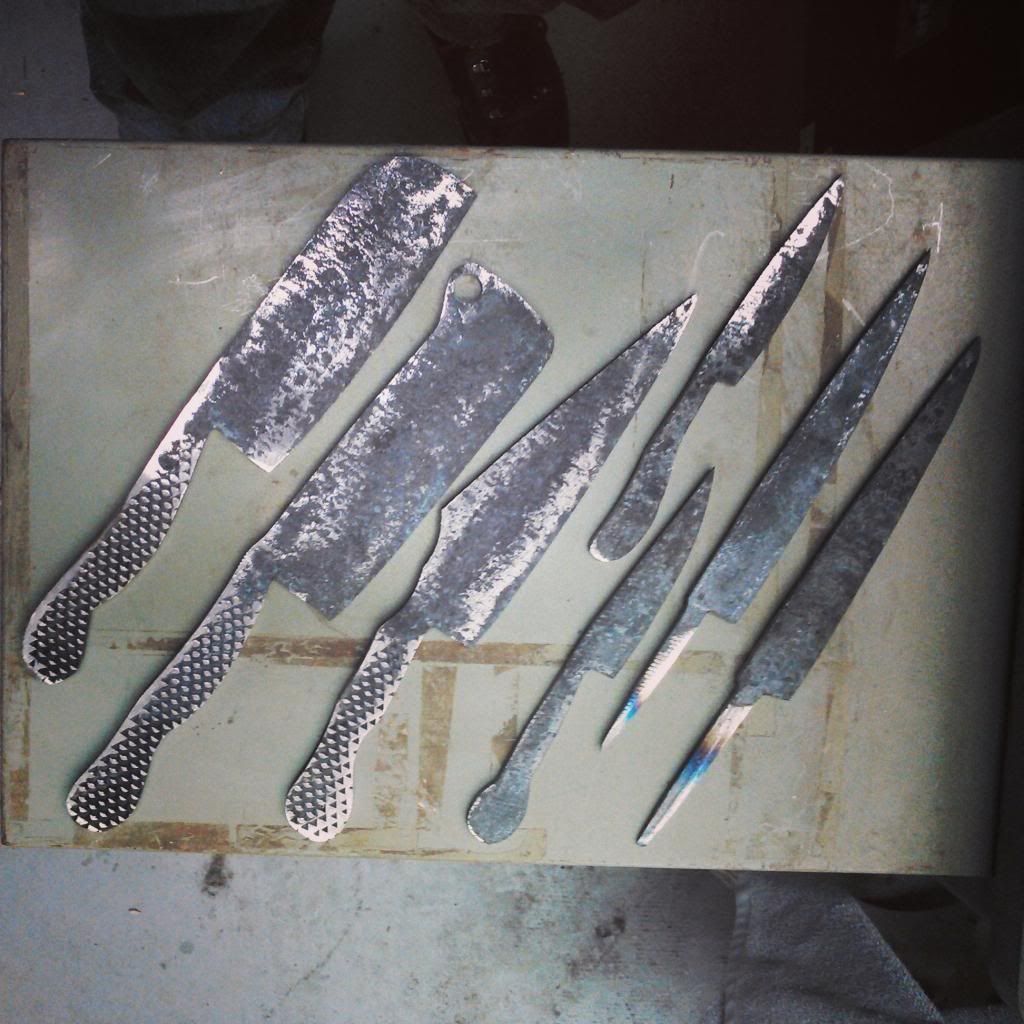
Going with a nice mix as far as styles:

Santoku, Mini Cleaver Chopper, 7.5" traditional Chef, Pairing, mini fillet, and two different hidden tangs... a slicer and fish fillet.

Image

Image


Since the last posting I have learned how to do hidden tang handles correctly and I cant wait to show you guys! So freaking slick how it works...

and...
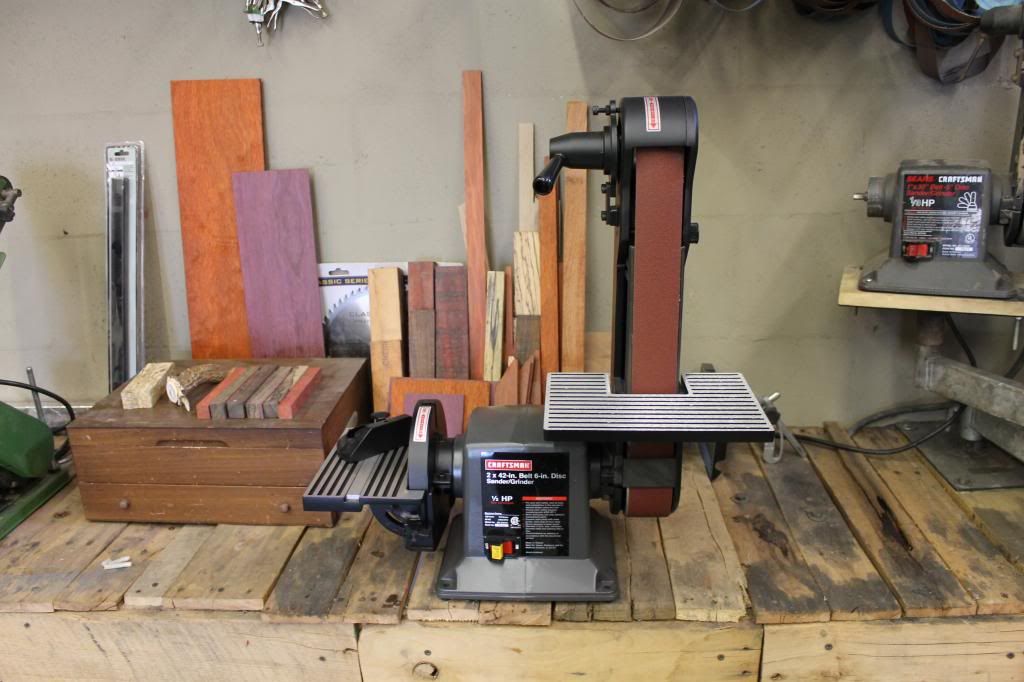
I found this baby for $100 on the big CL monday, new in the box...couldnt get there fast enough. 2x42 with the 1/2HP motor..This is gonna change the knife making from night to day. Its no "Bader" but compared to the 1x30 I have been using....no comparrison...plus, if i dont find the power good enough I can just put the sander arm on my extra baldor and that motor spins with so much torque/rpm it creates a time vortex! :scared:

Image


A quick note for Valentines Day...its coming soon so don't space out and forget...
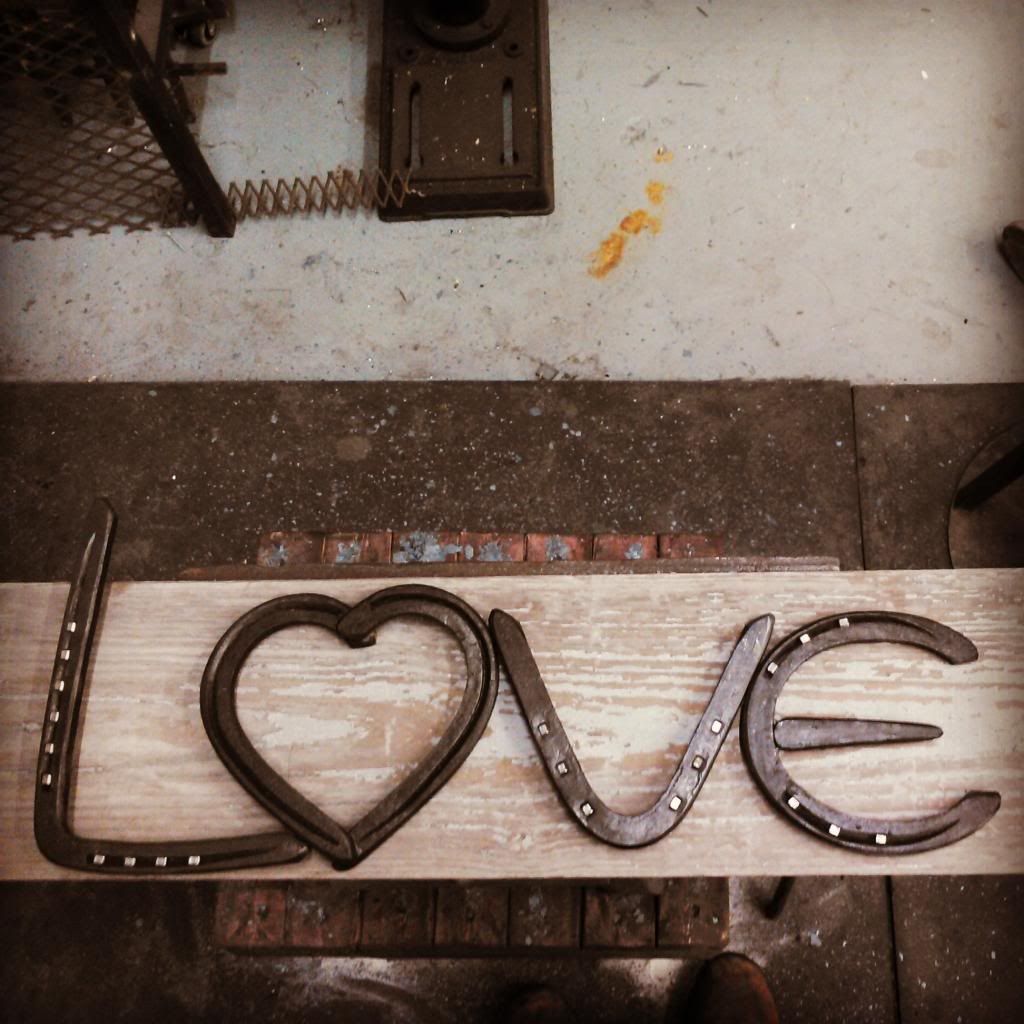
Here's a variation on the Horseshoe Heart... from the very first post...:o

This is for a friend of mine. He ordered the word love forged in the handmade horseshoe style and a large heart as well..
Image


Ok so thats the news...

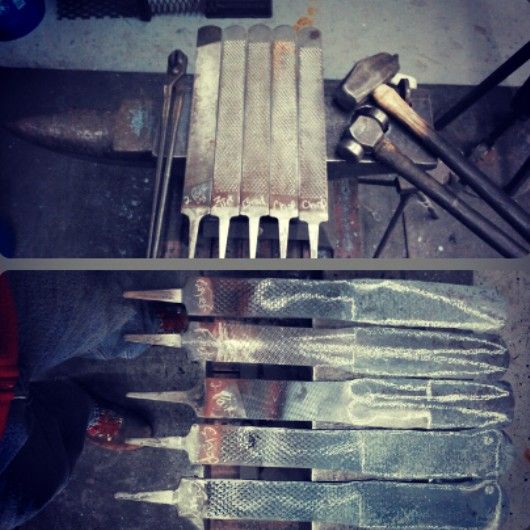
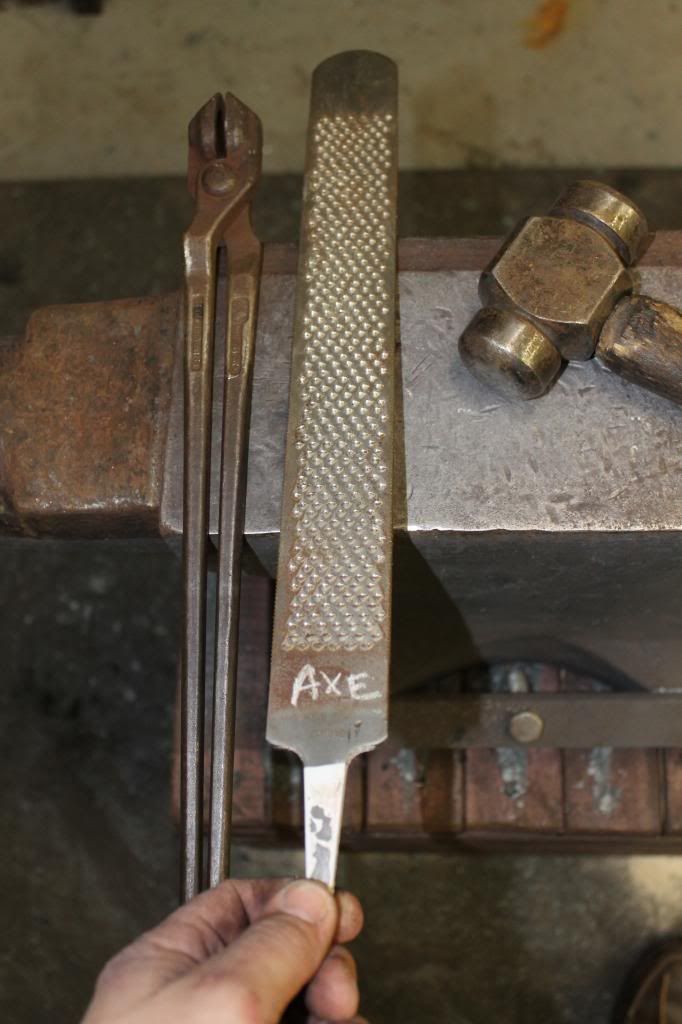
I saw a couple differnt guys on instagram making an axe from rasp and since rasp are kinda my thing...i decided I needed to make one as well.

Its stupid simple...

Image

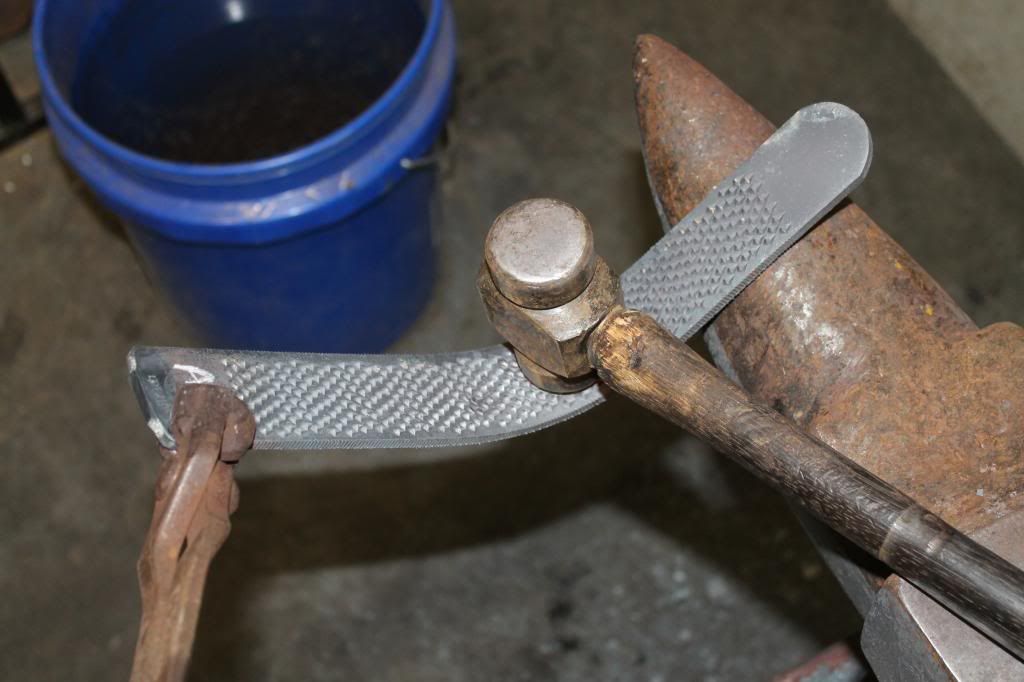
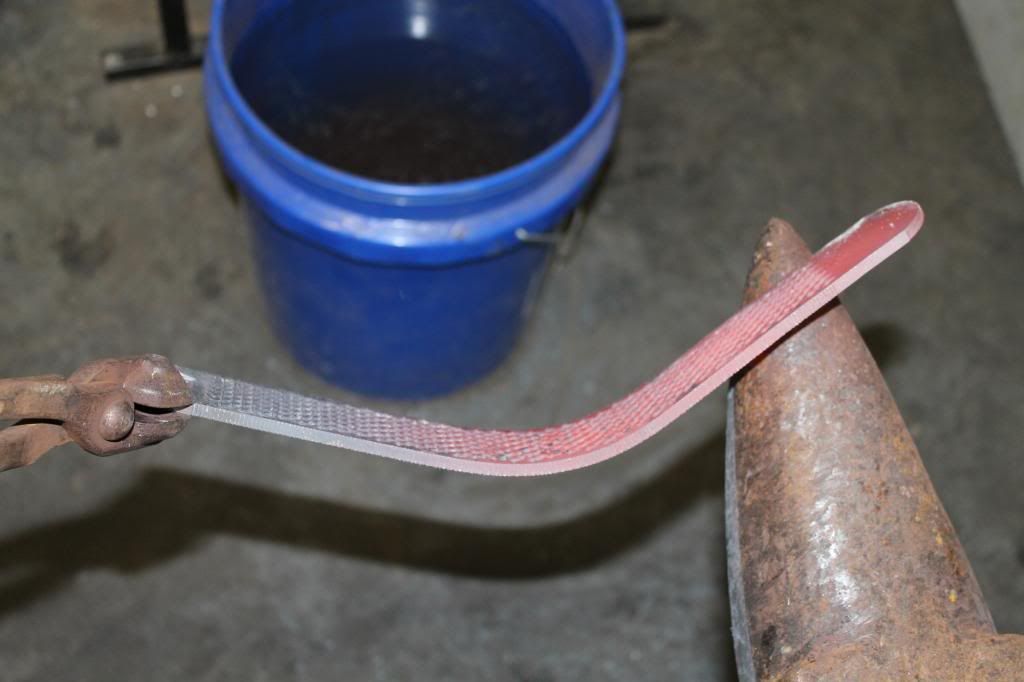
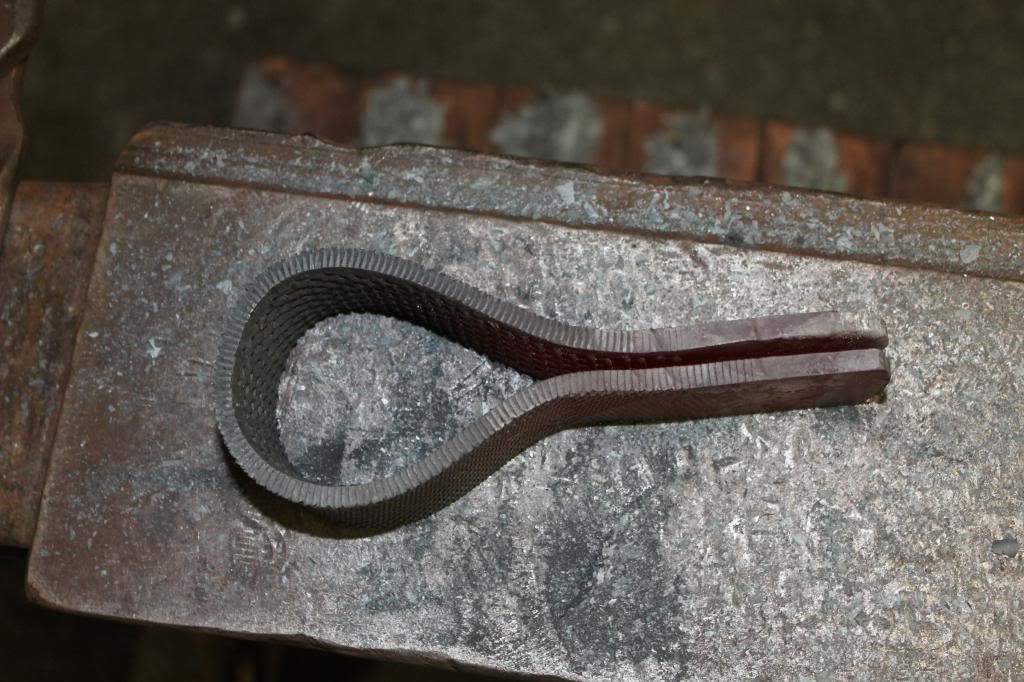
Break it just like the horseshoe toe bend from the very first post

Image

Image

Once you have it started use the horn and fold it on around itself into a "u"
Image

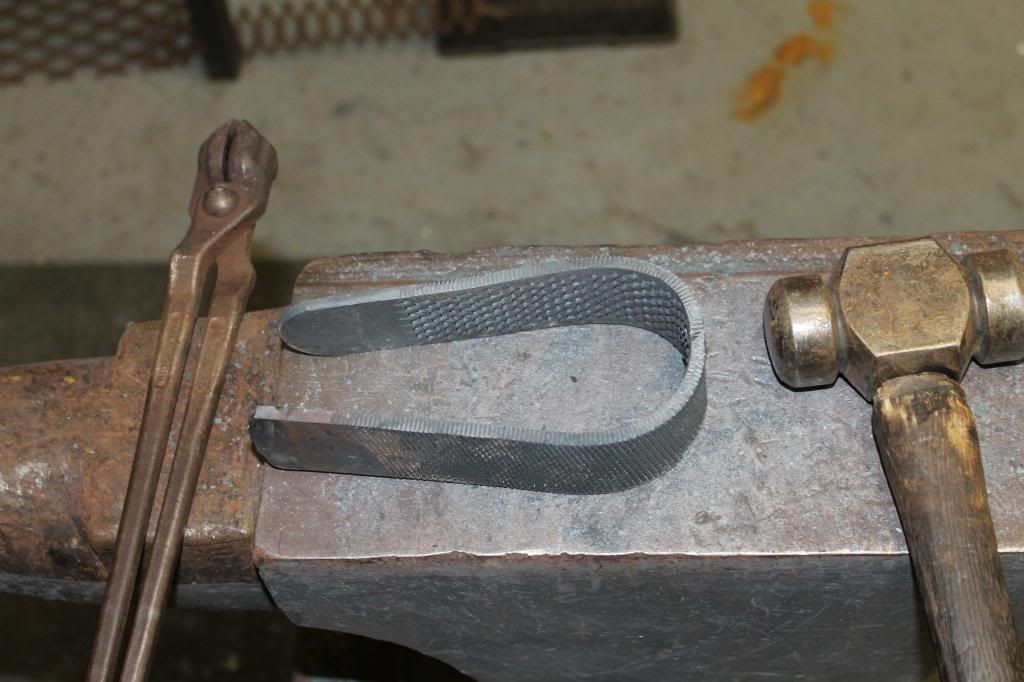
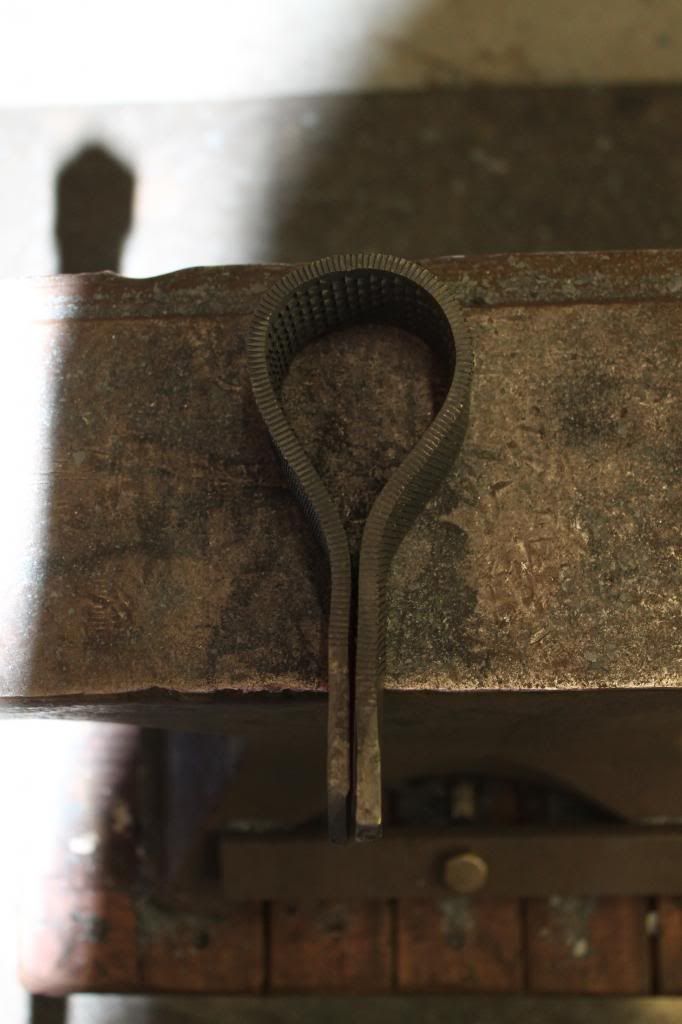
pick the point you want your handle drift to begin and drive the hammer into the bend you created. flip if over and drive into the other side. the secret is to use the edge of the anvil to set the crease...just like when we made handles a while back...
Image

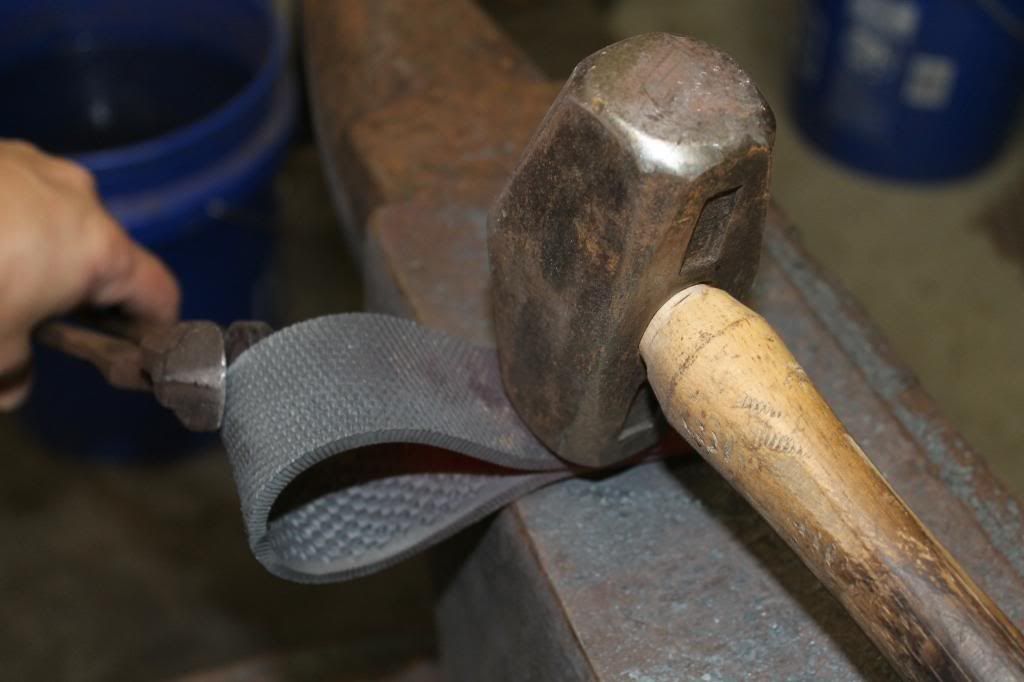
keep working it tighter and tighter untill your close to the size you want

Image

Image

Image

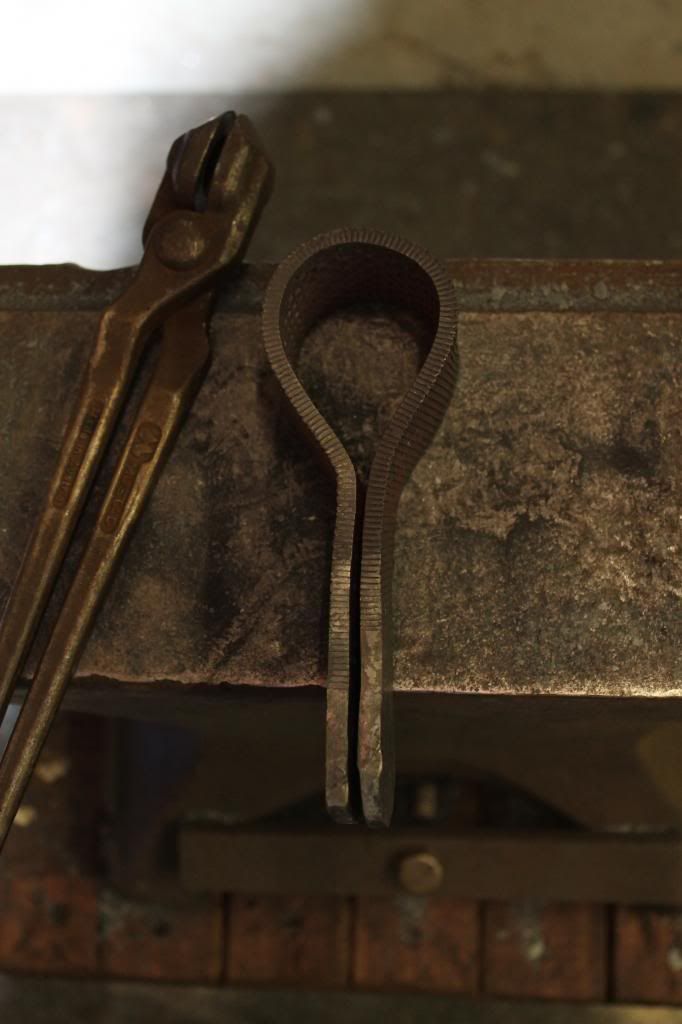
Once your close use a pipe to even out the distances around the drift...unless you happen to have a 1.5" solid bar lying around you will need to be gentle so you dont crush the pipe.

Image


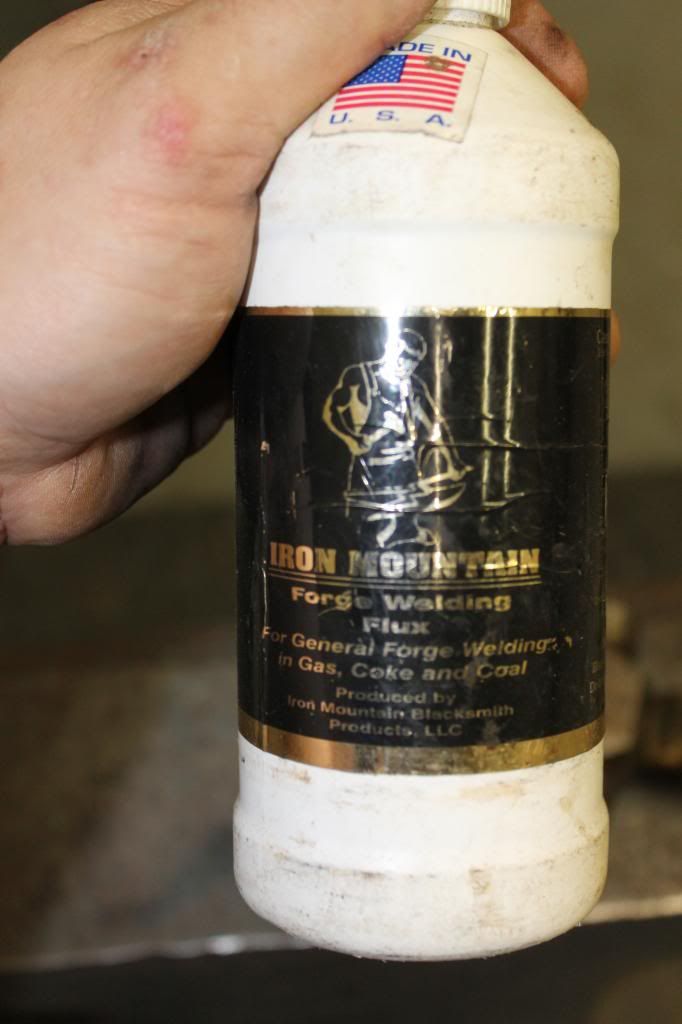
Next we are gonna forge weld the two sides into one solid section...I use "iron mountain flux" ...borax works as well, but I find the formula in Dr. Millers blend to give an edge in the process.
Image

Get the steel to an almost white heat and then brush the seem clean...apply a bead... bead/layer/line etc... of flux to all the seems in your weld. If your steel is the right temp it will melt into the seems as you are pooring it on..if it completly falls off as you move it around to do the other side it needs to be hotter. Some of the surface flux will fall off, but you will know what im mean when you see it melt into the cracks.

Image

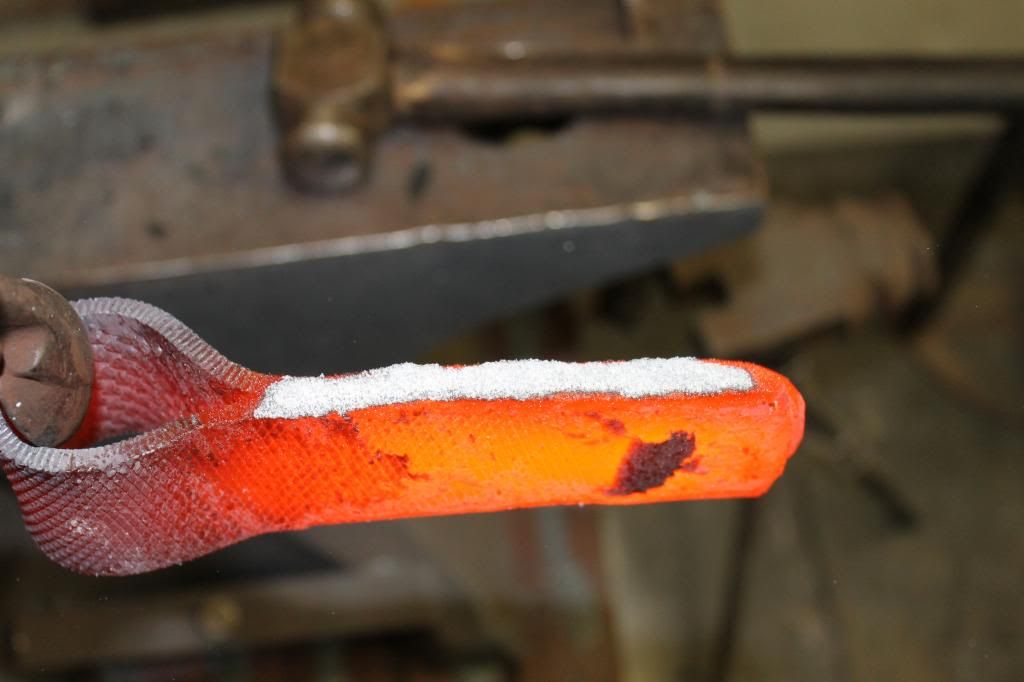
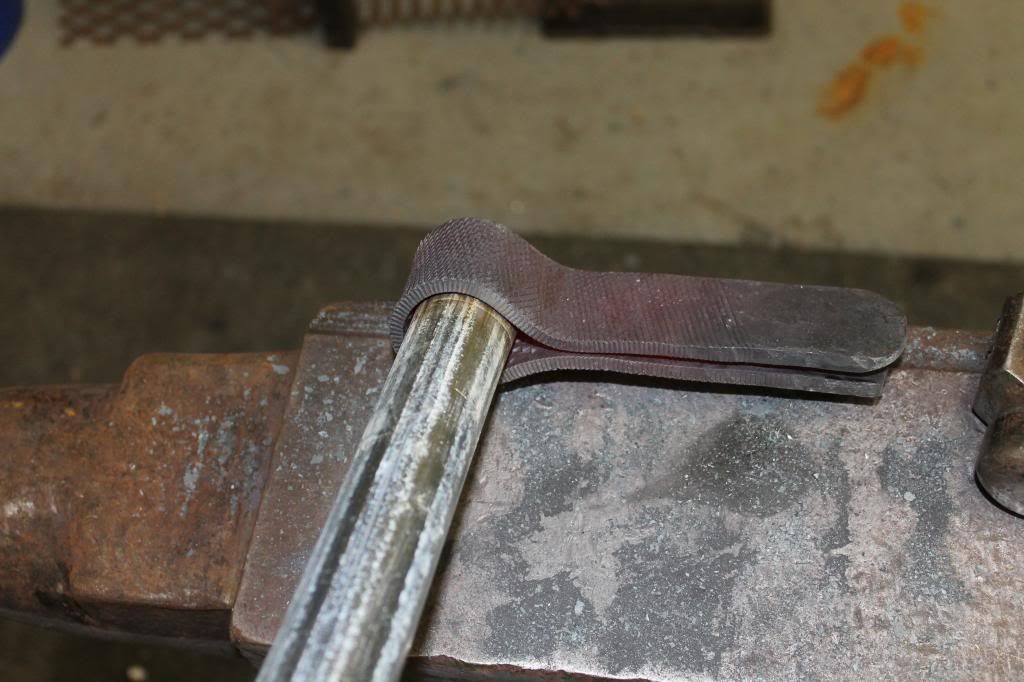
For the sake of the photographic process I got this one really close to the right temp...If you look at the steel about half of it is noticably whiter than the other...this is what you are looking for as for as color..
Image

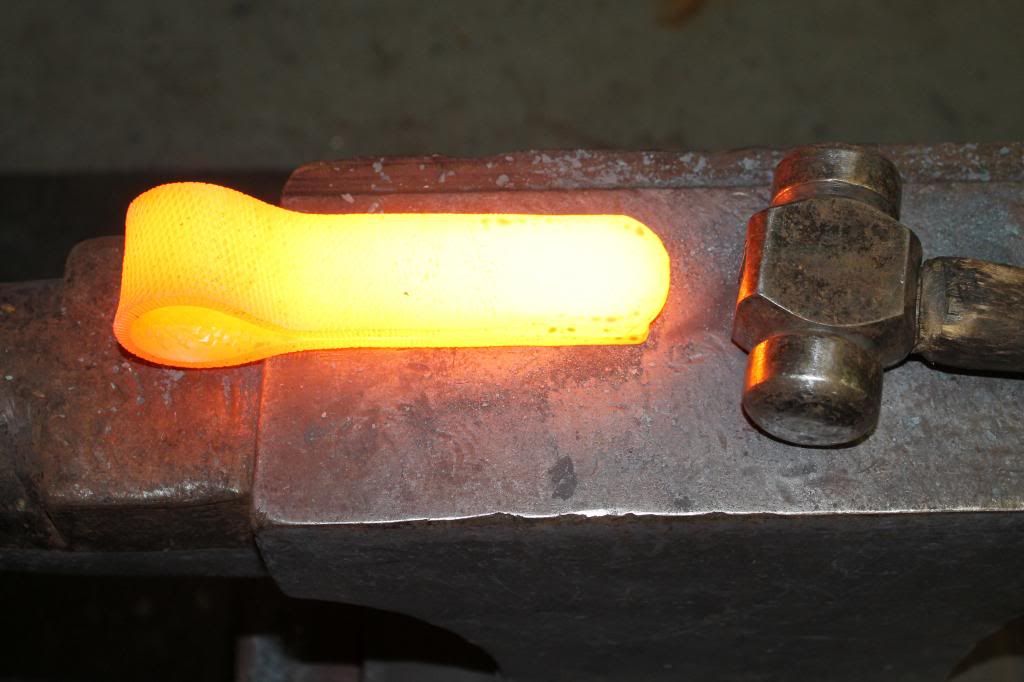
Unfortunatly I cant take pictures and forge weld at the same time...but its not about how hard you can hit it...Instead you want to work your seems with good even , overlapping blows. think of it as hemming the metal instead of pounding it together. the next series of pics shows the temp/color of the steel when Im welding it...

Work your edges and dont be shy about reheating when needed. if you only get one side done before your color changes thats fine, put it back in and start again with it hot. eventually you will belnd all the edges together. Re-flux each time and get it superheated. With the edges allready welded you can wail on the center and weld it. If you try to weld the center first there will be no sides to contain the mass, and it will just flatten out and push to the sides. With the sides as dams the center forges through to the other side instead of outward...
User avatar

Topic author
Florida83FSJCherokee
Posts: 196
Joined: Sat Mar 09, 2013 7:53 pm
Location: Lakeland , Central Florida

Re: Blacksmith forging project thread idea (pic heavy)

Post by Florida83FSJCherokee »

Image

Image

Image

and sometimes you run out of propane in the middle of a very important process...:headscrat :thumbup:

Here's how far i got... I will finish the welding tomorrow and continue on with the shaping of the axe head...

Notice the seems... some areas have blended better than others...this is why is important to work evenly and in smaller sections...I knew the propane was almost out so I was trying to hurry... Ill tidy this up tomorrow and post an after pic...this is actually a good learning momnet so I guess the propane running out is was a good thing.

Image

Image


Ok, i will get the second section to this project posted soon. Untill then everyone be safe and have a great weekend!

Its crazy around here!

Anvil Surfing! late night... :lol:

Image


JP
User avatar

Topic author
Florida83FSJCherokee
Posts: 196
Joined: Sat Mar 09, 2013 7:53 pm
Location: Lakeland , Central Florida

Re: Blacksmith forging project thread idea (pic heavy)

Post by Florida83FSJCherokee »

This is a continuation of the Battle Axe build fom the previous post. If you missed it jump back a bit to see how this got to where it is...


I went early this morning and finished the "Battle Axe"...changed its name...I like it... its amazing how much you can get done with a full tank of the pane.


So when I ran out of propane yesterday I had just started forge welding the two sections of rasp together. I was so focused on getting it done before it was empty that I made a careless error and left out a rather important piece of the equation...I was suppose to cut and place a third layer of rasp in between. This is needed to make mass and allows drawing of a large head...Oh well, I figured to late now so lets see what we can pull out of our bag of tricks....


Yesterday it ended up here:

I also grabed a nice thick oak dowell for a handle Image

Image

while it is welded in places it needs to be consistantly blended to handle the forging of the blade that comes later... so I reheated, refluxed, and repeated the work to the edges...

Image

Image

If you remeber from yesterday, you need to weld the sides/edges first so that when you forge the center it has containment and doesnt blow out the sides instead of forginging down through its self. This couldnt be a better photo of what im taking about...Notice the literal bubble in the center of the blade? The sides are all forged so there is a pocket in the center where we havent worked yet. As the metal is superheated it builds pressure and forces the 1/8" steel upwards like a ballon...

Without the sides welded this wouldnt happen and it shows me that we are ready to weld the centers together
Image

after working the center weld one pass I reheated and the bubble size decreased so I know im closing it up
Image

So after finishing the center weld and checking the edges I am confident that my axe head has become one solid peice of metal instead of two

Here are the seems
Image
Image
Image

Image


Now on to forging the heads taper and shape

Here is what im going for
Image


Now if I had rememberd the third layer this would be a breeze, but since im already playing with a short deck this is going to be a tall order for the steel I have to work and draw from...

Image


So to start i want to let the steel know what im thinking...It sounds silly, but I need the steel to get the idea that its going to move in a certain direction...once all the molecules are heading the right direction eveything flows better...

So i drive the edge of my hammer into and towards the corner im looking to create. I drew an arrow on the anvil for reference...
Image

Image


Then work the hammer flat and overlapping to smooth out the area. When you do this step the metal moves into the creases you created before and expands the shape
Image

If you notice im getting some "buck" in the opposite corner...Even driving away from it the force in the mass moving transfers enough to upset its location. To correct this turn the piece around and drive flat blows away from you instead of toward you. Your still forging the same direction but your hammer is coming from a different angle. there is another arrow on the anvil for reference
Image

That straightend it back out but im still really short for my long drop at the bottom...

Image
User avatar

Topic author
Florida83FSJCherokee
Posts: 196
Joined: Sat Mar 09, 2013 7:53 pm
Location: Lakeland , Central Florida

Re: Blacksmith forging project thread idea (pic heavy)

Post by Florida83FSJCherokee »

Here is where you have to stop and figure it out...you draw your shape on the blank and look at where there is metal where there shouldnt be???
Here I have a decent amount in front of my cutting edge and on the upper edge as well. The steel in front of the cutting edge is to thin too pack into its self so that metal is pretty much wasted :headscrat

But...the steel above my line is 1/8" thick so if i can source the steel from there, and move it all the way across the blade I can use its mass to fill where im missing...
Image


Here is the blade after i worked on that theory for a bit...Not enough to make it all the way but way better than before...
Image

So at this point I have robbed peter to pay paul and im am out of steel...Instead of pushing it to failure I will just make the best with what i have (another 1/4" of steel would have been nice :( )


So i went to the grinder and cleaned up my edges...even after removing a bit my seems are solid so that was a really good weld.
Image

Image

Here is what I was able to salvage...I happy with it. It still looks mean and Im sure it would do its job...
Image


So block brush untill all the slag and excess flux is off and then touch up the shape of the handle drift...I used the same pipe as before and just tapped it back into form

Image


Then fit your handle....make sure you fit it upside down the first time like me :headscrat :)
Image


Then knock it off and try it again....


Now to secure it to the handle you need to rivit it in some manor... I chose 1/4' copper rod since it was handy from my knife building and easy to rivit cold.

Image


use the drill press and create your holes. then feed the rod through and leave about 1/4" on each side

Image

Image

They make specific tools for this next step, but I find the round side of my driving hammer and the anvil work just fine...

lay the head with the rivit on the anvil face and drive it into itself...

Image

Image


use some sand paper to polish up the copper and take off the anvil marks
Image


i burned and sanded back the handle from 80 - 220 grit. Its a nice technique for your hammers as well. There is no smoother finish...especially after your hand oils work into for a couple weeks..

Image


Well here it is...
Image


It didnt look right on the bench so i moved it to a more natural element..:)

Image

Image


This was fun...and very easy...the forge welding is the hardest part but if you take you time its not bad to learn...Its also not nearly as difficult to shape the head if you start with enough steel in the first place.:o


Thanks for checking it out and have a great week!!!!

JP
User avatar

Topic author
Florida83FSJCherokee
Posts: 196
Joined: Sat Mar 09, 2013 7:53 pm
Location: Lakeland , Central Florida

Re: Blacksmith forging project thread idea (pic heavy)

Post by Florida83FSJCherokee »

Got an update that is almost totally Wood related tonight...

This is the largest single order so far ,and I have to admitt that the extra clamps and a rather !MASSIVE! change in the buthcherblock process made it possible in a little over a weeks time of evenings and a couple shop days.

The Serving boards have become pretty efficient in their process, but the next step is to use the money from this sale to buy a planner. Not having to rely on my own skills with the table saw and 3x21 sander to true everything up in thickness will be a definite step in the right direction. Plus as far as I understand as long as I sand the excess glue off I should be able to feed the assembled boards through after gluing if I need to even out a shift or low spot caused by human error...It would seem like a board sitting 1/16" lower than the others isnt alot, but when you have to bring down the entire board a 1/16" and keep it level with a 3x21 sander it adds up real quick.


Anyway, the knives are next on the list for the shop order, and I just got a big shipment of belts from "trugrit" tonight so this weekend at the horse show I will be manning the grinders...Since I had a rain out today with farrier work I went ahead and layed out some handle selections and pins. Im happy with whats on the table so there will be a nice range of styles to choose from at the stores display.


Heres the knife layouts:

There's a nice redwood burl with solid brass caps (this is my first addition of brass bar so im excited about the process)
Also included are Bacote, Bubinga, B/W Ebony with a purple heart centerline, some type of spalted wood (possible pecan?), Walnut and red heartwood with a yellow heartwood spacer, and a couple variations on my newest laminate creation. Rosewood with laminate caps for the chopper and full laminate for one of the pairing knives.

The hidden tang knives will also be a first, but I have been "learned" on the process so Im looking forward to it.

I guess last is the drop point hunter/skinner with brass bolster and deer antler handle. This one is gonna be fun!

Image


The laminate was fun and easy to make for once...I just saved all the trimmings from the serving board strips and pressed them into one solid block. Then I used the bandsaw to slice off 3/16"sections...I have enough to play with it on a few different projects and so far its looking really promising.

Image

Image

Before I get into the btucher block changes here are the lates serving boards

Added bubinga to the roster this go round...

Image

The walnut/yellowheartwood striped board was an experiment with grain direction..The walnut is almost diagonal and the yellowheartwood striping is completly square with the rest of the board but if you look at it dead on the walnuts grain pulls your eye away from center and makes the yellow appear bowed heavily...Its neat but not the best effect...I had to measure it repeatedly because I swore i made it curved...
Image


Bubinga on the outer edges... purpleheartwood and red oak
Image

This is my favorite this round... Ambrosia mapel with the yellow and purpleheart racing stripes... and a suprise purple heart sidewall
Image

Image

Image


Ambrosia/Bubinga/yellowheartwood
Image

This one was made as a remakef or another customer of the one from last November ...I love this layout and really played with the asemetry with the padauk lines and the sharp color variations in the walnuts grains.
Image
User avatar

Topic author
Florida83FSJCherokee
Posts: 196
Joined: Sat Mar 09, 2013 7:53 pm
Location: Lakeland , Central Florida

Re: Blacksmith forging project thread idea (pic heavy)

Post by Florida83FSJCherokee »

Now the butcher blocks... Im not sure if you guys saw Aggierailroads post in the last woodworking update about making patterns seperatly, and then building the boards in one direction instead of trying to center it from four...

I had absolutly the wrong understanding of what that post meant... :o and Im kinda thinking I might have been the only one...:headscrat

Anyway, this is what he meant...

descide the various patterns in the layout and glue entire board lenghts together...caul them like the serving boards to keep them flat and then when its dry use the table saw and slice it into strips at the depth you want the board to be.

Image

Image

These boards had two main patterns and one Bloodwood row so I made three different glue up sections... then layed them out and lined them up. Since they only move in one direction getting the lines crisp was a breeze. I could have been a little more creative with the grain directions but due to a couple goofd cuts certain pieces had to be the outside or end units and it wasnt worth fighting the whole board for it.

Image

Image


here they are all finished up

Image

Red oak/Poplar with padauk and purpleheartwood striping...I decided to feature the padauk as the end caps because its so vibrant its almost glowing !
Image

Image

Image

Redoak/poplar with bloodwood accents
Image

Image


Red oak/poplar bloodwood accents...this ones a little larger than the others...Image

Image
User avatar

Topic author
Florida83FSJCherokee
Posts: 196
Joined: Sat Mar 09, 2013 7:53 pm
Location: Lakeland , Central Florida

Re: Blacksmith forging project thread idea (pic heavy)

Post by Florida83FSJCherokee »

Now this last board became a person adventure...I found this crazy figured poplar at Lowes of all places...their poplar is usually plain jane and has zero color but these were nice! So i paid my $12 and had a vison...

I cut the two boards and glued them in what I thought would yeild me a replica of what the long grain looks like once i had flipped it over to endgrain...I was wrong...

The top pic in the photo below is what it looked liked simply presented with the endgrain up and in order as I cut it...
the second pic is where my mind started to get a little bit beyond my skill level or "pay grade" as my mentor would say...:) I fliped every other one over and made little matched pairs...

Image

I was happy with this and was about to glue it up when I realized...
If I cut this down the center and flip one side around i can face the pairs at each other! So i commenced to cutting each section down the middle after i had worked so hard at gluing them all together...:headscrat
Image

Now, at this point I had to call in reinforcements, so I sent Aggie a photo...He pointed out that if Im going to "bookmatch" something the grains in the center need to be alligned as well..otherwise your just pointing BEEP at each other... So i proceeded to trim all my connections and got the center aligned pretty close to perfect... Unfortunatly since the darker (rear) rows were still glued to the center I didnt realize i was going to be messing that alignment up and the end result is bitter sweet...


There is no question this thing is RAD! but the uneven rear row is killing me...The center and "ink splotch" section is perfect but im gonna have to try this again and get everything evened up before its glued...

Live and learn and cuss a lil bit!

Image

Image

Image

The blues and greys are blowing my mind...as cheap as this stuff was I have a bunch of plans in my head for other alignments!
Image

The sides are pretty rad as well
Image

Image


So thats the stats for the moment.

I am going to be working this weekend and over the next week at the stack of knives from earlier in the post. I look forward to sharing that with everyone.

I also need to update a small! (dont worry not a full on science class) part of the metallurgy...I dont know if very many people saw the post because it was the last post on a page, but i was having issues with my finished blades cracking during the hardening phase...This sucked! because you were basiclly up BEEP creek and no body cares... except you who just wasted 4-5 hours of build time on the blade... I am happy to announce that I have solved that issue thanks to a article Aggie linked about the subject, so I will explain further when I do the next knife update.


Have a great rest of the week and enjoy the weekend!

JP


Ive been nostalgic latley...and was making dinner yeaterday thinking about how much fun this has been over the last year. Its cool to look down at a pile of cut veggies and a rocking cutting board and know you made your tools... I should point out that I use that pairing knife minimum 3 times a week and aside from the hone...never needed to resharpen it!:D

This also shows a really godo example of what the patina on a year old non stainless knife looks like...
Image
User avatar

Topic author
Florida83FSJCherokee
Posts: 196
Joined: Sat Mar 09, 2013 7:53 pm
Location: Lakeland , Central Florida

Re: Blacksmith forging project thread idea (pic heavy)

Post by Florida83FSJCherokee »

Knife Building update (Warning Contains Science Content)


Here's a photo of where I left you with the knives since this is a fresh page.

Image

Image


So tonight I have half of the current knife projects to post on. There is some brief science content but mostly just an update on the forged blanks that were picture in the previous posting.


ok, It was buried on the bottom of a long! page a while back, but I asked the board for some advice on what to do to keep the blades from cracking during the hardening cycyle. Most notably the actuall quench...

Well, Mr. Road was kind enough to post a PDF link on the subject of "Quench Cracking" and it proved exactly the resource needed to solve the problems mystery.

What was happening was I would get a knife ground and ready for the hardening phase. The knife would be heated in the forge, temp checked against non magnetic, and when critical temp was reached it was submerged or differentially quenched in water (W-2 steel requires water not oil)

Once I pulled the cooled blade out of the quench medium there would be one or two small cracks in the blade. Could be in the cutting edge or the spine, but it wasnt limited to a certain thickness. These cracks would go completly through the blade and basicly ruin the knife, and the HOURS of work already devoted to it. Some could be ground out and the blade reshaped, but it was a loss no matter which way you looked at it since these blades could not be sold or gifted with the known defects in the heat treating cycle.

My initial theory was that the steel was being shocked too suddenly and in turn cracking the blade...
This is an exampe of "cant see the forrest through the trees"...
While reading the report Aggie posted it was made clear where my error was coming from.

"Quench cracking" is absoluty the name for what was happening, but its a very misleading term because it should really be called "quench tearing"...

From the knife making journey so far we have learned that when metal heats it expands...and in order for something to tear it must first split, and then pull away from itself...If the molecular change occuring during the rapid cooling is a condensing of the molecules(hardening or compacting) then it would therefore be impossible for the steel to tear at that point because the molecules are moving in the opposite direction...

So...the only time the molecules are moving away from one another is during the reheat process...as the metal heats it expands and that expansion is what is needed to facilitate the tearing or cracking.

Upon further testing it was discovered that the areas that would split/crack were the areas directly under the forge jets... So these areas were being heated to rapidly for the metal to handle and in turn it would pull apart under the forces of the rapid expansion....

easy fix right? just go drop around $1500 on a heat treating kiln and problem solved... :wtf:

I do not have resources to drop on an investment like that at this point in the knife making journey but Im damn sure not gonna quit working on the solution...

If the root areas affected by the spliting were under the forge jets then I hypothesized that I could control the expansion by not letting any areas come in direct contact with the flame jets... In order to accomplish this I used some scrap 14 guage steel and the sheet metal brake to bend a 90 in it. this piece went into the front of the forge and pushed up onto the firebrick sill just inside the main door. With it in place the heat could pass around the sides and radiate thorugh the metal barrier, but not directly flood the firebrick. The knives were placed flat on the firebrick and the PSI running the forge was dropped to 3psi... while it used to take 1 minutes to bring a blade up to critical it now took 10-12min behind the baffle.

Ok, almost done with the metallurgy...

If you go back to post number (147) you will find all the charts on the heat treating tolerances of W-2 steel...

I basicly blew this part off -

Preheating
1200-1250° F
Preheat time in furnace is ¾ Hr. per inch of thickness


I didnt think it mattered then, but now i realize what the time and heat comparison numbers are for...

If the minimum preheat time from 0 deg. up to 1250 deg. is 45min/inch of thickness then an 1/8" of thickness can take no less than - 5.625 minutes to span the same range....


So with this last batch all the knives were treated in this approach, and Im happy to announce that 8 for 8! were hardend successfully.


Flat Ground and ready to harden
Image


heres the pic of the test baffle...I am going to be making a nice bolt on version for the next round of knives.
Image

Image
Post Reply