66 Gladiator- Lily A Re-ignited Long term Project
-
 Gladiator265
Topic author - Posts: 26
- Joined: Thu Aug 21, 2014 12:09 pm
- Location: Rochester Hills, MI
Re: 66 Gladiator- Lily A Re-ignited Long term Project
OK so finally figured out the color, and we were both wrong  Turns out it was Electric Blue Pearl (AB5). O well, went and picked up all the paint/primer/ what have you today, forgot how expensive paint is!
-
Gladiator265
Topic author - Posts: 26
- Joined: Thu Aug 21, 2014 12:09 pm
- Location: Rochester Hills, MI
Re: 66 Gladiator- Lily A Re-ignited Long term Project
Few quick updates,
I had said I'd take pictures of the HVAC so here they are.
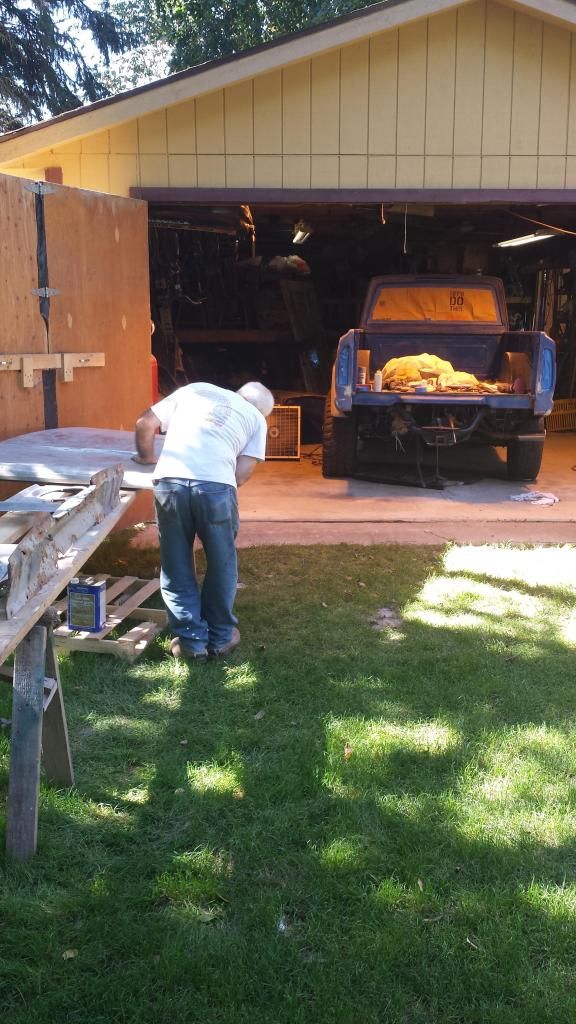
Got the back garage cleaned out and the Gladi pushed in and started pulling lock box, etc.
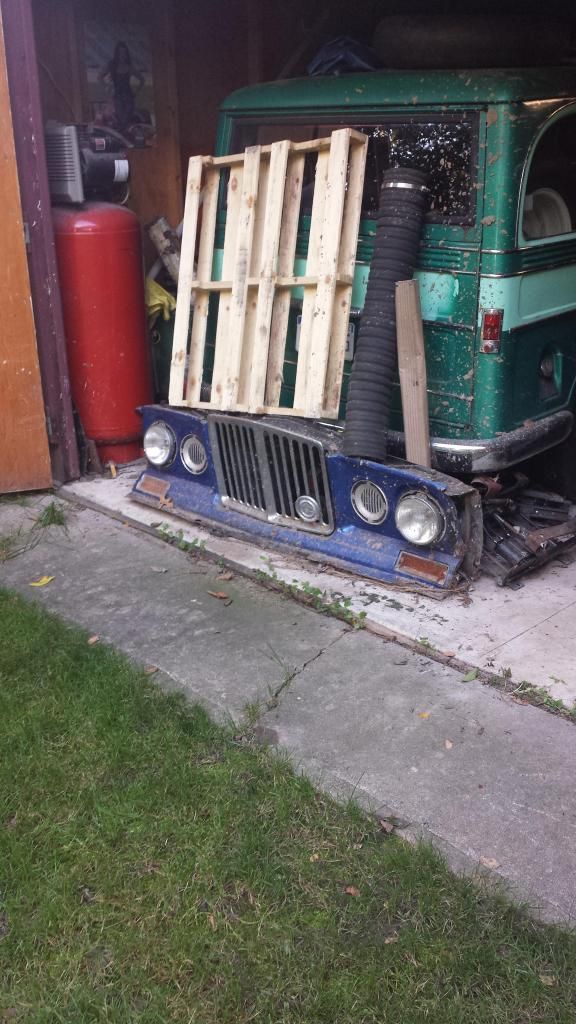
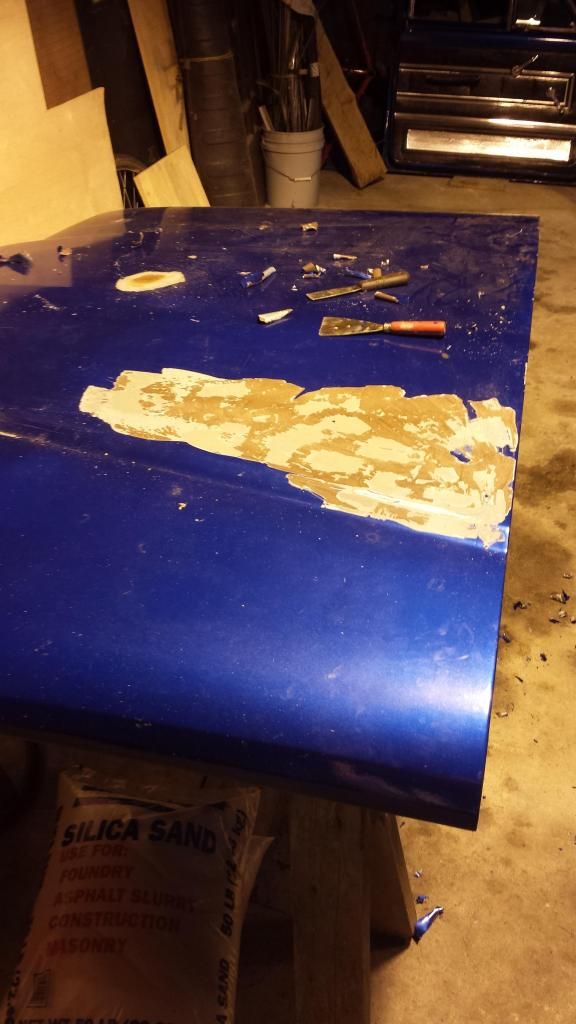
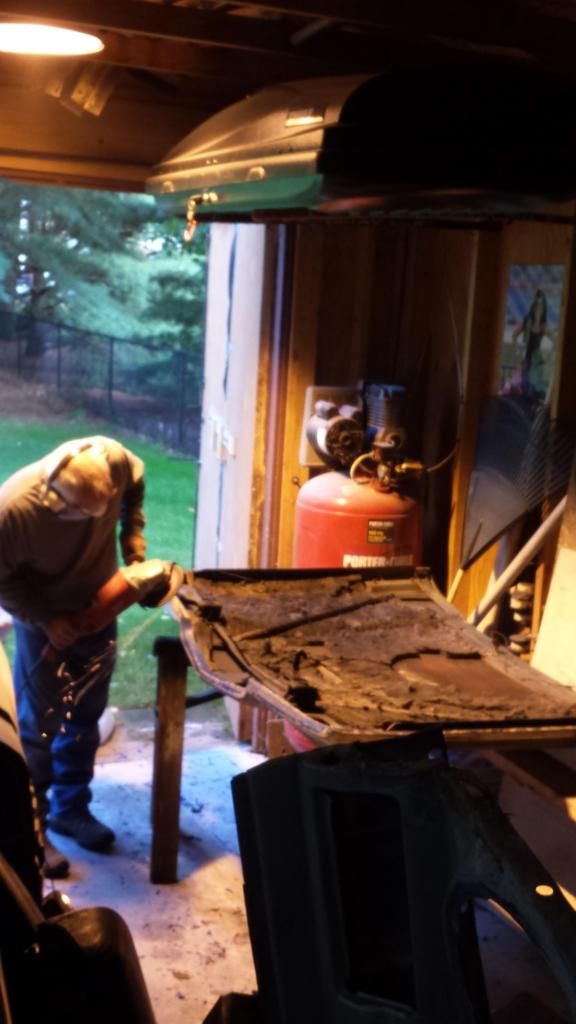
Starting the stripping process!
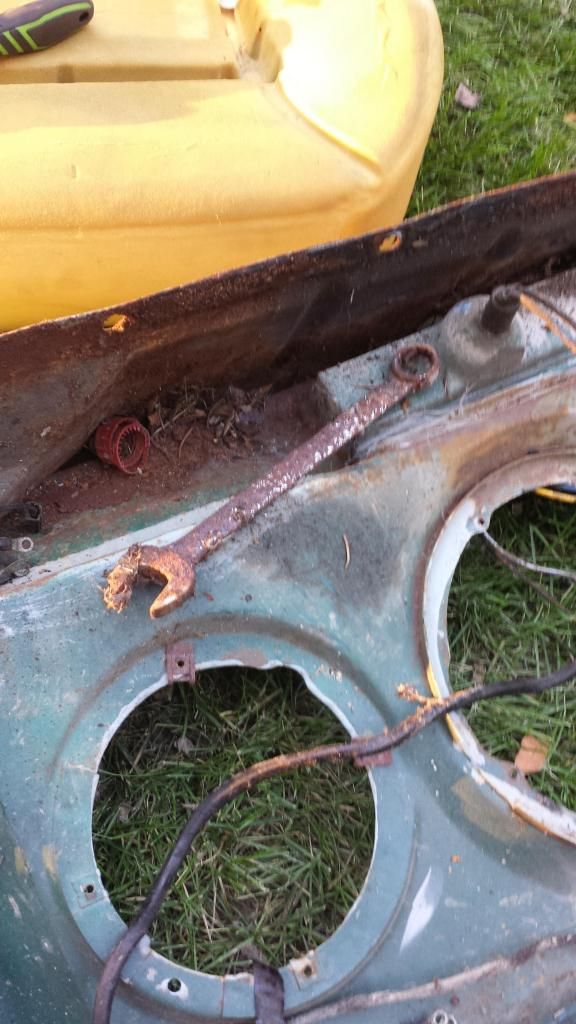
Ah Ha! That's where that wrench went! haha pulled the radiator support and face apart and this was riding around wedged under the turn signal.
More stripping, got everything cleaned up best I could then hit it with the sand blaster to get whatever was left.
Terrible pictures but dad taking the flap wheel to the hood and our sand blasting setup
I had said I'd take pictures of the HVAC so here they are.


Got the back garage cleaned out and the Gladi pushed in and started pulling lock box, etc.


Starting the stripping process!

Ah Ha! That's where that wrench went! haha pulled the radiator support and face apart and this was riding around wedged under the turn signal.

More stripping, got everything cleaned up best I could then hit it with the sand blaster to get whatever was left.

Terrible pictures but dad taking the flap wheel to the hood and our sand blasting setup


-
 66stepside
- Posts: 3793
- Joined: Sat Oct 13, 2012 9:59 pm
- Location: Spokane Valley, WA.
Re: 66 Gladiator- Lily A Re-ignited Long term Project
Paint and body work is my favorite part!
On the XJ HVAC set up:
Did you reuse the stock controls, if so, where'd you put and route them?
It's vacuum actuated, so any problems with hooking up the vacuum lines?
What does it like ok like from the firewall side?
On the XJ HVAC set up:
Did you reuse the stock controls, if so, where'd you put and route them?
It's vacuum actuated, so any problems with hooking up the vacuum lines?
What does it like ok like from the firewall side?
1960 FC170 DRW 401/TH400/D20
1966 J3000 401/T18/D300
19?? Quadcab Thriftside, 5.3, 4L60-E, NP261XHD
1968 M715, 454, sm465, np205, 14 bolt rear, 60 front
1966 J3000 401/T18/D300
19?? Quadcab Thriftside, 5.3, 4L60-E, NP261XHD
1968 M715, 454, sm465, np205, 14 bolt rear, 60 front
-
Gladiator265
Topic author - Posts: 26
- Joined: Thu Aug 21, 2014 12:09 pm
- Location: Rochester Hills, MI
Re: 66 Gladiator- Lily A Re-ignited Long term Project
Paint and Body is a blessing and curse to me. I love doing it, but I always seem to be on a time crunch and never seem to have the time I need to do a perfect job (doesn't help I tend to bea perfectionist on that kinda stuff). Always seems to be more stressful than it should be66stepside wrote:Paint and body work is my favorite part!
On the XJ HVAC set up:
Did you reuse the stock controls, if so, where'd you put and route them?
It's vacuum actuated, so any problems with hooking up the vacuum lines?
What does it like ok like from the firewall side?
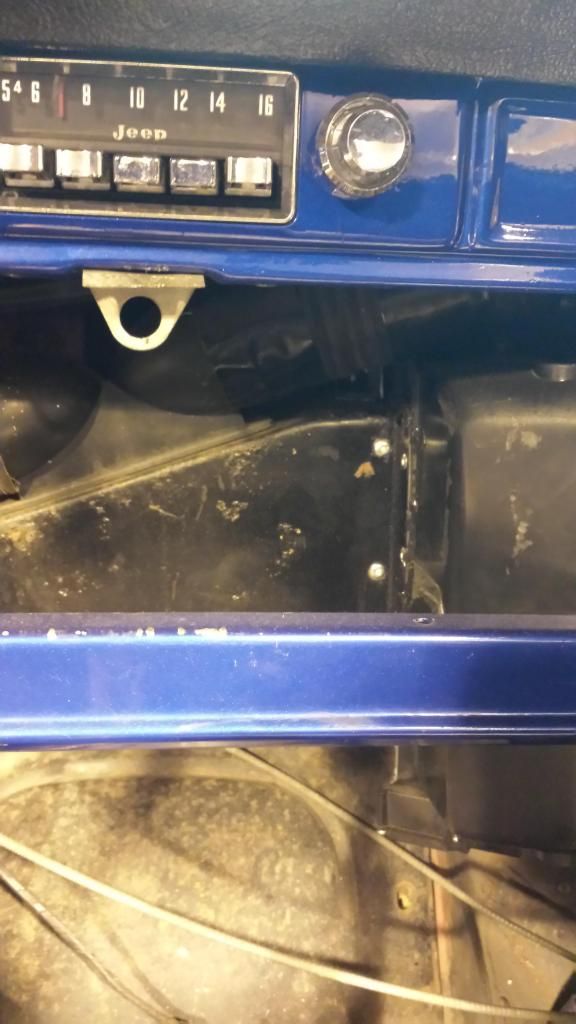
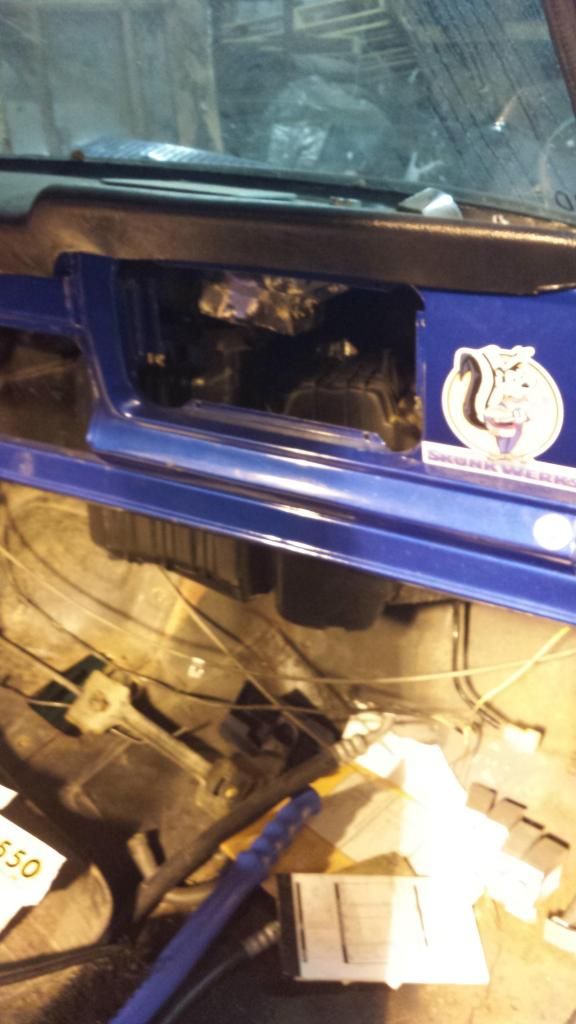
Sorry I must have mis-typed it, we used a ZJ HVAC system.
I used the stock controls in the dash so the vac lines for switching from defrost to floor etc all hook up to the same actuators as they normally would.
The blend air door which is part of the ZJ housing is electrically actuated so we just pulled the actuator motor off the box and it has a splined shaft on the end. We built an arm for it and hooked up the cable from the stock blend air door lever on the dash. I'll have to take some pictures tonight when I'm working on it.

Stock Blend air actuator. Pulled it and built an arm for the stock cable to mount to.
From the firewall side it doesn't look too bad. a few holes for the fasteners to hold the HVAC in place and then an opening for AC Lines and an opening for Heater lines. The AC evap ends hang out into the engine bay like a modern car. The heater core ends actually come out into the bay the same way but in the relief in the firewall for a V8. with the swap on a new frame the hemi sits more forward in the bay and leaves enough room to sneak behind it. Once again, useless explaination without pictures, I'll take some tonight and put them up tomorrow.
-
66stepside
- Posts: 3793
- Joined: Sat Oct 13, 2012 9:59 pm
- Location: Spokane Valley, WA.
66 Gladiator- Lily A Re-ignited Long term Project
Thanks for the detailed response. I don't think it was a typo on your end, it was my mistake- xj, zj, CJ, YJ, it's like alphabet soup, but tastes worse.
There are similarities, though, between the Xj and ZJ set up, and I am thinking of using the XJ HVAC set up on the 62 so I am super curious on what you've done with your set ZJ up.
Sent from my Deloran (upgraded Flux Capacitor) using Tapatalk.
There are similarities, though, between the Xj and ZJ set up, and I am thinking of using the XJ HVAC set up on the 62 so I am super curious on what you've done with your set ZJ up.
Sent from my Deloran (upgraded Flux Capacitor) using Tapatalk.
1960 FC170 DRW 401/TH400/D20
1966 J3000 401/T18/D300
19?? Quadcab Thriftside, 5.3, 4L60-E, NP261XHD
1968 M715, 454, sm465, np205, 14 bolt rear, 60 front
1966 J3000 401/T18/D300
19?? Quadcab Thriftside, 5.3, 4L60-E, NP261XHD
1968 M715, 454, sm465, np205, 14 bolt rear, 60 front
-
Gladiator265
Topic author - Posts: 26
- Joined: Thu Aug 21, 2014 12:09 pm
- Location: Rochester Hills, MI
Re: 66 Gladiator- Lily A Re-ignited Long term Project
No problem hope it helps! I just realized I was so excited about the paint being complete and turning out nicely that I completely forgot to take the pictures! Sorry, I'll get those soon so I can post em up.66stepside wrote:Thanks for the detailed response. I don't think it was a typo on your end, it was my mistake- xj, zj, CJ, YJ, it's like alphabet soup, but tastes worse.
There are similarities, though, between the Xj and ZJ set up, and I am thinking of using the XJ HVAC set up on the 62 so I am super curious on what you've done with your set ZJ up.
Sent from my Deloran (upgraded Flux Capacitor) using Tapatalk.
-
Gladiator265
Topic author - Posts: 26
- Joined: Thu Aug 21, 2014 12:09 pm
- Location: Rochester Hills, MI
Re: 66 Gladiator- Lily A Re-ignited Long term Project
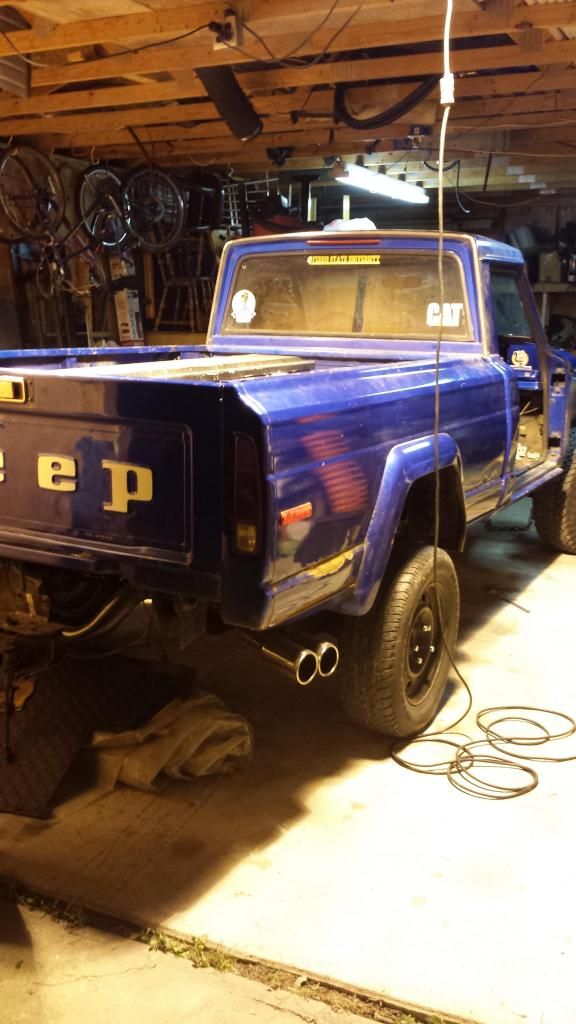
Speaking of paint in my last response... It's done!! Well at least it's painted, still need to let it cure, polish, etc, etc but at least it's done and curing.
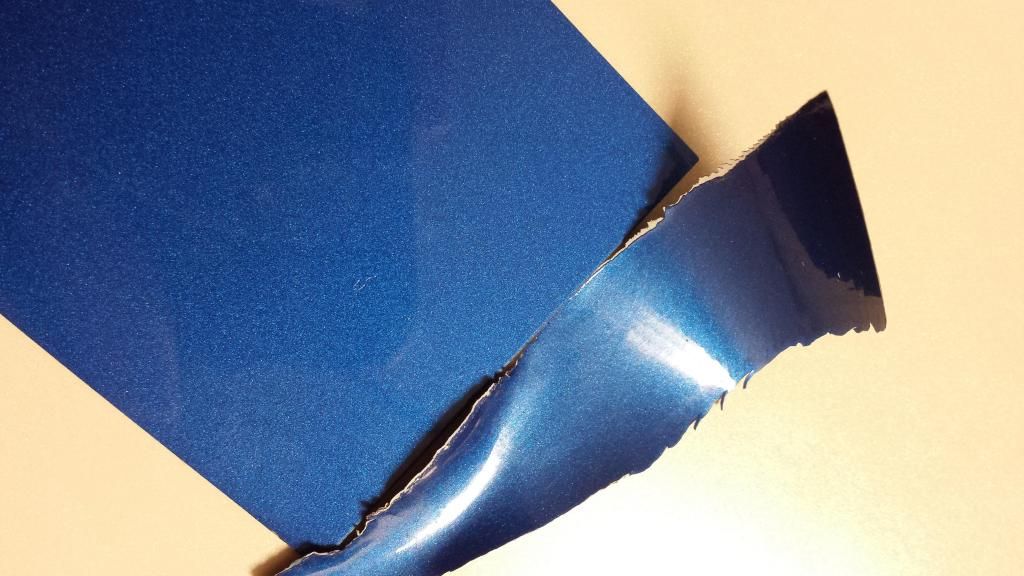
When I finally figured out what color it was.
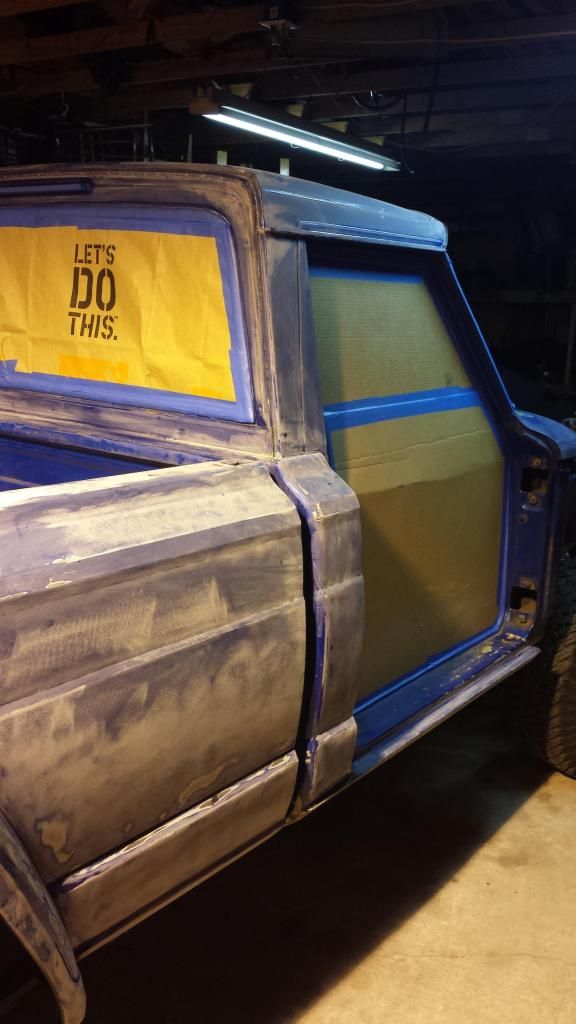
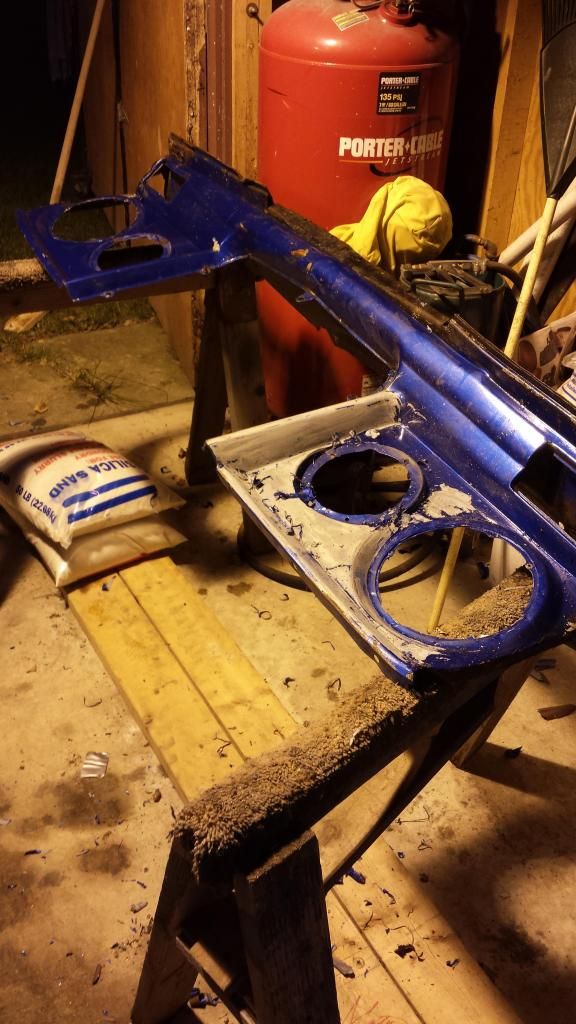
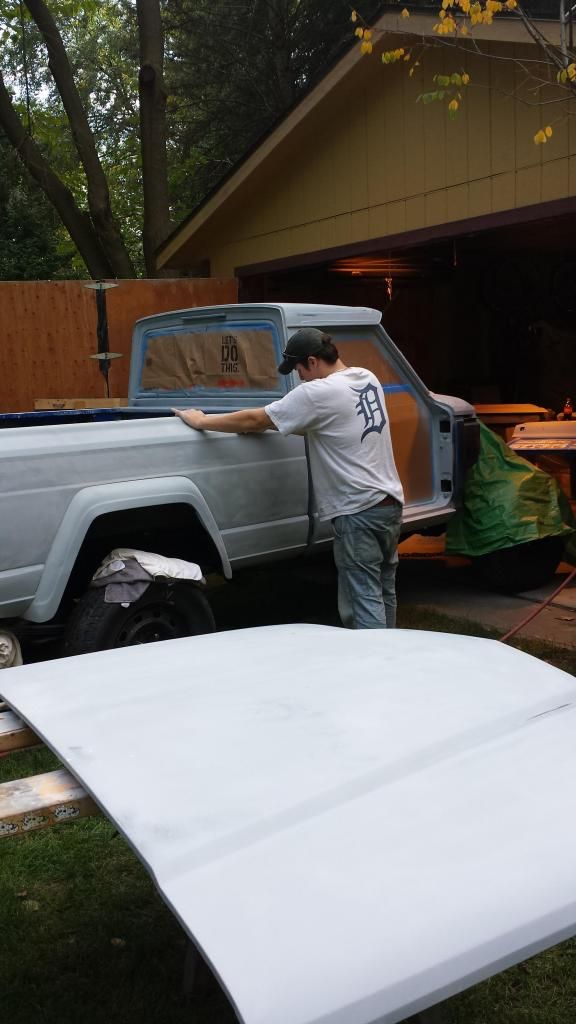
Sanding everything down, Used a couple of leaf bags to cover the rear window, thought it was funny the "let's do this" quote was facing out. Gotta get your motivation from somewhere.
Dad working on the hood, our high tech paintbooth setup
Finally in 2K, wet sanding.
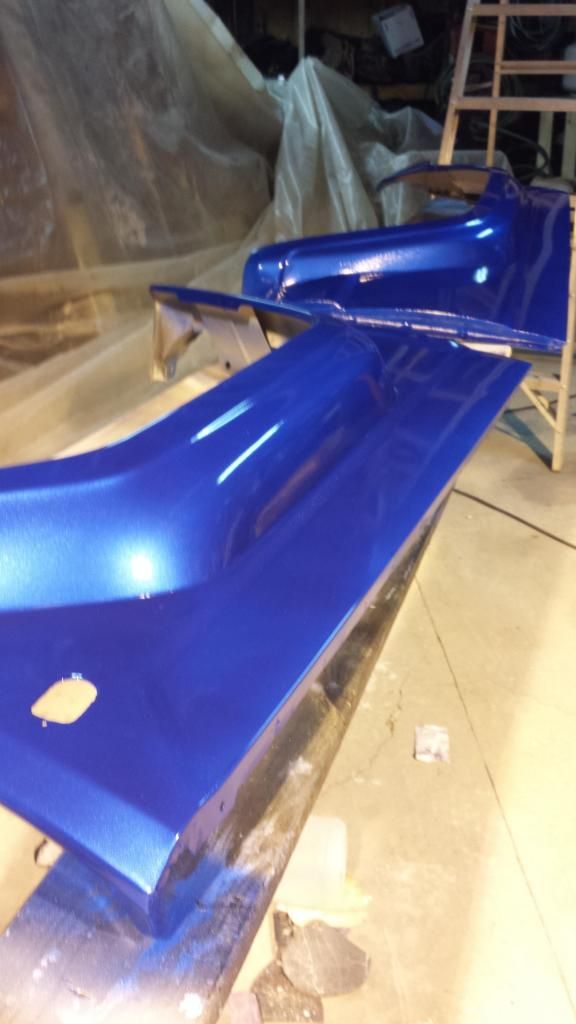
Front fenders all done! It was sooo nice starting with NOS fenders for this build!
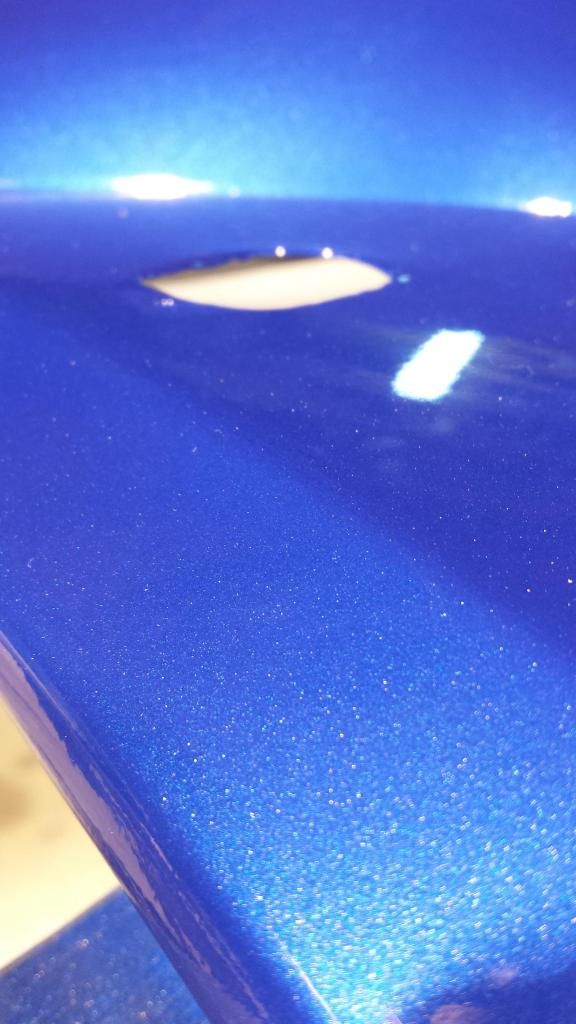
Tried to get a closeup of the paint to show the pearl, kinda worked.
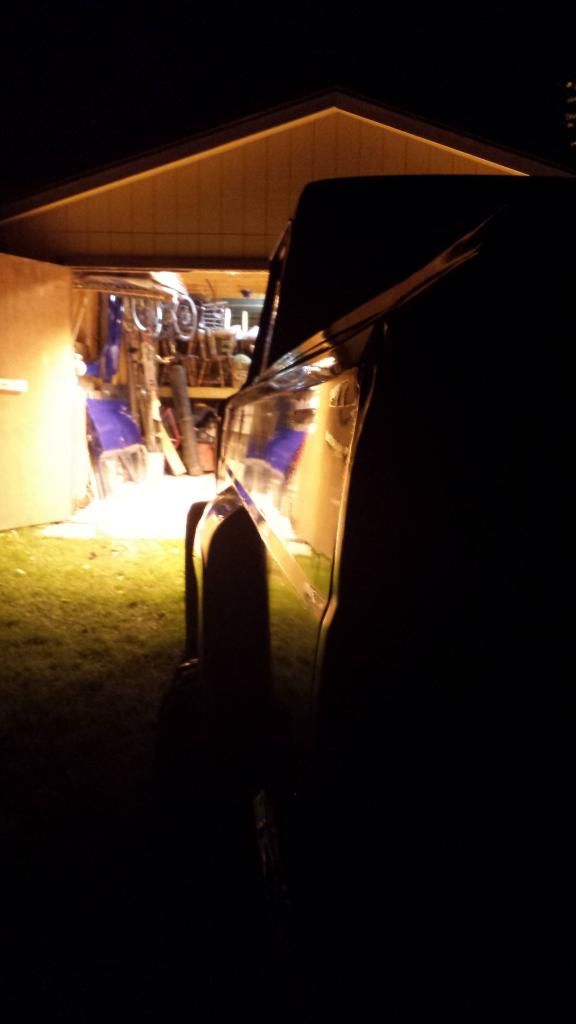
Side shot as we were cleaning up the garage to roll her back in. It actually turned out straighter than I thought!
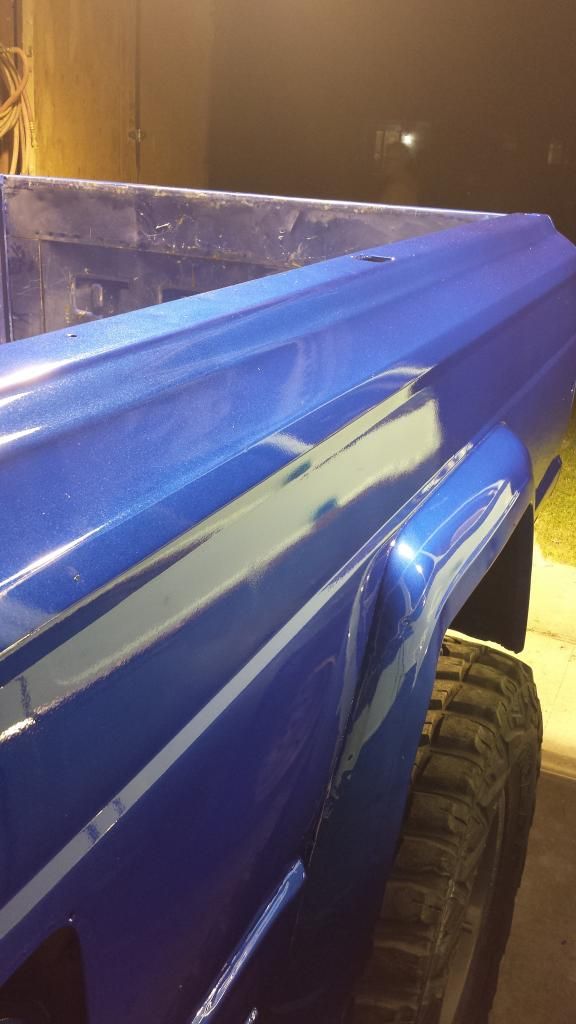
Shot of the bedside in the garage back under the lights.
Now she's going to sit for a few weeks while I go wheeling for a few days and get everything done that I've neglected while I was working on her.
I figure it's a blessing in disguise, it'll give the paint time to fully harden and cure before I can get my hands on it again and start messing with it.
** As a reminder to myself in 5 years when I'm looking for the paint code again (Lord knows I'll loose it) it's AB5, Electric Blue Pearl
Thoughts?

When I finally figured out what color it was.

Sanding everything down, Used a couple of leaf bags to cover the rear window, thought it was funny the "let's do this" quote was facing out. Gotta get your motivation from somewhere.

Dad working on the hood, our high tech paintbooth setup

Finally in 2K, wet sanding.

Front fenders all done! It was sooo nice starting with NOS fenders for this build!

Tried to get a closeup of the paint to show the pearl, kinda worked.

Side shot as we were cleaning up the garage to roll her back in. It actually turned out straighter than I thought!

Shot of the bedside in the garage back under the lights.
Now she's going to sit for a few weeks while I go wheeling for a few days and get everything done that I've neglected while I was working on her.
I figure it's a blessing in disguise, it'll give the paint time to fully harden and cure before I can get my hands on it again and start messing with it.
** As a reminder to myself in 5 years when I'm looking for the paint code again (Lord knows I'll loose it) it's AB5, Electric Blue Pearl
Thoughts?
-
66stepside
- Posts: 3793
- Joined: Sat Oct 13, 2012 9:59 pm
- Location: Spokane Valley, WA.
Re: 66 Gladiator- Lily A Re-ignited Long term Project
It pops! I did not catch whether it's single, or two stage paint.
Are you going to wet sand it?
Sent from my Deloran (upgraded Flux Capacitor) using Tapatalk.
Are you going to wet sand it?
Sent from my Deloran (upgraded Flux Capacitor) using Tapatalk.
1960 FC170 DRW 401/TH400/D20
1966 J3000 401/T18/D300
19?? Quadcab Thriftside, 5.3, 4L60-E, NP261XHD
1968 M715, 454, sm465, np205, 14 bolt rear, 60 front
1966 J3000 401/T18/D300
19?? Quadcab Thriftside, 5.3, 4L60-E, NP261XHD
1968 M715, 454, sm465, np205, 14 bolt rear, 60 front
-
 Atla
Atla
- Posts: 303
- Joined: Tue Jul 31, 2012 6:47 am
- Location: North Carolina
Re: 66 Gladiator- Lily A Re-ignited Long term Project
Very nice!
~Atla. (I'm just here for the pictures)
1983 J-10
2001 TJ
My Build Thread - http://fsjnetwork.com/forum/viewtopic.php?f=12&t=2722
1983 J-10
2001 TJ
My Build Thread - http://fsjnetwork.com/forum/viewtopic.php?f=12&t=2722
-
 jaber
jaber
- Vendor
- Posts: 3067
- Joined: Sat Aug 27, 2011 5:24 pm
- Location: Chino Valley, Az.
Re: 66 Gladiator- Lily A Re-ignited Long term Project
Love it... 
Jeff
'46 cj3a
'51 Willys p/u
'51 Willys Parkway Conversion
'74 CJ5
'75 J-20 Wrecker
'75 J-20 Cummins service truck
'77 J-10 p/u
'79 Cherokee
'88 Grand Wagoneer
http://s252.photobucket.com/albums/hh14/jeffaber/
'46 cj3a
'51 Willys p/u
'51 Willys Parkway Conversion
'74 CJ5
'75 J-20 Wrecker
'75 J-20 Cummins service truck
'77 J-10 p/u
'79 Cherokee
'88 Grand Wagoneer
http://s252.photobucket.com/albums/hh14/jeffaber/
-
Gladiator265
Topic author - Posts: 26
- Joined: Thu Aug 21, 2014 12:09 pm
- Location: Rochester Hills, MI
Re: 66 Gladiator- Lily A Re-ignited Long term Project
Thanks!! I'm pretty happy with how it turned out!
It was a 2 stage, base/clear. Planning on wet sanding the clear to really make it pop, there were a few spots in the clear that also need a little help so I'll take care of those then.
It was a 2 stage, base/clear. Planning on wet sanding the clear to really make it pop, there were a few spots in the clear that also need a little help so I'll take care of those then.