.
Originally posted by lobie 03-08-2012 08:21 AM
________________________________________
Thanks Resbum
It's just a bump in the road. Everything has a solution, just has to be engineered.
1970 Gladiator 1 Ton 6BT 12V Cummins Build
-
 Resbum
Topic author - Posts: 466
- Joined: Fri Jun 08, 2012 9:45 am
- Location: North East Oregon
Re: 1970 Gladiator 1 Ton 6BT 12V Cummins Build
Last edited by Resbum on Sat Apr 06, 2013 7:21 am, edited 1 time in total.
Originally Posted by Resbum
"What year is my truck?... Which part?" Build thread- http://www.fsjnetwork.com/forum/viewtop ... 290#p18290
"What year is my truck?... Which part?" Build thread- http://www.fsjnetwork.com/forum/viewtop ... 290#p18290
-
Resbum
Topic author - Posts: 466
- Joined: Fri Jun 08, 2012 9:45 am
- Location: North East Oregon
Re: 1970 Gladiator 1 Ton 6BT 12V Cummins Build
Quote:
________________________________________
Originally Posted by lobie
...It's just a bump in the road. ....
________________________________________
 This bump really rattled my teeth together, but at least I didn't break any of them.
Now it's off to Oregon and I'm going to totally forget about the truck for the first time in 8 months.
Resbum
________________________________________
Originally Posted by lobie
...It's just a bump in the road. ....
________________________________________
Now it's off to Oregon and I'm going to totally forget about the truck for the first time in 8 months.
Resbum
Originally Posted by Resbum
"What year is my truck?... Which part?" Build thread- http://www.fsjnetwork.com/forum/viewtop ... 290#p18290
"What year is my truck?... Which part?" Build thread- http://www.fsjnetwork.com/forum/viewtop ... 290#p18290
-
Resbum
Topic author - Posts: 466
- Joined: Fri Jun 08, 2012 9:45 am
- Location: North East Oregon
Re: 1970 Gladiator 1 Ton 6BT 12V Cummins Build
.
Originally posted by Hook574 03-09-2012 05:12 AM
________________________________________
Resbum, I'm sure you have done a lot of reading on 4btswaps.com, there are a ton of exhaust manifolds for those motors that locate the turbo in different places. There's even guys on there cutting the manifolds up and putting them back together where they want them. Maybe you can get some ideas there.
Last edited by Resbum on Sat Apr 06, 2013 7:22 am, edited 1 time in total.
Originally Posted by Resbum
"What year is my truck?... Which part?" Build thread- http://www.fsjnetwork.com/forum/viewtop ... 290#p18290
"What year is my truck?... Which part?" Build thread- http://www.fsjnetwork.com/forum/viewtop ... 290#p18290
-
Resbum
Topic author - Posts: 466
- Joined: Fri Jun 08, 2012 9:45 am
- Location: North East Oregon
Re: 1970 Gladiator 1 Ton 6BT 12V Cummins Build
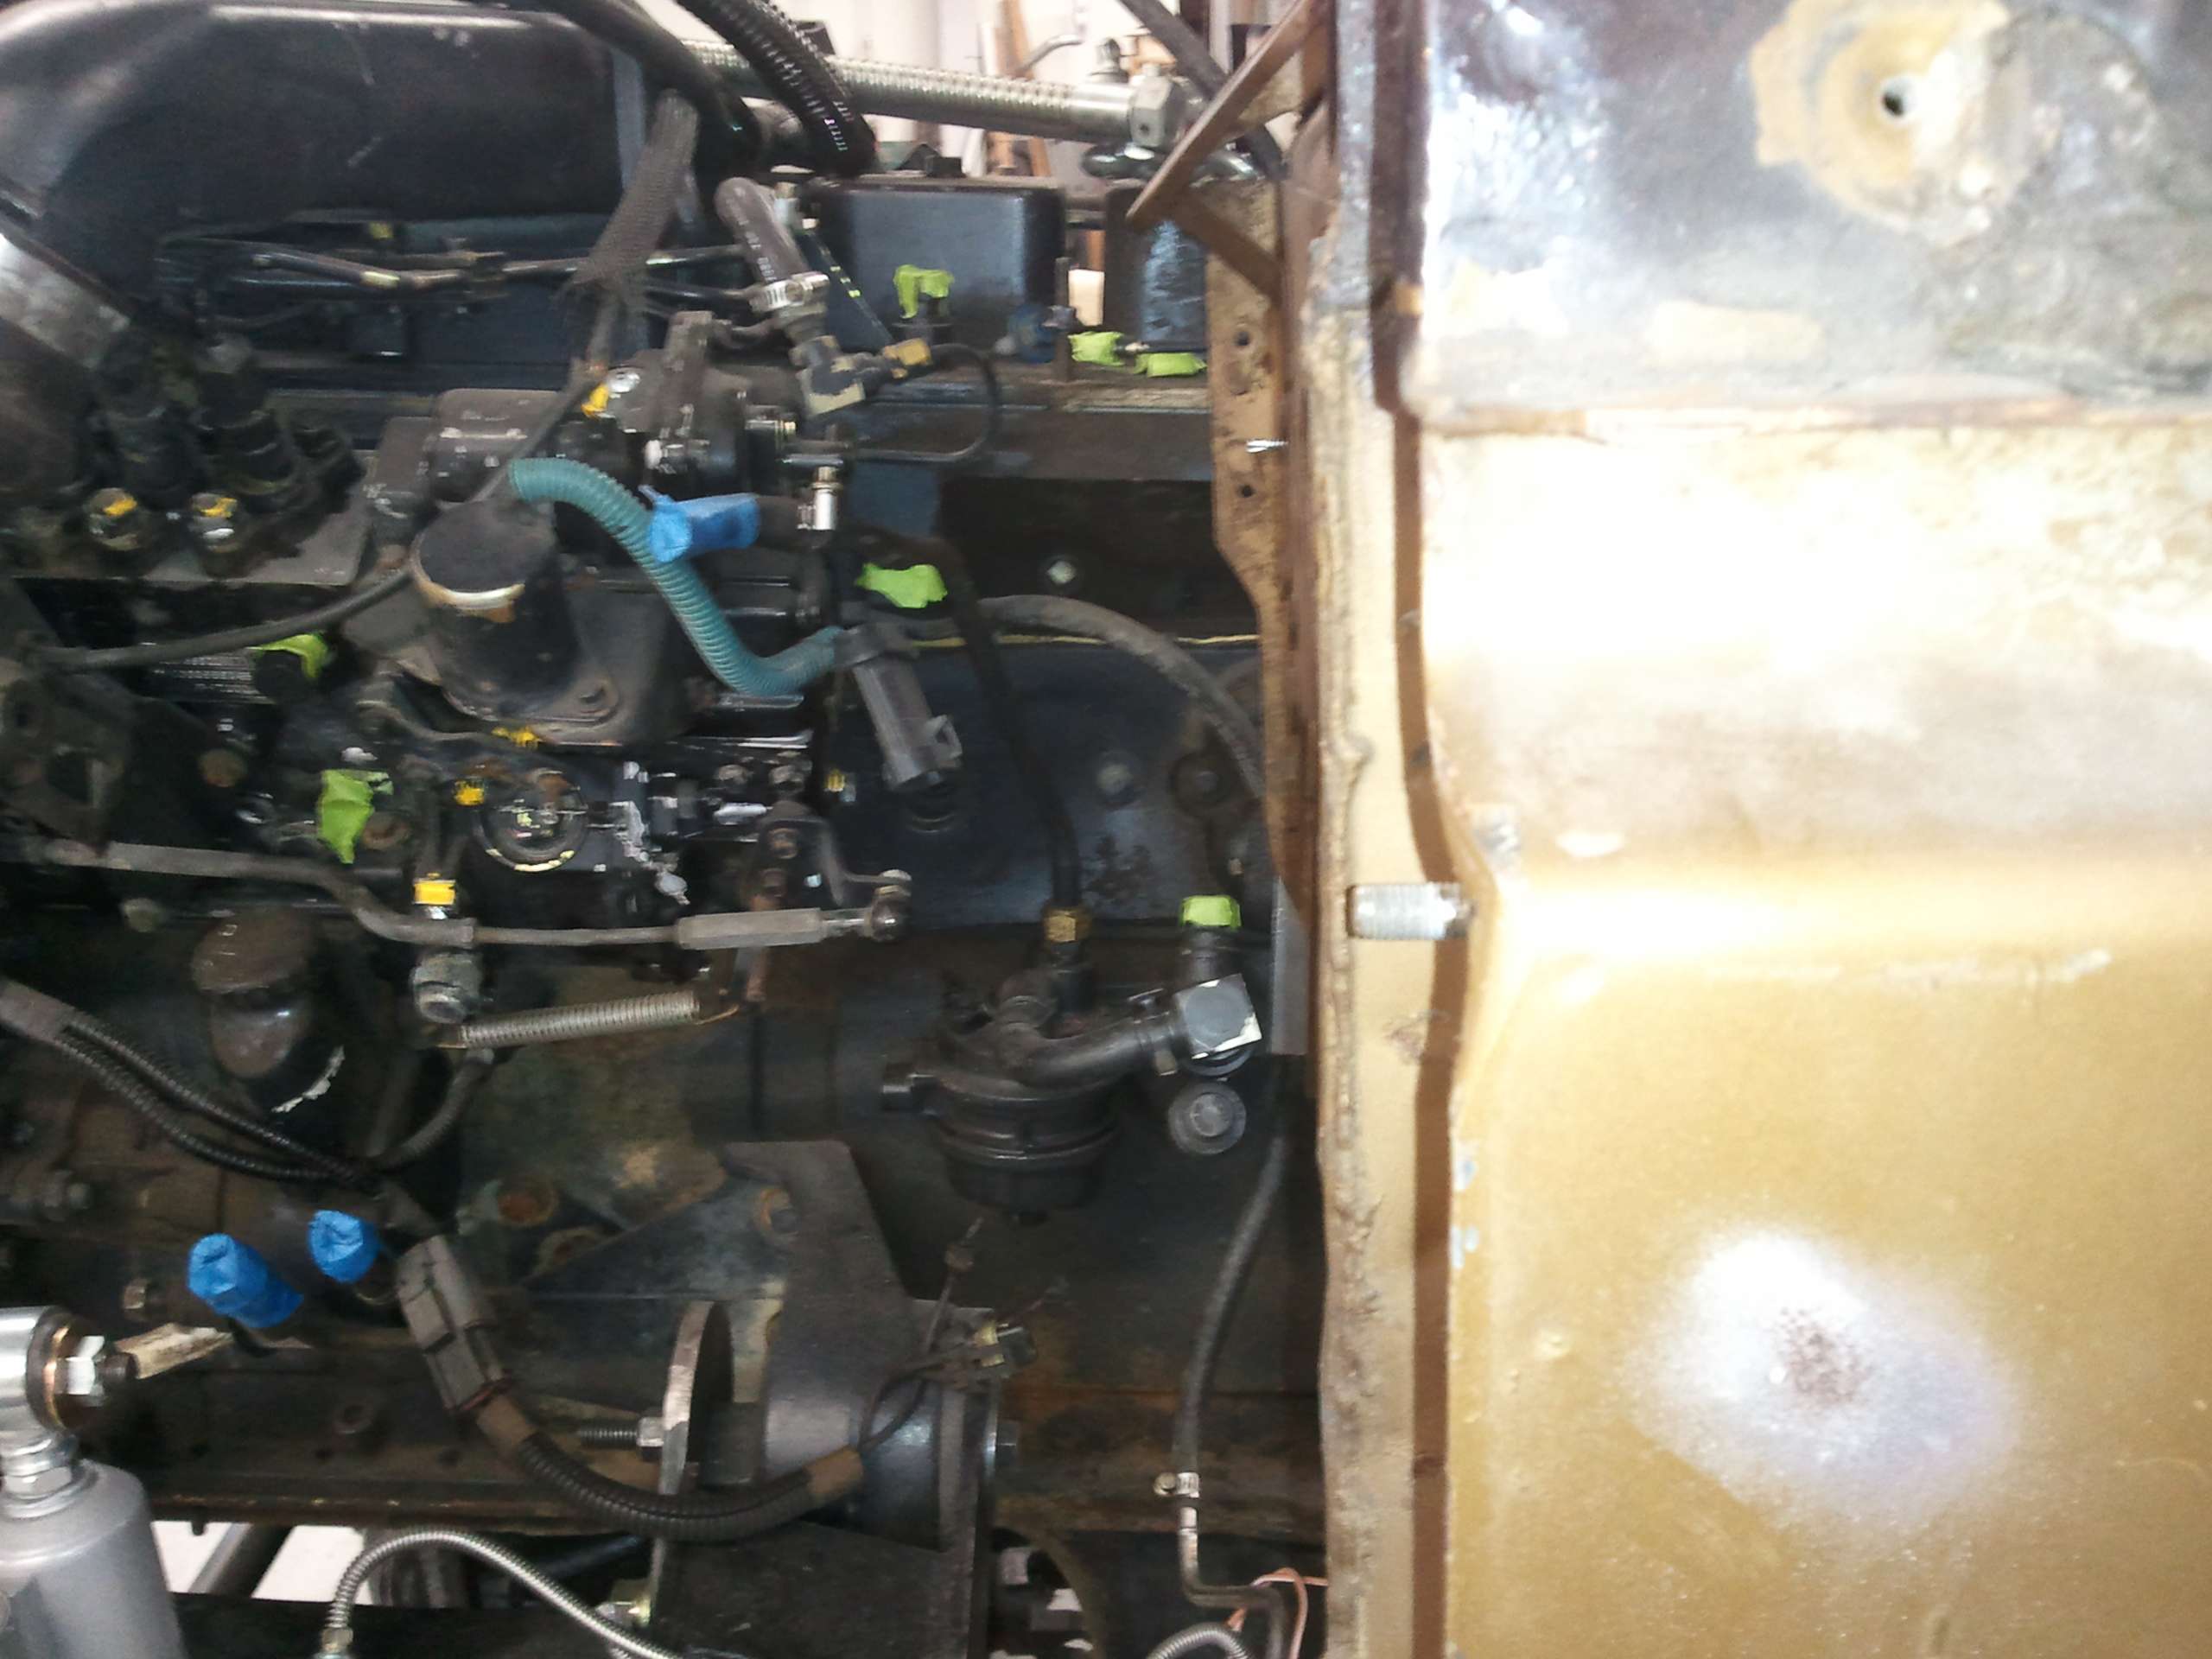
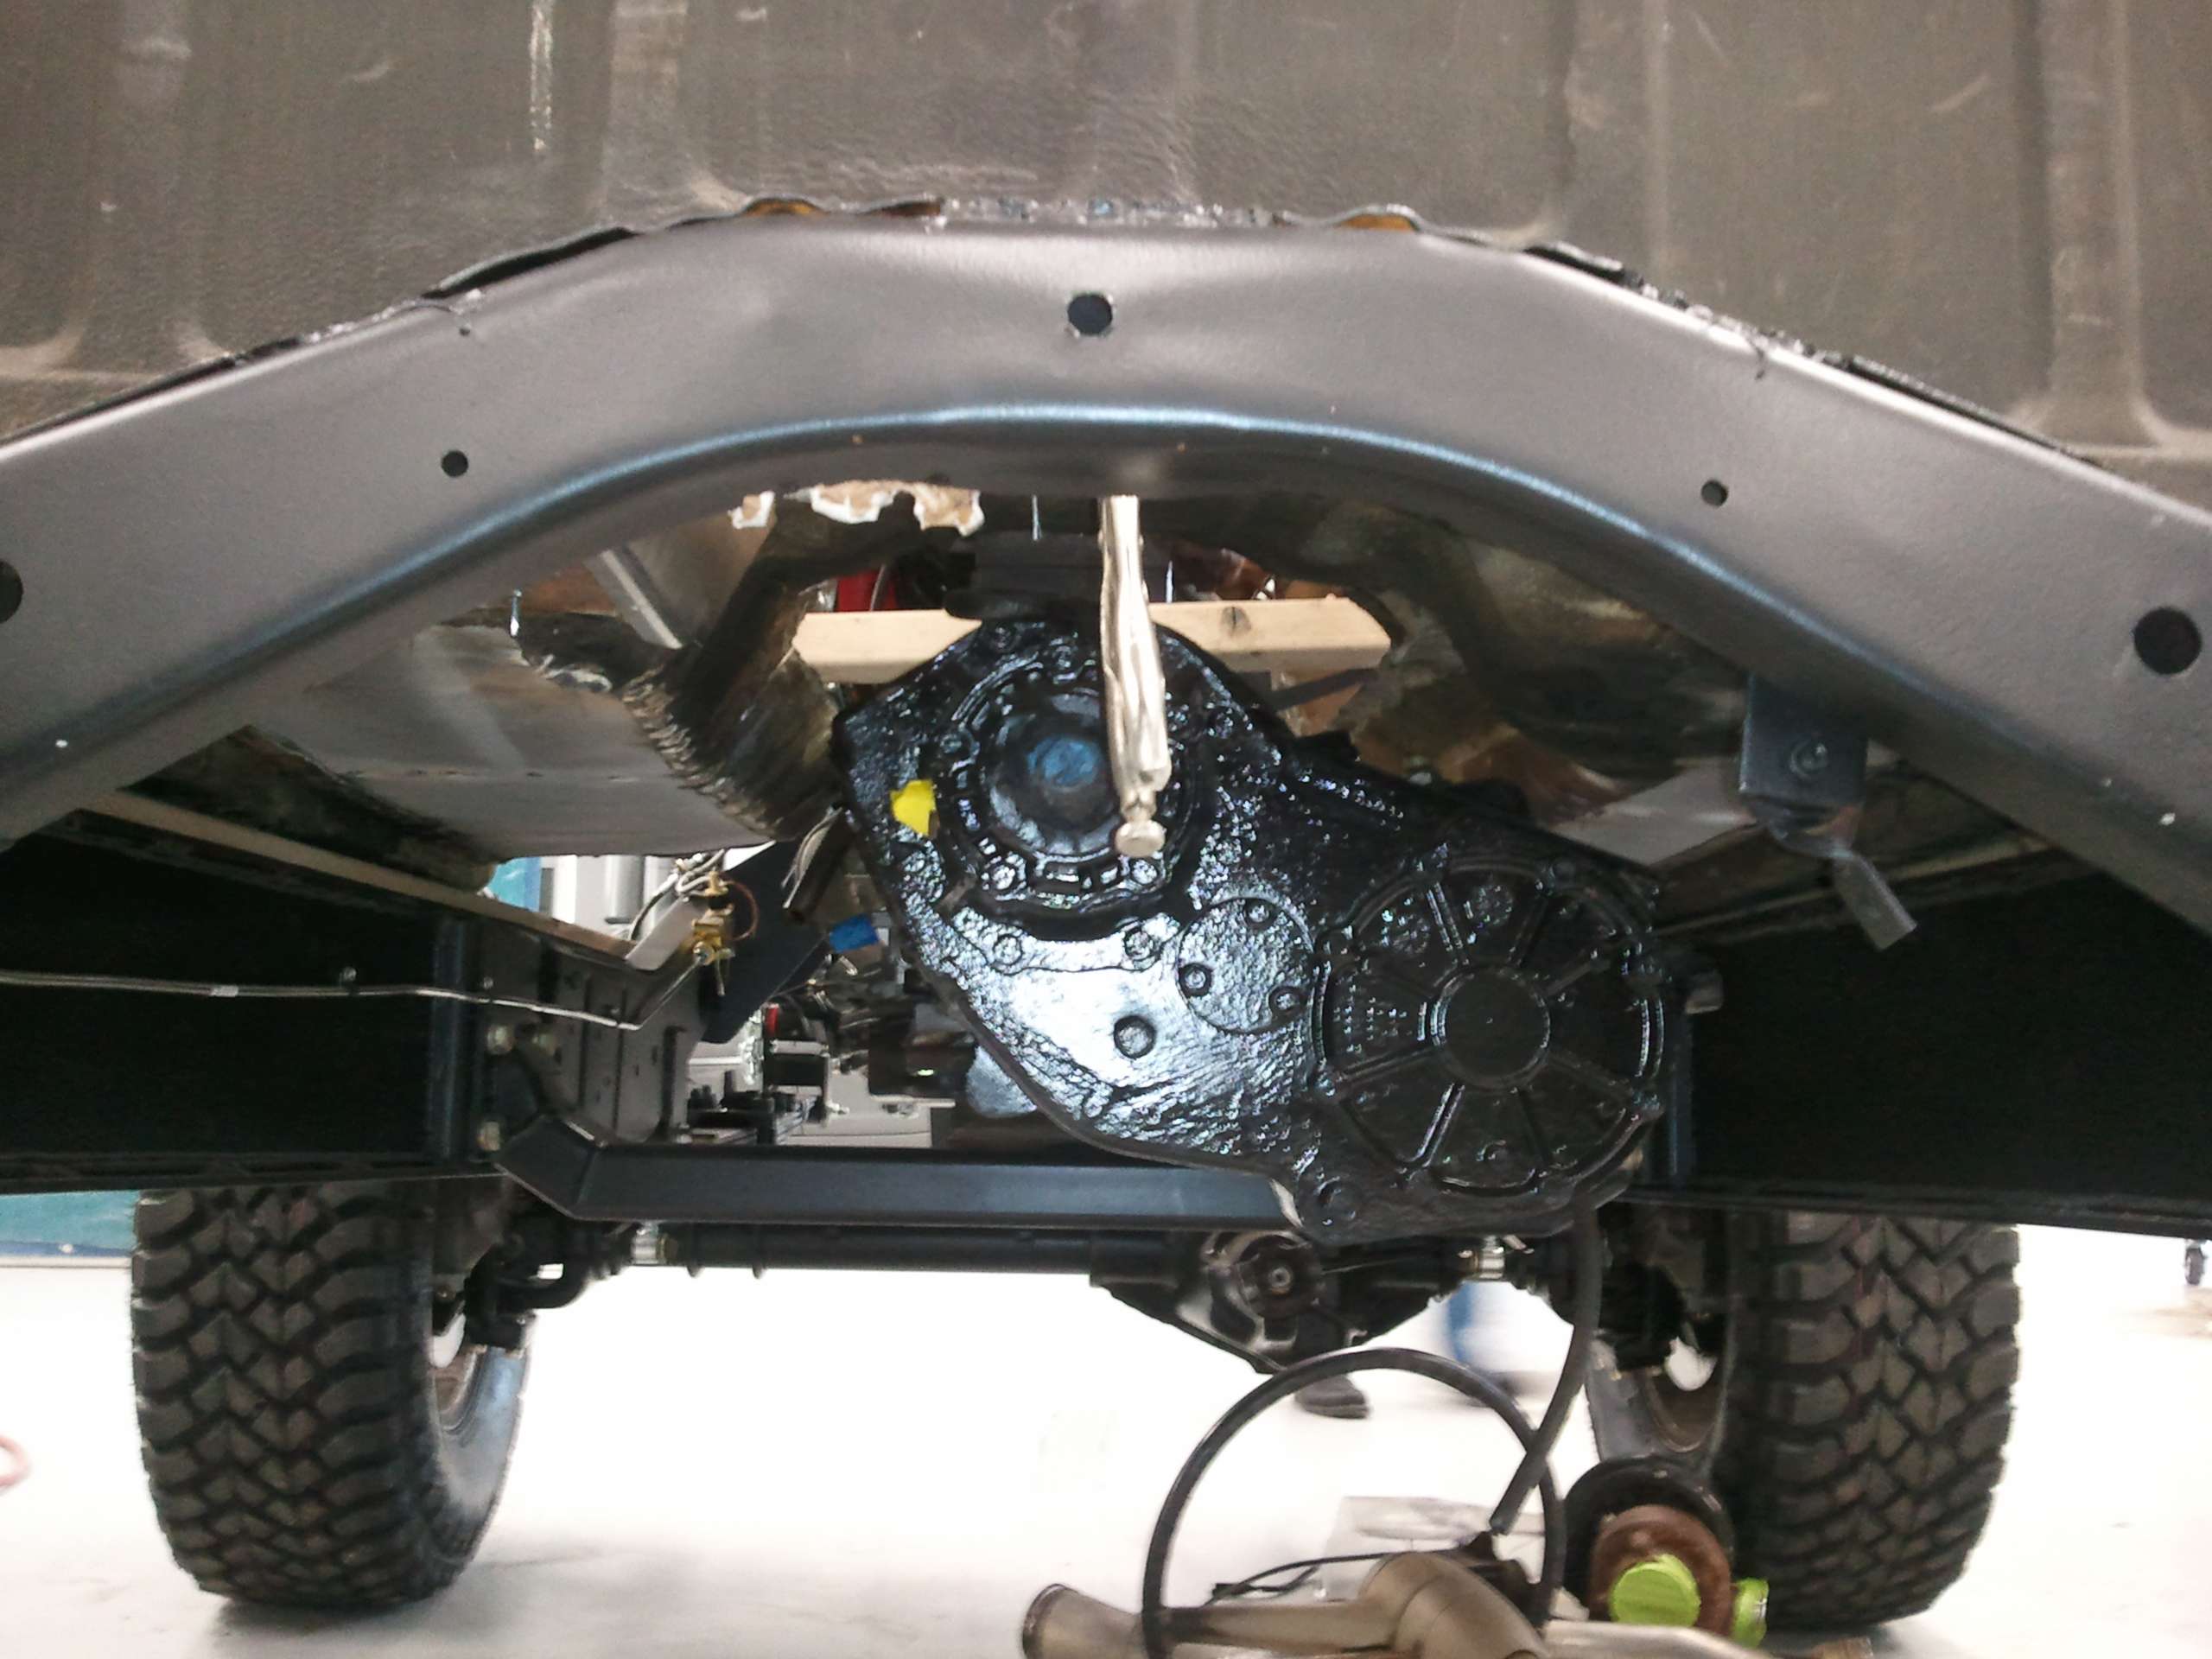
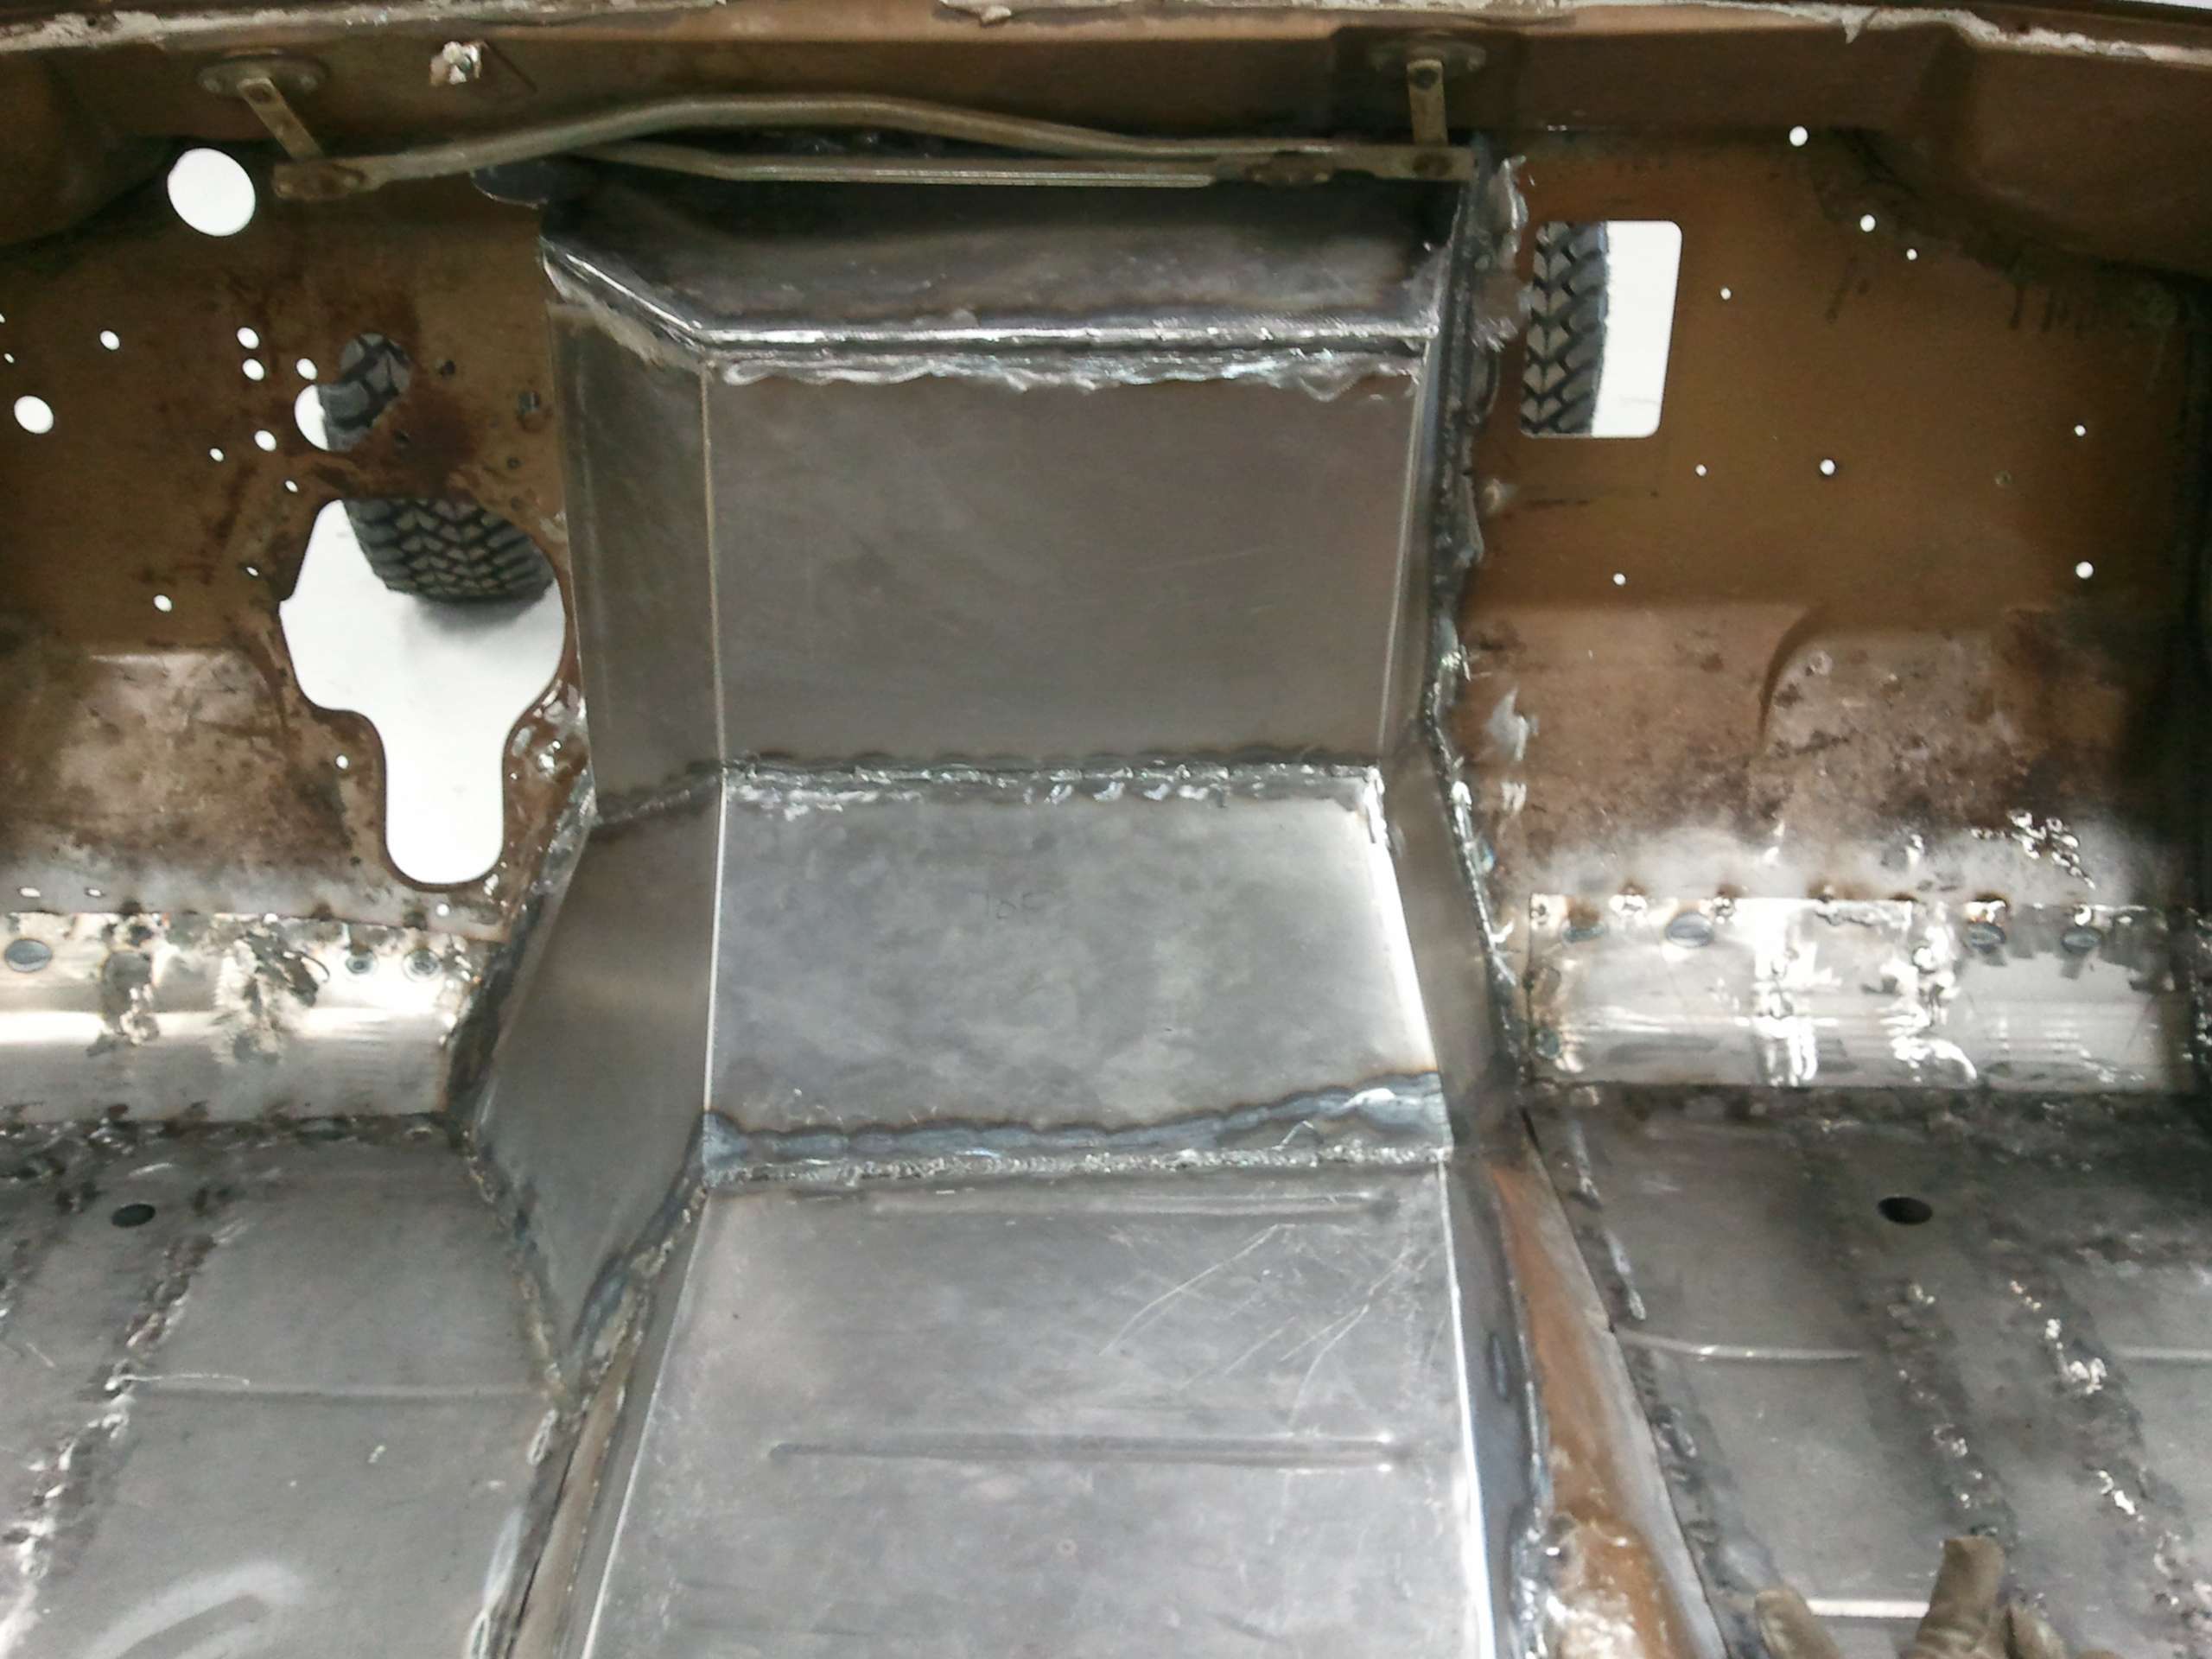
I definitely was off in my anticipated firewall clearance. On one hand, in this pic look at how much of the weight I got behind the front axle. On the other hand, it's taken a lot of notching to make this work.

I'm not really sure why they've notched it so generously. It actually comes about 3 inches farther in than the back of the engine. It doesn't really affect the plans I had for under the dash so I'll take it. Also, I now have a really nice surface on top of the tunnel for mounting the shifter and twin-stick boot.
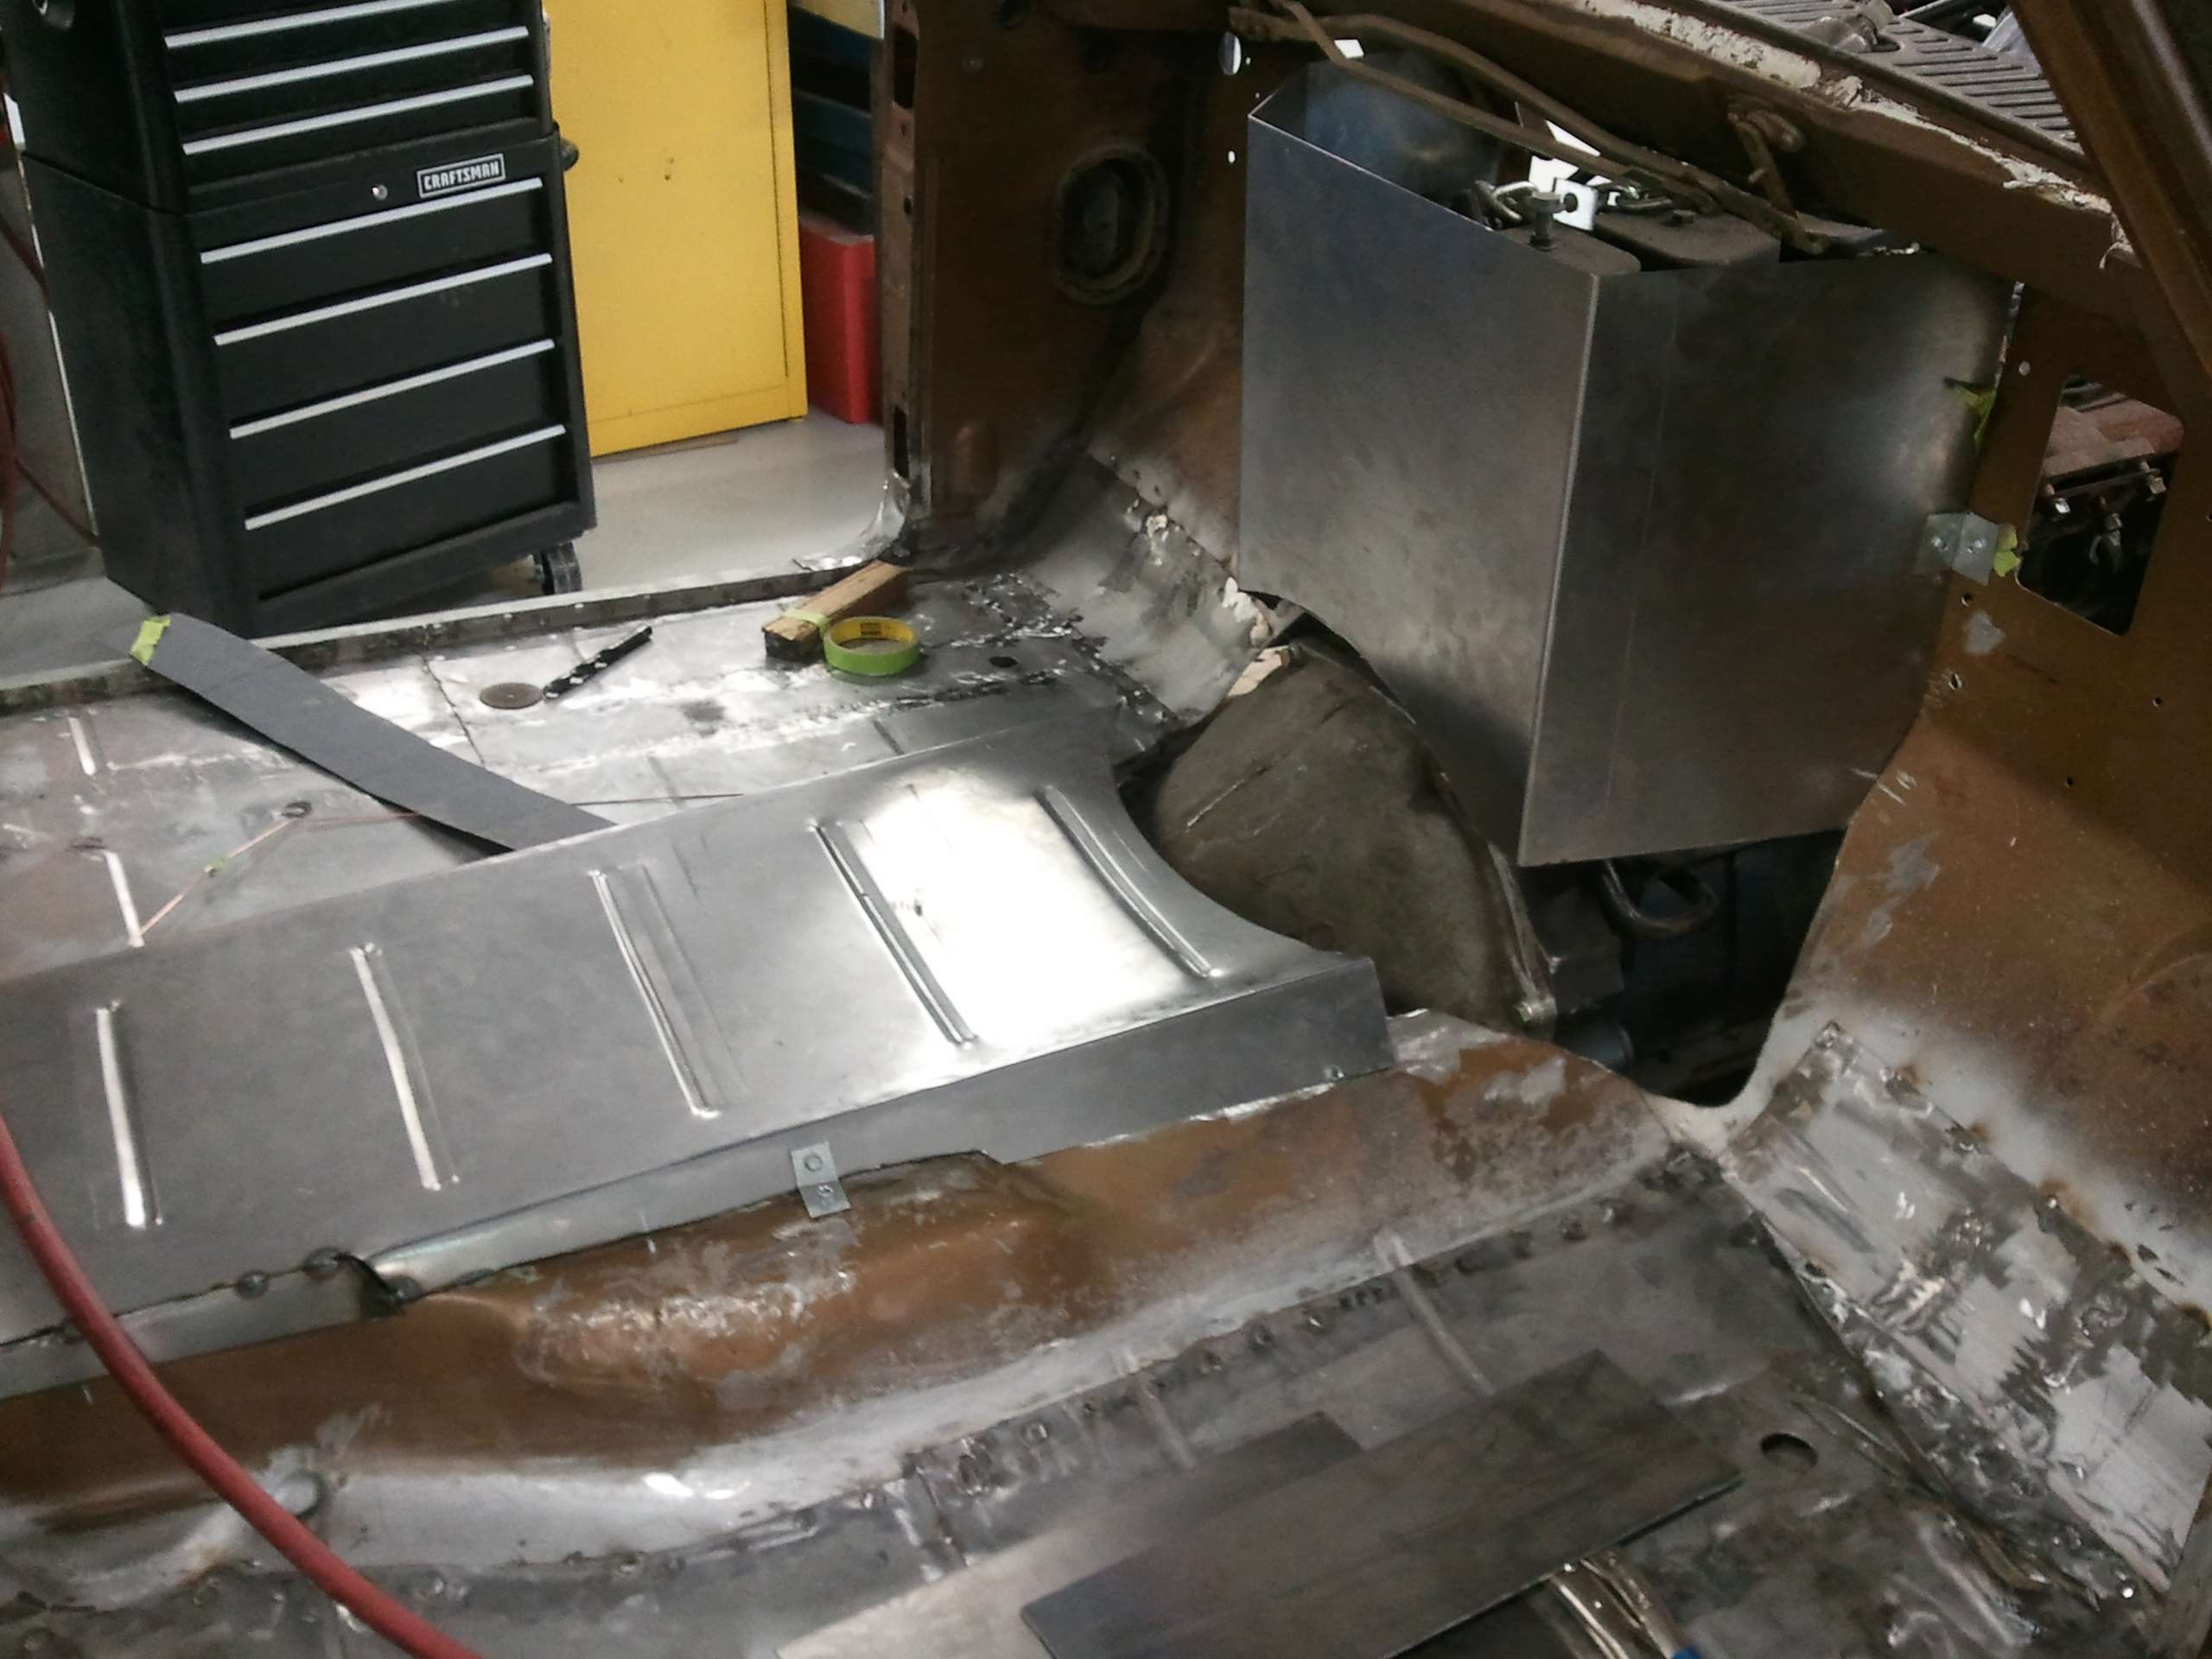
The starter bulge in the side of the bellhousing was one of the things that really caught us off guard and led to the major amounts of fabrication that's taken place. It will take some creativity to not interfer with the throttle foot too much.
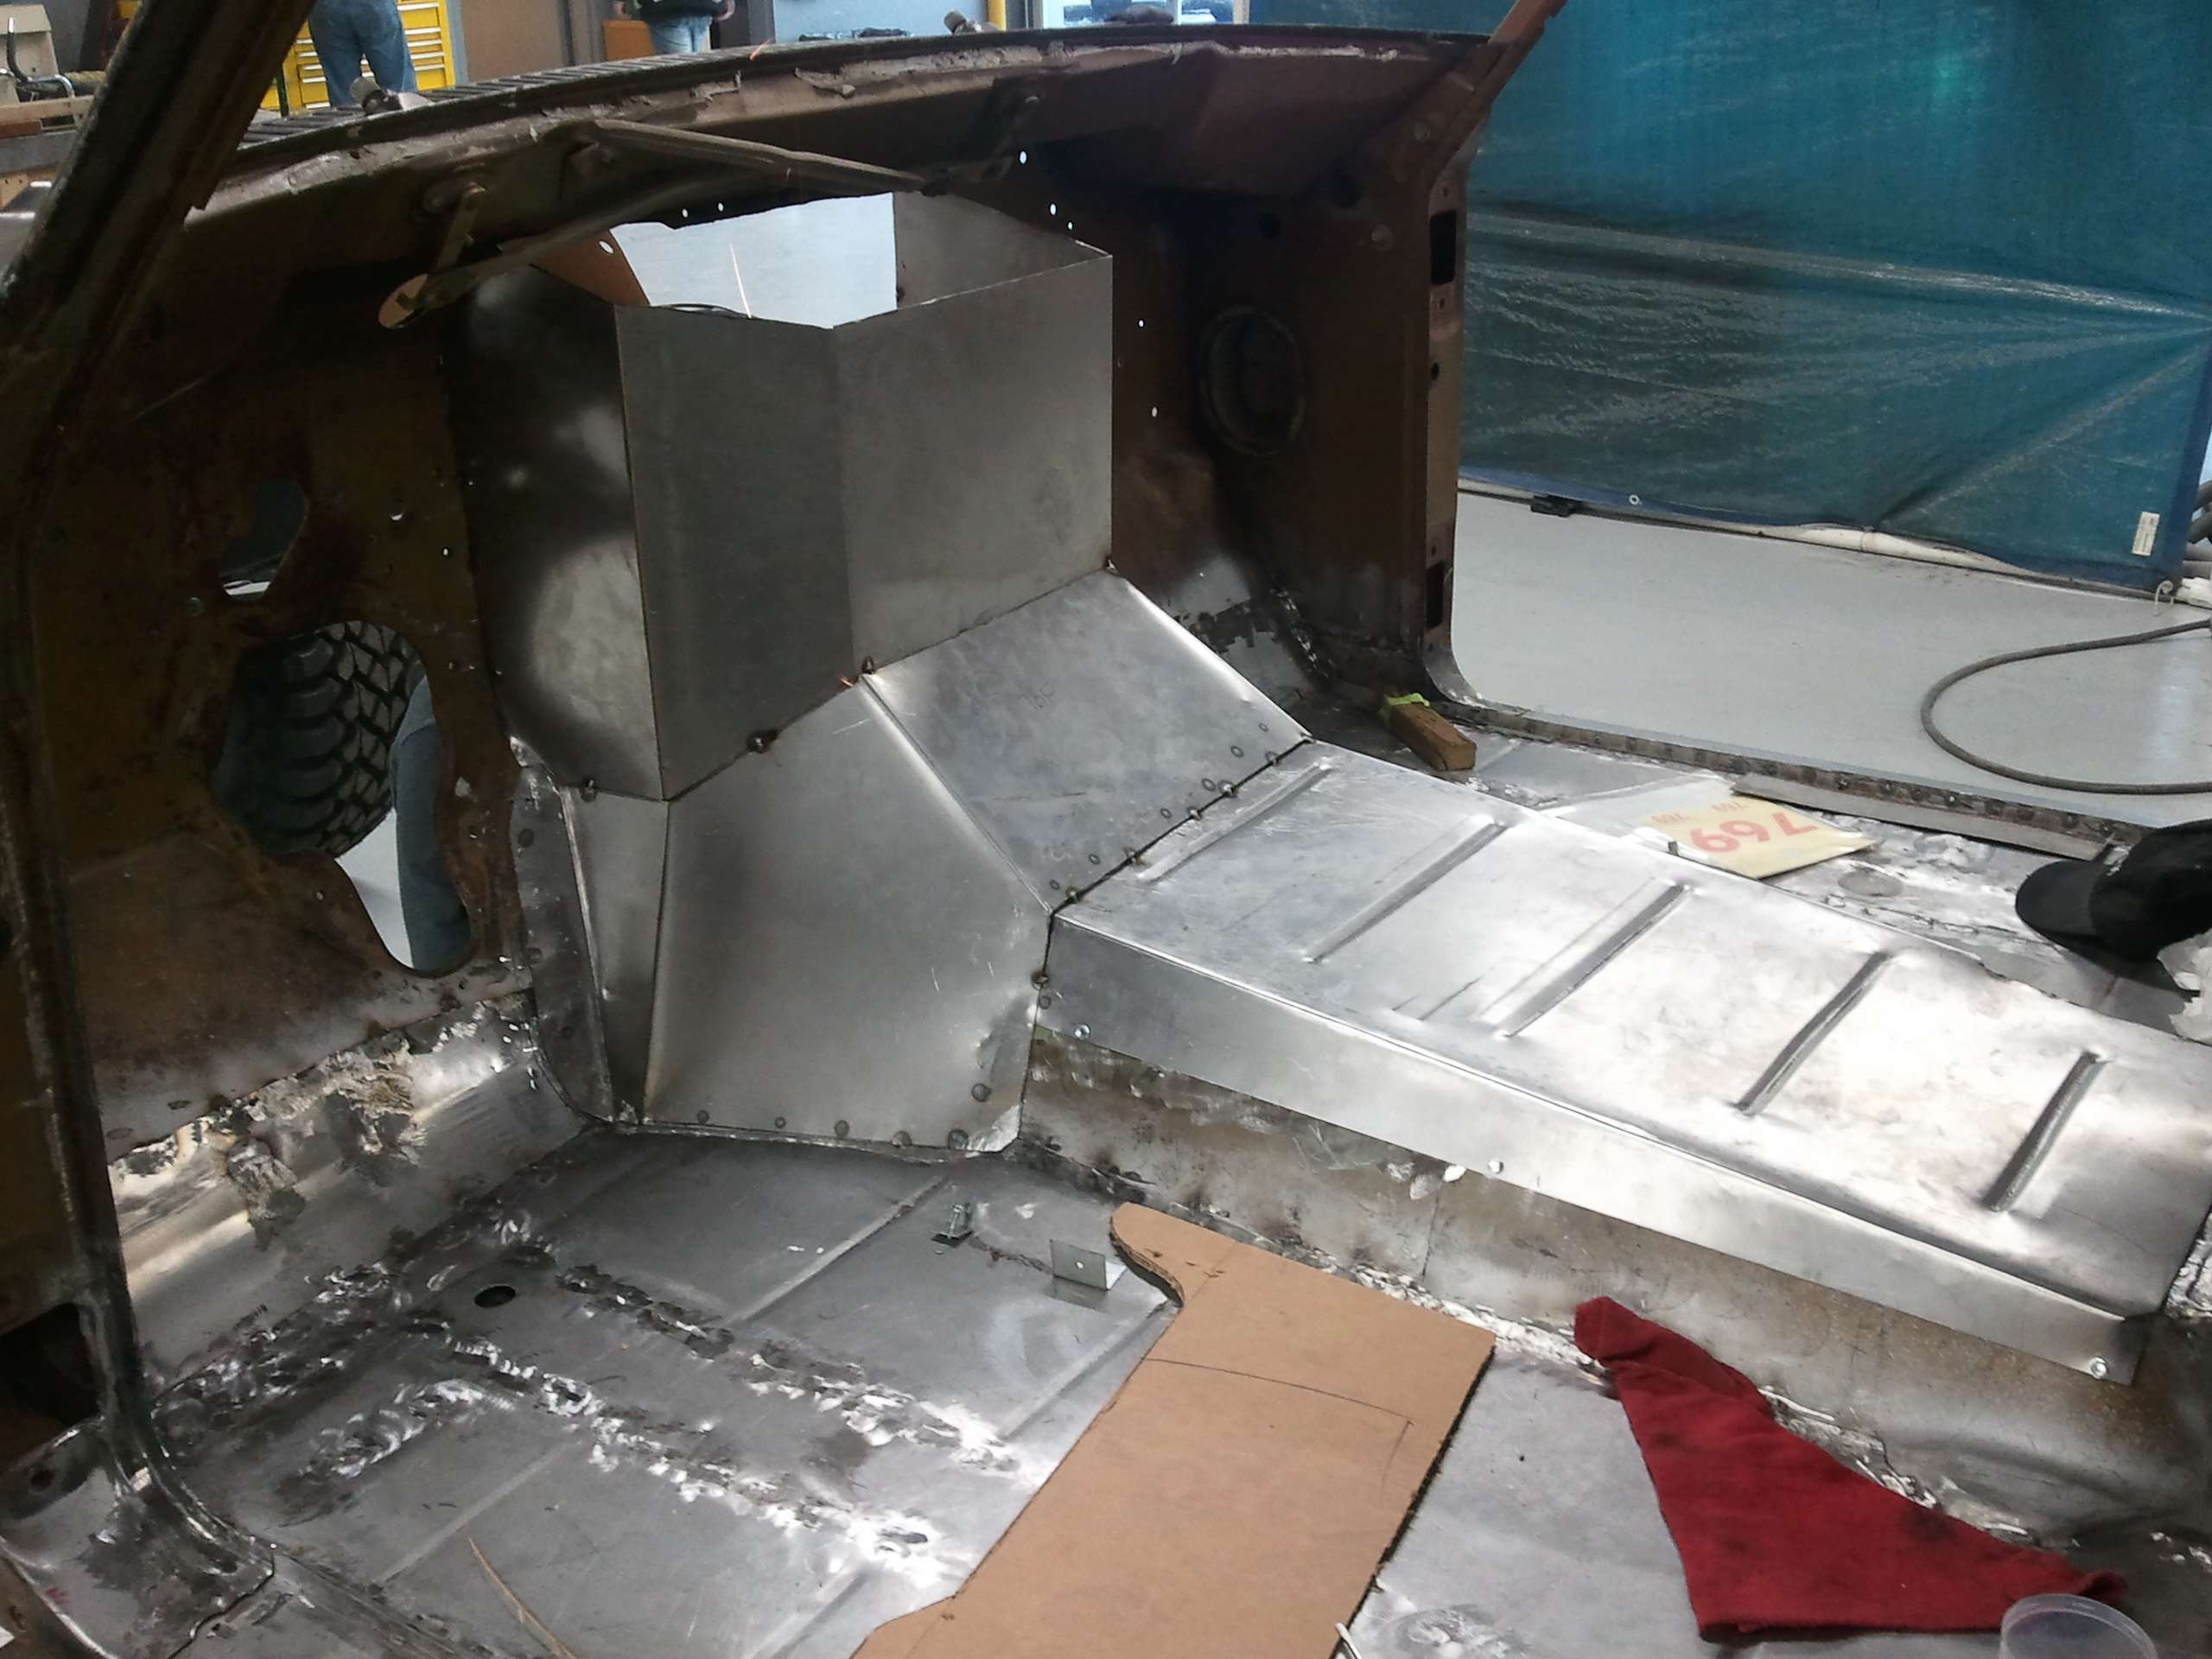
Drivers side firewall view

I'm not really sure why they've notched it so generously. It actually comes about 3 inches farther in than the back of the engine. It doesn't really affect the plans I had for under the dash so I'll take it. Also, I now have a really nice surface on top of the tunnel for mounting the shifter and twin-stick boot.

The starter bulge in the side of the bellhousing was one of the things that really caught us off guard and led to the major amounts of fabrication that's taken place. It will take some creativity to not interfer with the throttle foot too much.
Drivers side firewall view

Last edited by Resbum on Sat Apr 06, 2013 7:28 am, edited 1 time in total.
Originally Posted by Resbum
"What year is my truck?... Which part?" Build thread- http://www.fsjnetwork.com/forum/viewtop ... 290#p18290
"What year is my truck?... Which part?" Build thread- http://www.fsjnetwork.com/forum/viewtop ... 290#p18290
-
Resbum
Topic author - Posts: 466
- Joined: Fri Jun 08, 2012 9:45 am
- Location: North East Oregon
Re: 1970 Gladiator 1 Ton 6BT 12V Cummins Build
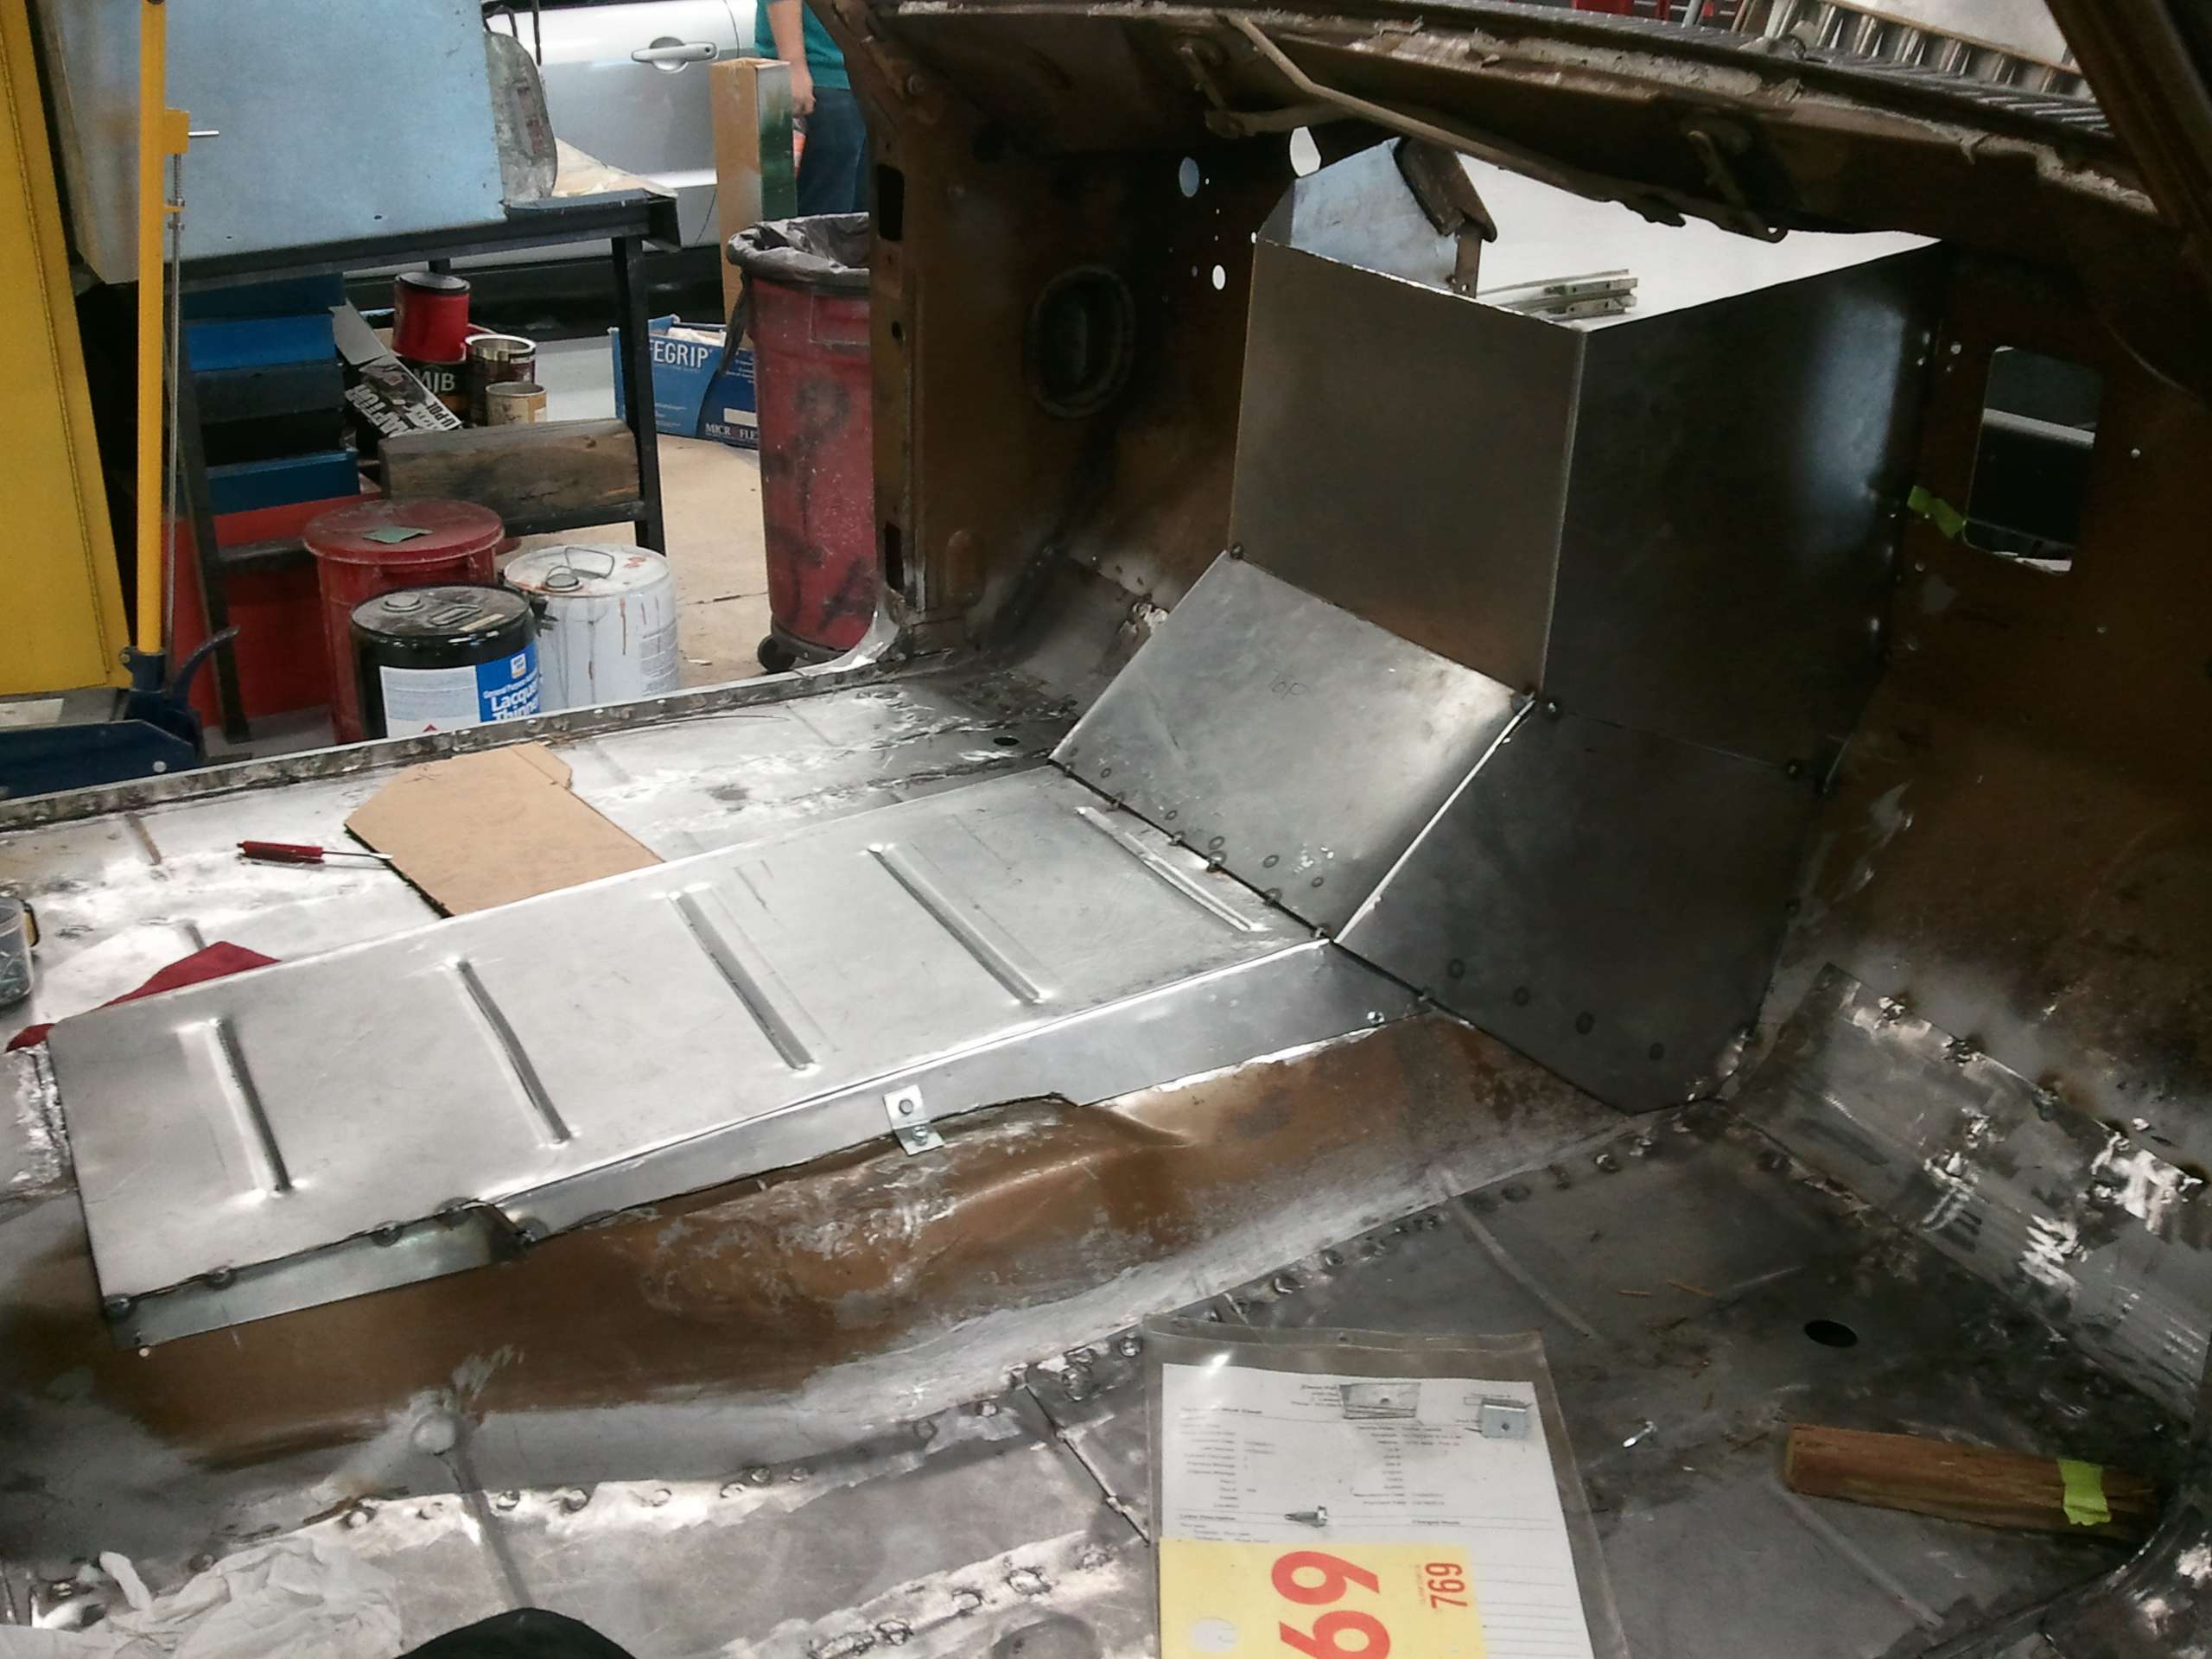
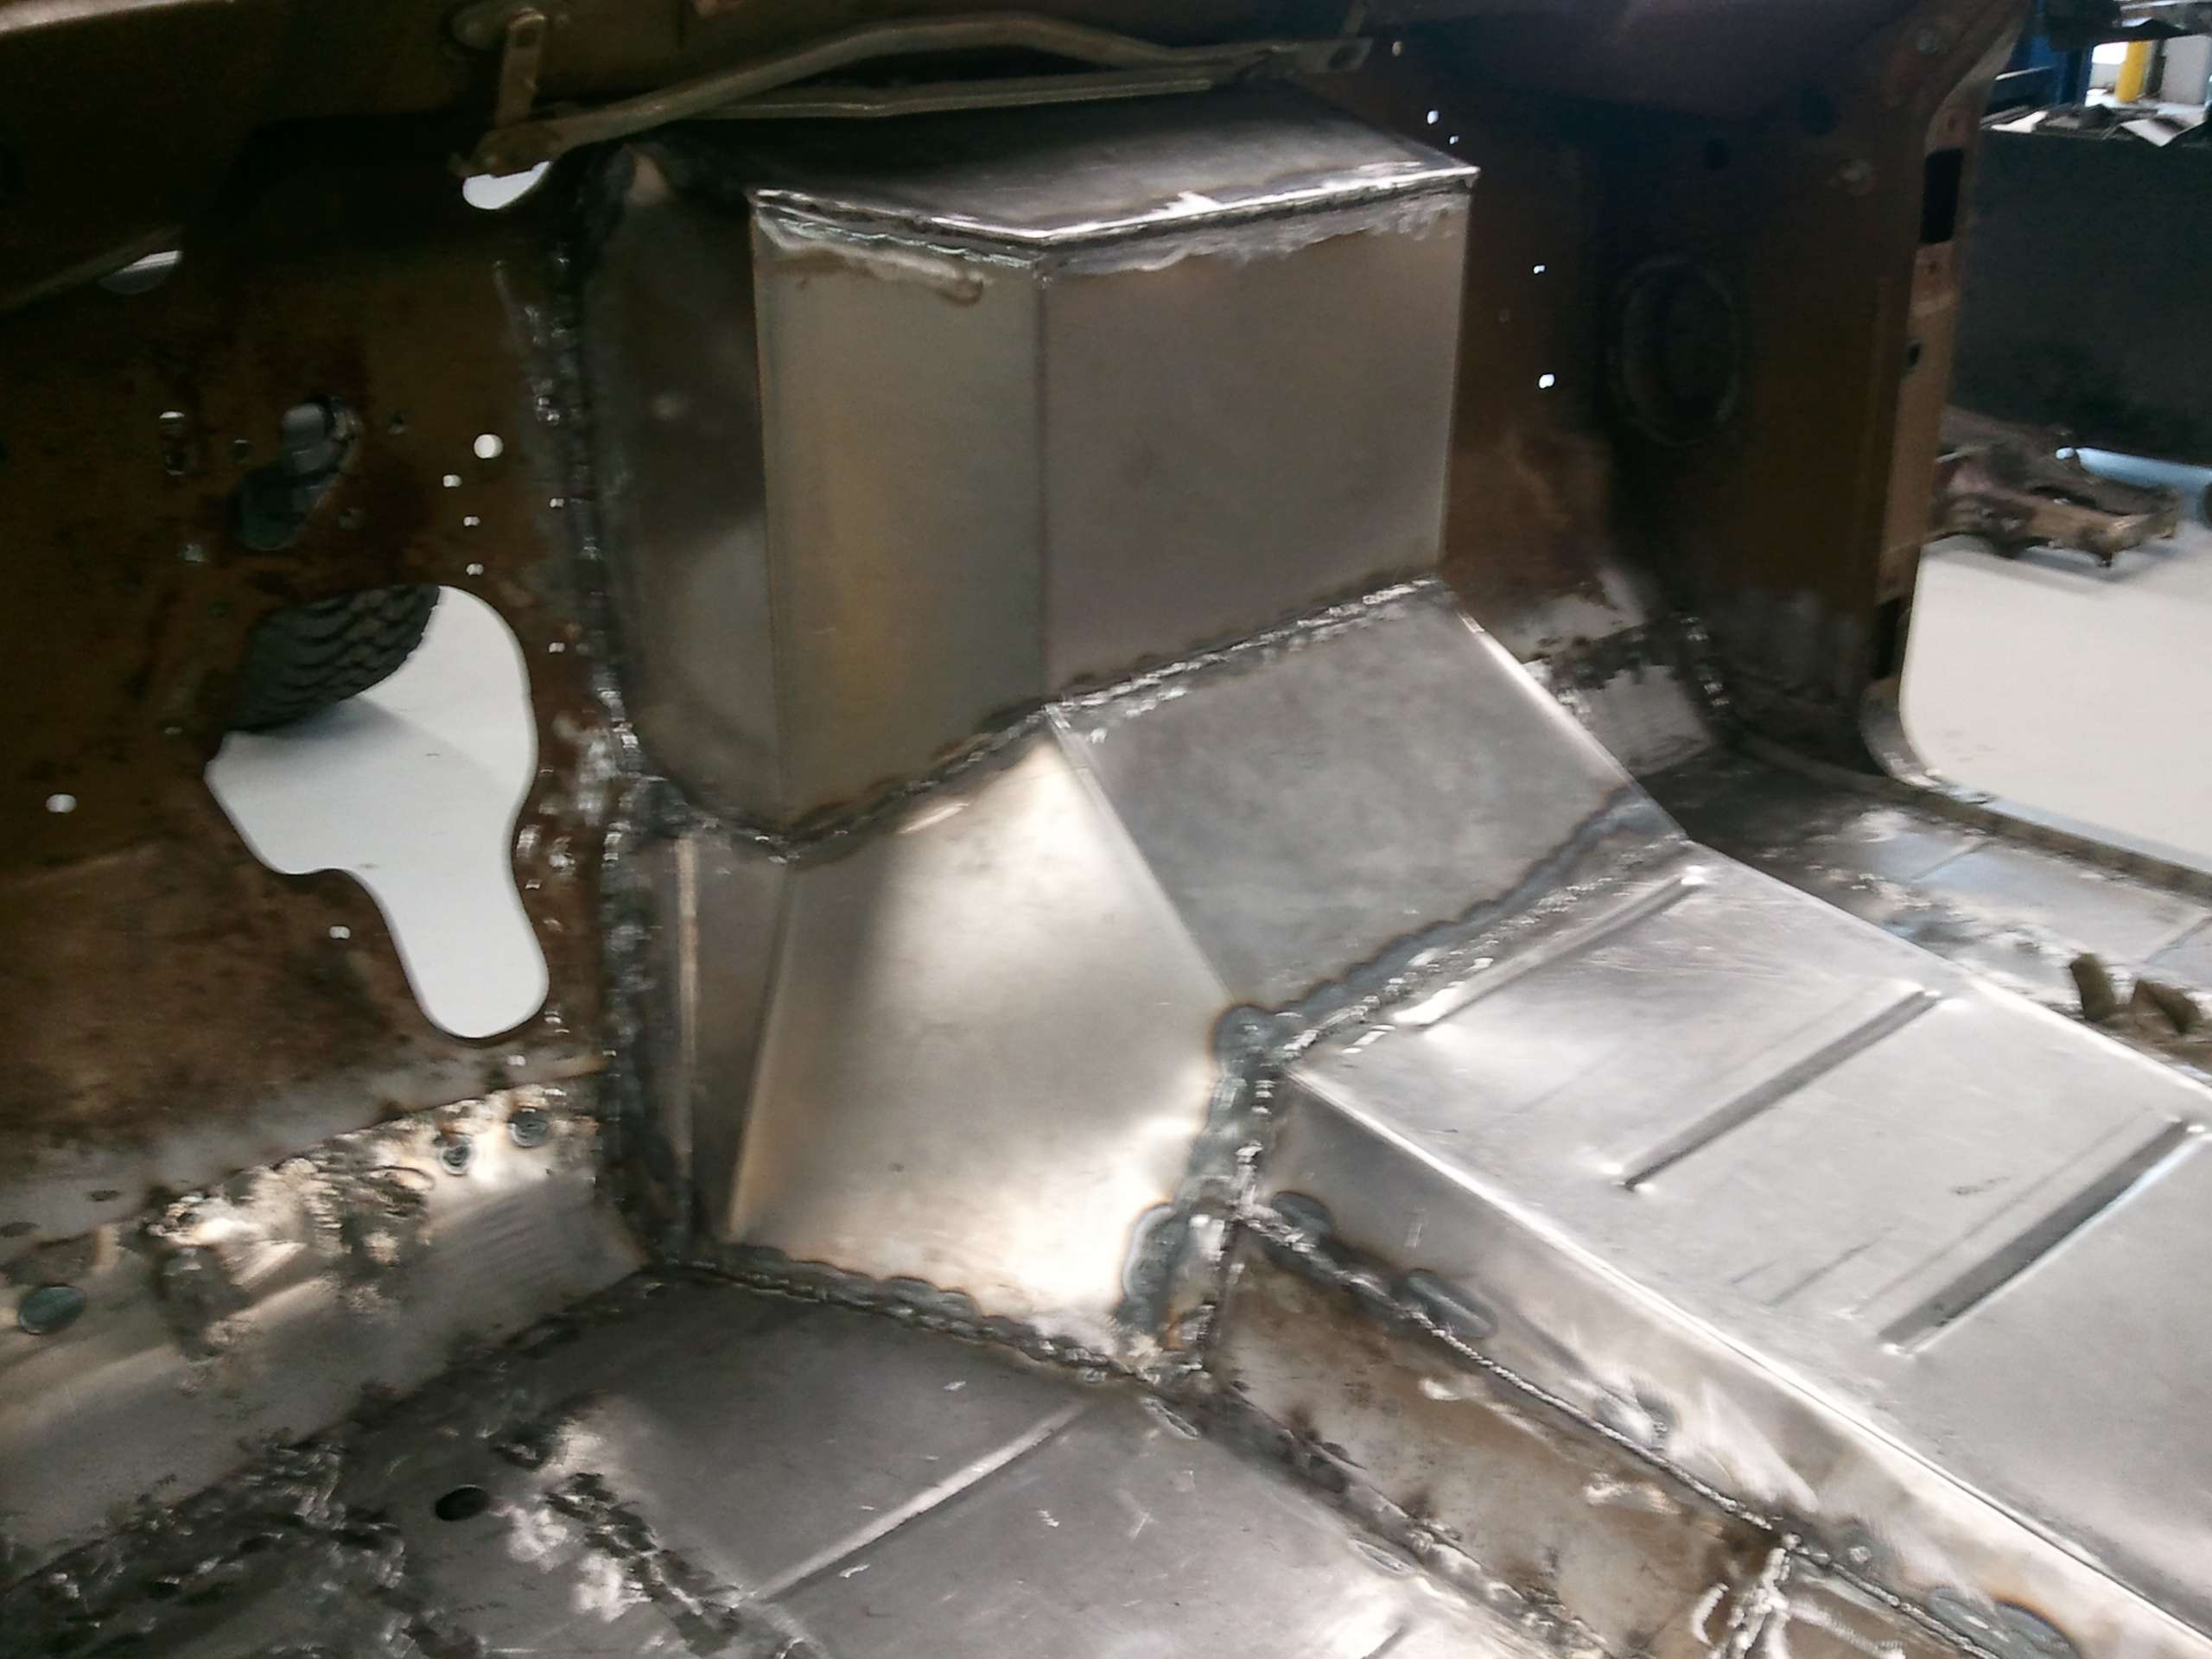
By notching it so generously I'll have plenty of room for taking the exhaust manifold off and on. I also have plenty of room for taking the rear valve cover off.

Here's how much clearance I currently have out the back of the turbo for the downpipe. There's currently a couple options I'm considering.
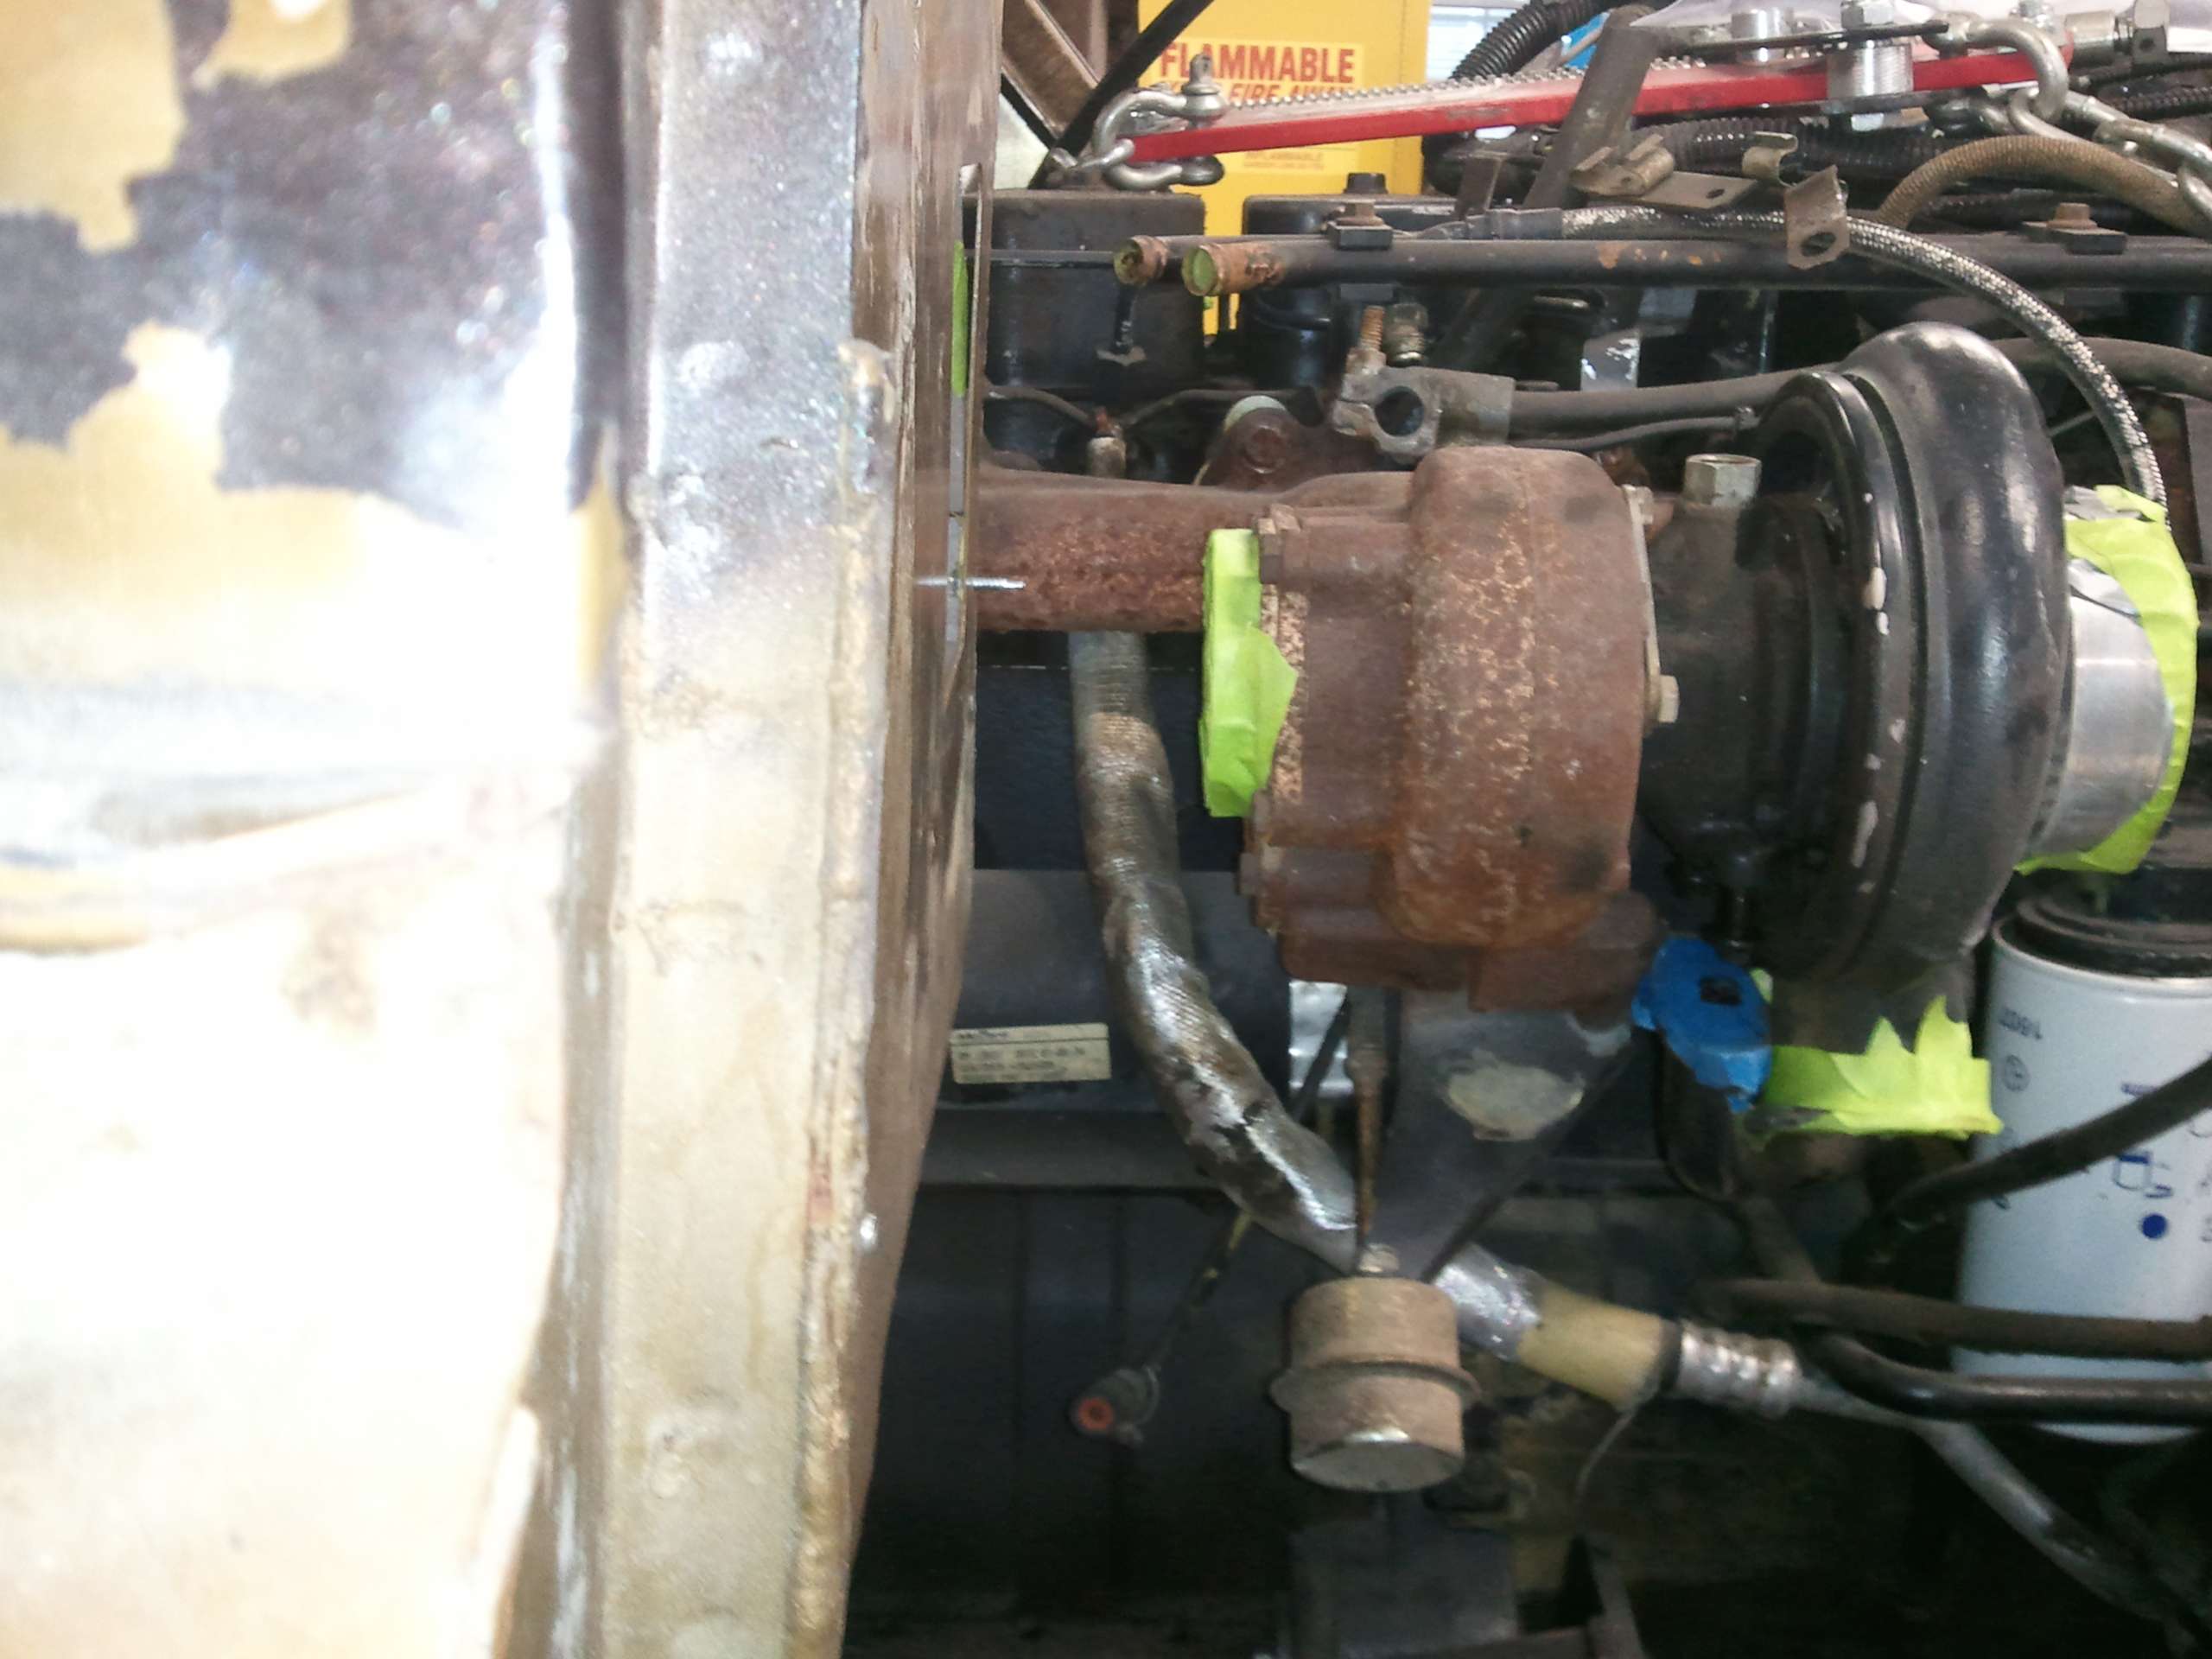
The NP205 rear output wasn't in the same spot as the old Dana20. The trans tunnel originally didn't go directly out the middle of the back, so the school notched the back of the tunnel, too.
I couldn't be happier with all the thought and hard work these young people have put into this project for me.
Resbum

Here's how much clearance I currently have out the back of the turbo for the downpipe. There's currently a couple options I'm considering.

The NP205 rear output wasn't in the same spot as the old Dana20. The trans tunnel originally didn't go directly out the middle of the back, so the school notched the back of the tunnel, too.


I couldn't be happier with all the thought and hard work these young people have put into this project for me.
Resbum
Last edited by Resbum on Sat Apr 06, 2013 7:31 am, edited 2 times in total.
Originally Posted by Resbum
"What year is my truck?... Which part?" Build thread- http://www.fsjnetwork.com/forum/viewtop ... 290#p18290
"What year is my truck?... Which part?" Build thread- http://www.fsjnetwork.com/forum/viewtop ... 290#p18290
-
Resbum
Topic author - Posts: 466
- Joined: Fri Jun 08, 2012 9:45 am
- Location: North East Oregon
Re: 1970 Gladiator 1 Ton 6BT 12V Cummins Build
I did a bunch of running around yesterday gathering things for working on/around/under the dashboard. I plan on working on it while the school has the cab. I wasn't planning on working on it yet, so hadn't bought/ordered some of the things I'll need.
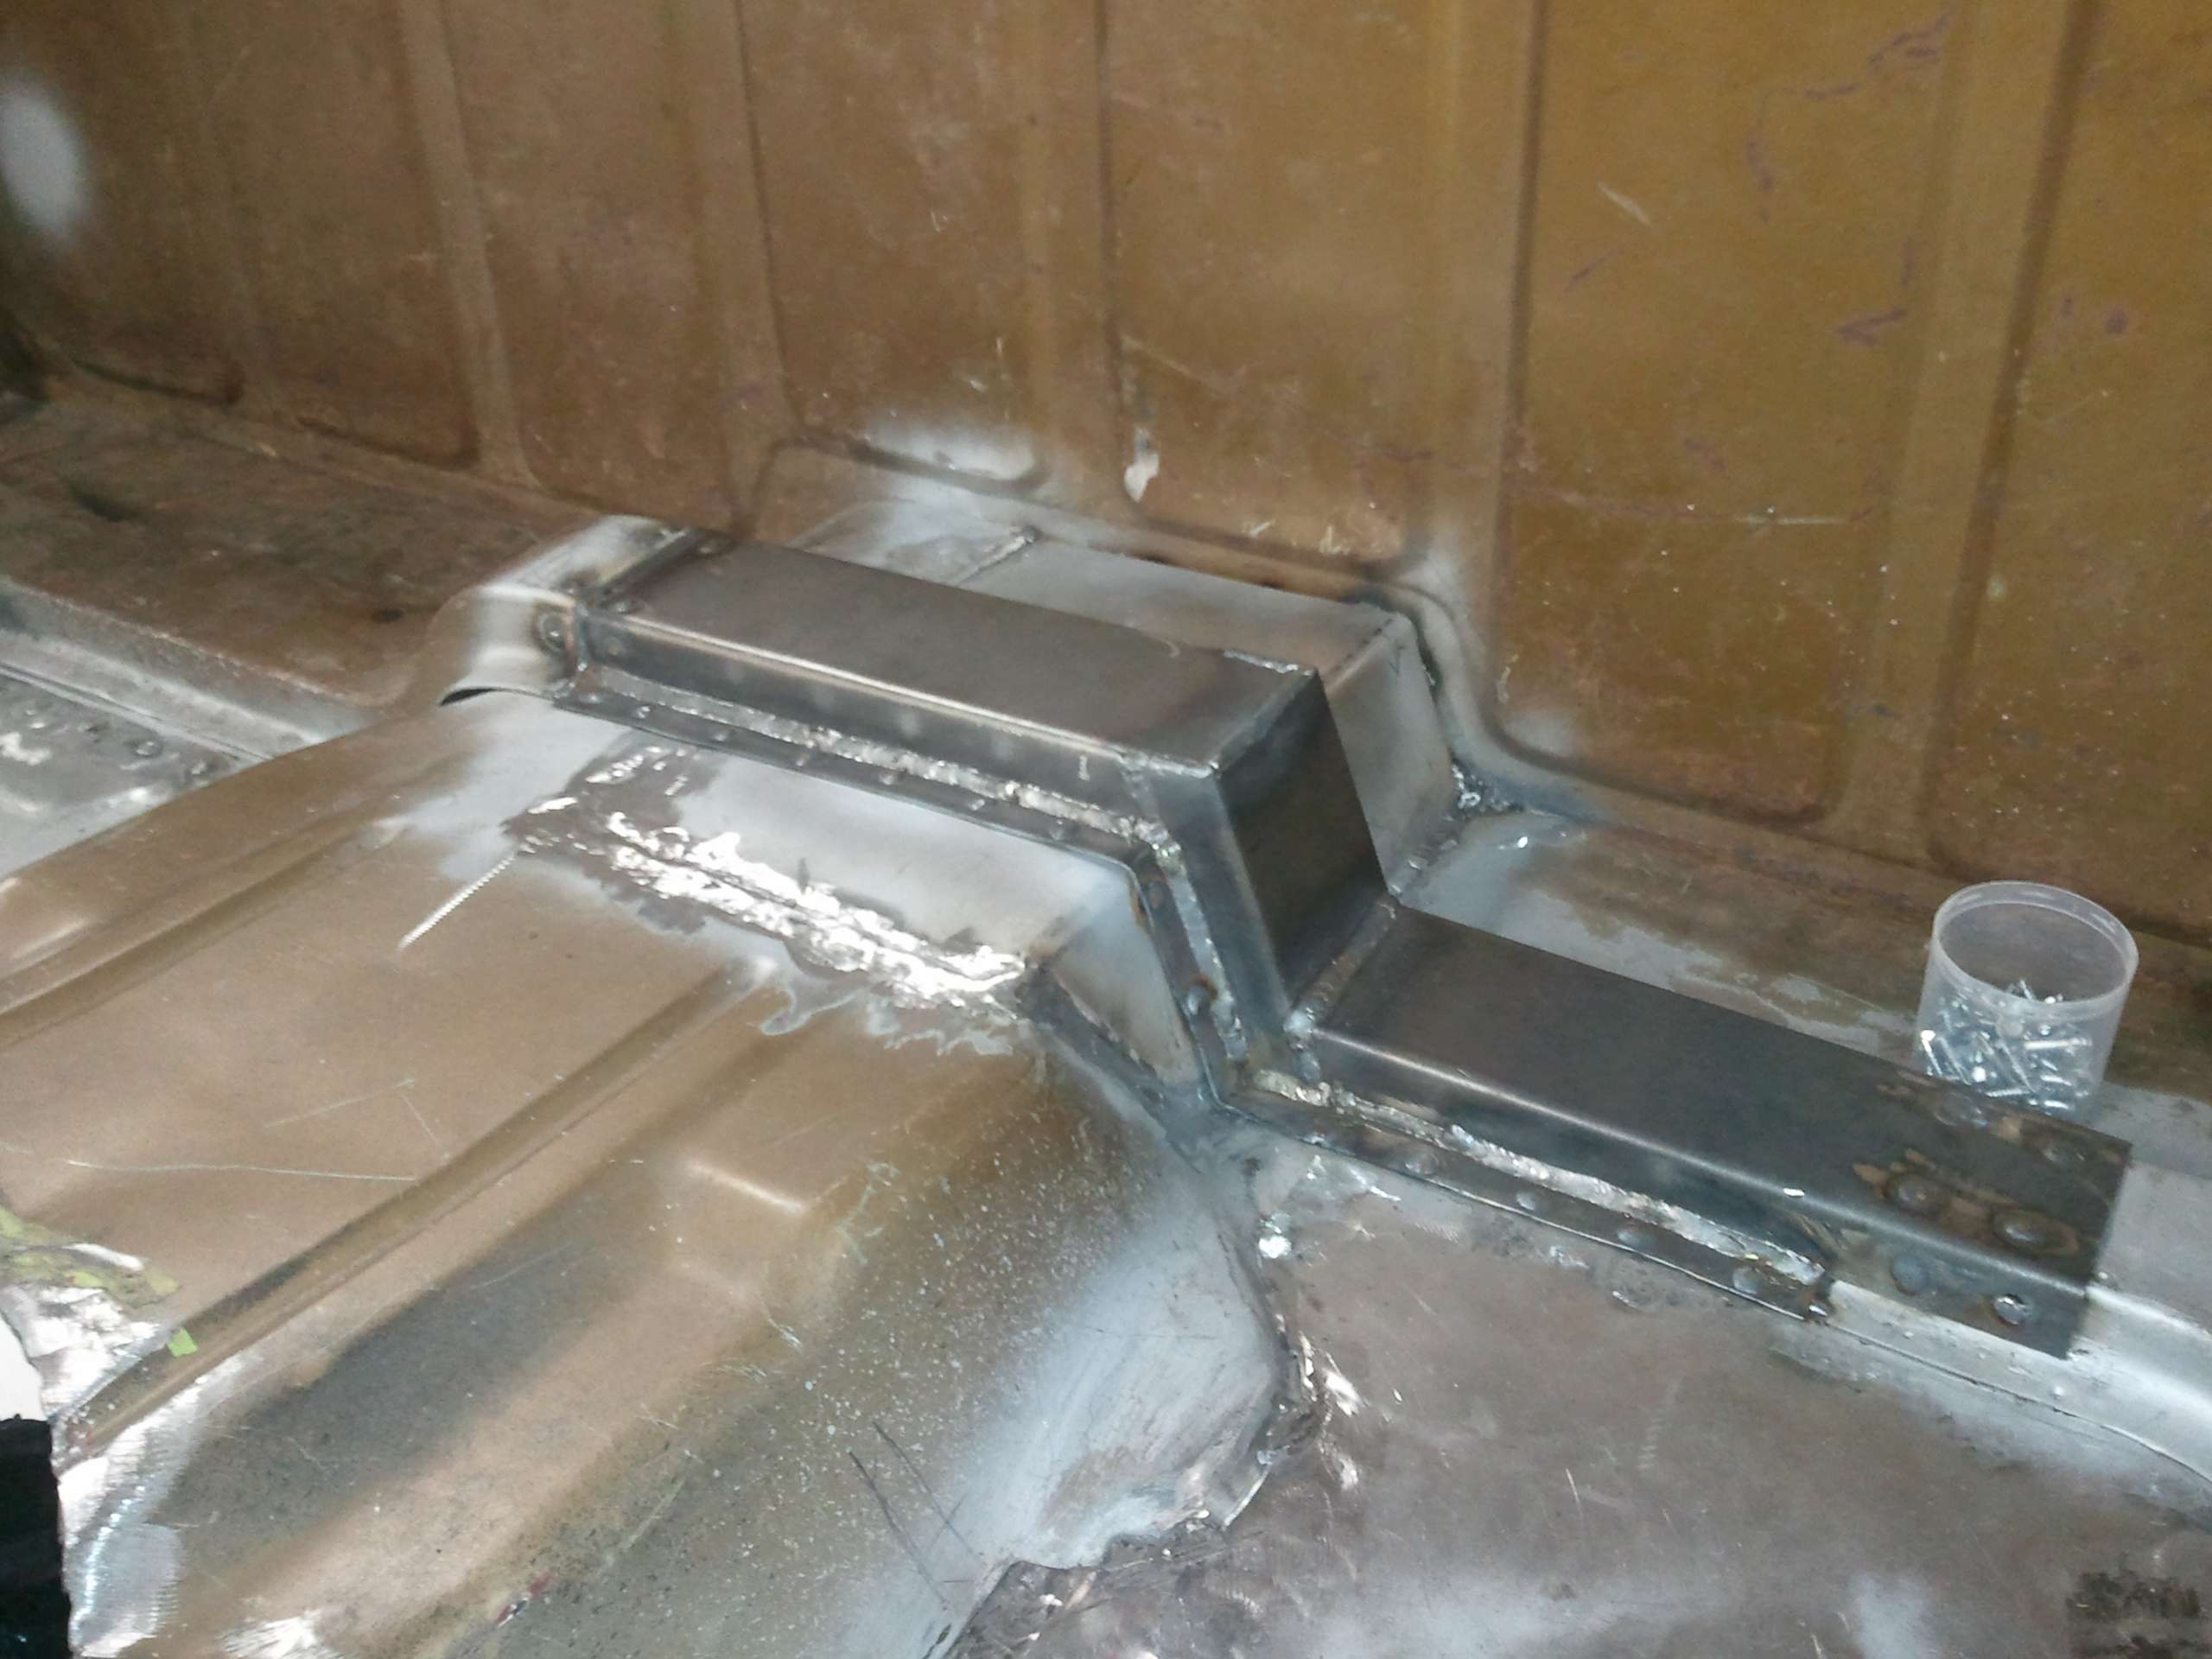
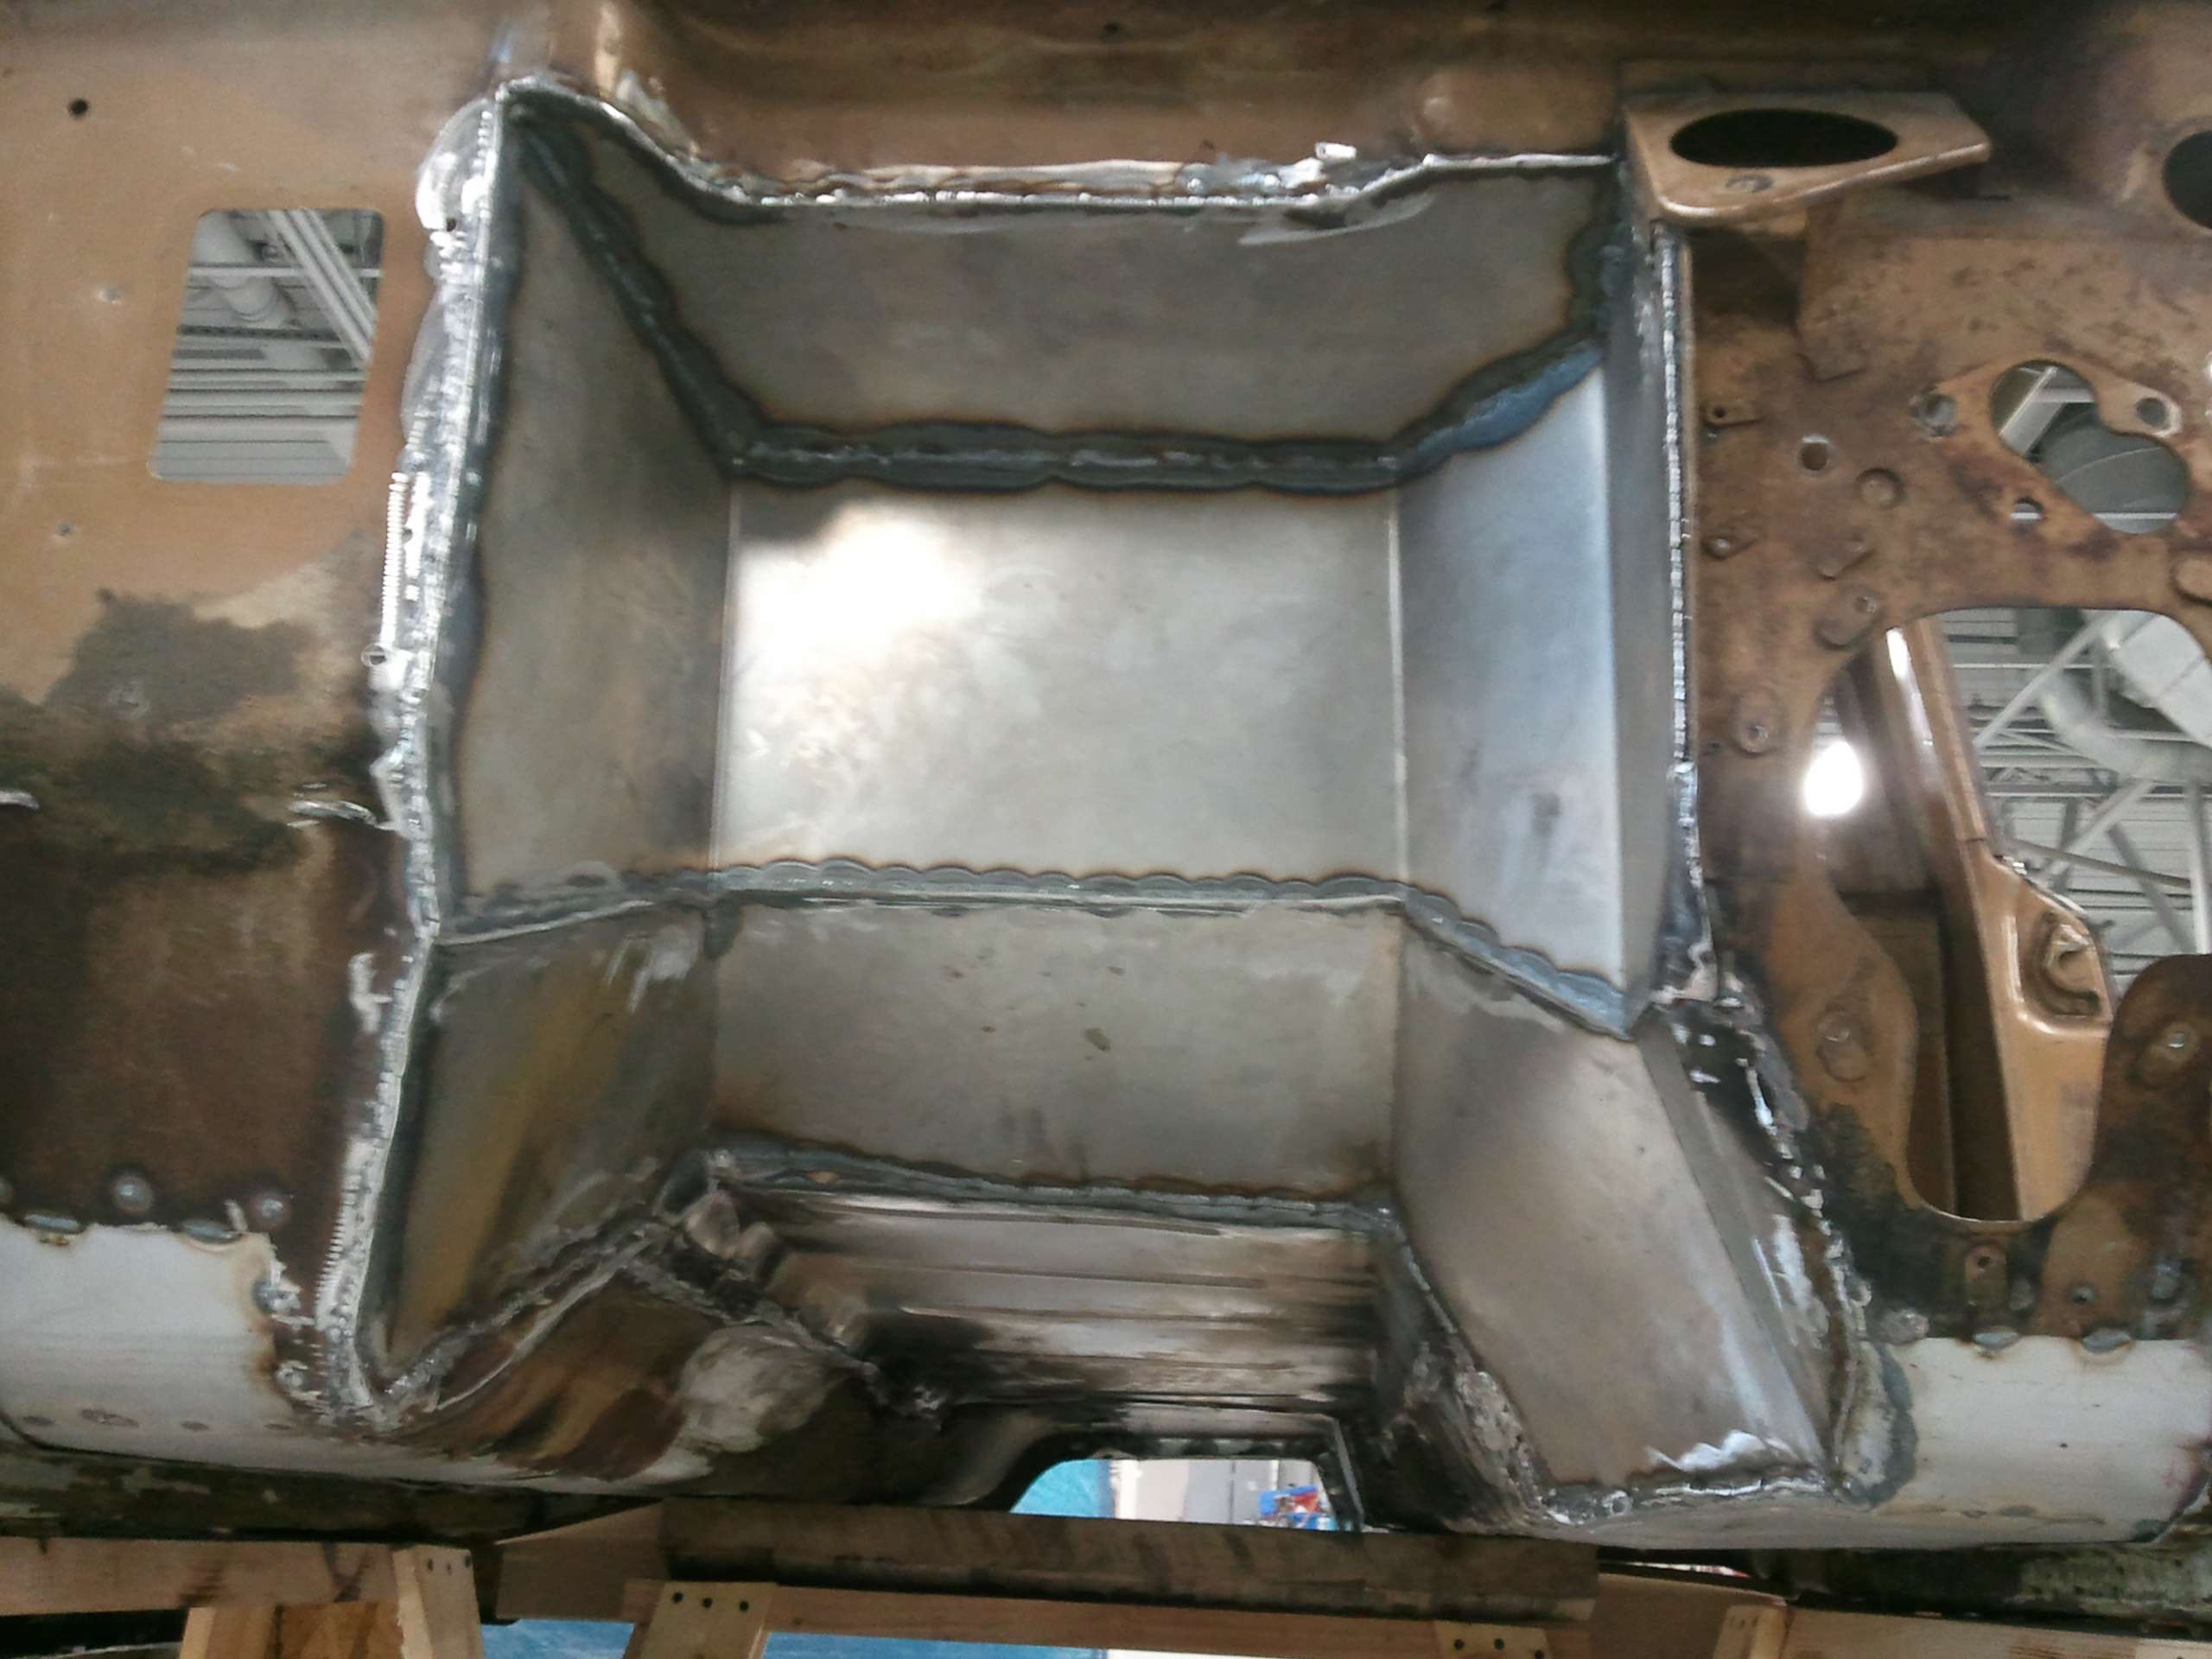
The school finalized the firewall notch and I swung by there and took final measurements for mocking up a dummy on the old cab. When all was said and done I lost about an inch of floor space to the starter where my throttle foot will sit. Considering how bad I messed up calculating when placing the engine/drivetrain I'll take it. I finally remembered to ask why they notched it so much deeper than the back of the engine. The answer was something I wouldn't have considered. Notches can trap a lot of heat. The extra room is there to help let it escape. Works for me considering I'm not planning on having AC.
A couple weeks ago I mentioned in passing that I was going to move this crossmember back. The instructor asked if they could do it. Sure, why not. I had them move it back the width of the old rivet holes. The front crossmember holes are now in the old rear frame holes. I did this for several reasons. 1- It centers the crossmember in the middle of the flat part of the frame. 2- I gain back the space I lost in the front when I put in the track bar mount. This keeps the space for the fuel tank the same. 3- It centers the crossmember directly under where the 5th wheel hitch will be. 4- Using grade 8, 1/2" bolts, torqued properly nearly doubles the strength and clamping pressure over the rivets to tie the crossmember to the frame.

The school finalized the firewall notch and I swung by there and took final measurements for mocking up a dummy on the old cab. When all was said and done I lost about an inch of floor space to the starter where my throttle foot will sit. Considering how bad I messed up calculating when placing the engine/drivetrain I'll take it. I finally remembered to ask why they notched it so much deeper than the back of the engine. The answer was something I wouldn't have considered. Notches can trap a lot of heat. The extra room is there to help let it escape. Works for me considering I'm not planning on having AC.


A couple weeks ago I mentioned in passing that I was going to move this crossmember back. The instructor asked if they could do it. Sure, why not. I had them move it back the width of the old rivet holes. The front crossmember holes are now in the old rear frame holes. I did this for several reasons. 1- It centers the crossmember in the middle of the flat part of the frame. 2- I gain back the space I lost in the front when I put in the track bar mount. This keeps the space for the fuel tank the same. 3- It centers the crossmember directly under where the 5th wheel hitch will be. 4- Using grade 8, 1/2" bolts, torqued properly nearly doubles the strength and clamping pressure over the rivets to tie the crossmember to the frame.

Last edited by Resbum on Sat Apr 06, 2013 7:43 am, edited 2 times in total.
Originally Posted by Resbum
"What year is my truck?... Which part?" Build thread- http://www.fsjnetwork.com/forum/viewtop ... 290#p18290
"What year is my truck?... Which part?" Build thread- http://www.fsjnetwork.com/forum/viewtop ... 290#p18290
-
Resbum
Topic author - Posts: 466
- Joined: Fri Jun 08, 2012 9:45 am
- Location: North East Oregon
Re: 1970 Gladiator 1 Ton 6BT 12V Cummins Build
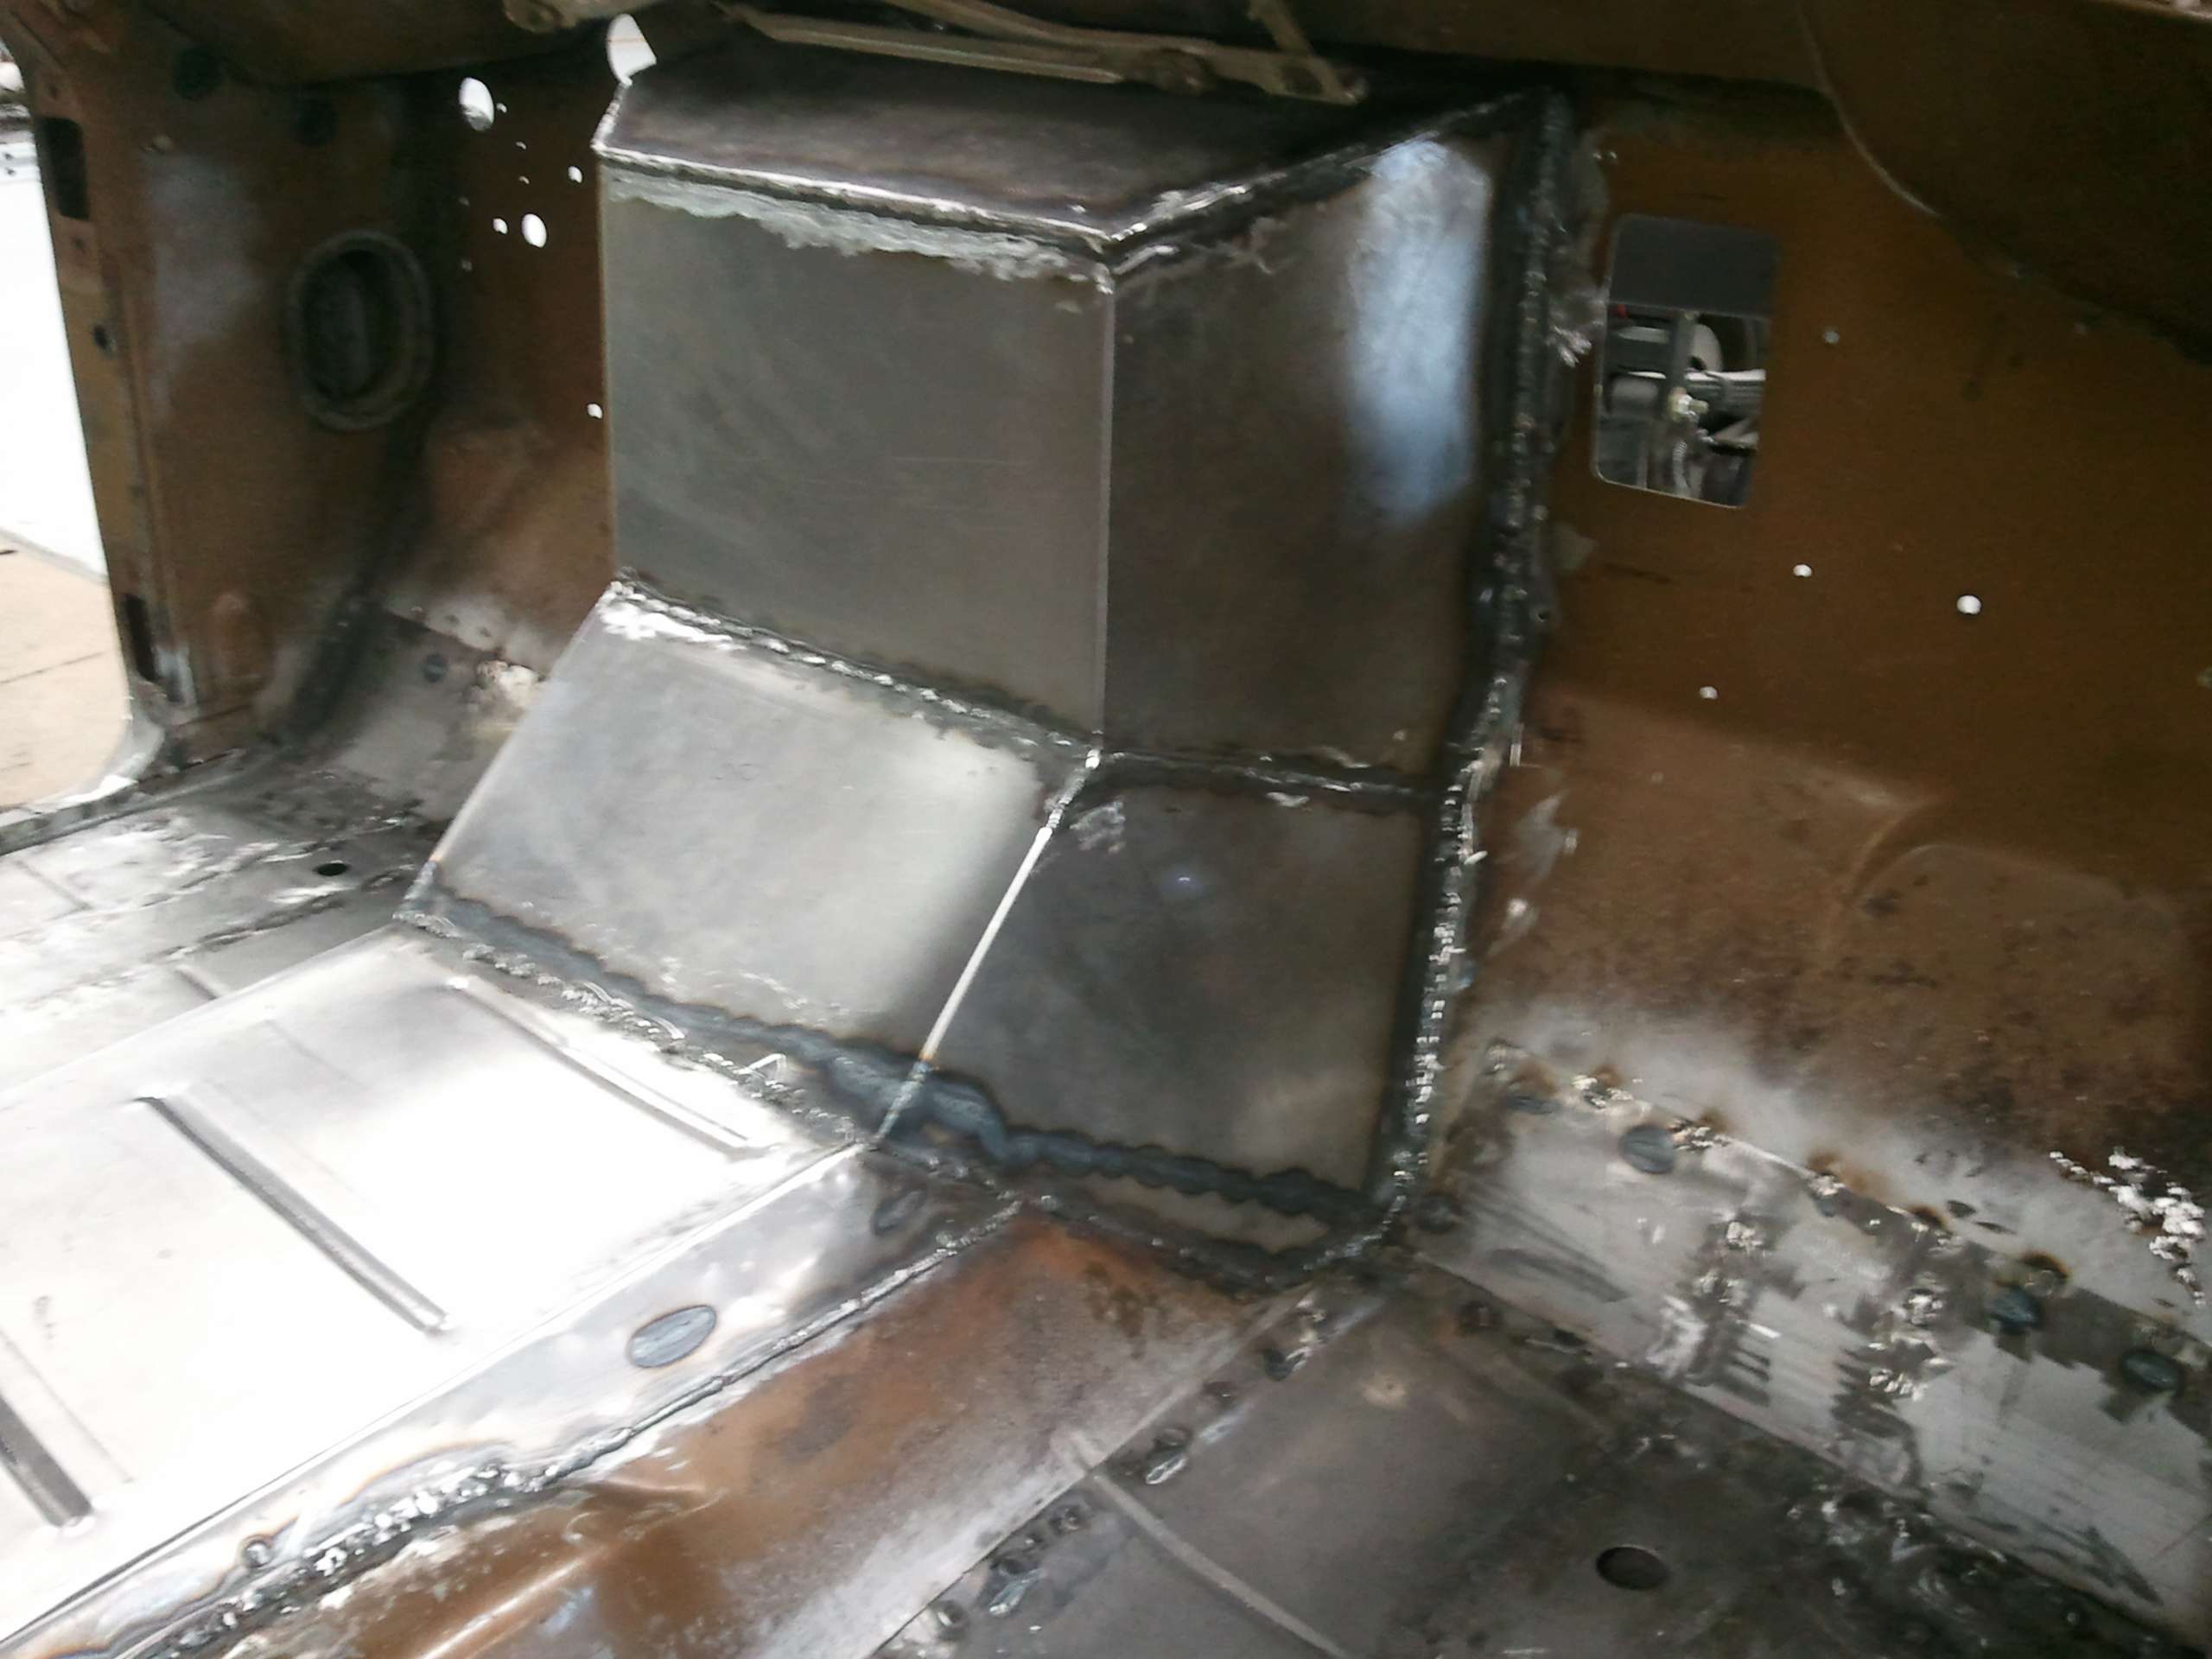
Just some updates. The school got the last of the tunnel welded up and when they come back at the end of next week they’ll be wrapping up their work.


Last edited by Resbum on Sat Apr 06, 2013 7:47 am, edited 3 times in total.
Originally Posted by Resbum
"What year is my truck?... Which part?" Build thread- http://www.fsjnetwork.com/forum/viewtop ... 290#p18290
"What year is my truck?... Which part?" Build thread- http://www.fsjnetwork.com/forum/viewtop ... 290#p18290
-
Resbum
Topic author - Posts: 466
- Joined: Fri Jun 08, 2012 9:45 am
- Location: North East Oregon
Re: 1970 Gladiator 1 Ton 6BT 12V Cummins Build
It looks like the school isn't going to get the cab finished before the end of this quarter. So, they'll probably be keeping it for the next 3+ weeks. I'm going to put that time to use fabricating and plumbing in all the things going into and behind the dashboard.
To do that I'm going to use the old cab floor & firewall and the dashboard out of the new truck to mock it all up. When I picked up the dashboard I took measurements of the notch the school is putting in the cab and I'll make one out of cardboard for the old cab to fabricate around.
To do that I'm going to use the old cab floor & firewall and the dashboard out of the new truck to mock it all up. When I picked up the dashboard I took measurements of the notch the school is putting in the cab and I'll make one out of cardboard for the old cab to fabricate around.

Last edited by Resbum on Sat Apr 06, 2013 7:50 am, edited 1 time in total.
Originally Posted by Resbum
"What year is my truck?... Which part?" Build thread- http://www.fsjnetwork.com/forum/viewtop ... 290#p18290
"What year is my truck?... Which part?" Build thread- http://www.fsjnetwork.com/forum/viewtop ... 290#p18290
-
Resbum
Topic author - Posts: 466
- Joined: Fri Jun 08, 2012 9:45 am
- Location: North East Oregon
Re: 1970 Gladiator 1 Ton 6BT 12V Cummins Build
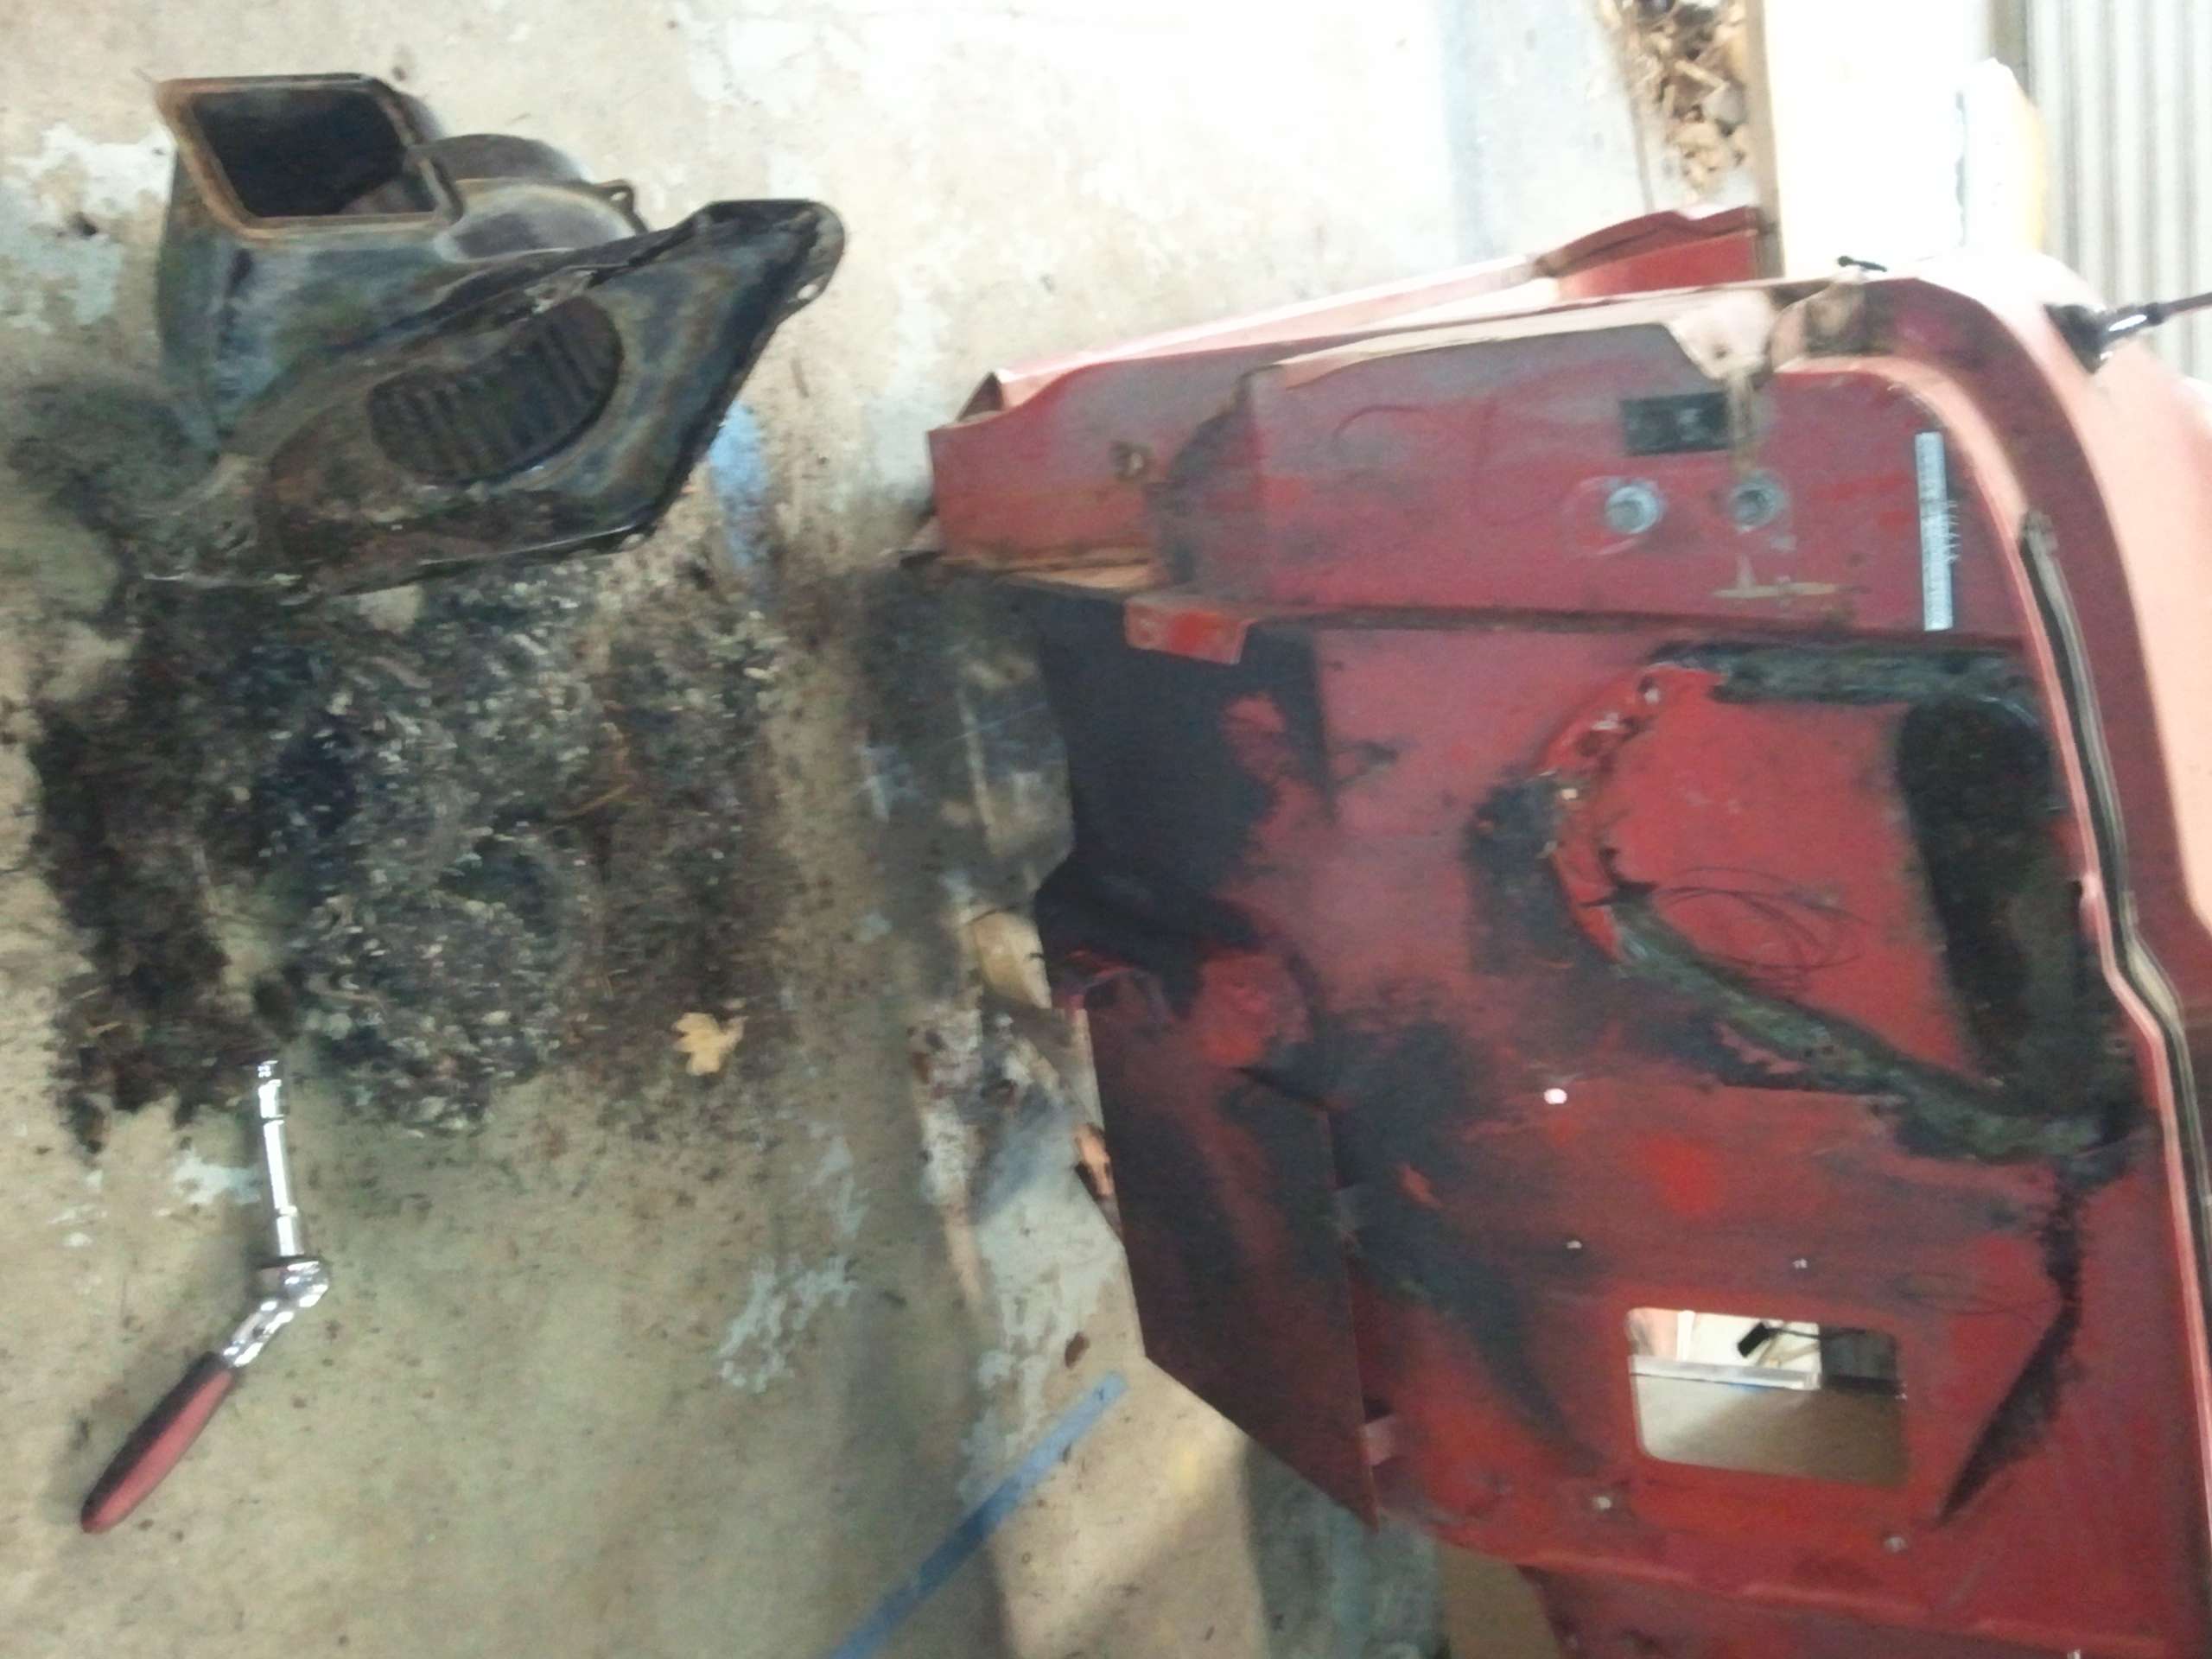
The squirrel cage fan of my old heater was literally a Squirrel cage fan. When I removed it from the firewall the sheetmetal ducting and fan were packed with all the nesting material of some critter that took up residence. The truck had been sitting for 16 years, so it didn’t really surprise me.
Most of the work I’ve gotten done on the dash this last week has been in my head. I wasn’t planning on working on it yet, so hadn’t really thought about placement of everything. Now I'm almost positive I got it figured out and the parts have been ordered.
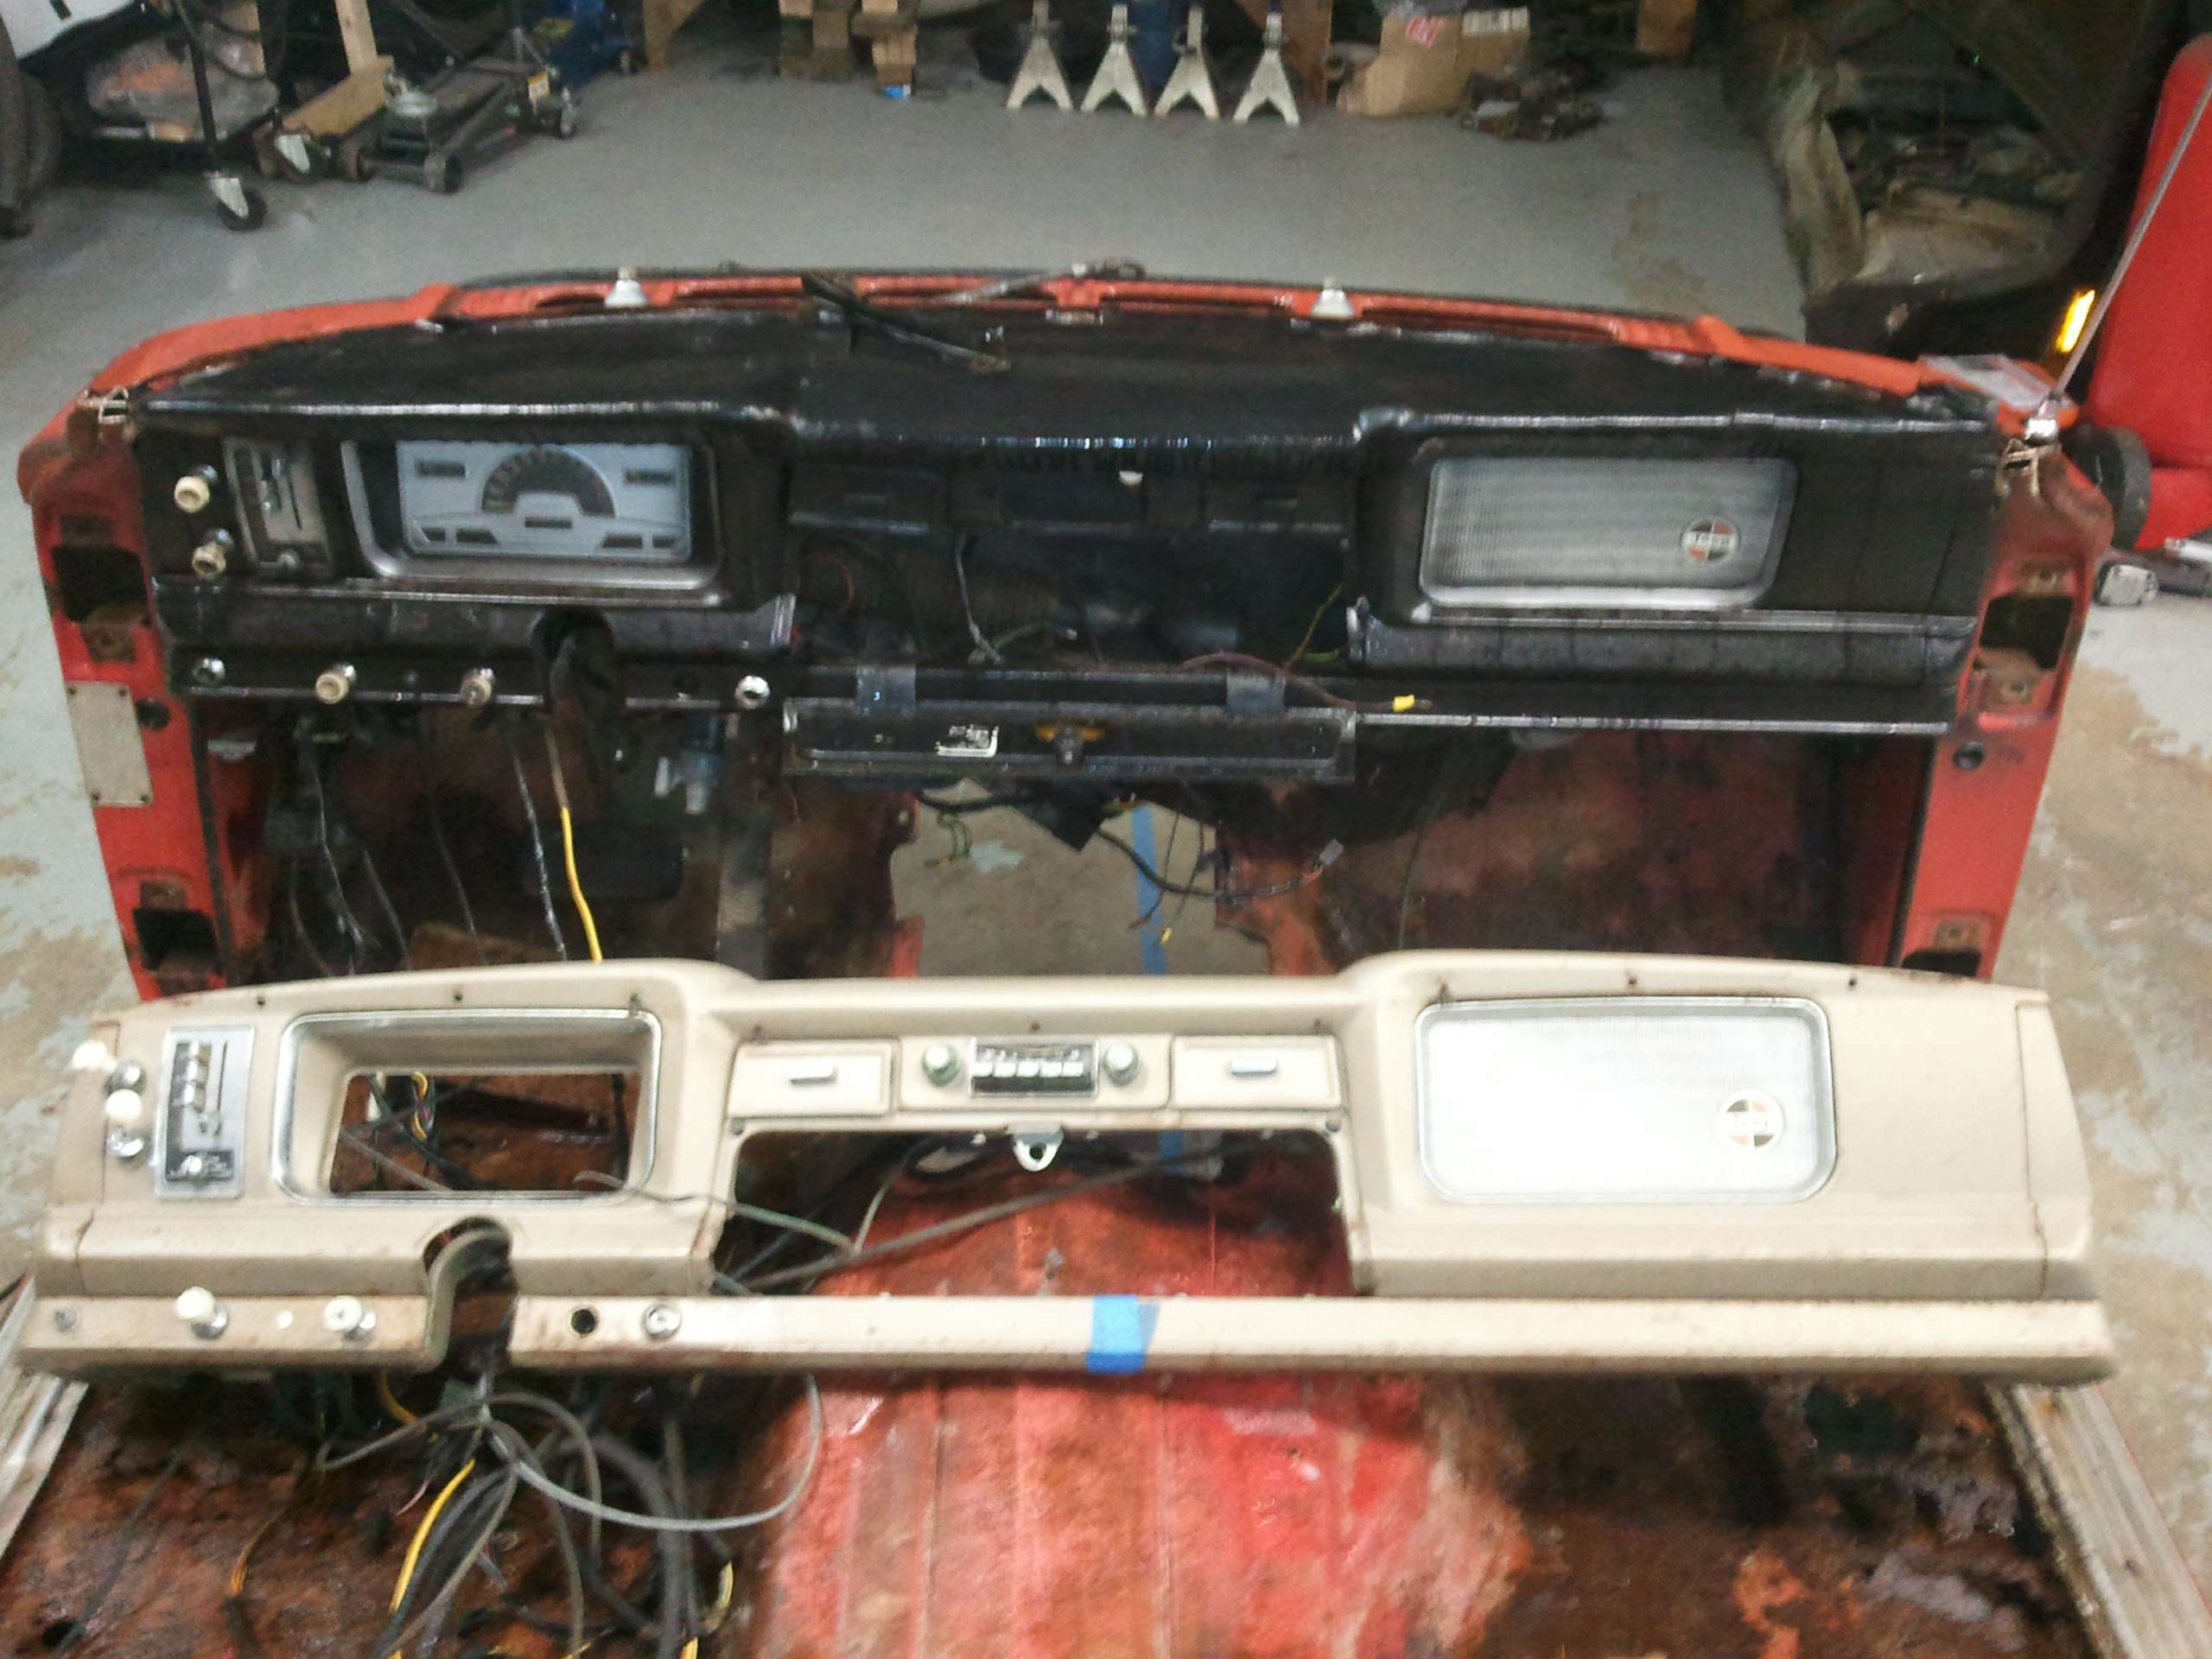
I stripped everything off the old firewall and fabricated the notch mock up. Then put the new dash on and took some measurements. The old cab was definitely not going to be saved. As I've been walking on it this last week working I kept stepping through it.
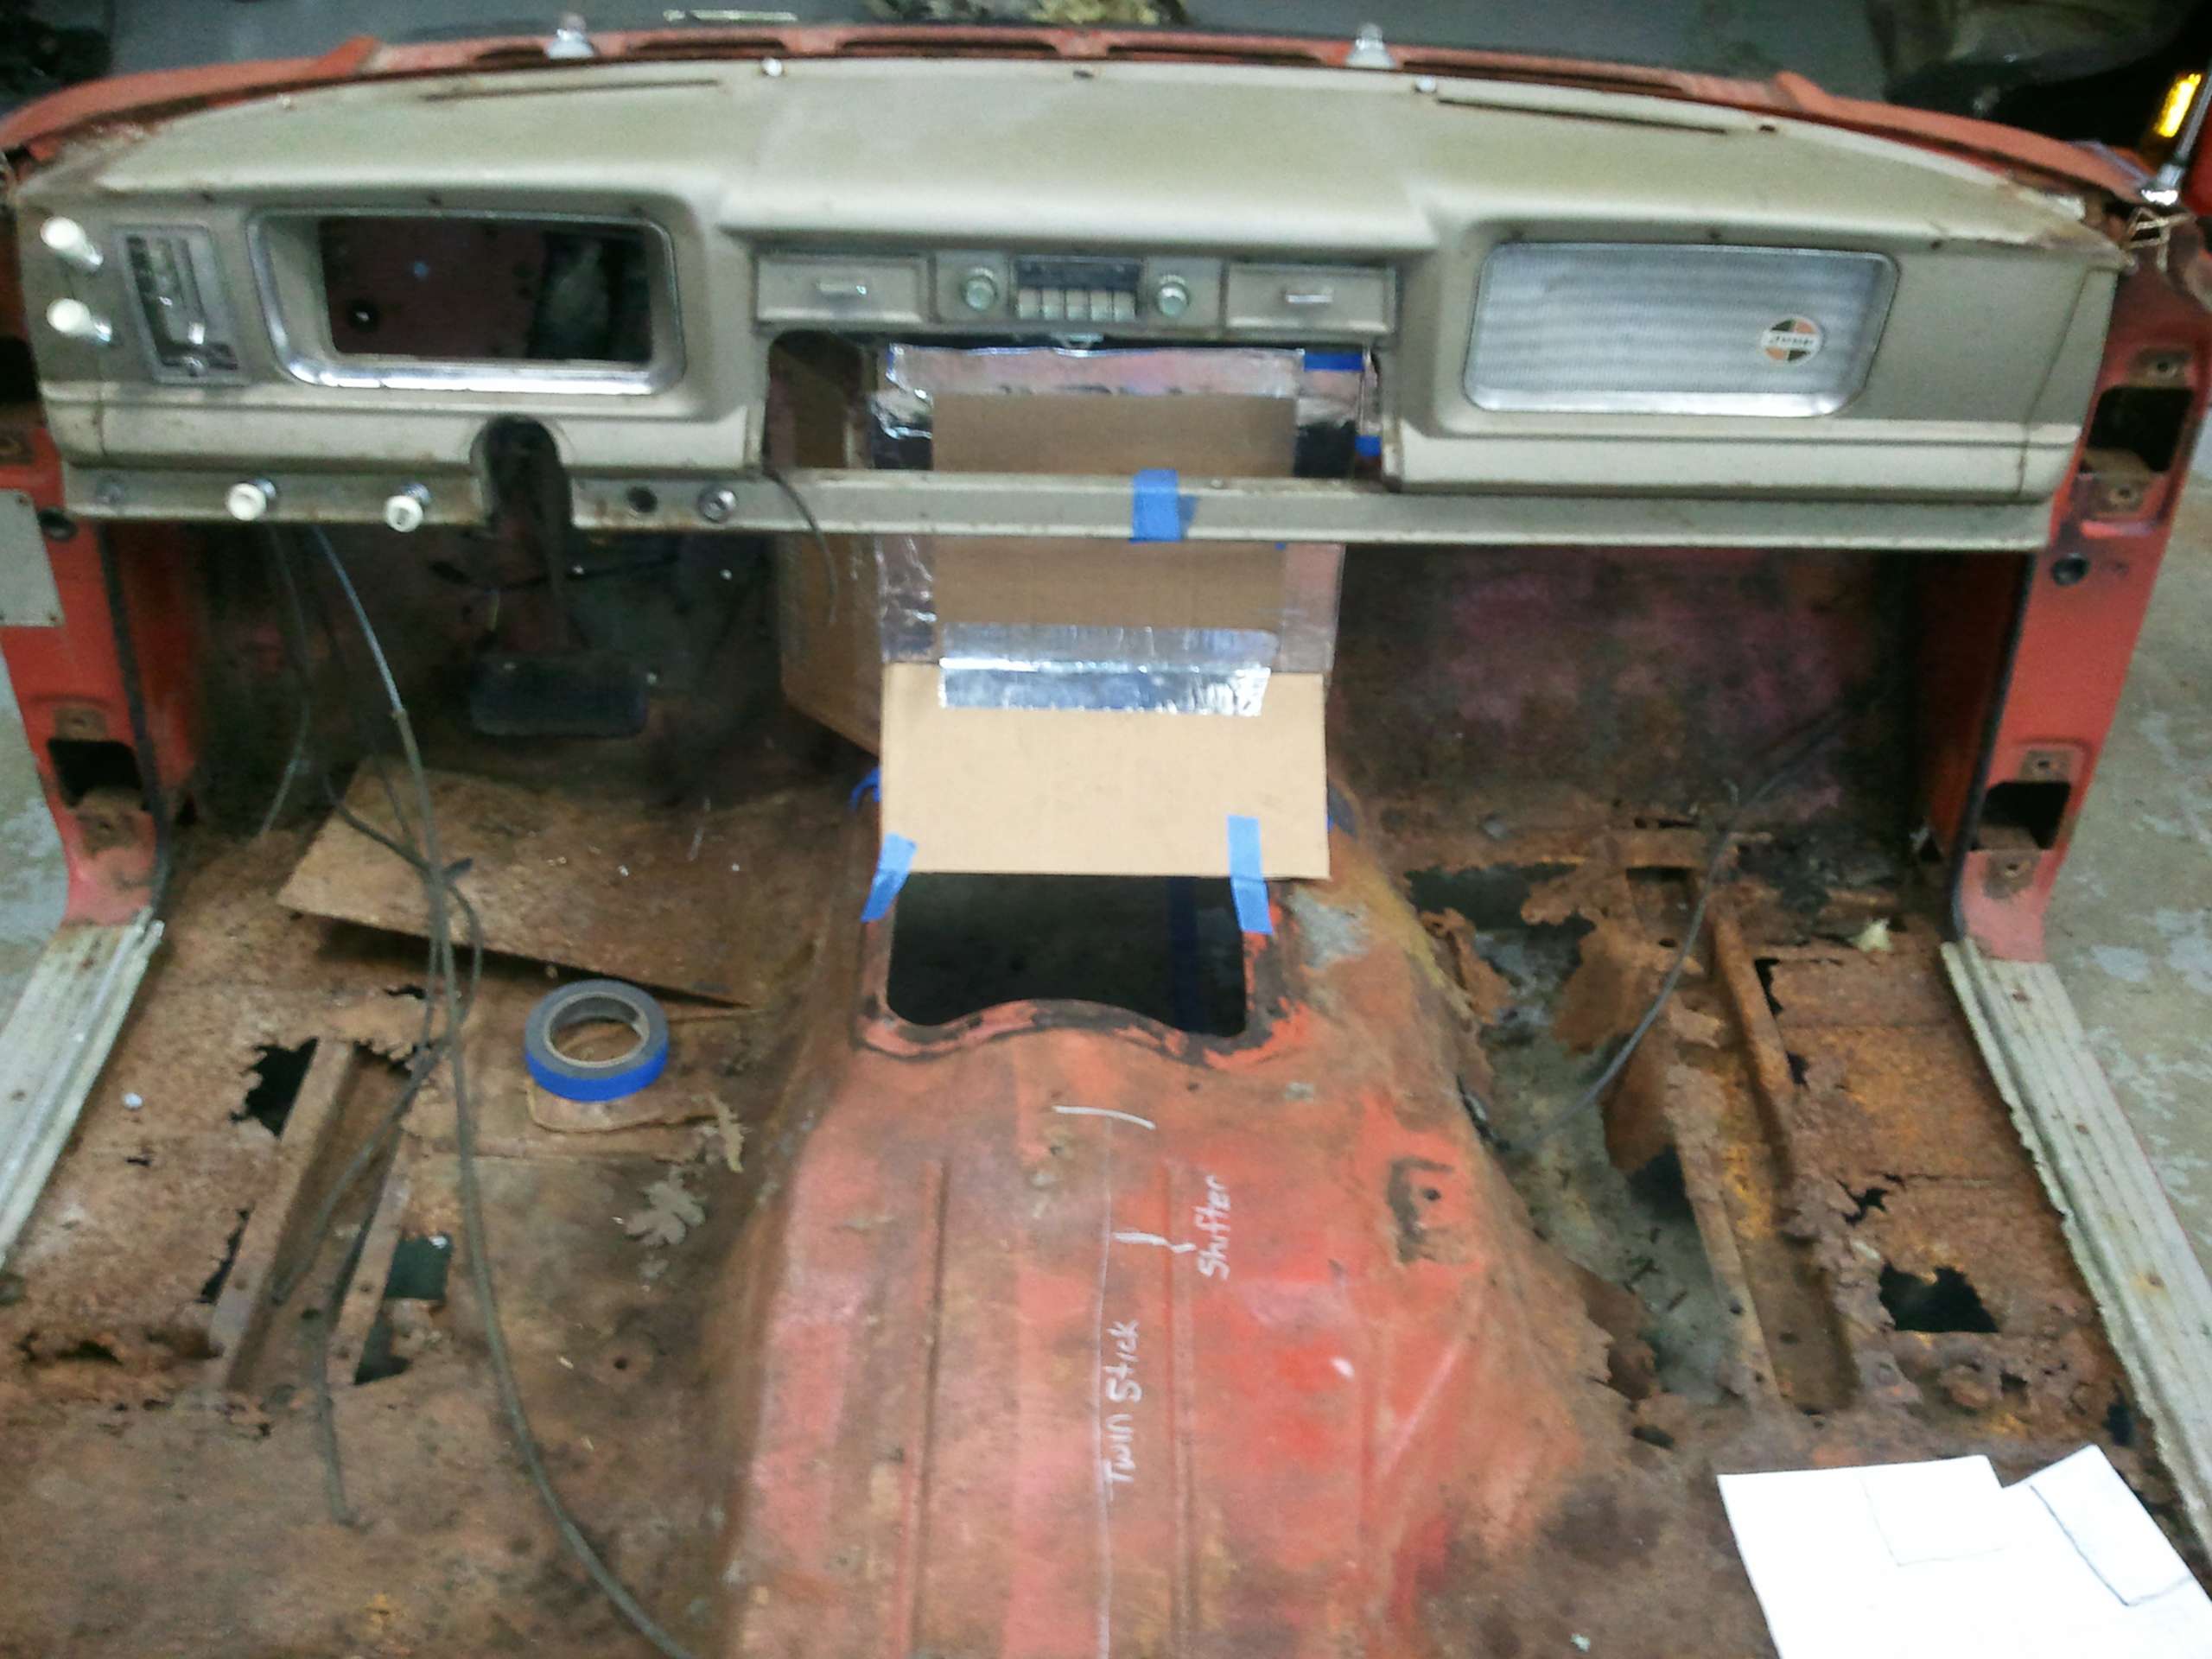
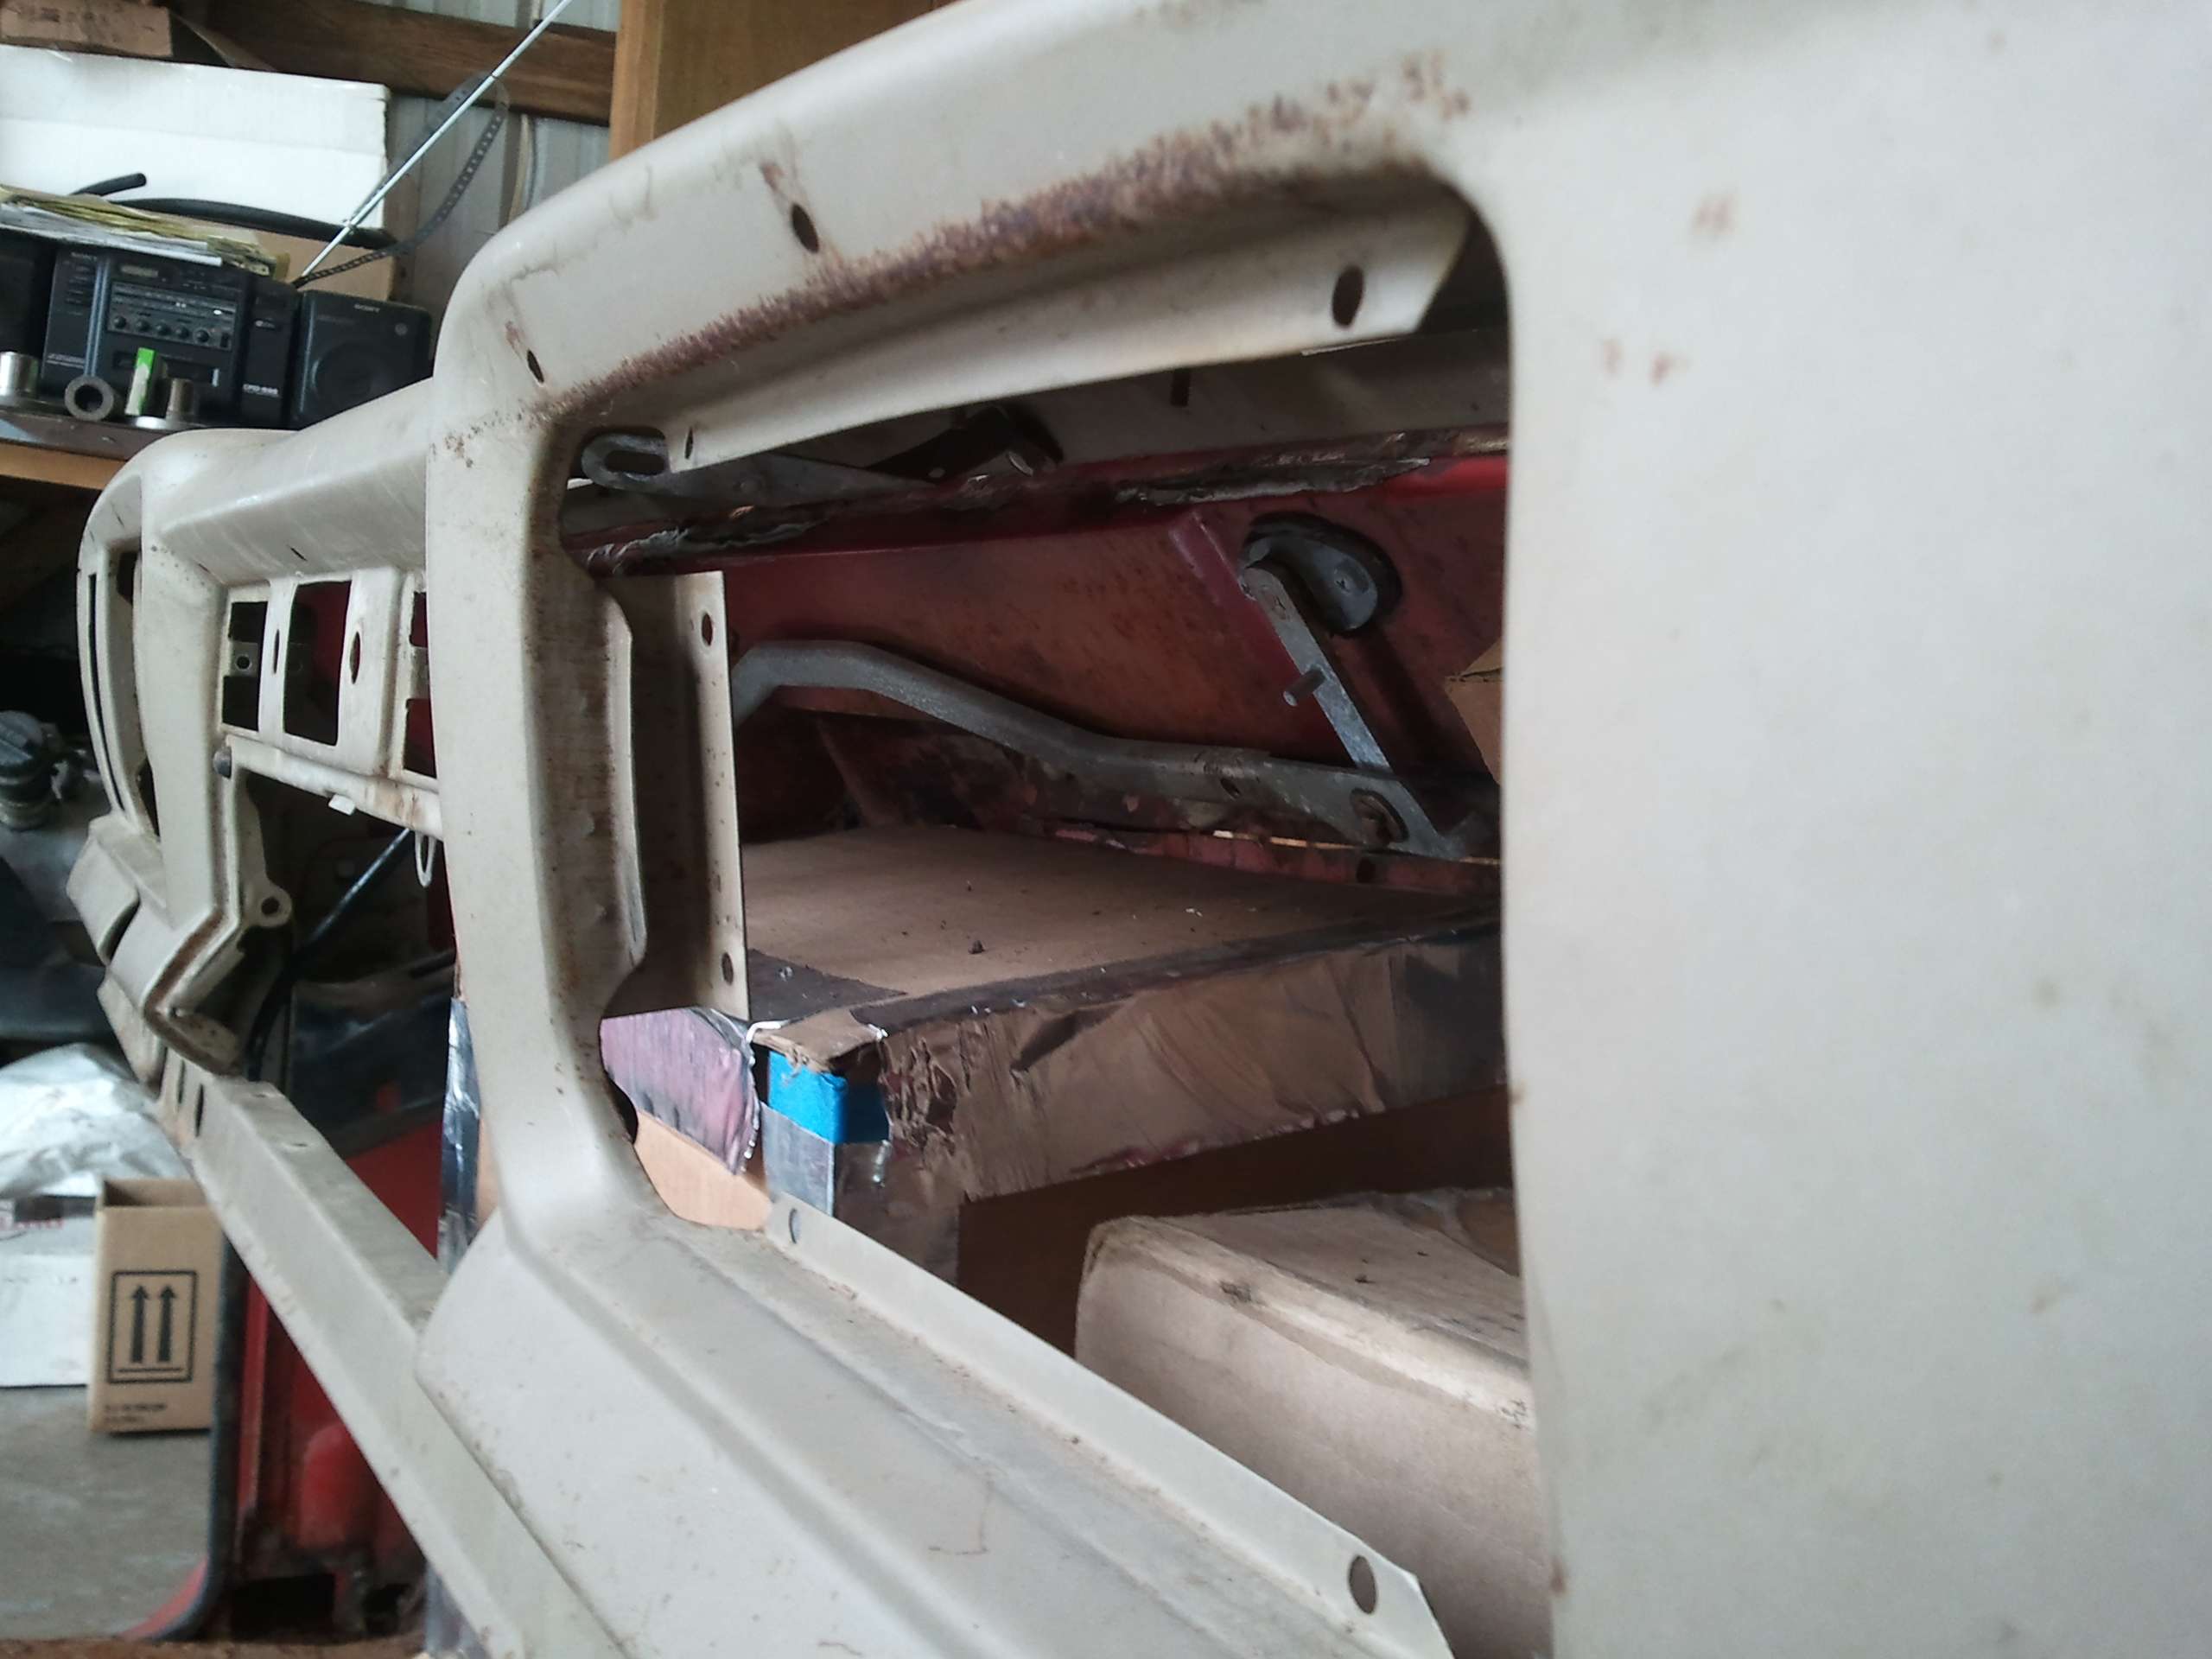
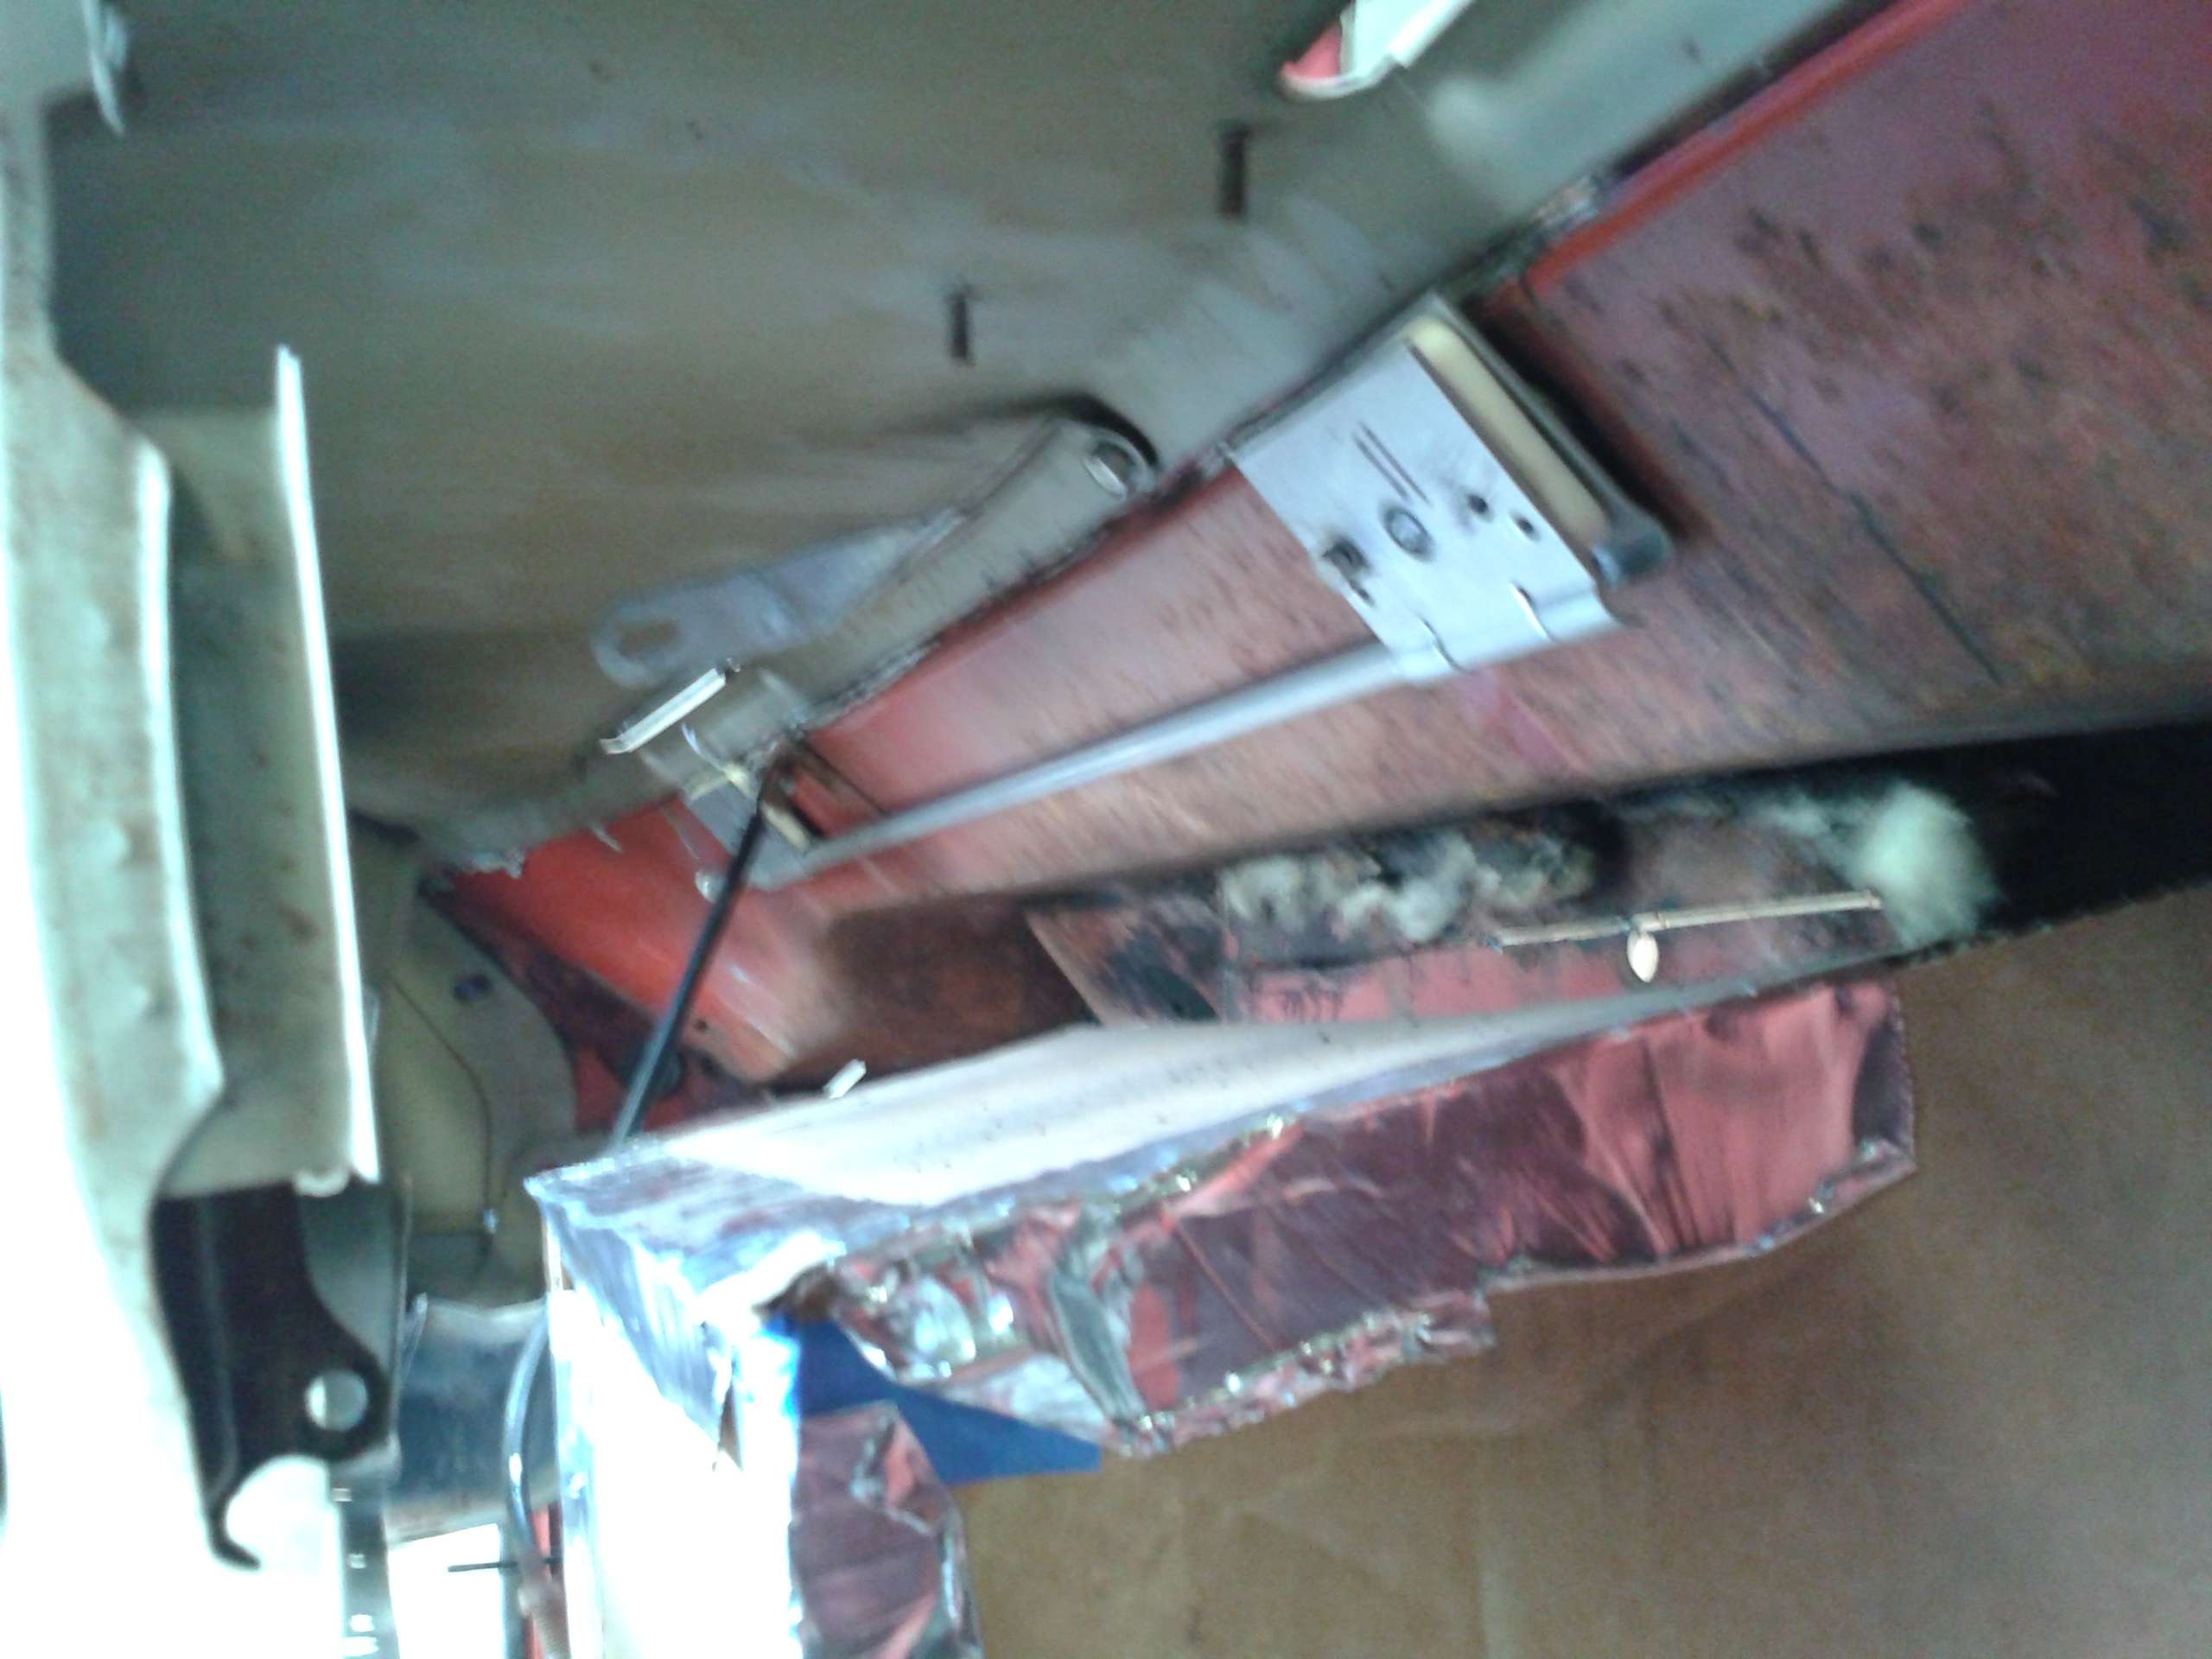
After measuring, stripping the new dash, and some consideration I’ve decided the easiest route to go is to buy an aftermarket heater and wipers. In this picture you can see the mocked up heater box on the passenger side. It stops flush with the bottom of the dash and doesn’t take any room from the passenger’s feet. The new wiper motor will fit perfectly in the space above the heater box, next to the notch. This will also allow me room to have a glove box in the old speaker opening. The door to the old glove box will now become access to the new fuse panel on the left side and switches, misc., etc., in the middle and right side. I have all new switches coming from Ron Francis, the heater coming from Danhard #1412, and the wipers coming Specialty Power Windows.

Another thing I've decided is to leave the top of the dash bare metal. The old covers are absolutely hashed and beyond saving. The metal dash they sat on top of is actually quiet pretty and I think it will look good just being painted. If you look closely above the instrument panel opening you can see where I sprayed on some of the Cummins Beige to see what it would look like.
Resbum

Most of the work I’ve gotten done on the dash this last week has been in my head. I wasn’t planning on working on it yet, so hadn’t really thought about placement of everything. Now I'm almost positive I got it figured out and the parts have been ordered.
I stripped everything off the old firewall and fabricated the notch mock up. Then put the new dash on and took some measurements. The old cab was definitely not going to be saved. As I've been walking on it this last week working I kept stepping through it.

After measuring, stripping the new dash, and some consideration I’ve decided the easiest route to go is to buy an aftermarket heater and wipers. In this picture you can see the mocked up heater box on the passenger side. It stops flush with the bottom of the dash and doesn’t take any room from the passenger’s feet. The new wiper motor will fit perfectly in the space above the heater box, next to the notch. This will also allow me room to have a glove box in the old speaker opening. The door to the old glove box will now become access to the new fuse panel on the left side and switches, misc., etc., in the middle and right side. I have all new switches coming from Ron Francis, the heater coming from Danhard #1412, and the wipers coming Specialty Power Windows.

Another thing I've decided is to leave the top of the dash bare metal. The old covers are absolutely hashed and beyond saving. The metal dash they sat on top of is actually quiet pretty and I think it will look good just being painted. If you look closely above the instrument panel opening you can see where I sprayed on some of the Cummins Beige to see what it would look like.
Resbum
Last edited by Resbum on Sat Apr 06, 2013 7:53 am, edited 1 time in total.
Originally Posted by Resbum
"What year is my truck?... Which part?" Build thread- http://www.fsjnetwork.com/forum/viewtop ... 290#p18290
"What year is my truck?... Which part?" Build thread- http://www.fsjnetwork.com/forum/viewtop ... 290#p18290
-
Resbum
Topic author - Posts: 466
- Joined: Fri Jun 08, 2012 9:45 am
- Location: North East Oregon
Re: 1970 Gladiator 1 Ton 6BT 12V Cummins Build
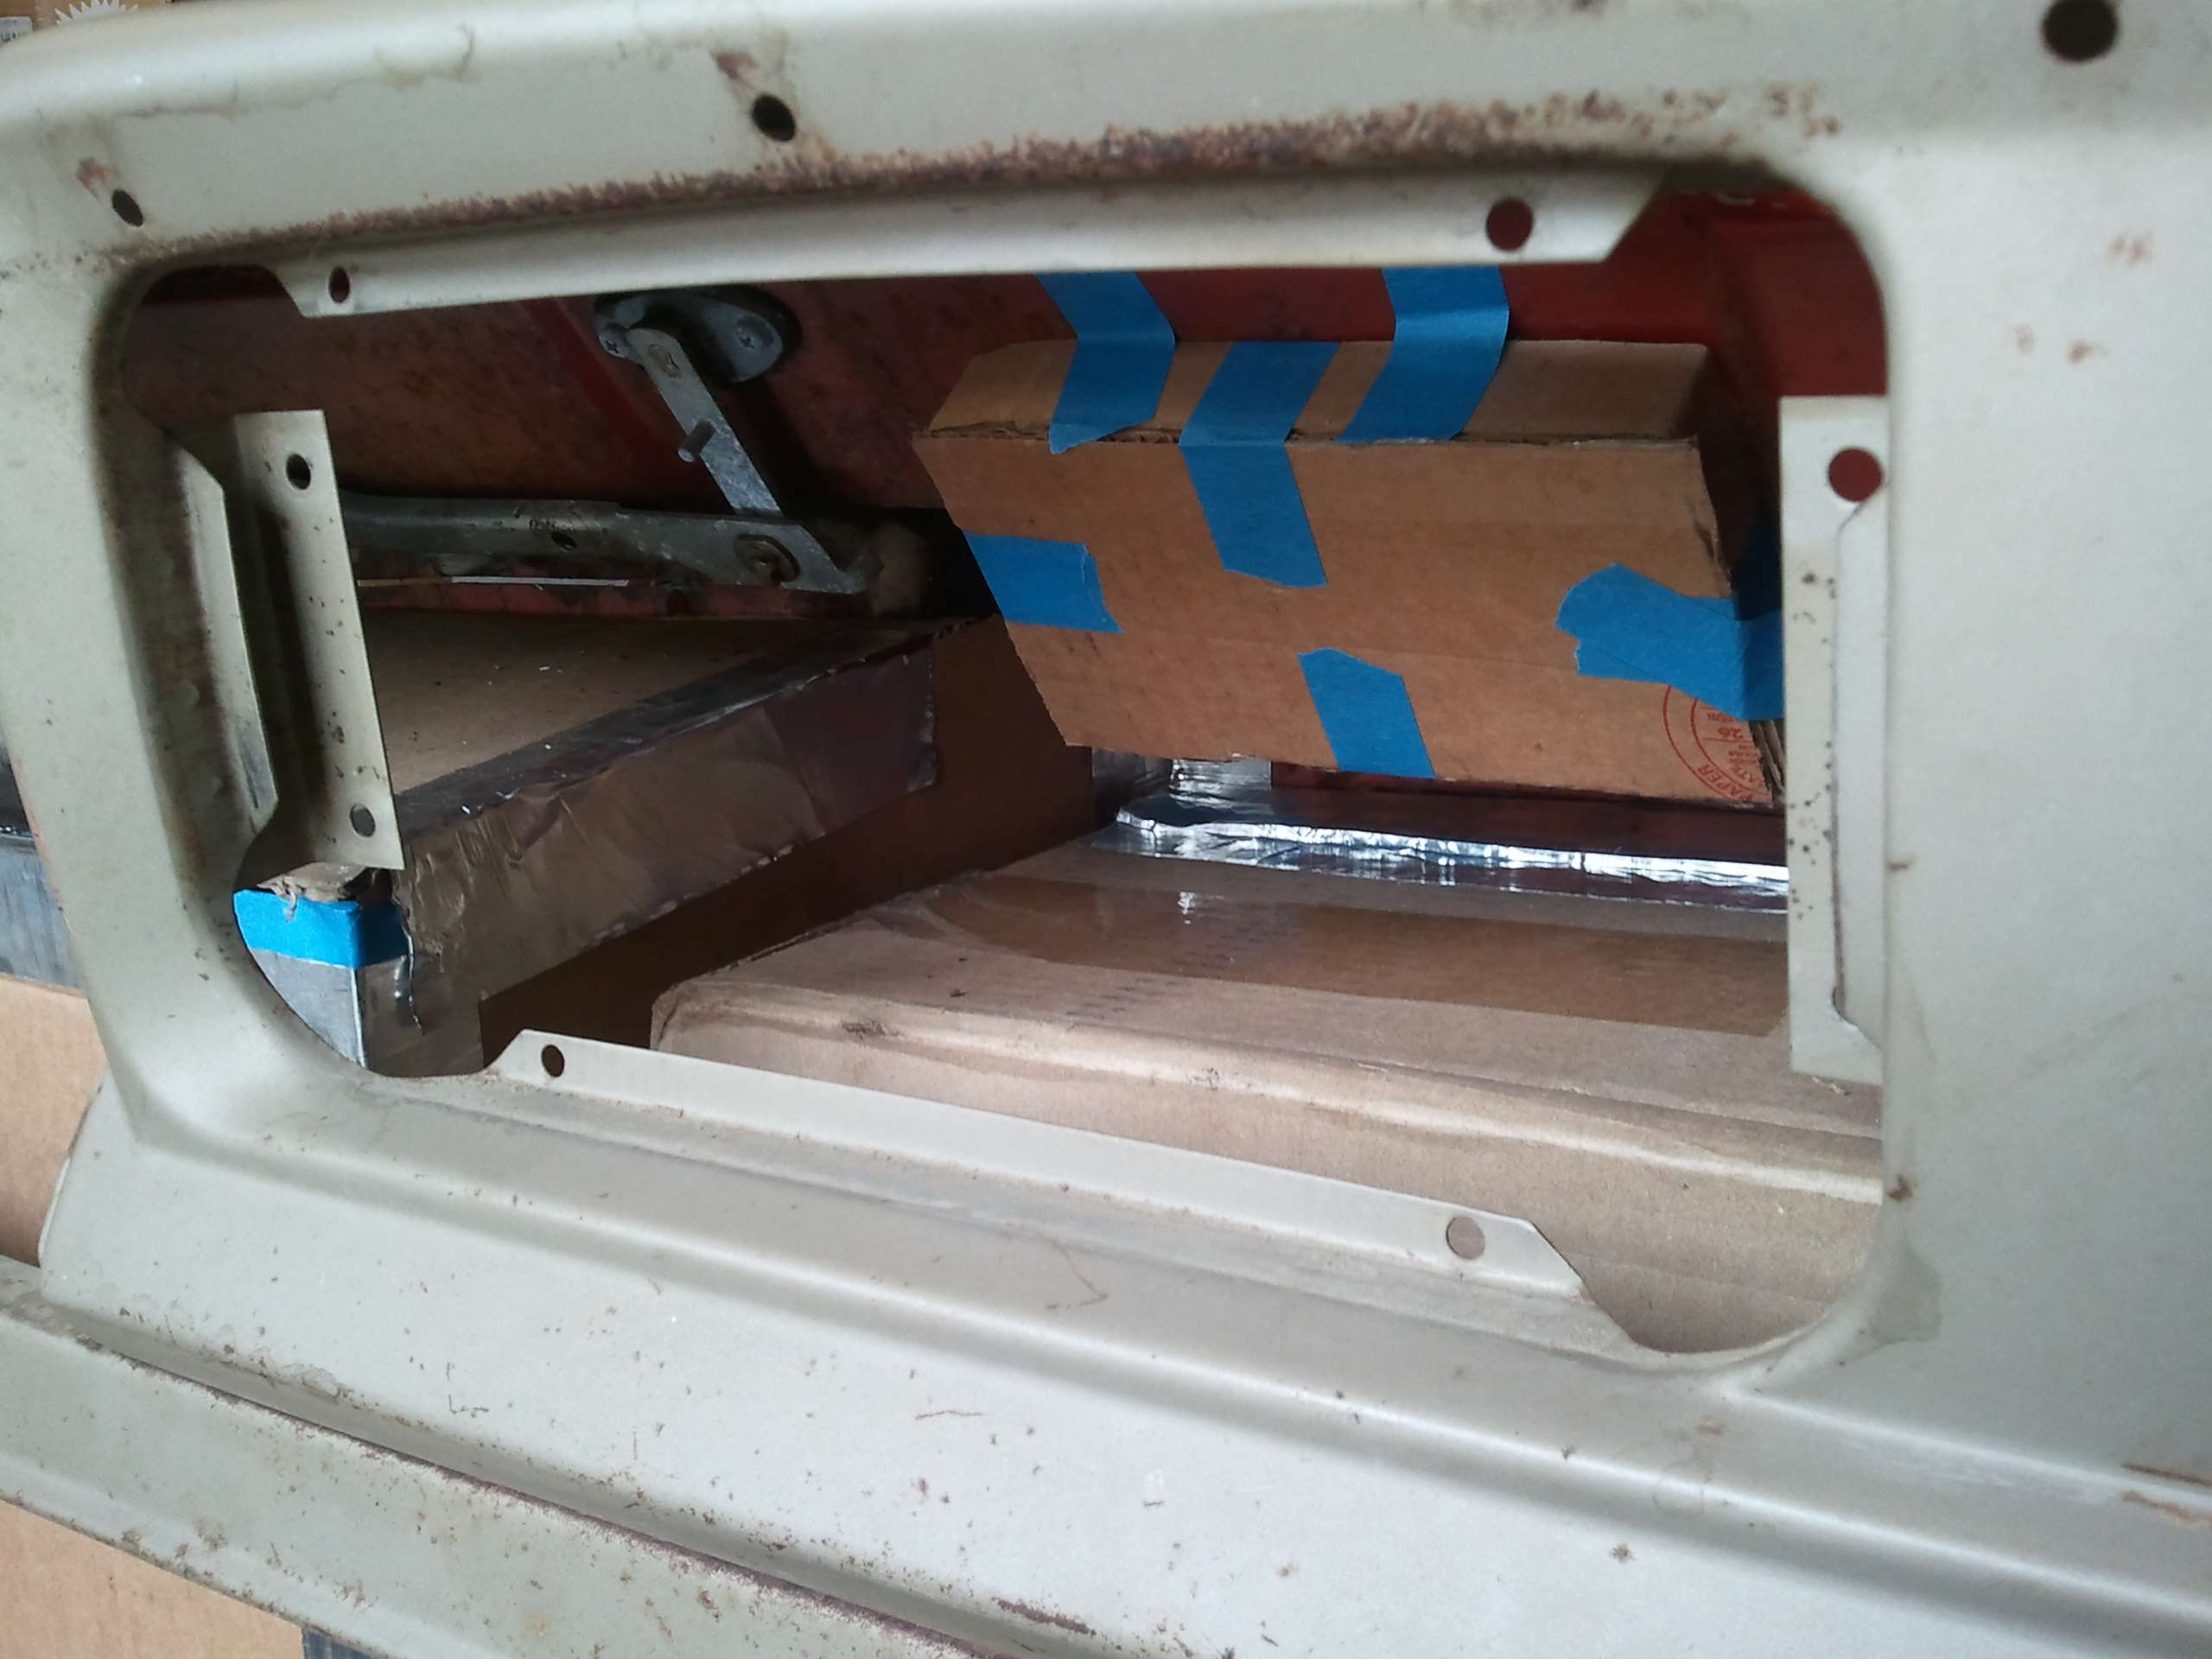
Today I mocked up the space I need for the wiper motor. I'll still need some room to run the air ducting, but here are some pics of how much room is under the dash to work with everything. The logical order is to plumb in the heater and ducts, then the wipers, and then run the wiring in the space that's left. So, I'm now on hold for that until the heater and wipers come in.


Last edited by Resbum on Sat Apr 06, 2013 7:55 am, edited 1 time in total.
Originally Posted by Resbum
"What year is my truck?... Which part?" Build thread- http://www.fsjnetwork.com/forum/viewtop ... 290#p18290
"What year is my truck?... Which part?" Build thread- http://www.fsjnetwork.com/forum/viewtop ... 290#p18290
-
Resbum
Topic author - Posts: 466
- Joined: Fri Jun 08, 2012 9:45 am
- Location: North East Oregon
Re: 1970 Gladiator 1 Ton 6BT 12V Cummins Build
.
Windshield Wiper Mods
Well, I finally have something to update. It's been a long two weeks of planning, waiting on parts to arrive, and doing odds and ends. Wednesday I got 5 UPS packages and 1 FedEx package.
I got started with the new windshield wipers. I really, really like this setup from Specialty Power Windows. Apparently, this is the type of system a lot of the European cars use.
The switch that came with it has washer, intermittent/delay, slow and fast settings in it. The Ol' Jeep got a touch of modernization!
Robbie and Keith, at SPW, are also really into customers (me) doing mod’s to suit their needs. After looking at everything, taking some measurements, and a couple phone calls, I decided to use the OEM Jeep wiper transmissions with the SPW gears mounted to them.
The Jeep parts have thicker shafts, Bronz bushings, and the knurled ends were different sizes and I wanted to use the original Jeep wiper arms.

The Jeep shafts are swedged at the end to hold the knurl on, but the knurls are splined to the shaft. The first thing I did was tap a set screw into the knurl and shaft. Then I ground the swedge off. After that I cutoff off the base of the housing and trued it.

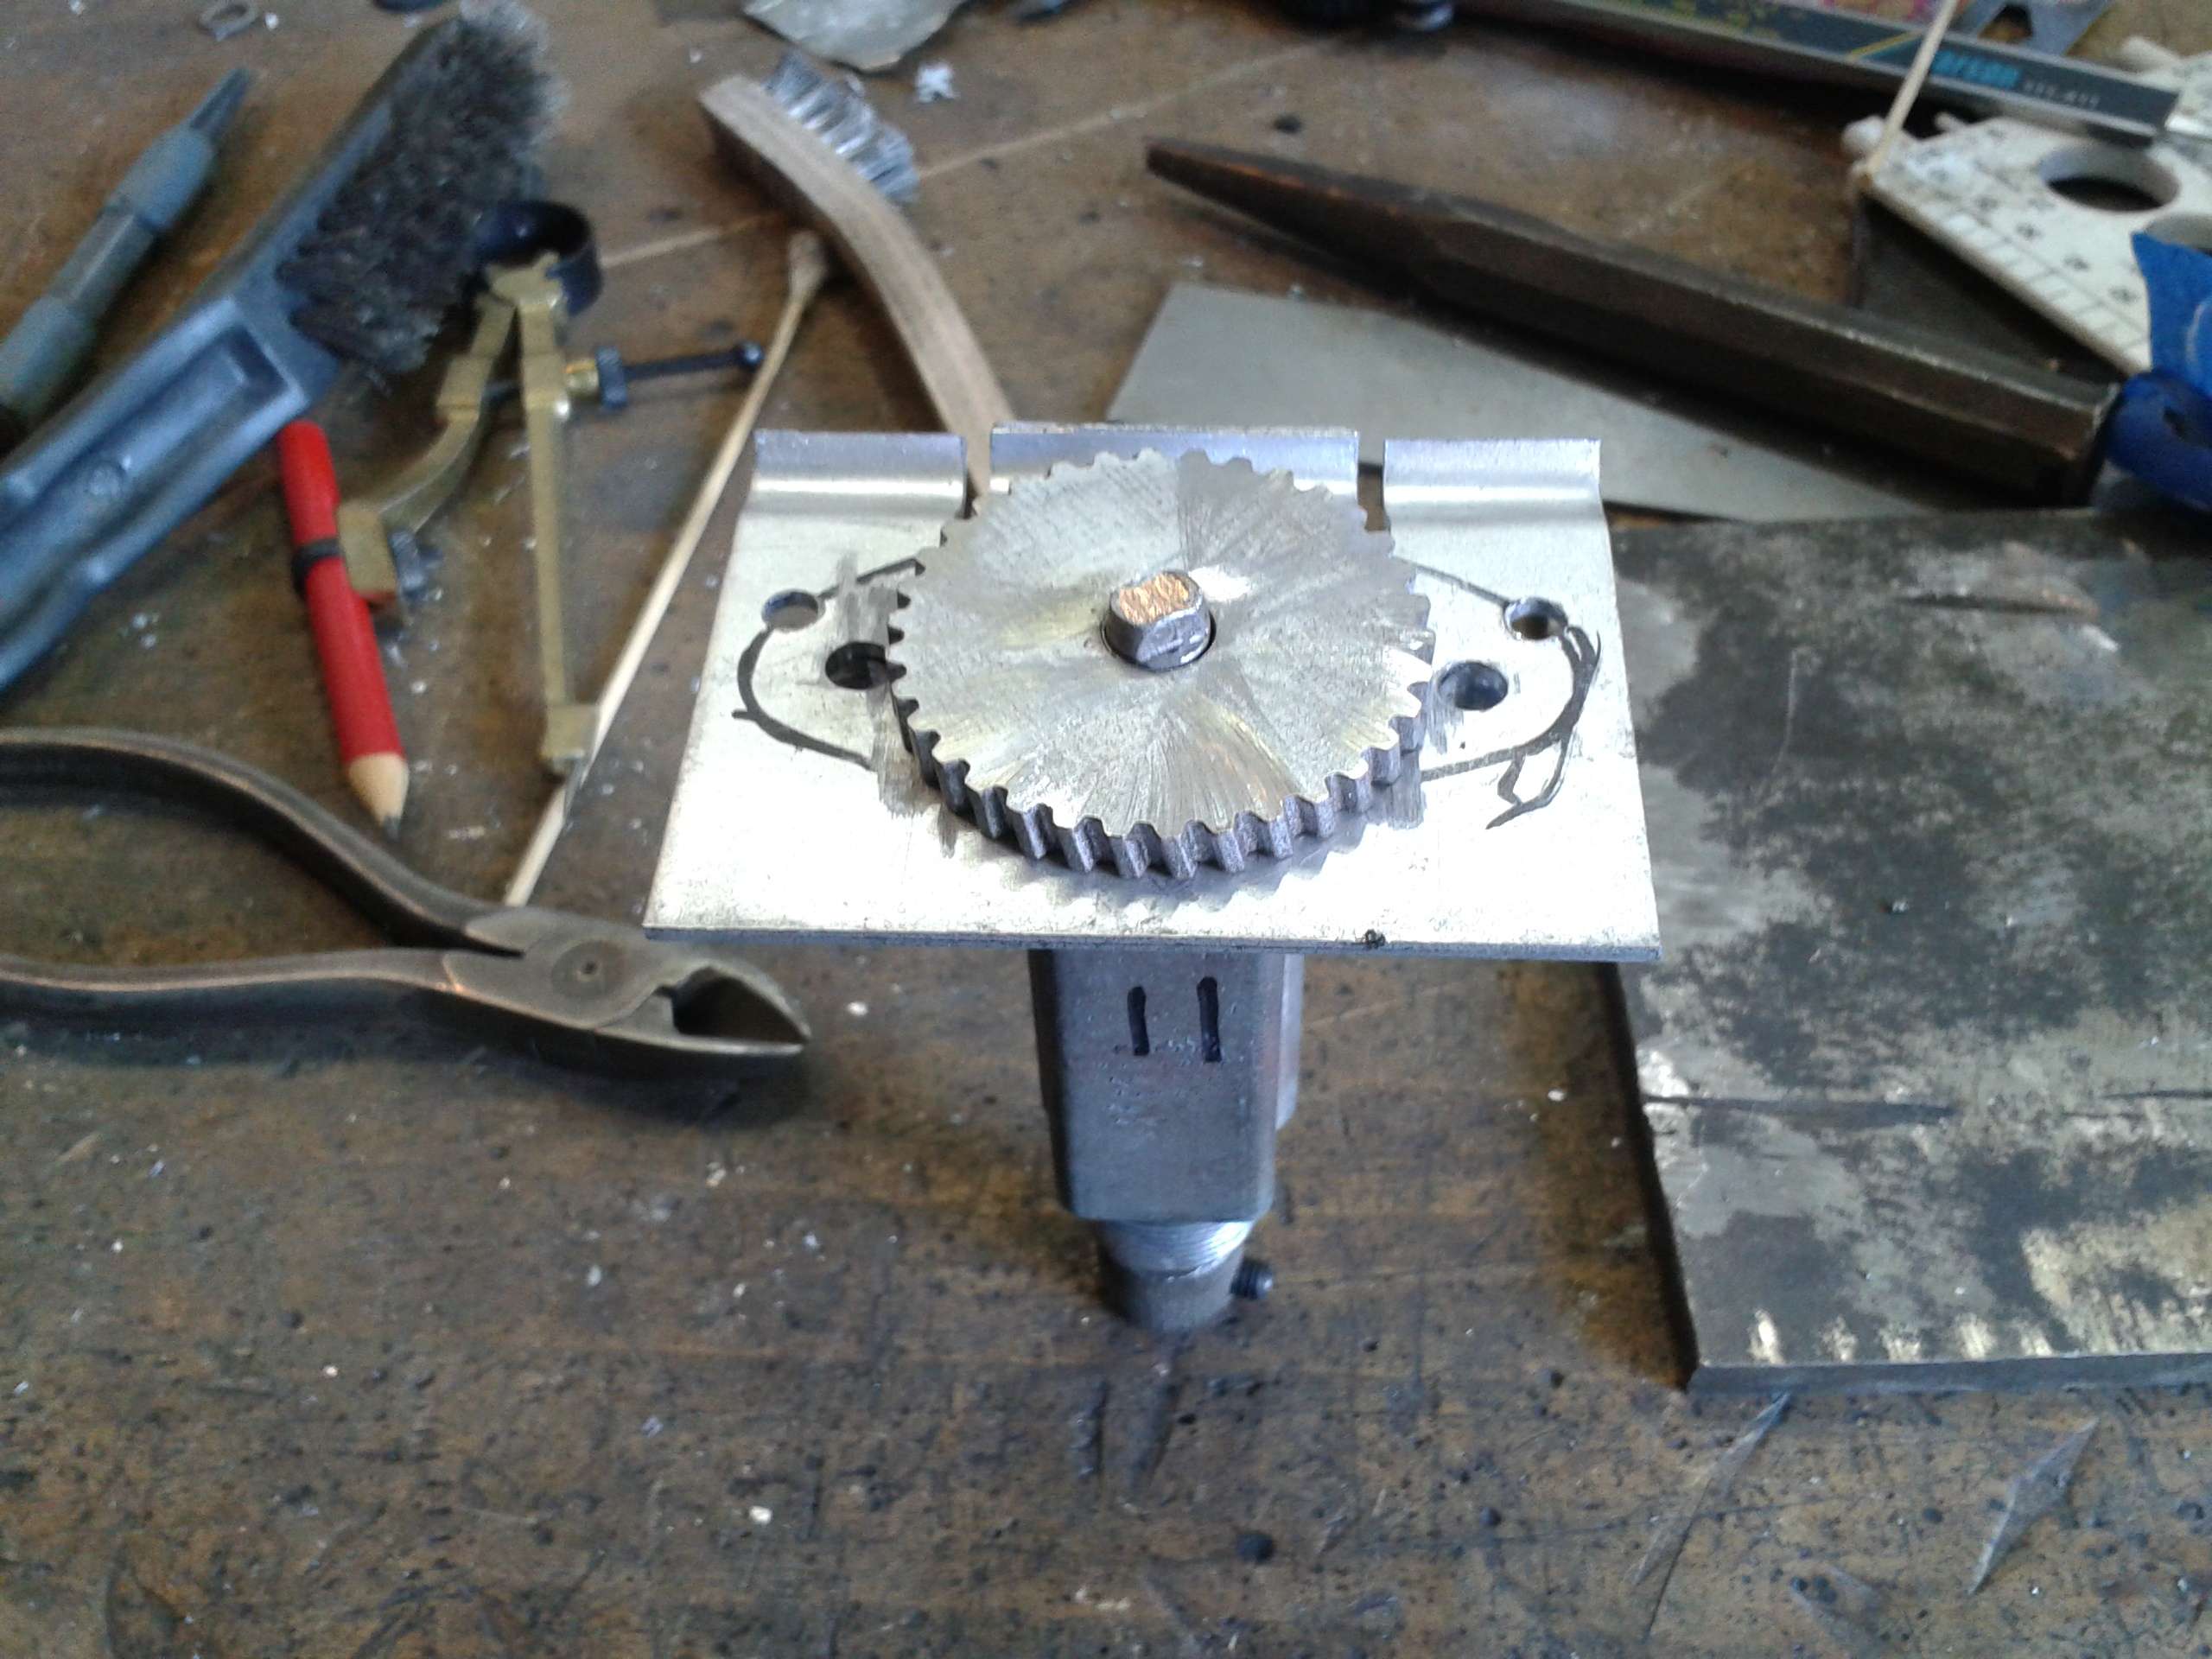
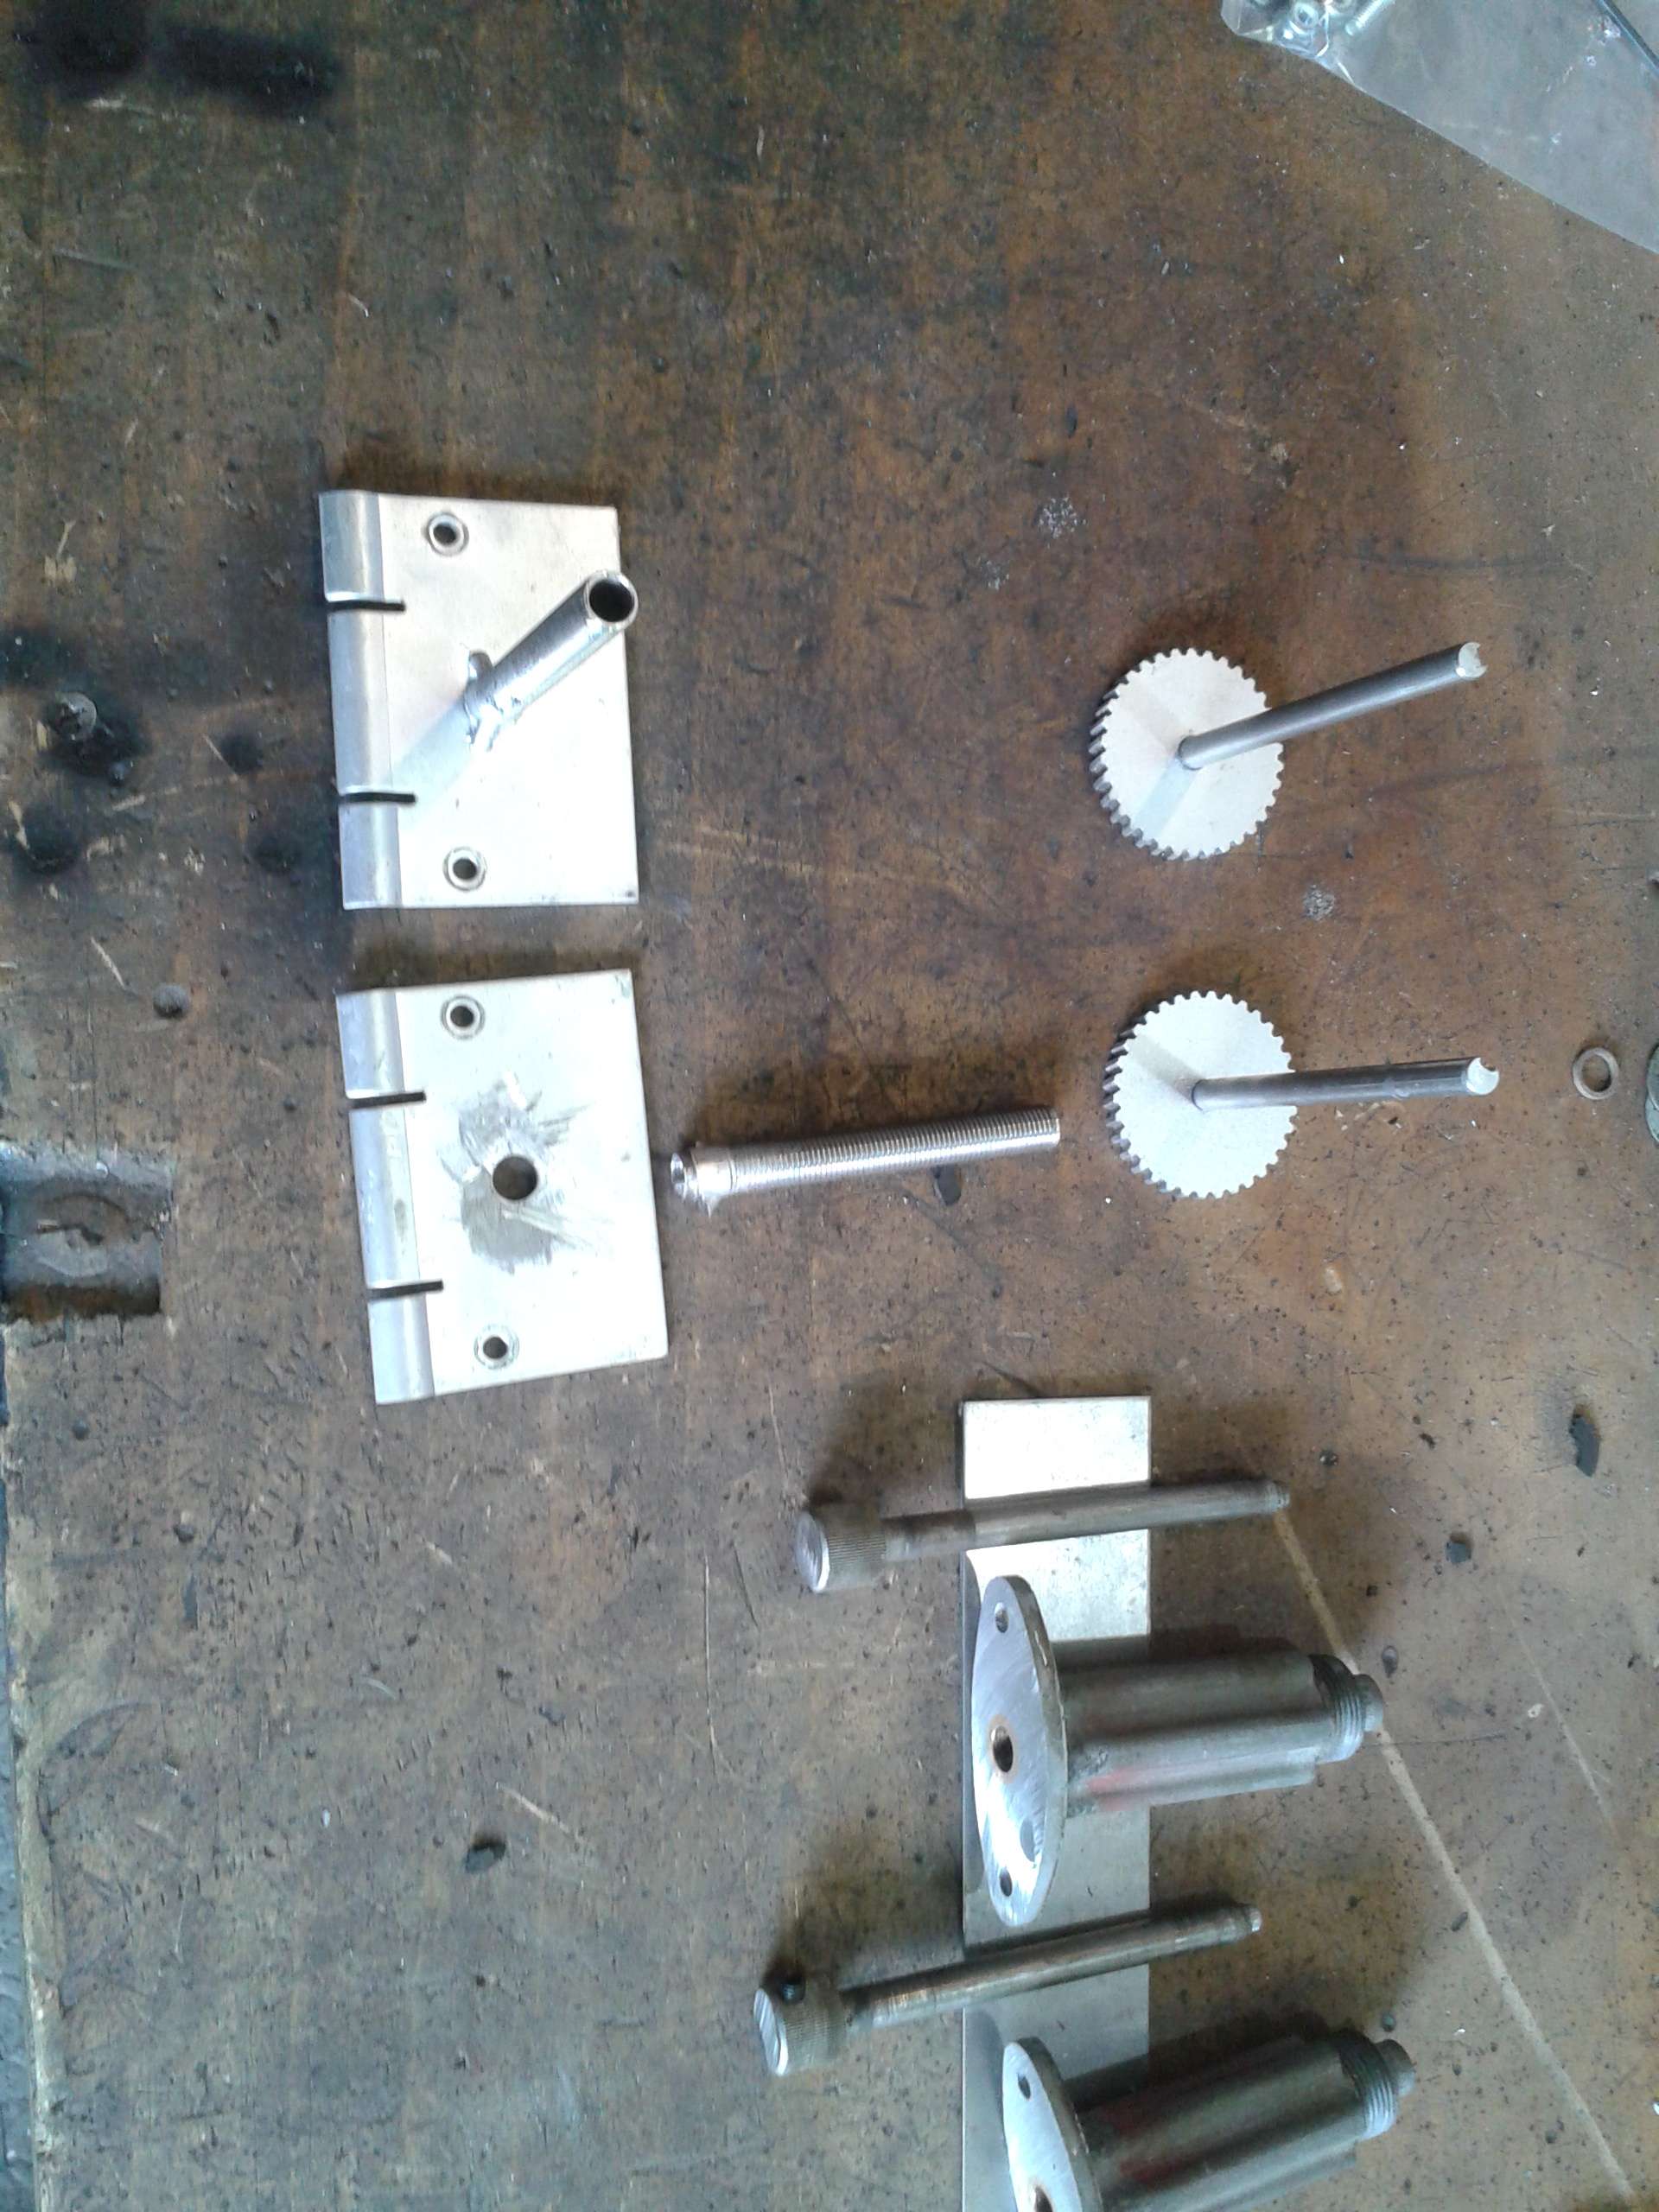
I then cut the new shaft housing off of the gear housing and made the hole the same diameter of the Jeep shaft. After that I mounted the Jeep housing to the new gear housing with counter-sunk flathead machine screws. It's important to keep the two orientated properly making sure the flat part of the Jeep housing is parrallel with the long end of the gear housing. I did that with the metal plates they're sitting on in this picture.
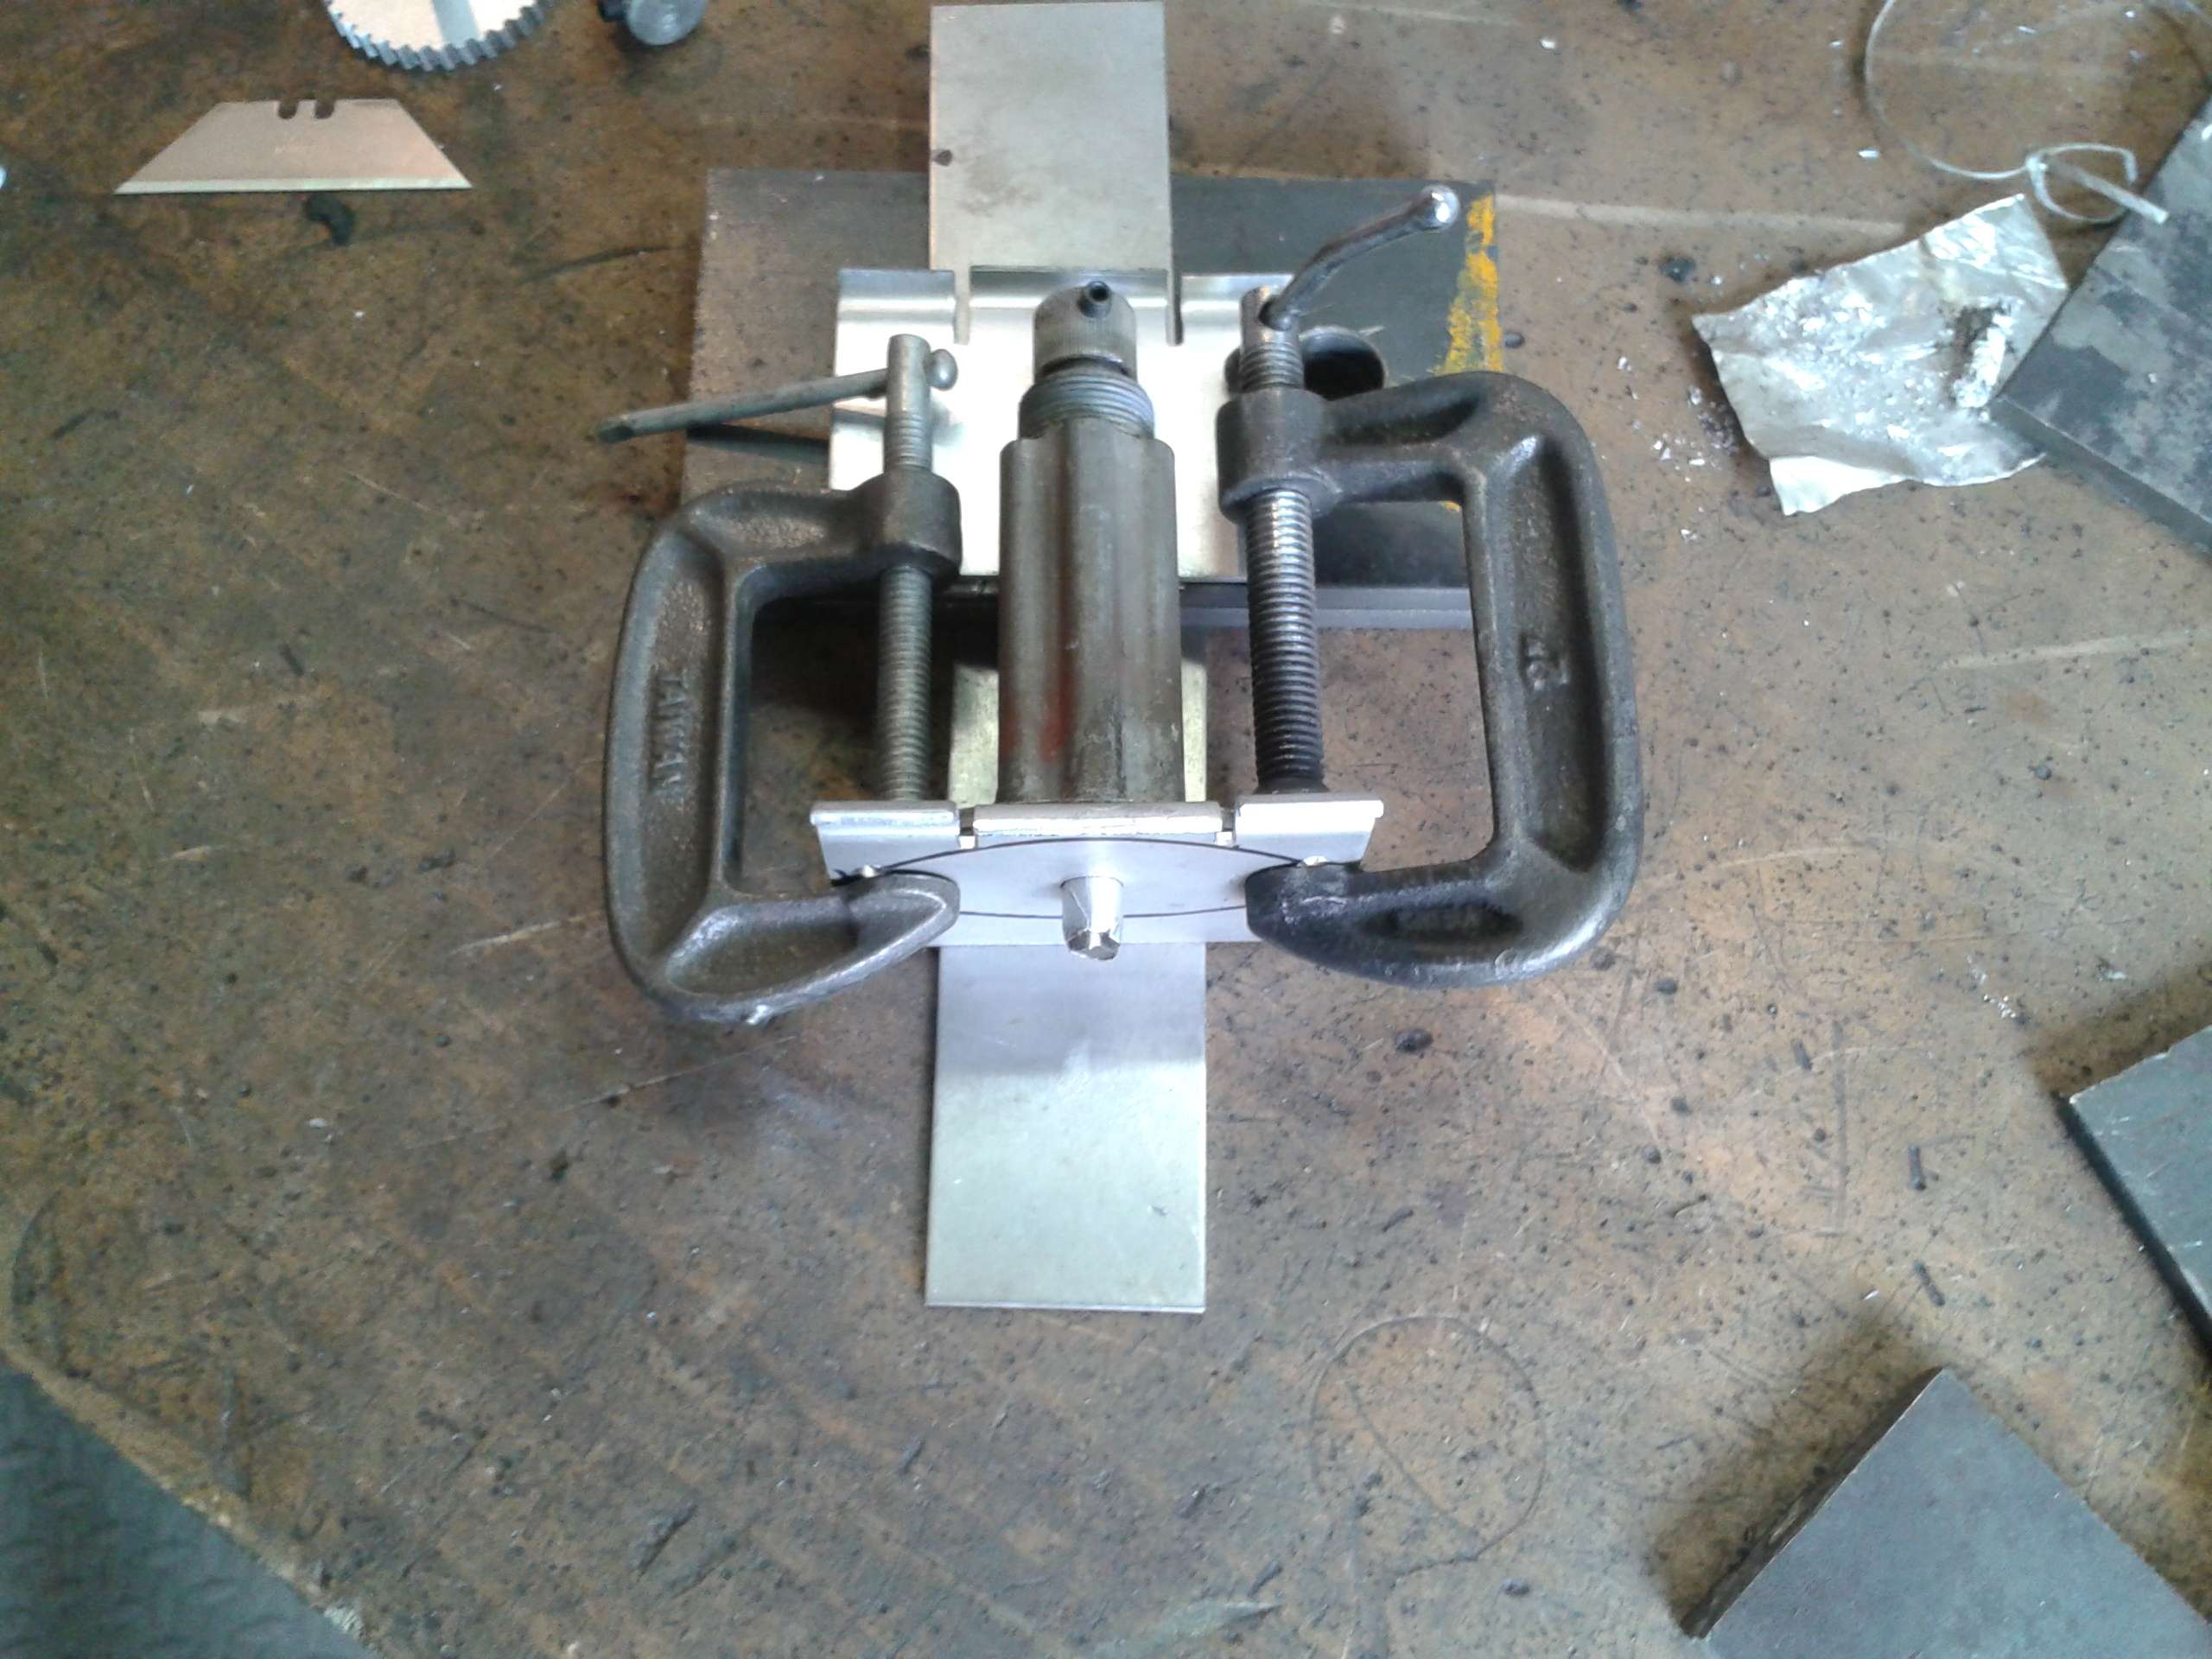
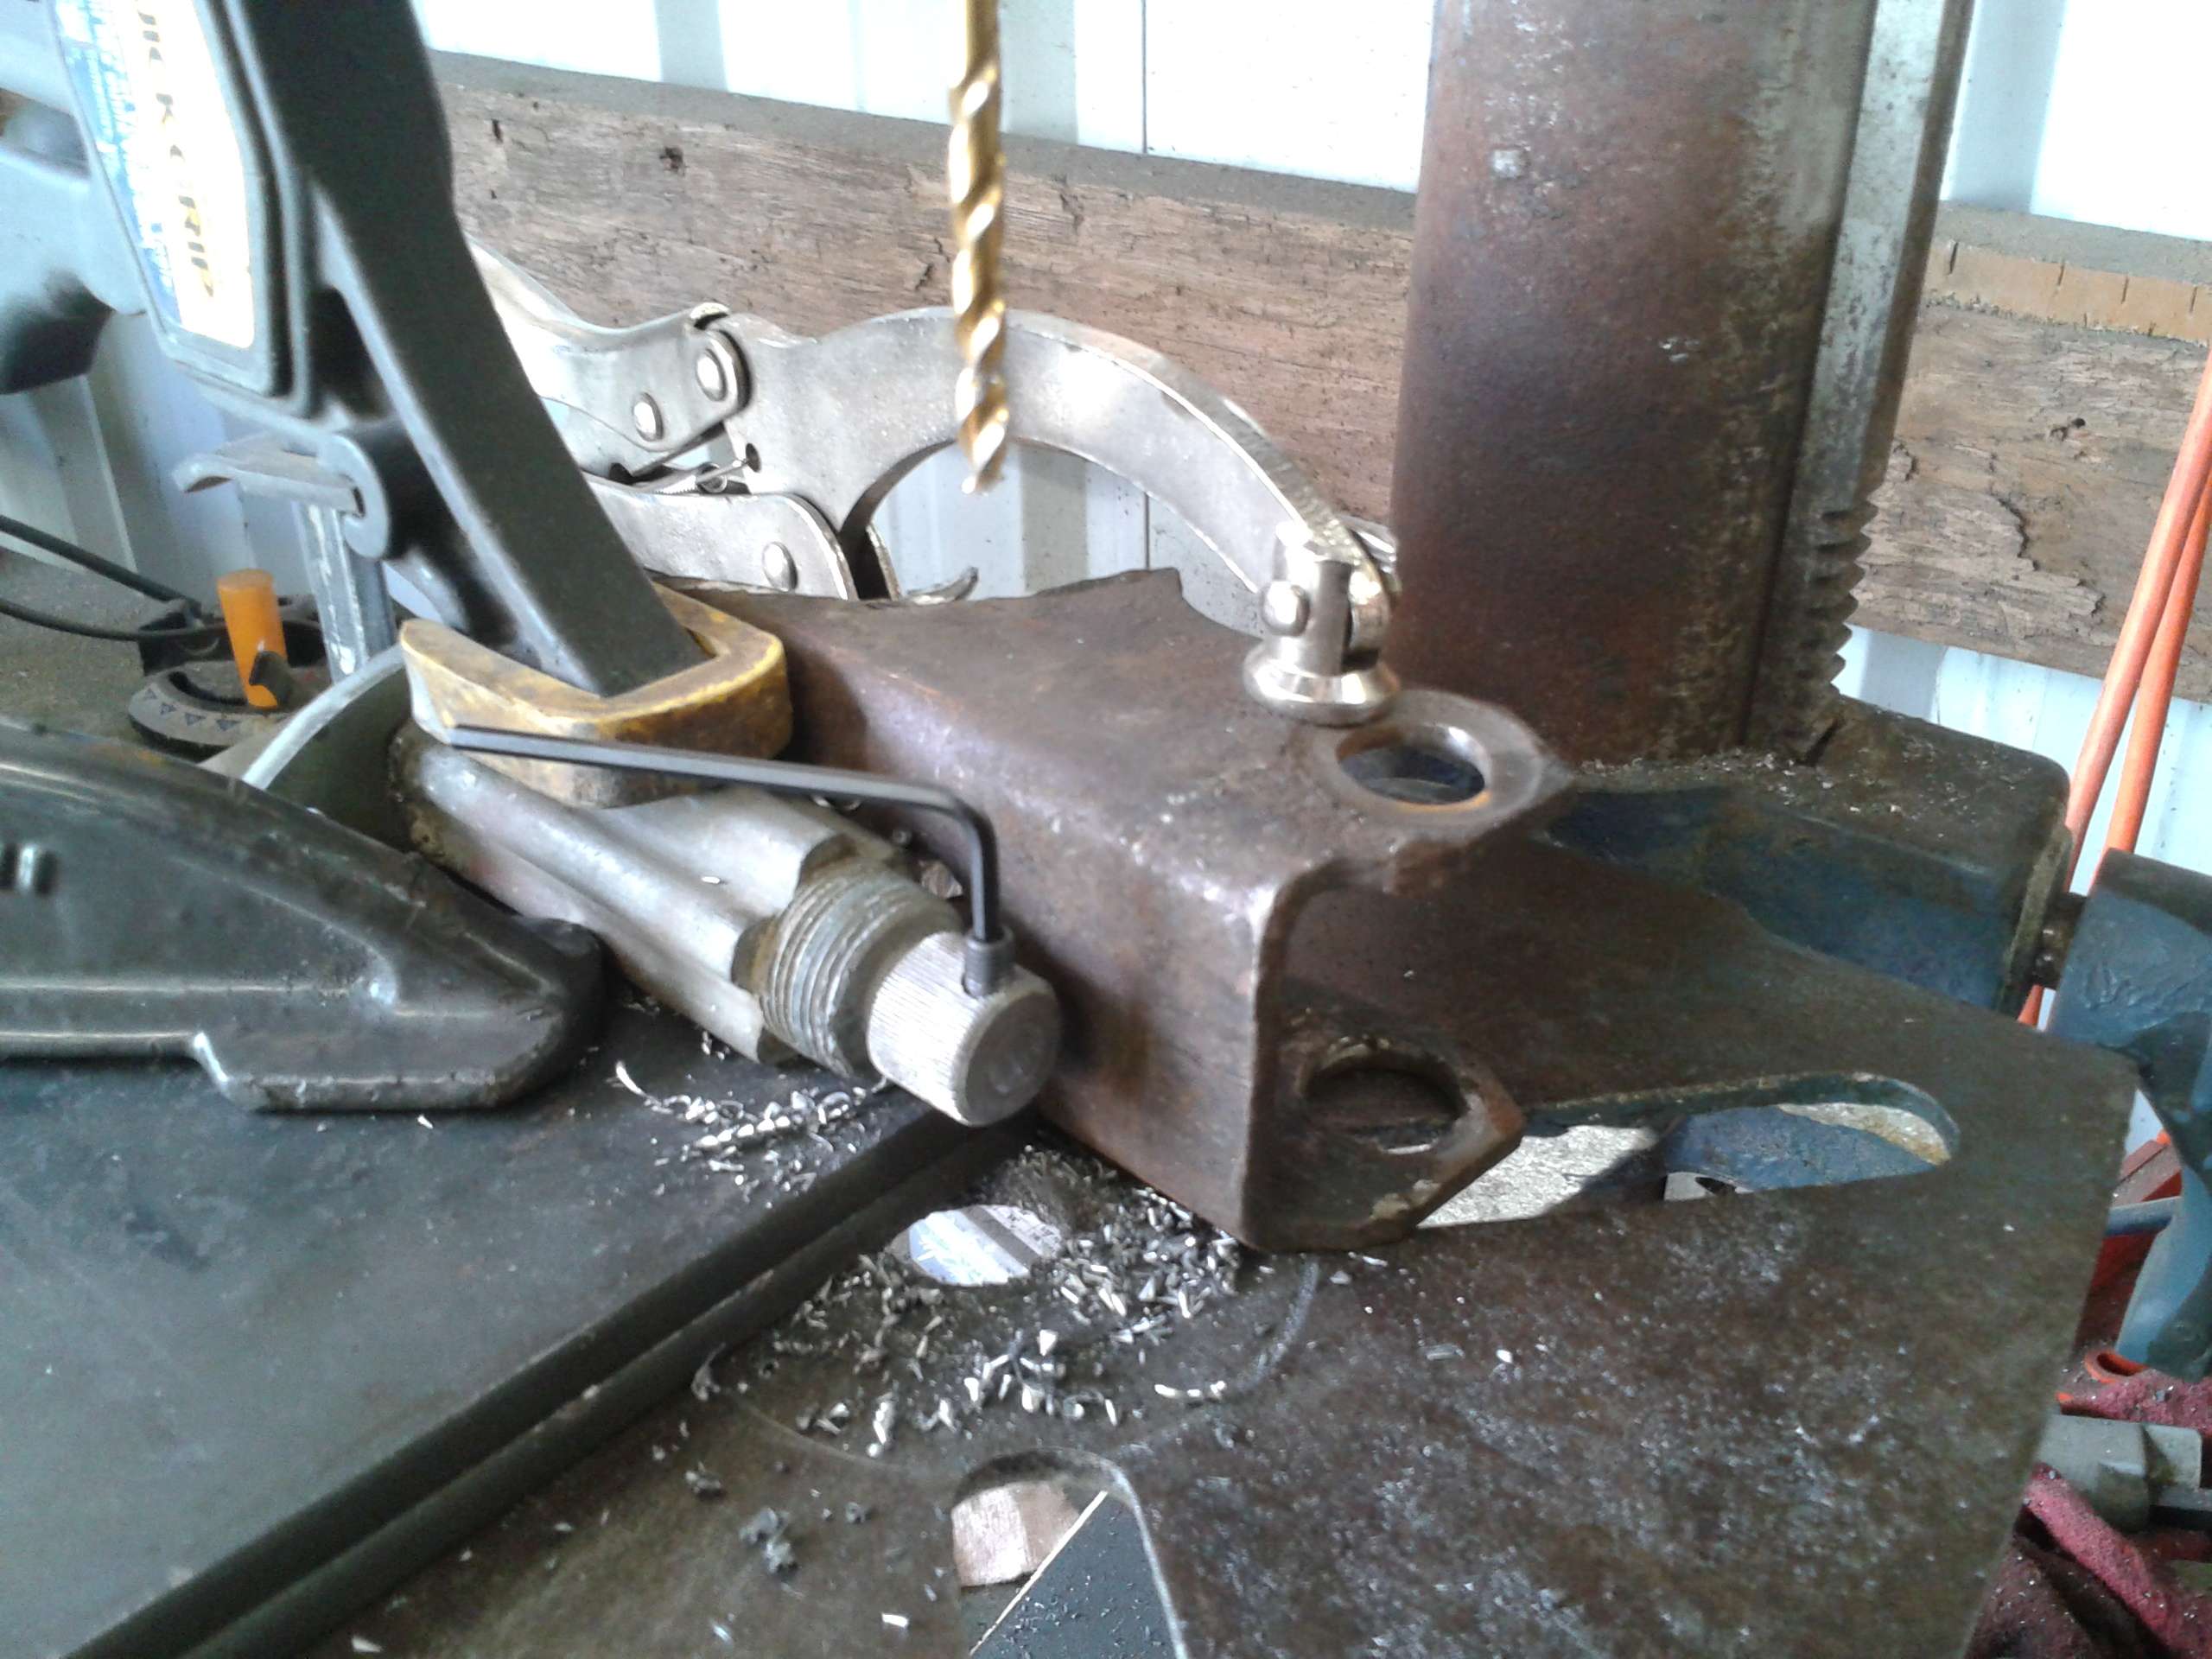
A note about the gears that come in this kit. They have a rockwell hardness of 45 and I destroyed 7 drill bits trying to remove them from their shafts. I finally had to go buy a pure carbide 5/16's locksmiths bit. Specialty Power windows is more than happy to sell gears that haven't been welded to shafts and they're only $4.00(mine are in the mail, but I didn't feel like waiting). In this pic you can see that the original Jeep mounting holes are barely wide enough to clear the gear, allowing you to use the original mounting points. There's a bronz washer between the knurl and the housing and a shim between the gear and the housing. I made sure they were in place and temporarily added a second shim for future clearance.
Then place the everything in a vice with the knurl resting on the vice jaw bar underneath. Push firmly down on the housing and lock the vice down. I used this jig to hold the gear clamped true to the housing and keep it from possibly warping and welded it on. At this point everything was assembled so tight the the shaft won't turn. Remove the set screw from the knurl and drive the knurl off the shaft. disassemble everything and take the extra shim off from between the gear and the housing. When reassembled with just one shim everything spins as smooth as a babies butt. A hole also has to be drilled into the other housing plate to accommodate the new weld. At this point you can clean everything up and reassemble following Specialty Power Windows instructions. They even included a installation DVD with the written instructions.
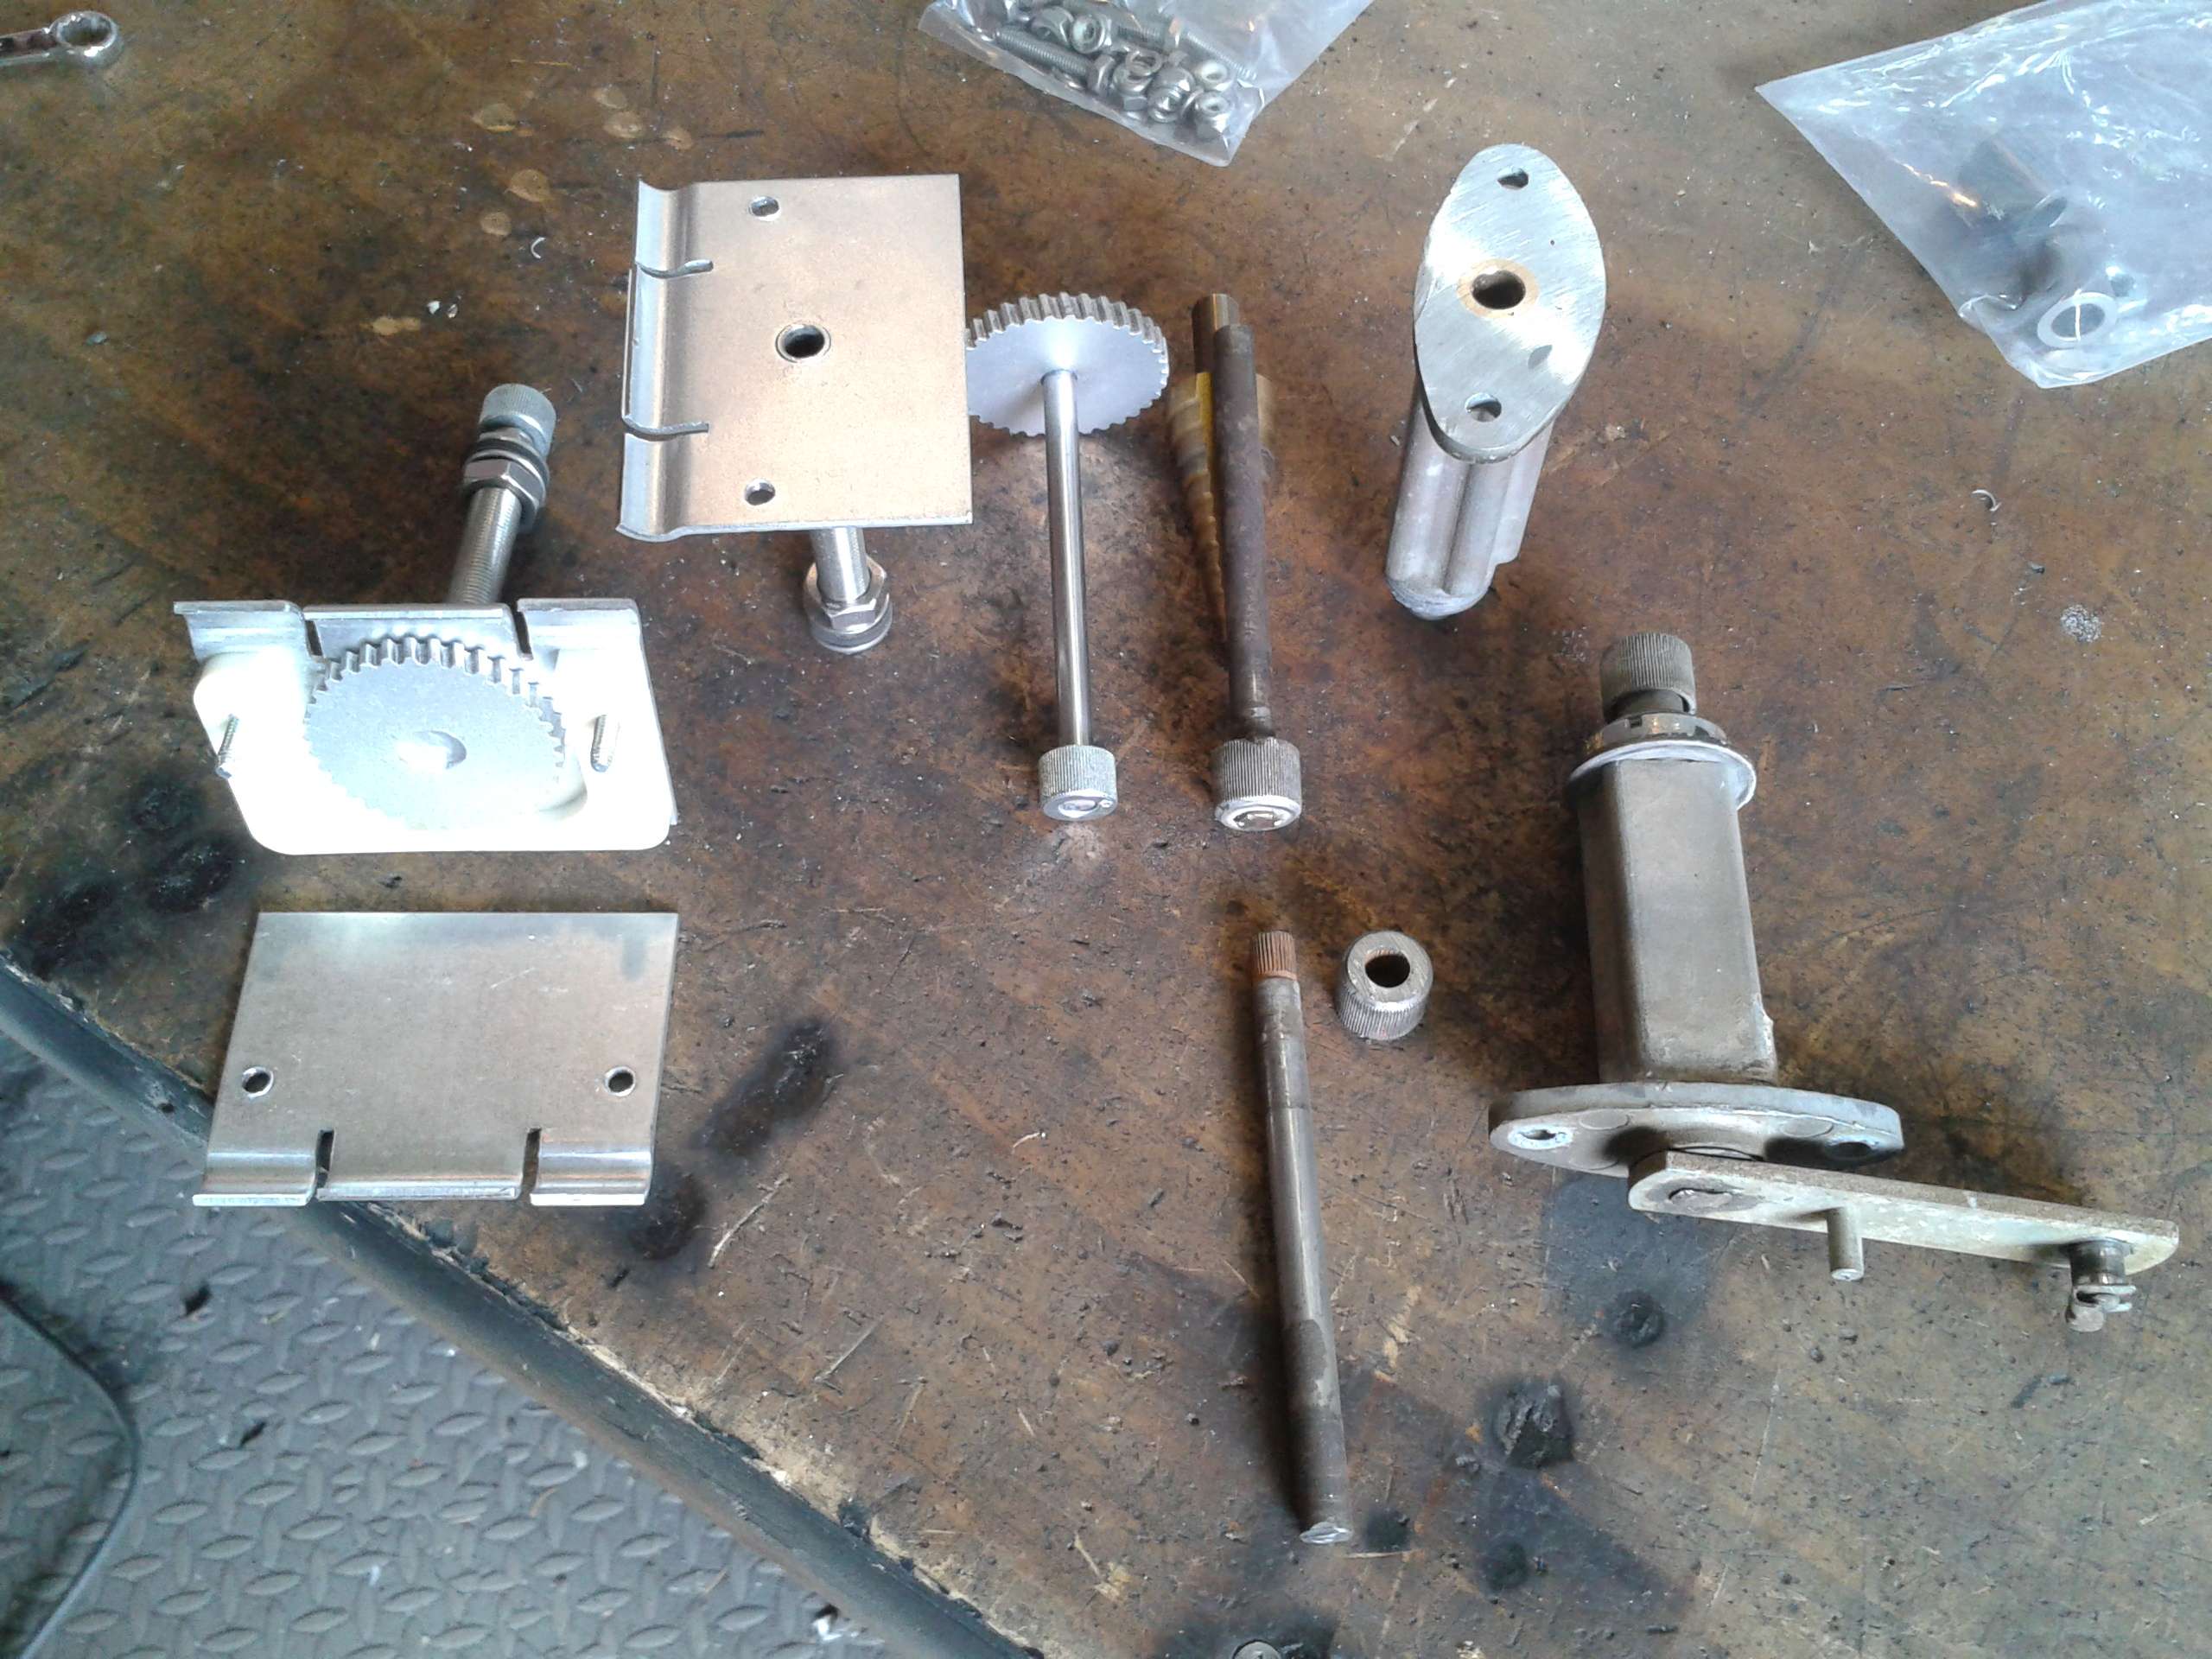
It was nice having two complete sets of Jeep wiper assemblies. I set the nicest individual parts aside and experimented with the others.
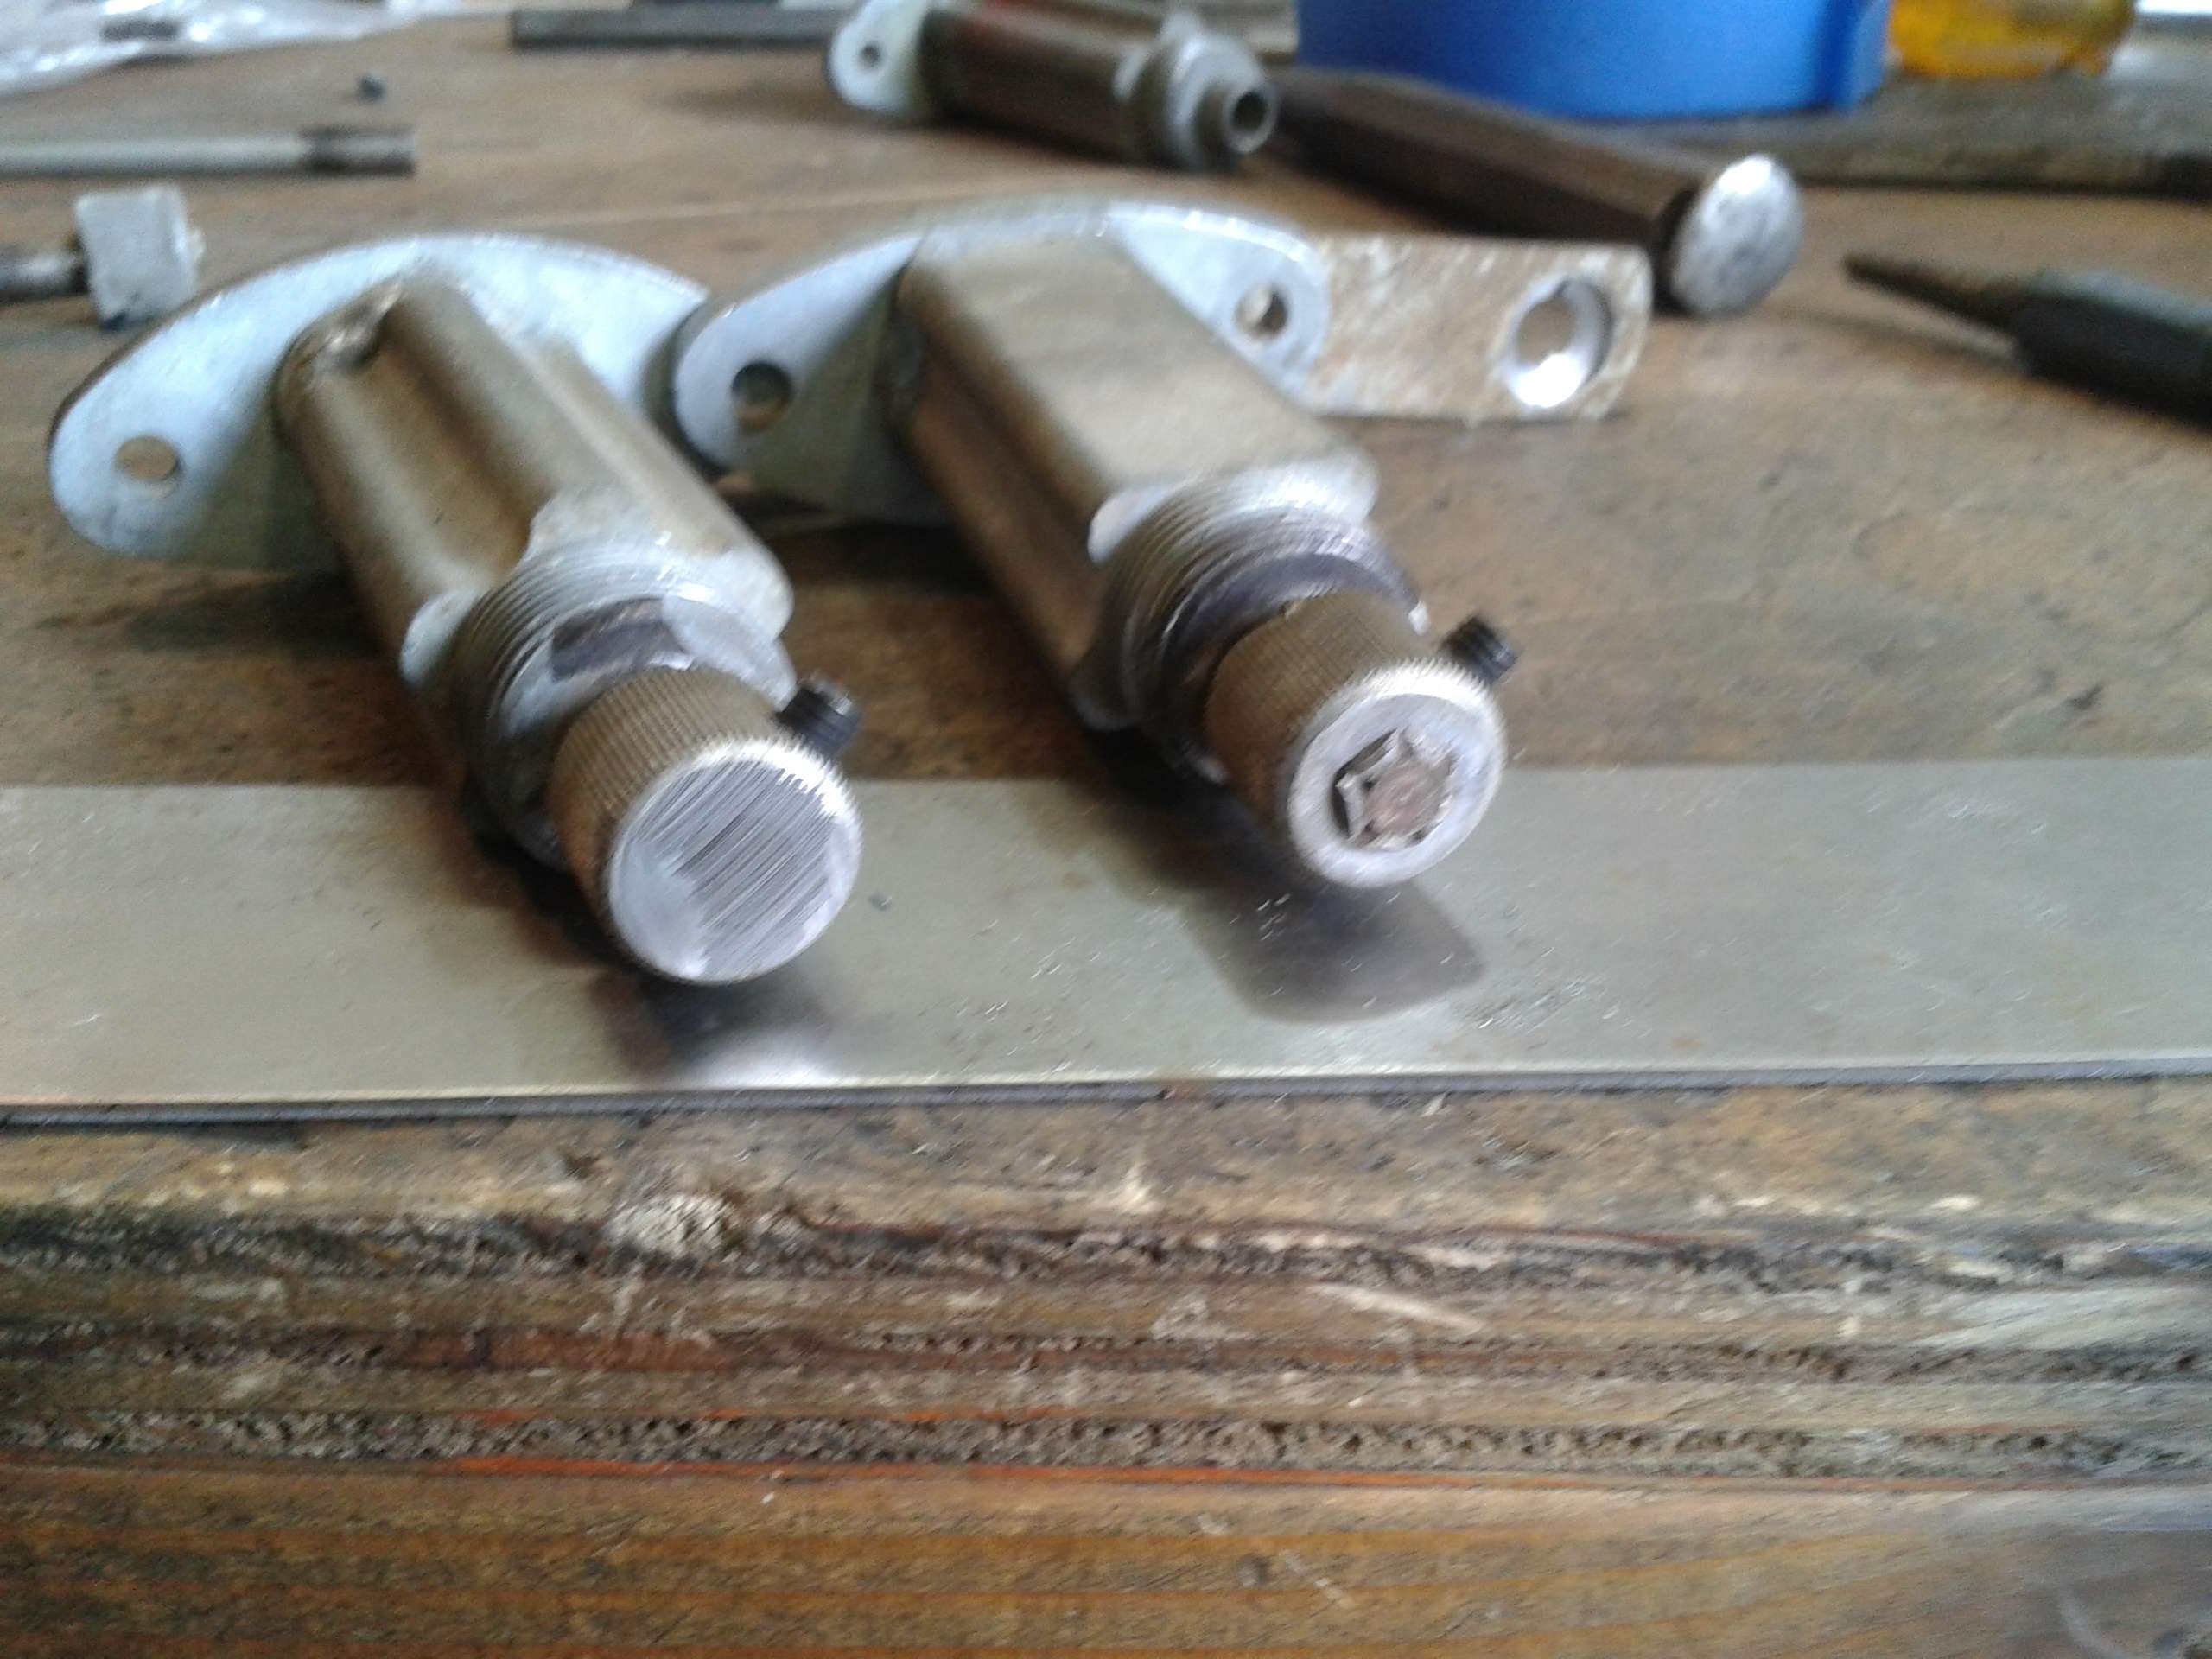
OEM assemblies are swedged at both ends. Grind them off to take things apart. You can also see the splines inside the knurl on the right.
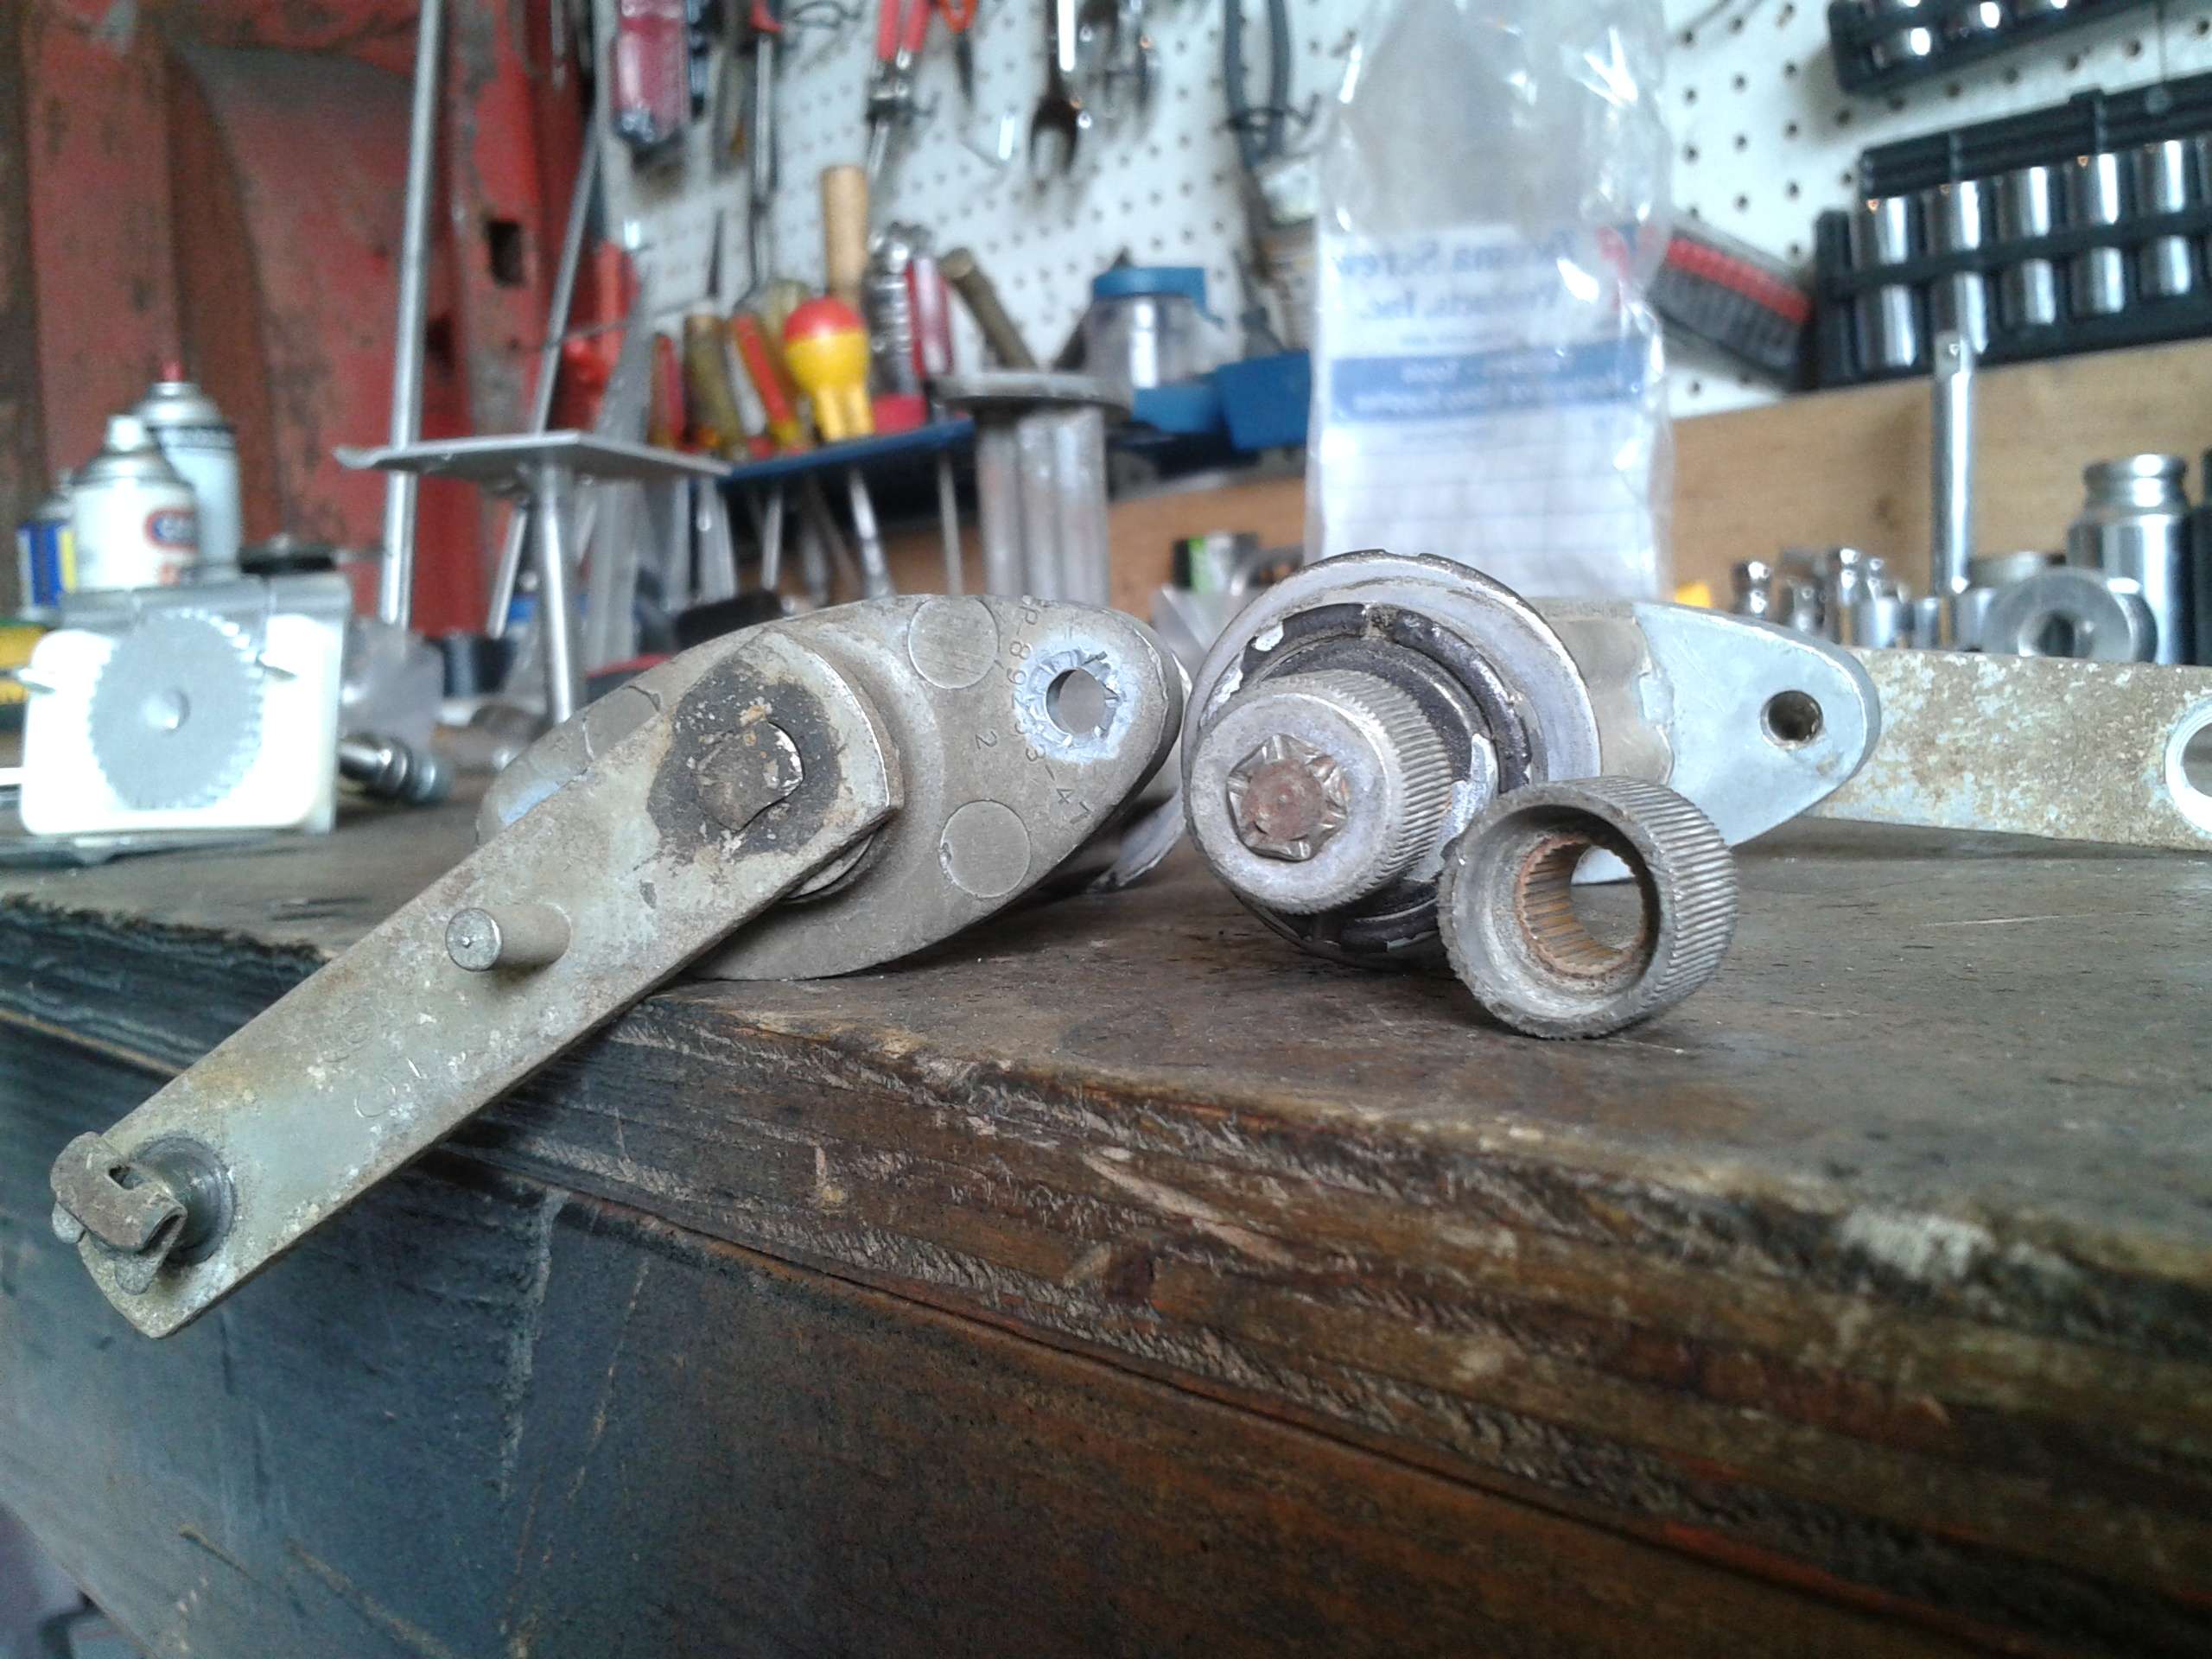
While the knurl was still in its original location I tapped the set screw into it. Here I'm experimenting. That's why the swedge is already removed.
These are the knurls and shafts I used in the conversion. Install the set screws, then remove the swedges. The set screws were also eventually shorted so they set all the way into the knurl.
The new gear and shaft housings with one of the shaft housings already cut off.
Windshield Wiper Mods
Well, I finally have something to update. It's been a long two weeks of planning, waiting on parts to arrive, and doing odds and ends. Wednesday I got 5 UPS packages and 1 FedEx package.
I got started with the new windshield wipers. I really, really like this setup from Specialty Power Windows. Apparently, this is the type of system a lot of the European cars use.
The switch that came with it has washer, intermittent/delay, slow and fast settings in it. The Ol' Jeep got a touch of modernization!
Robbie and Keith, at SPW, are also really into customers (me) doing mod’s to suit their needs. After looking at everything, taking some measurements, and a couple phone calls, I decided to use the OEM Jeep wiper transmissions with the SPW gears mounted to them.

The Jeep parts have thicker shafts, Bronz bushings, and the knurled ends were different sizes and I wanted to use the original Jeep wiper arms.

The Jeep shafts are swedged at the end to hold the knurl on, but the knurls are splined to the shaft. The first thing I did was tap a set screw into the knurl and shaft. Then I ground the swedge off. After that I cutoff off the base of the housing and trued it.

I then cut the new shaft housing off of the gear housing and made the hole the same diameter of the Jeep shaft. After that I mounted the Jeep housing to the new gear housing with counter-sunk flathead machine screws. It's important to keep the two orientated properly making sure the flat part of the Jeep housing is parrallel with the long end of the gear housing. I did that with the metal plates they're sitting on in this picture.

A note about the gears that come in this kit. They have a rockwell hardness of 45 and I destroyed 7 drill bits trying to remove them from their shafts. I finally had to go buy a pure carbide 5/16's locksmiths bit. Specialty Power windows is more than happy to sell gears that haven't been welded to shafts and they're only $4.00(mine are in the mail, but I didn't feel like waiting). In this pic you can see that the original Jeep mounting holes are barely wide enough to clear the gear, allowing you to use the original mounting points. There's a bronz washer between the knurl and the housing and a shim between the gear and the housing. I made sure they were in place and temporarily added a second shim for future clearance.

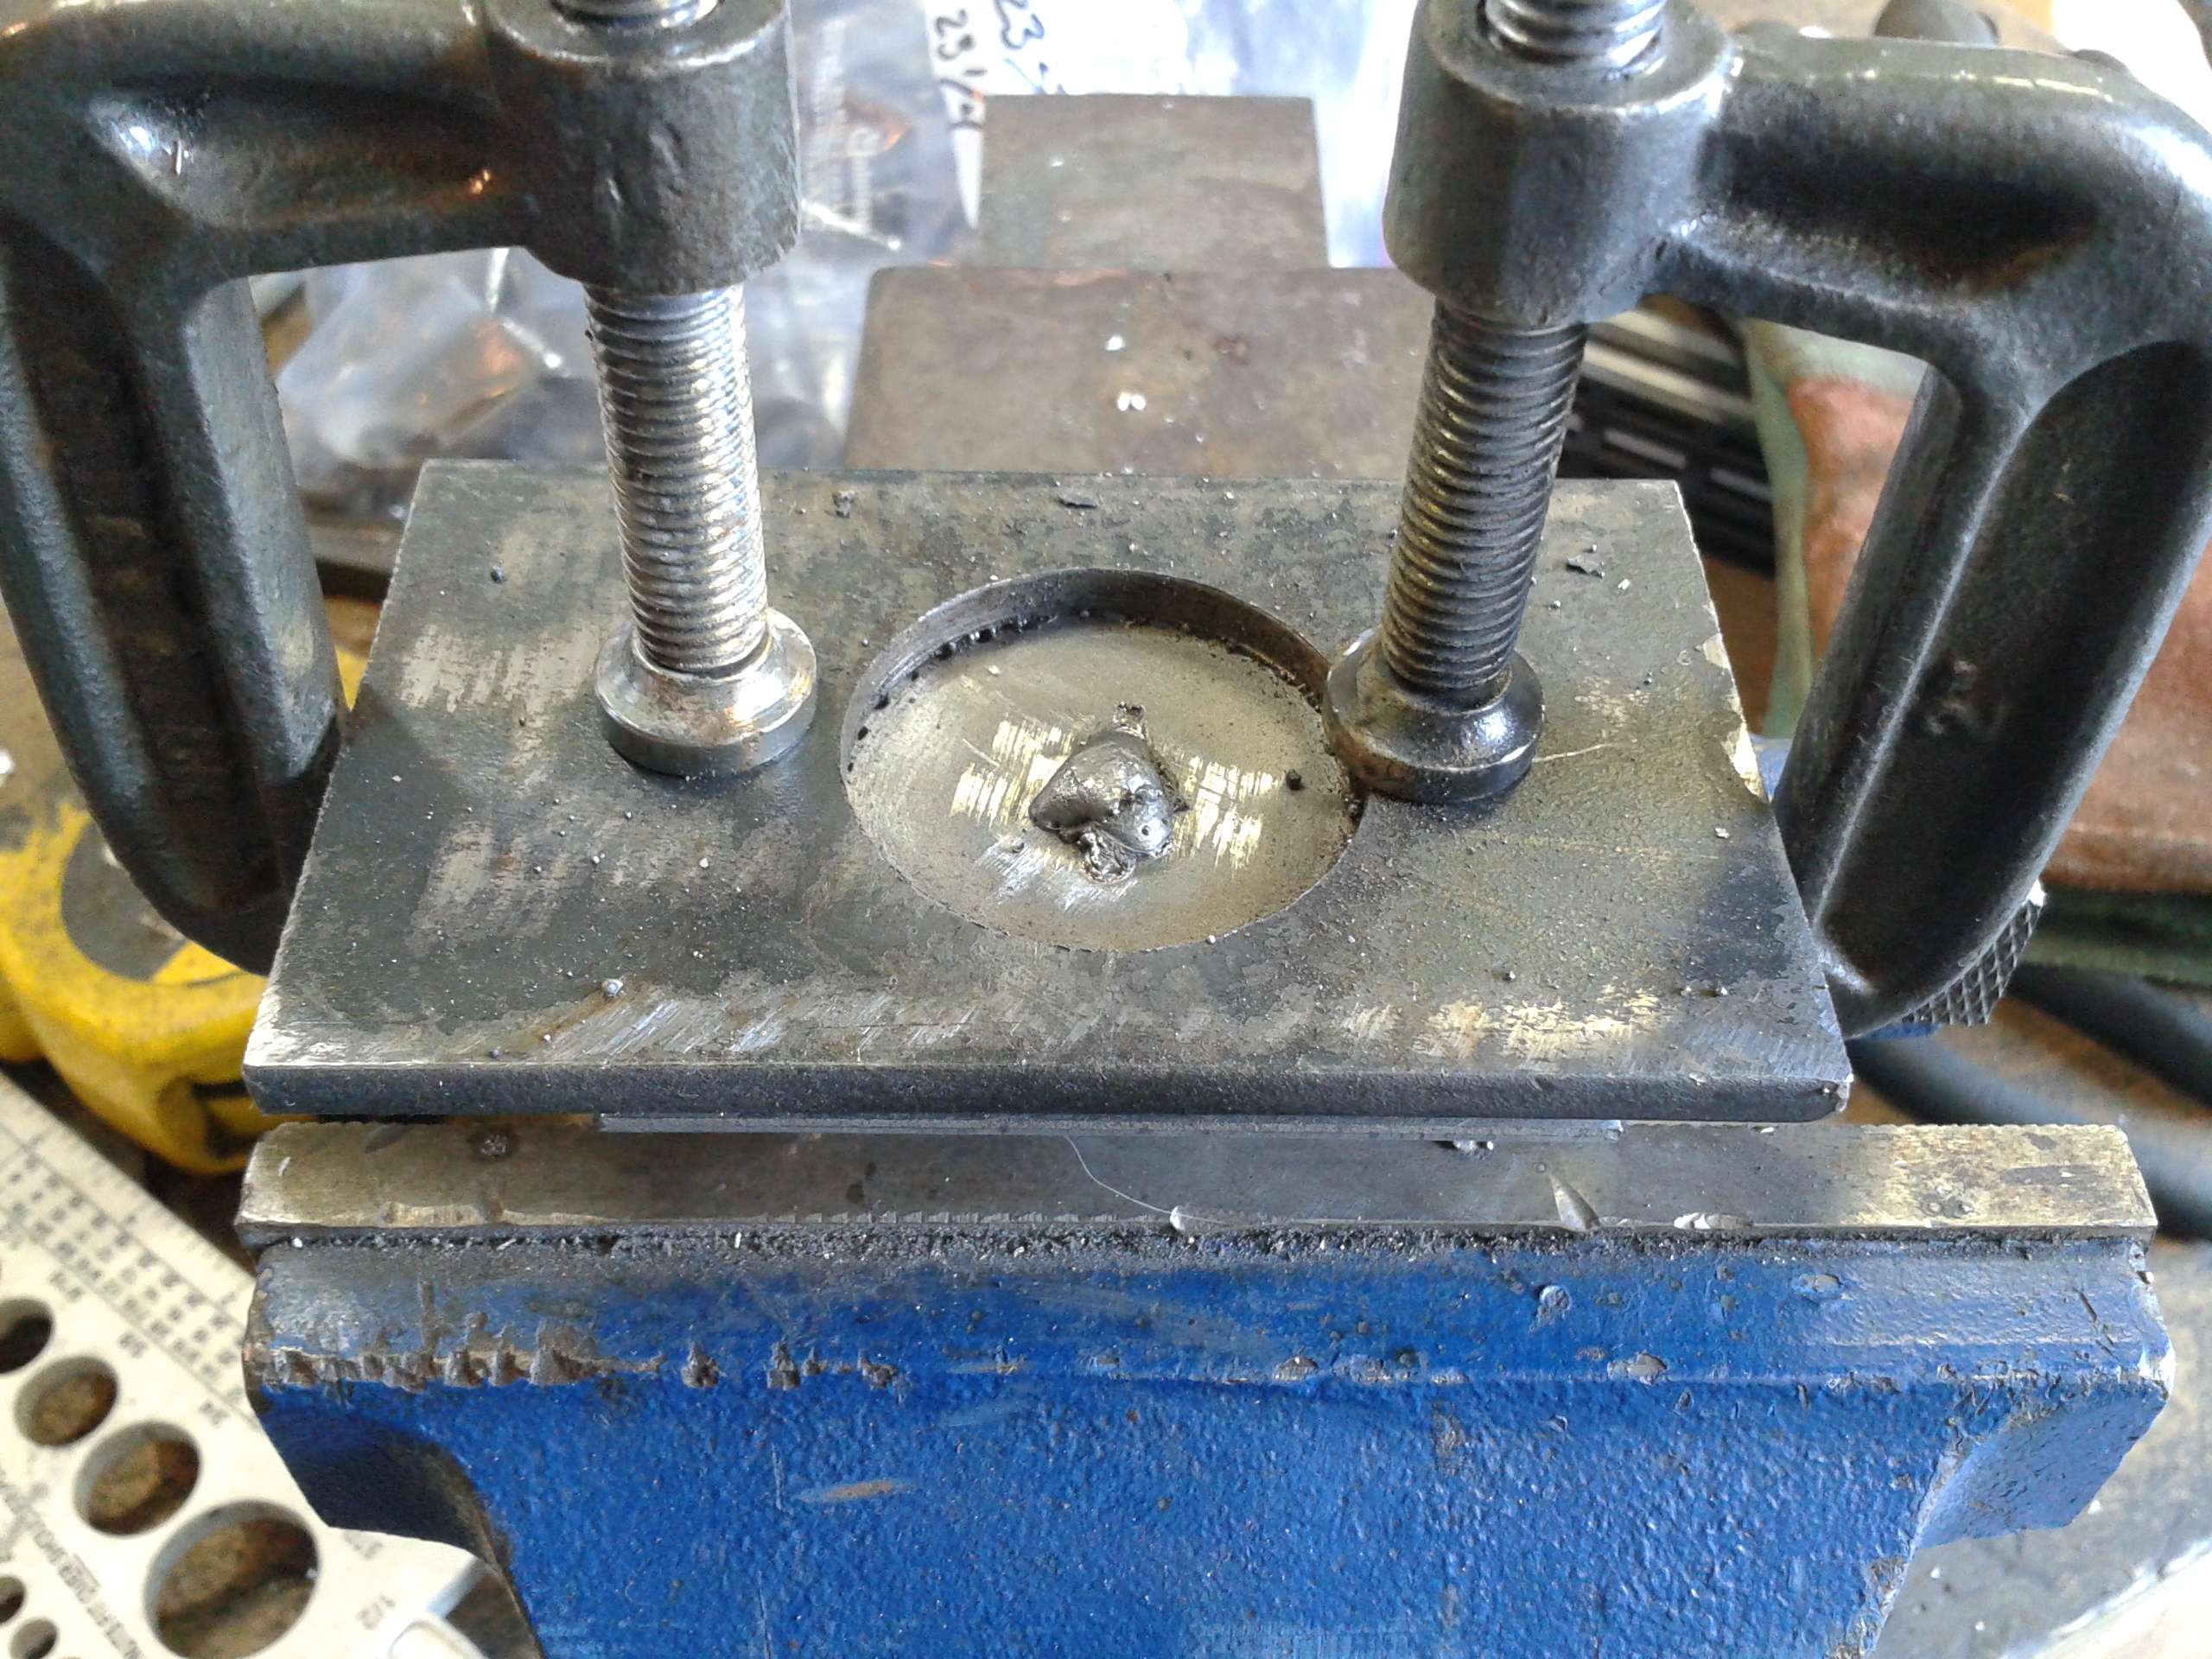
Then place the everything in a vice with the knurl resting on the vice jaw bar underneath. Push firmly down on the housing and lock the vice down. I used this jig to hold the gear clamped true to the housing and keep it from possibly warping and welded it on. At this point everything was assembled so tight the the shaft won't turn. Remove the set screw from the knurl and drive the knurl off the shaft. disassemble everything and take the extra shim off from between the gear and the housing. When reassembled with just one shim everything spins as smooth as a babies butt. A hole also has to be drilled into the other housing plate to accommodate the new weld. At this point you can clean everything up and reassemble following Specialty Power Windows instructions. They even included a installation DVD with the written instructions.

It was nice having two complete sets of Jeep wiper assemblies. I set the nicest individual parts aside and experimented with the others.
OEM assemblies are swedged at both ends. Grind them off to take things apart. You can also see the splines inside the knurl on the right.

While the knurl was still in its original location I tapped the set screw into it. Here I'm experimenting. That's why the swedge is already removed.

These are the knurls and shafts I used in the conversion. Install the set screws, then remove the swedges. The set screws were also eventually shorted so they set all the way into the knurl.

The new gear and shaft housings with one of the shaft housings already cut off.

Last edited by Resbum on Tue Apr 09, 2013 7:21 am, edited 2 times in total.
Originally Posted by Resbum
"What year is my truck?... Which part?" Build thread- http://www.fsjnetwork.com/forum/viewtop ... 290#p18290
"What year is my truck?... Which part?" Build thread- http://www.fsjnetwork.com/forum/viewtop ... 290#p18290
-
Resbum
Topic author - Posts: 466
- Joined: Fri Jun 08, 2012 9:45 am
- Location: North East Oregon
Re: 1970 Gladiator 1 Ton 6BT 12V Cummins Build
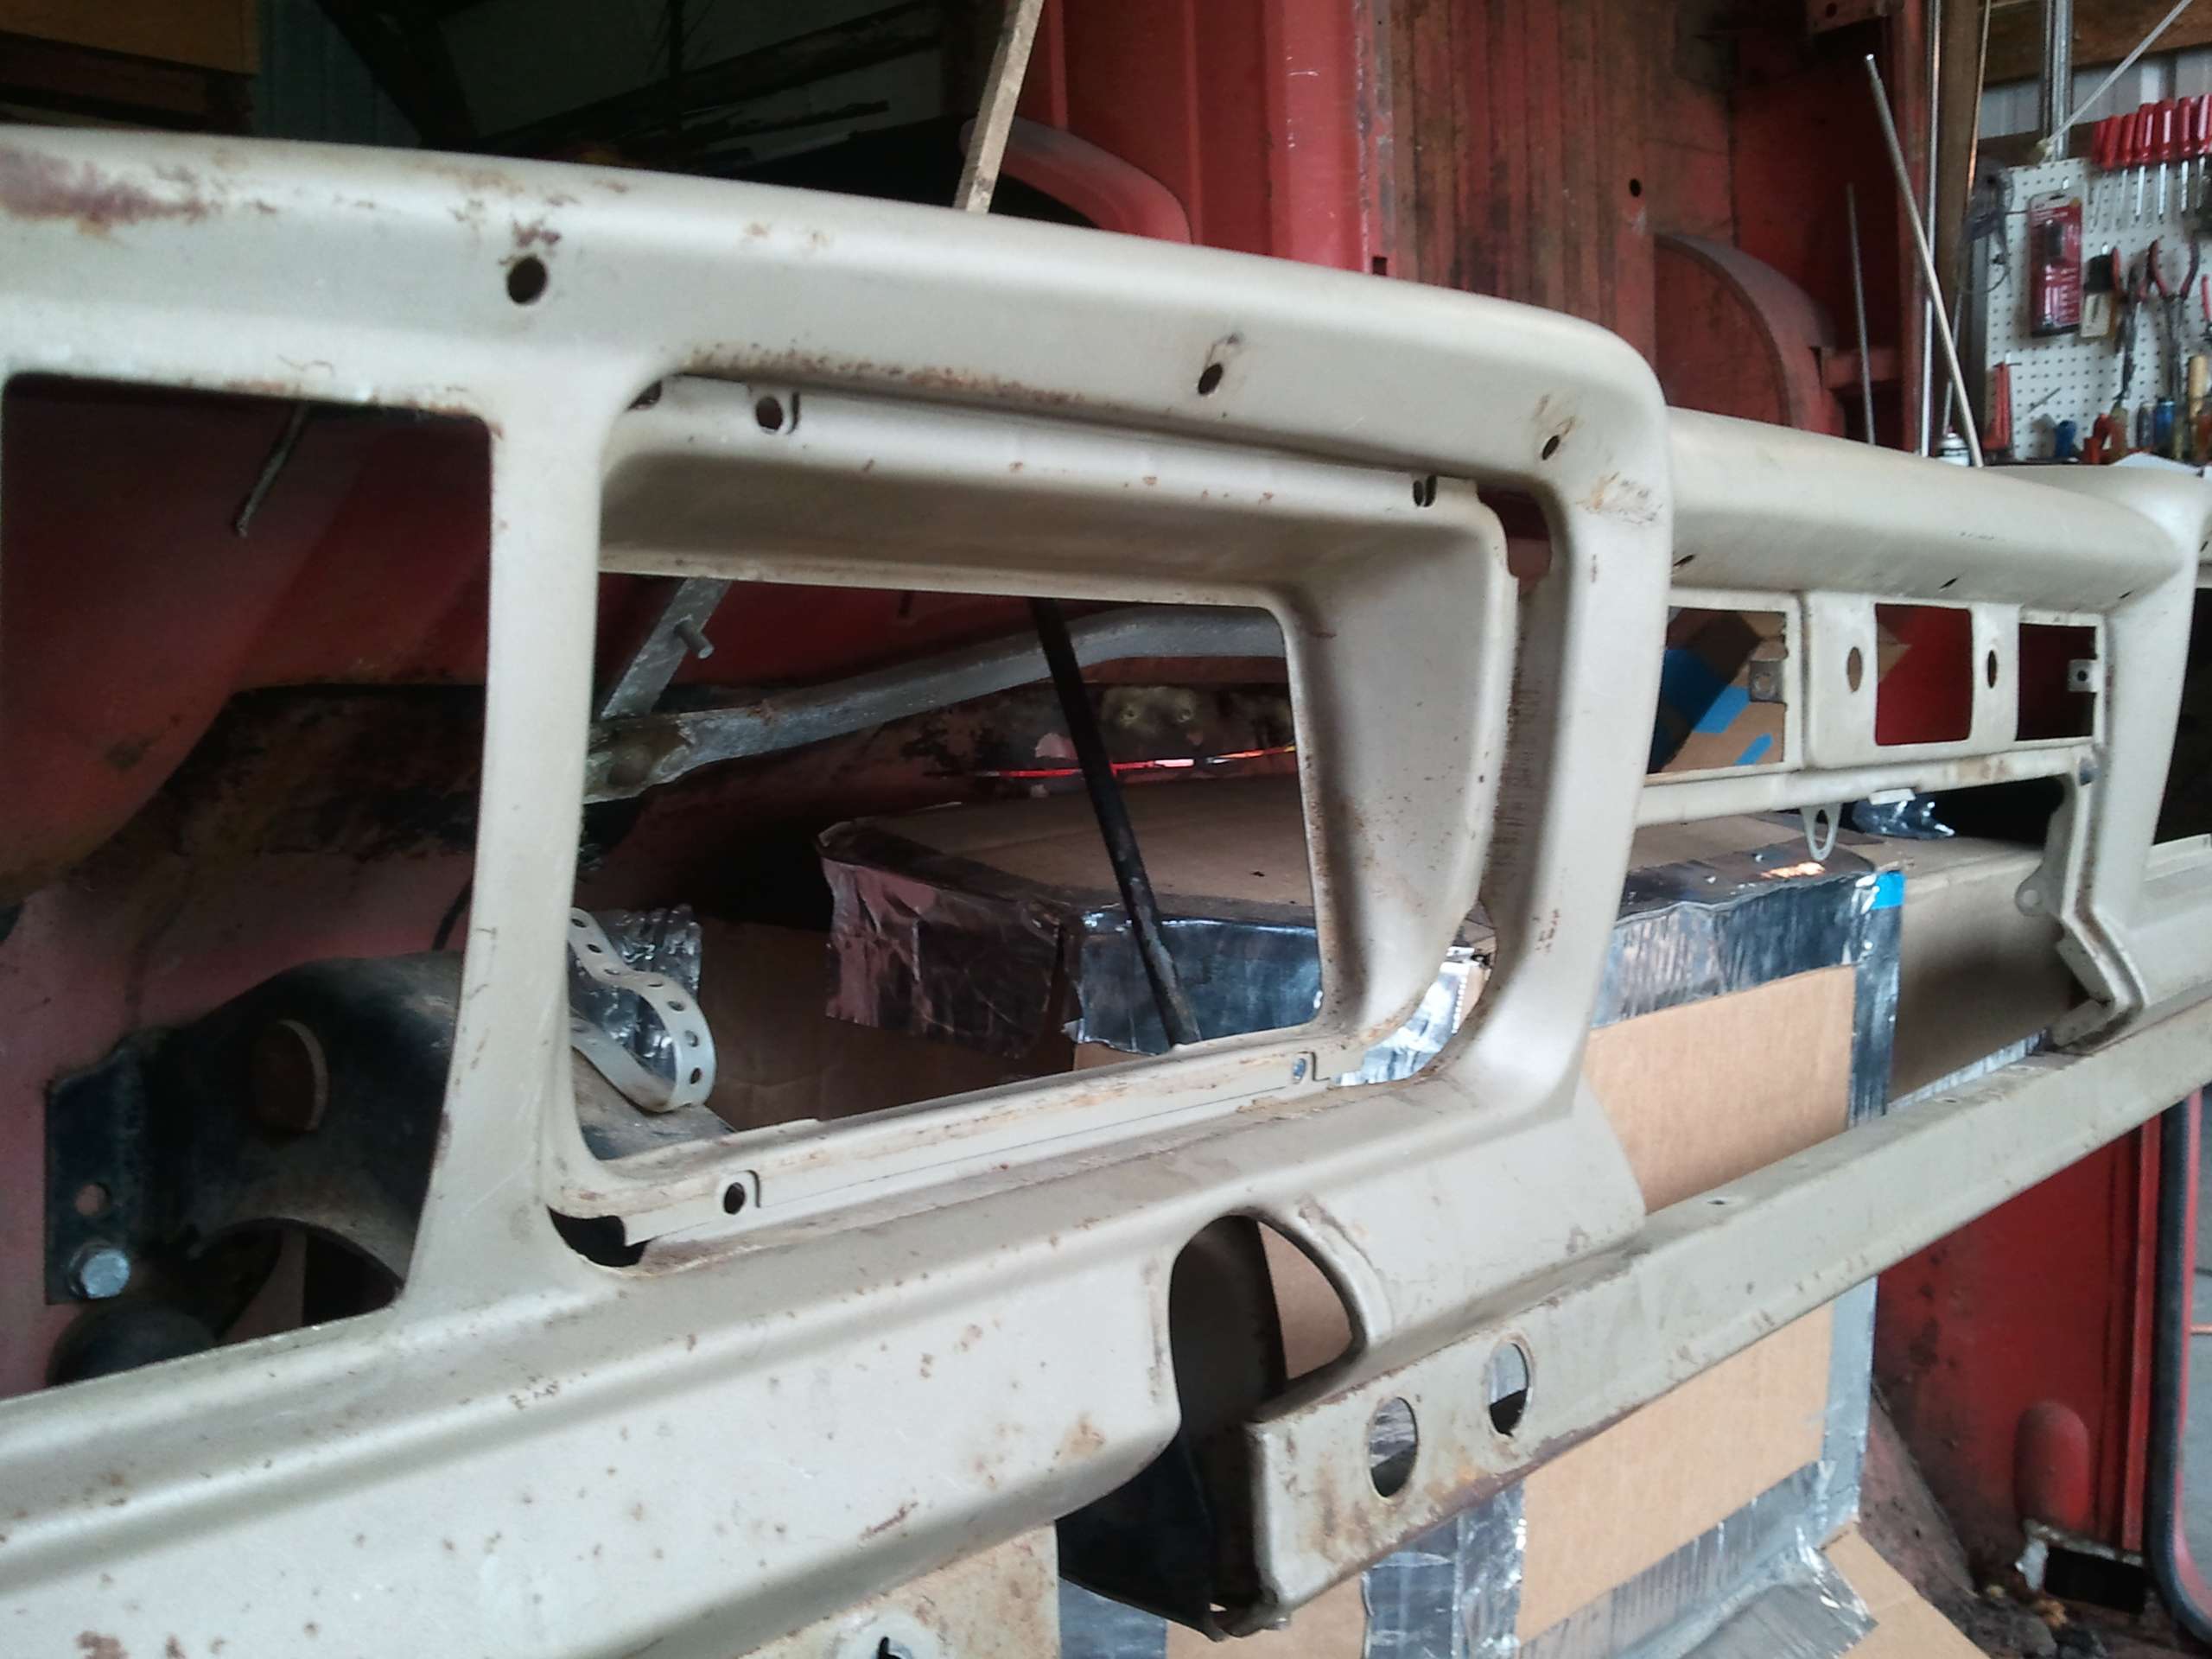
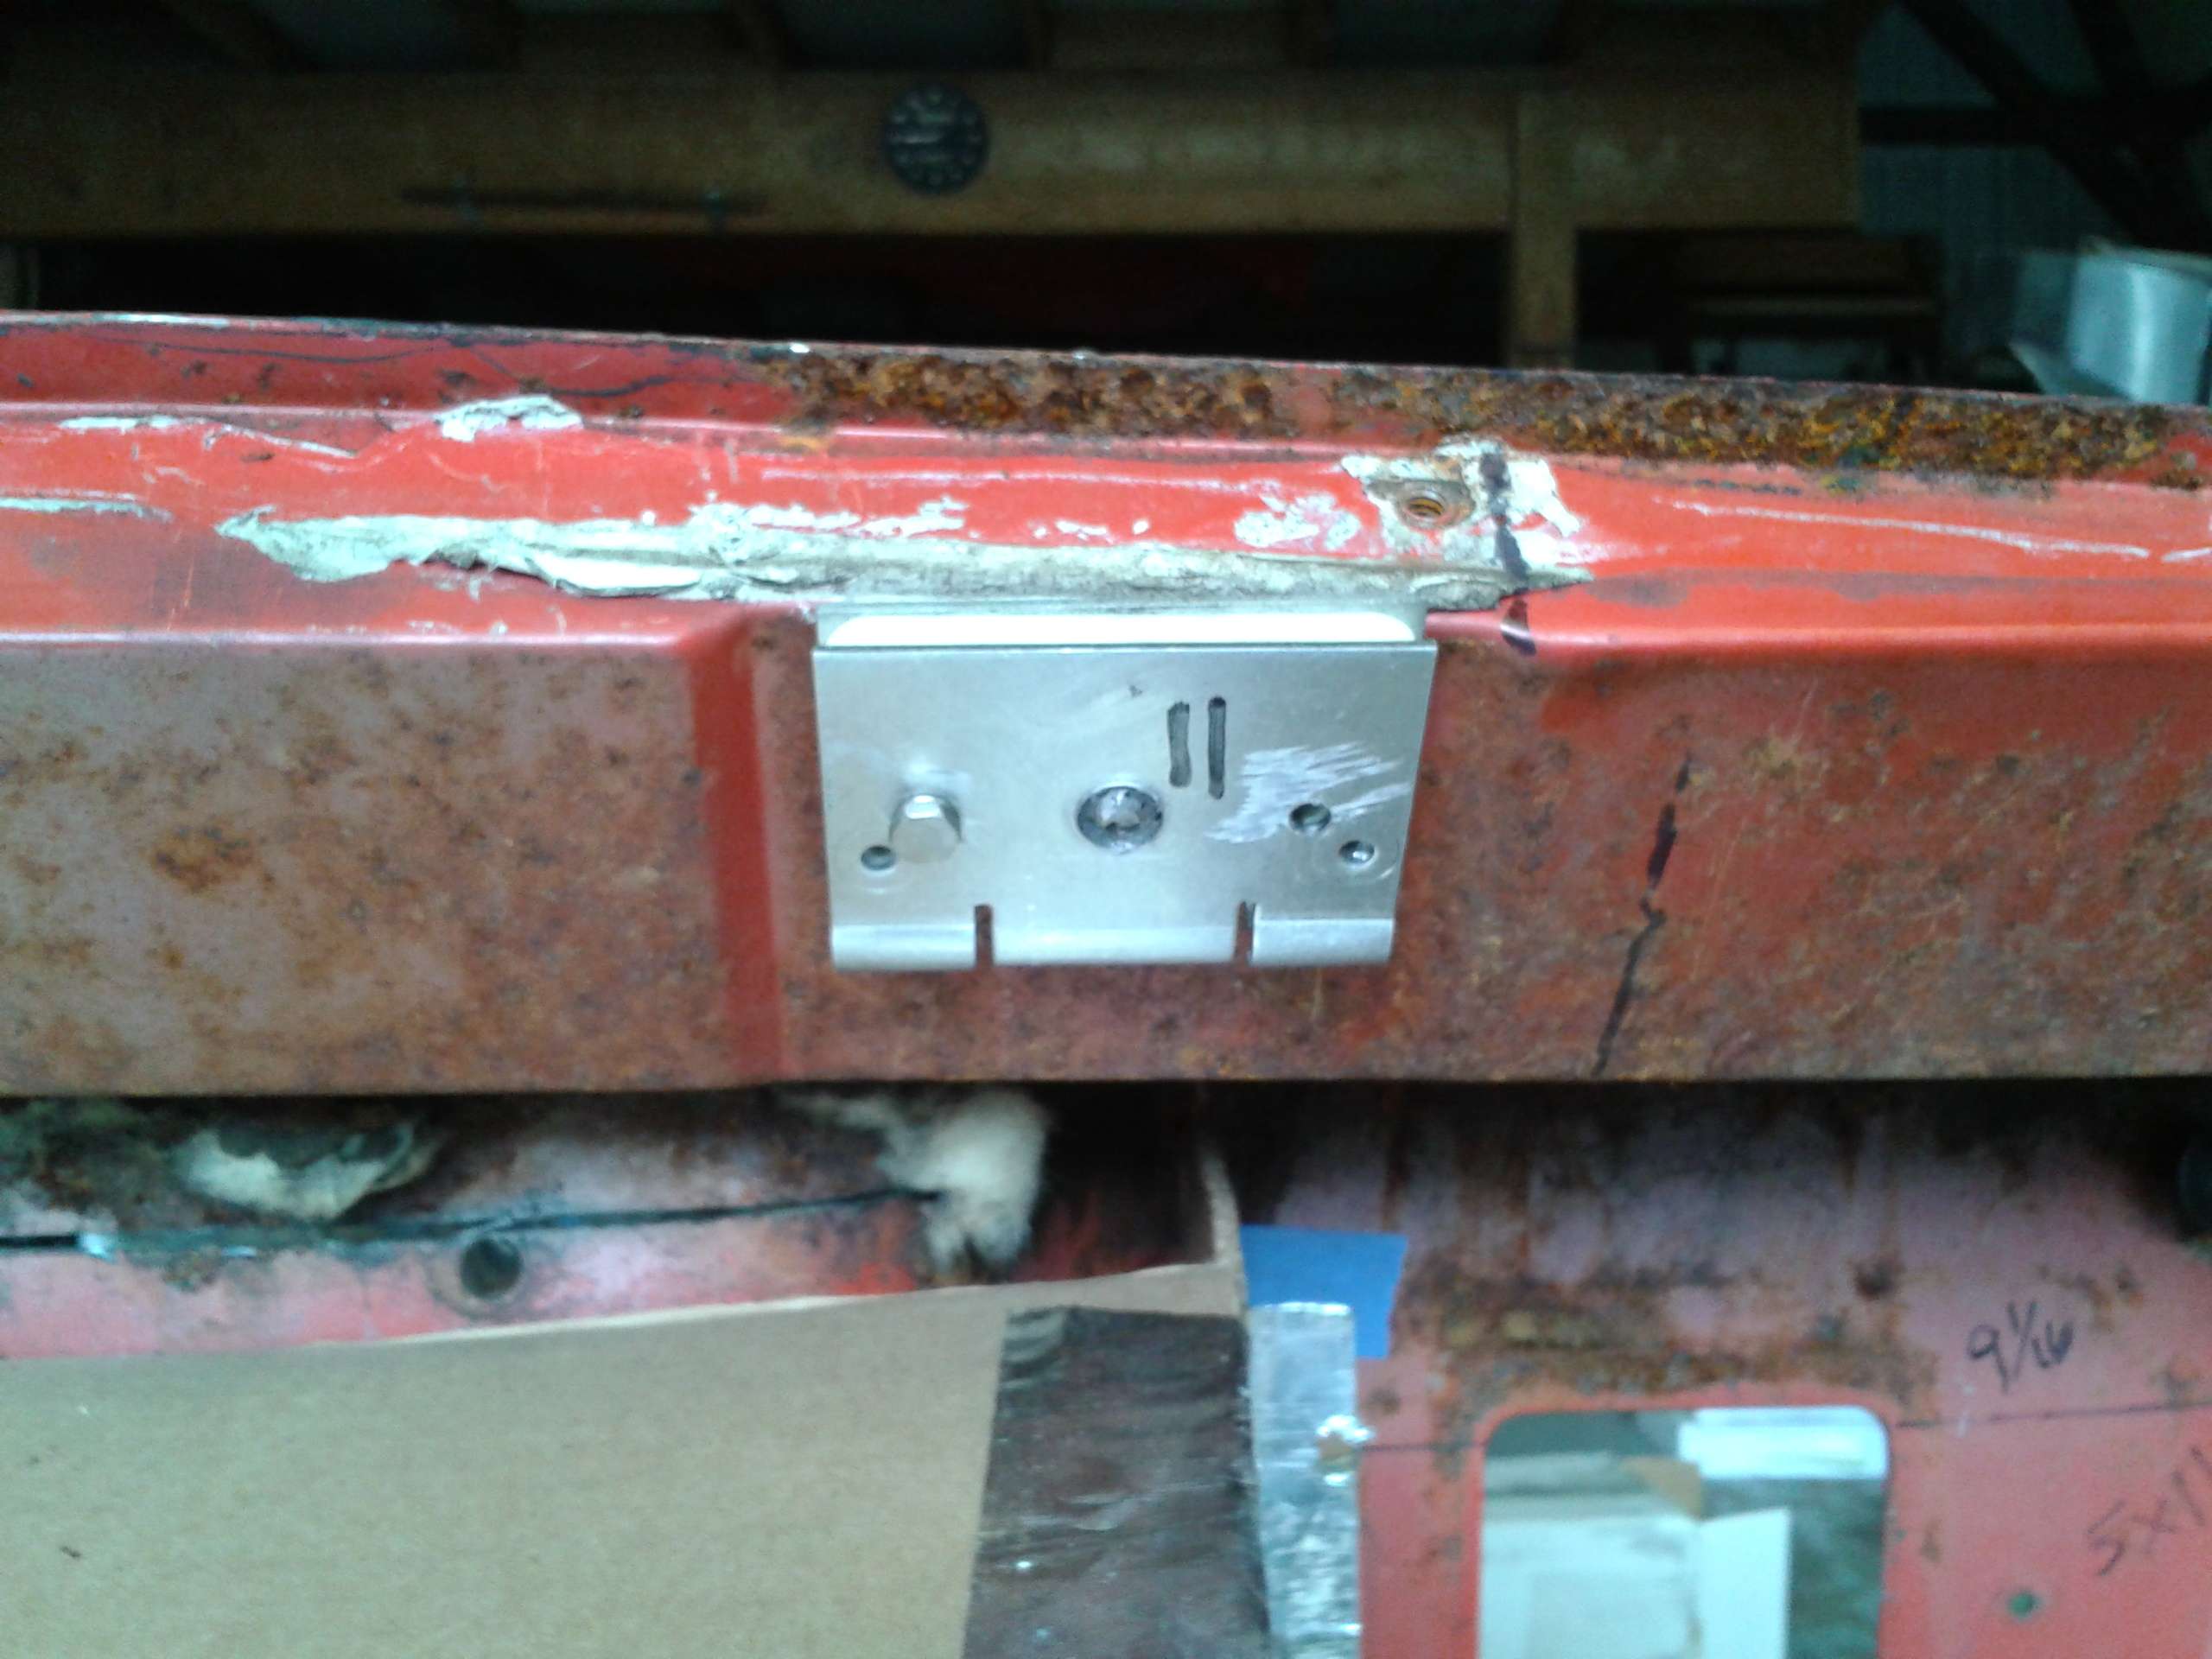
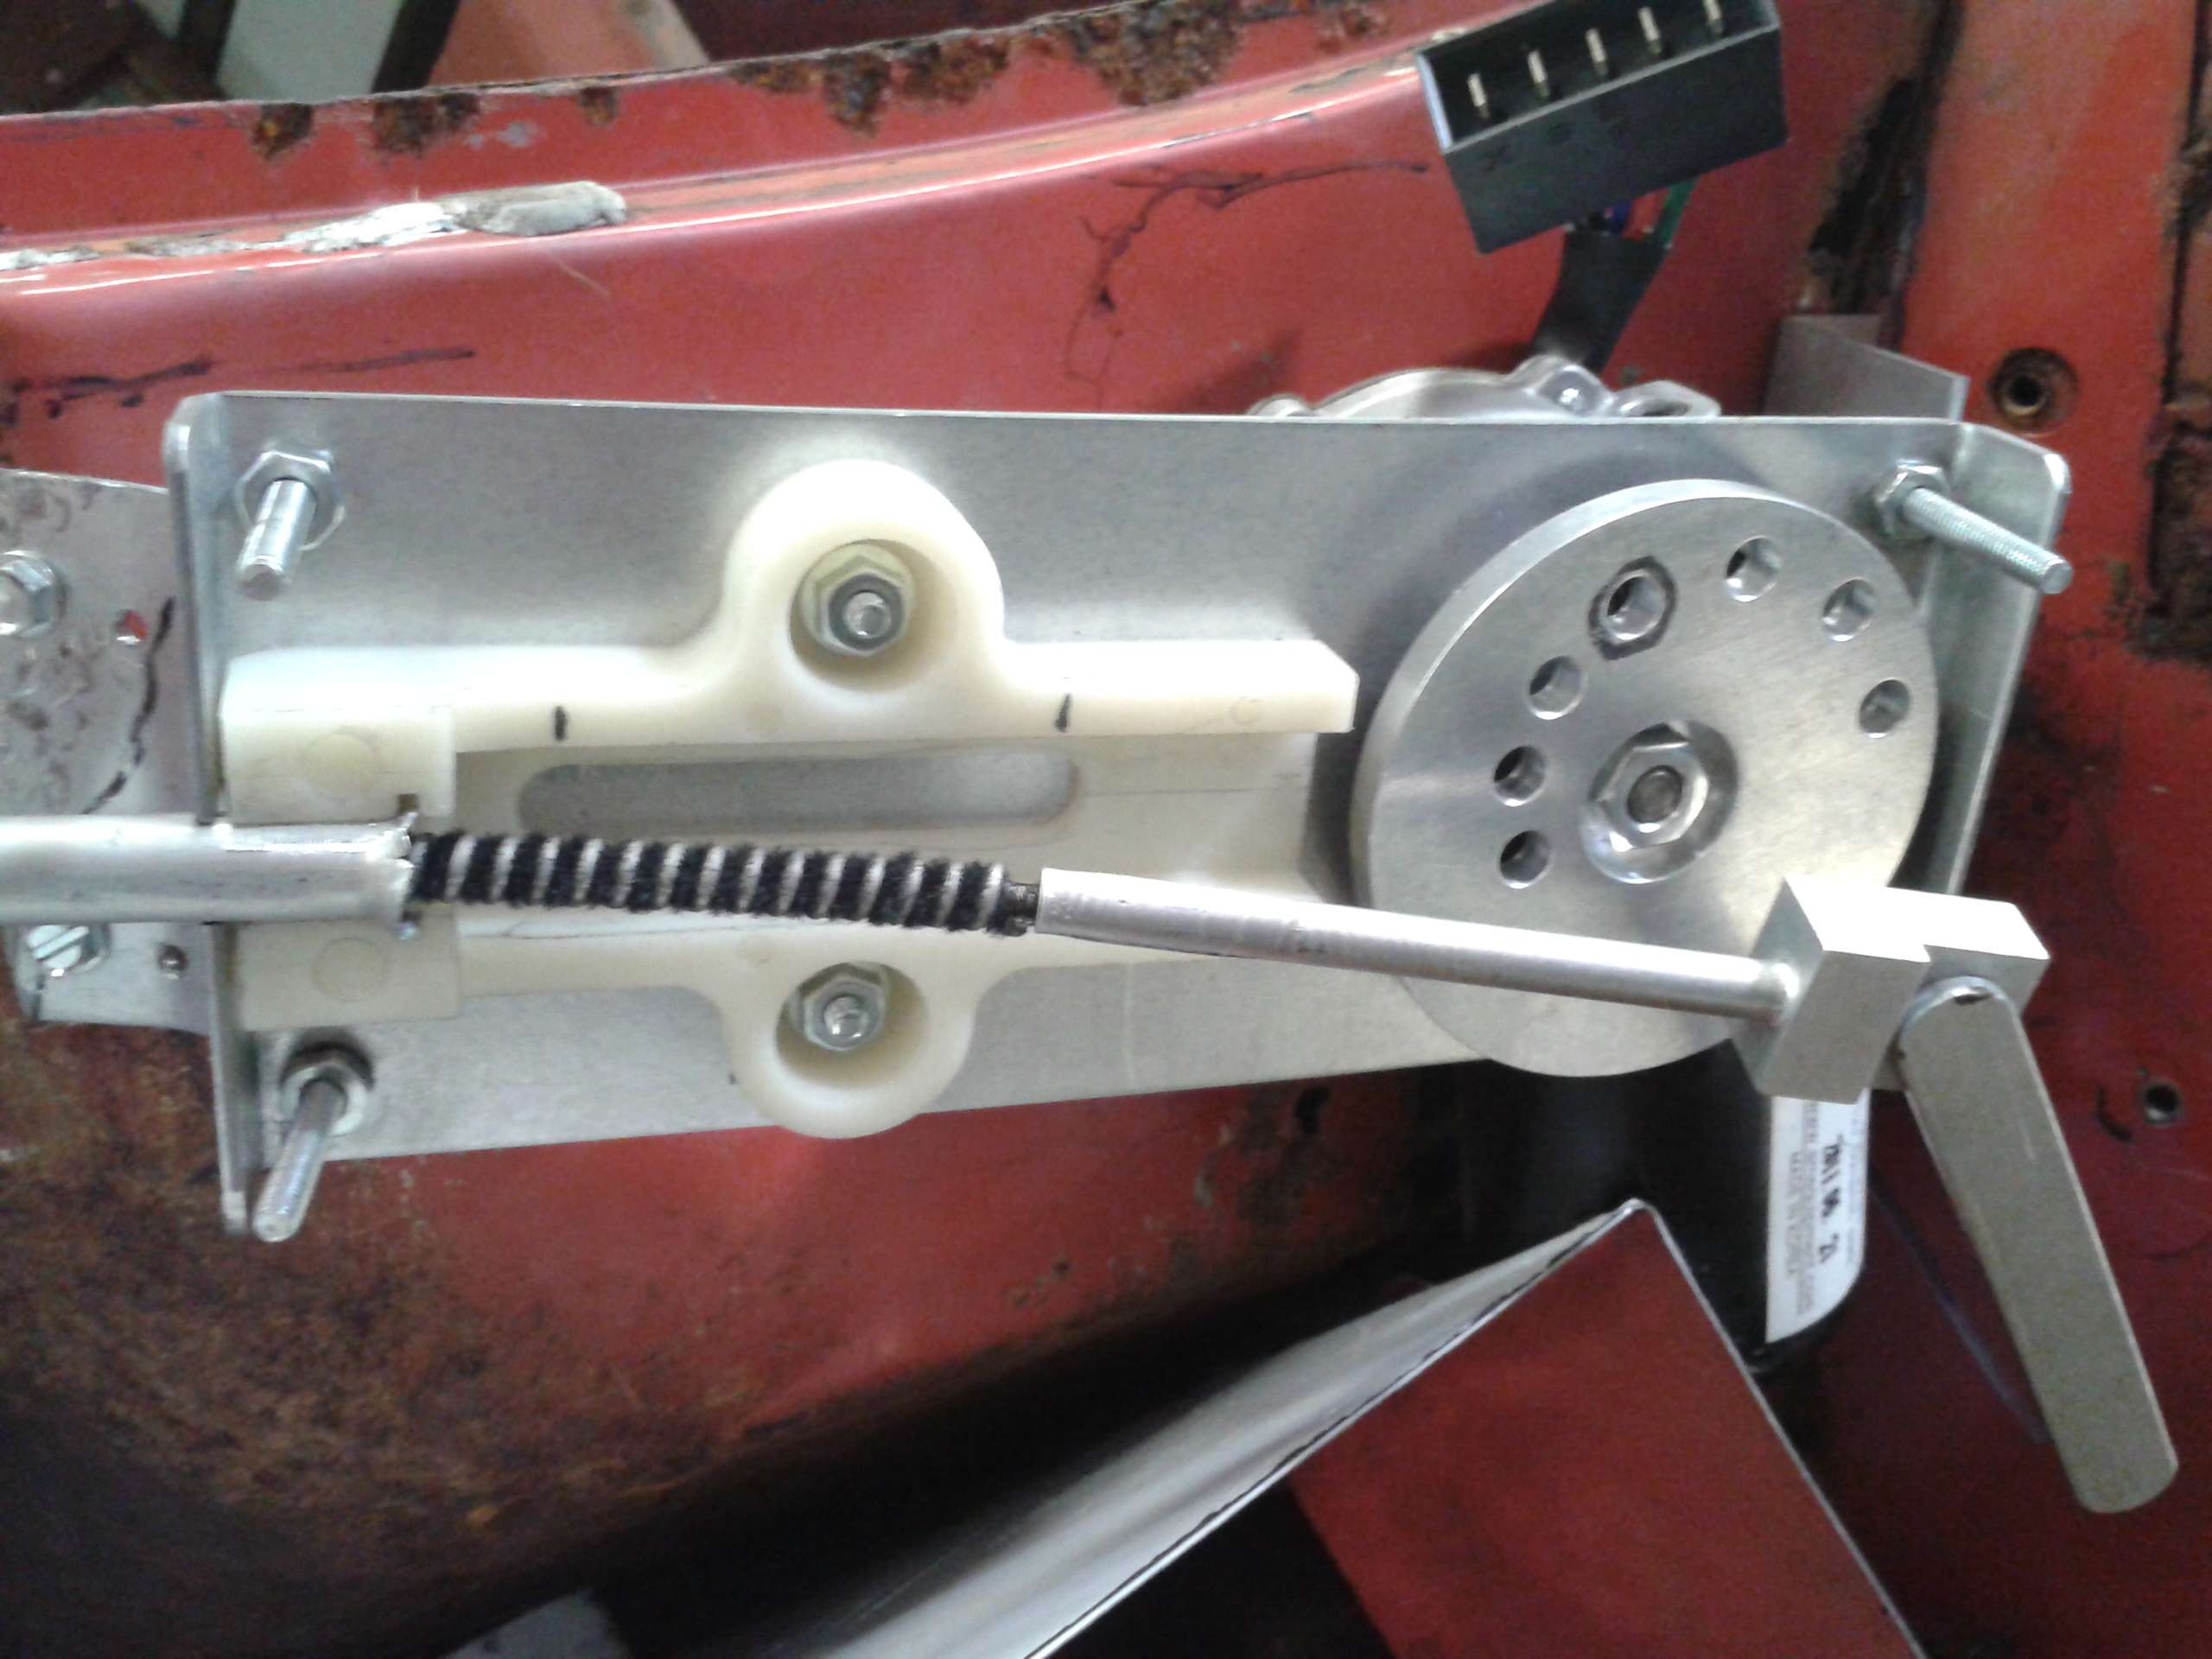
This is how a housing looks when mounted.
Run the tubing for the gear drive between the housings.
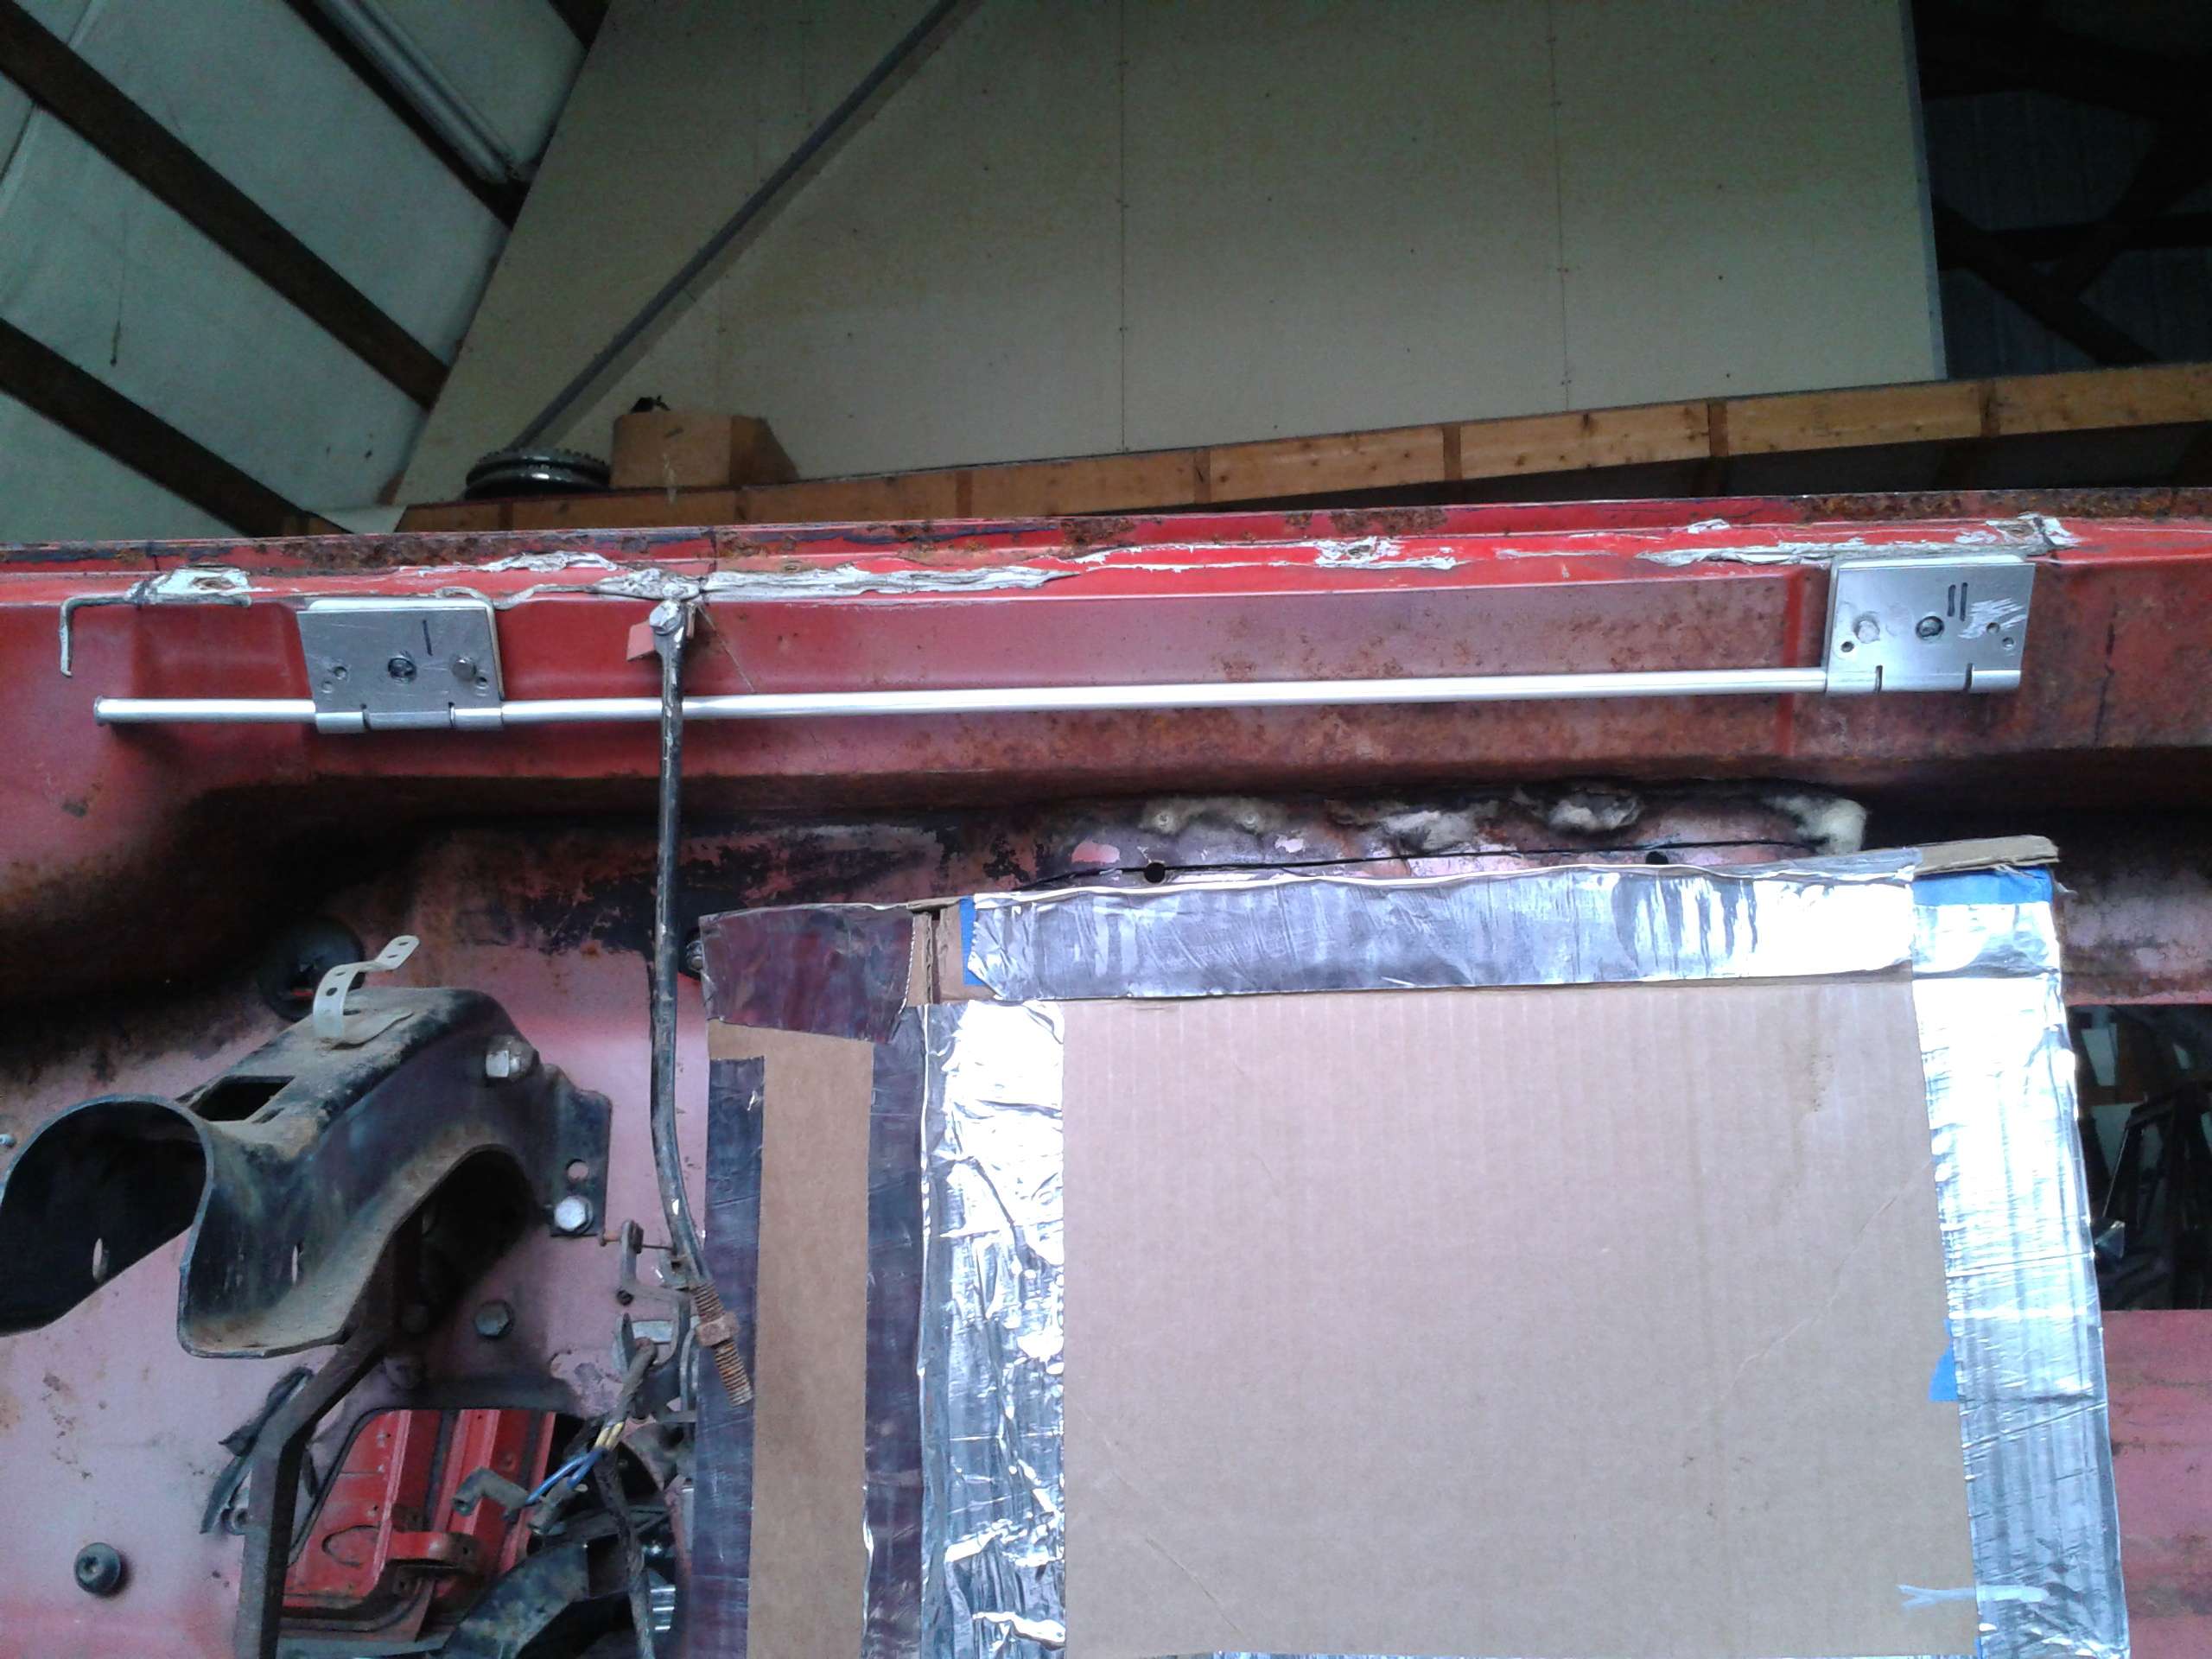
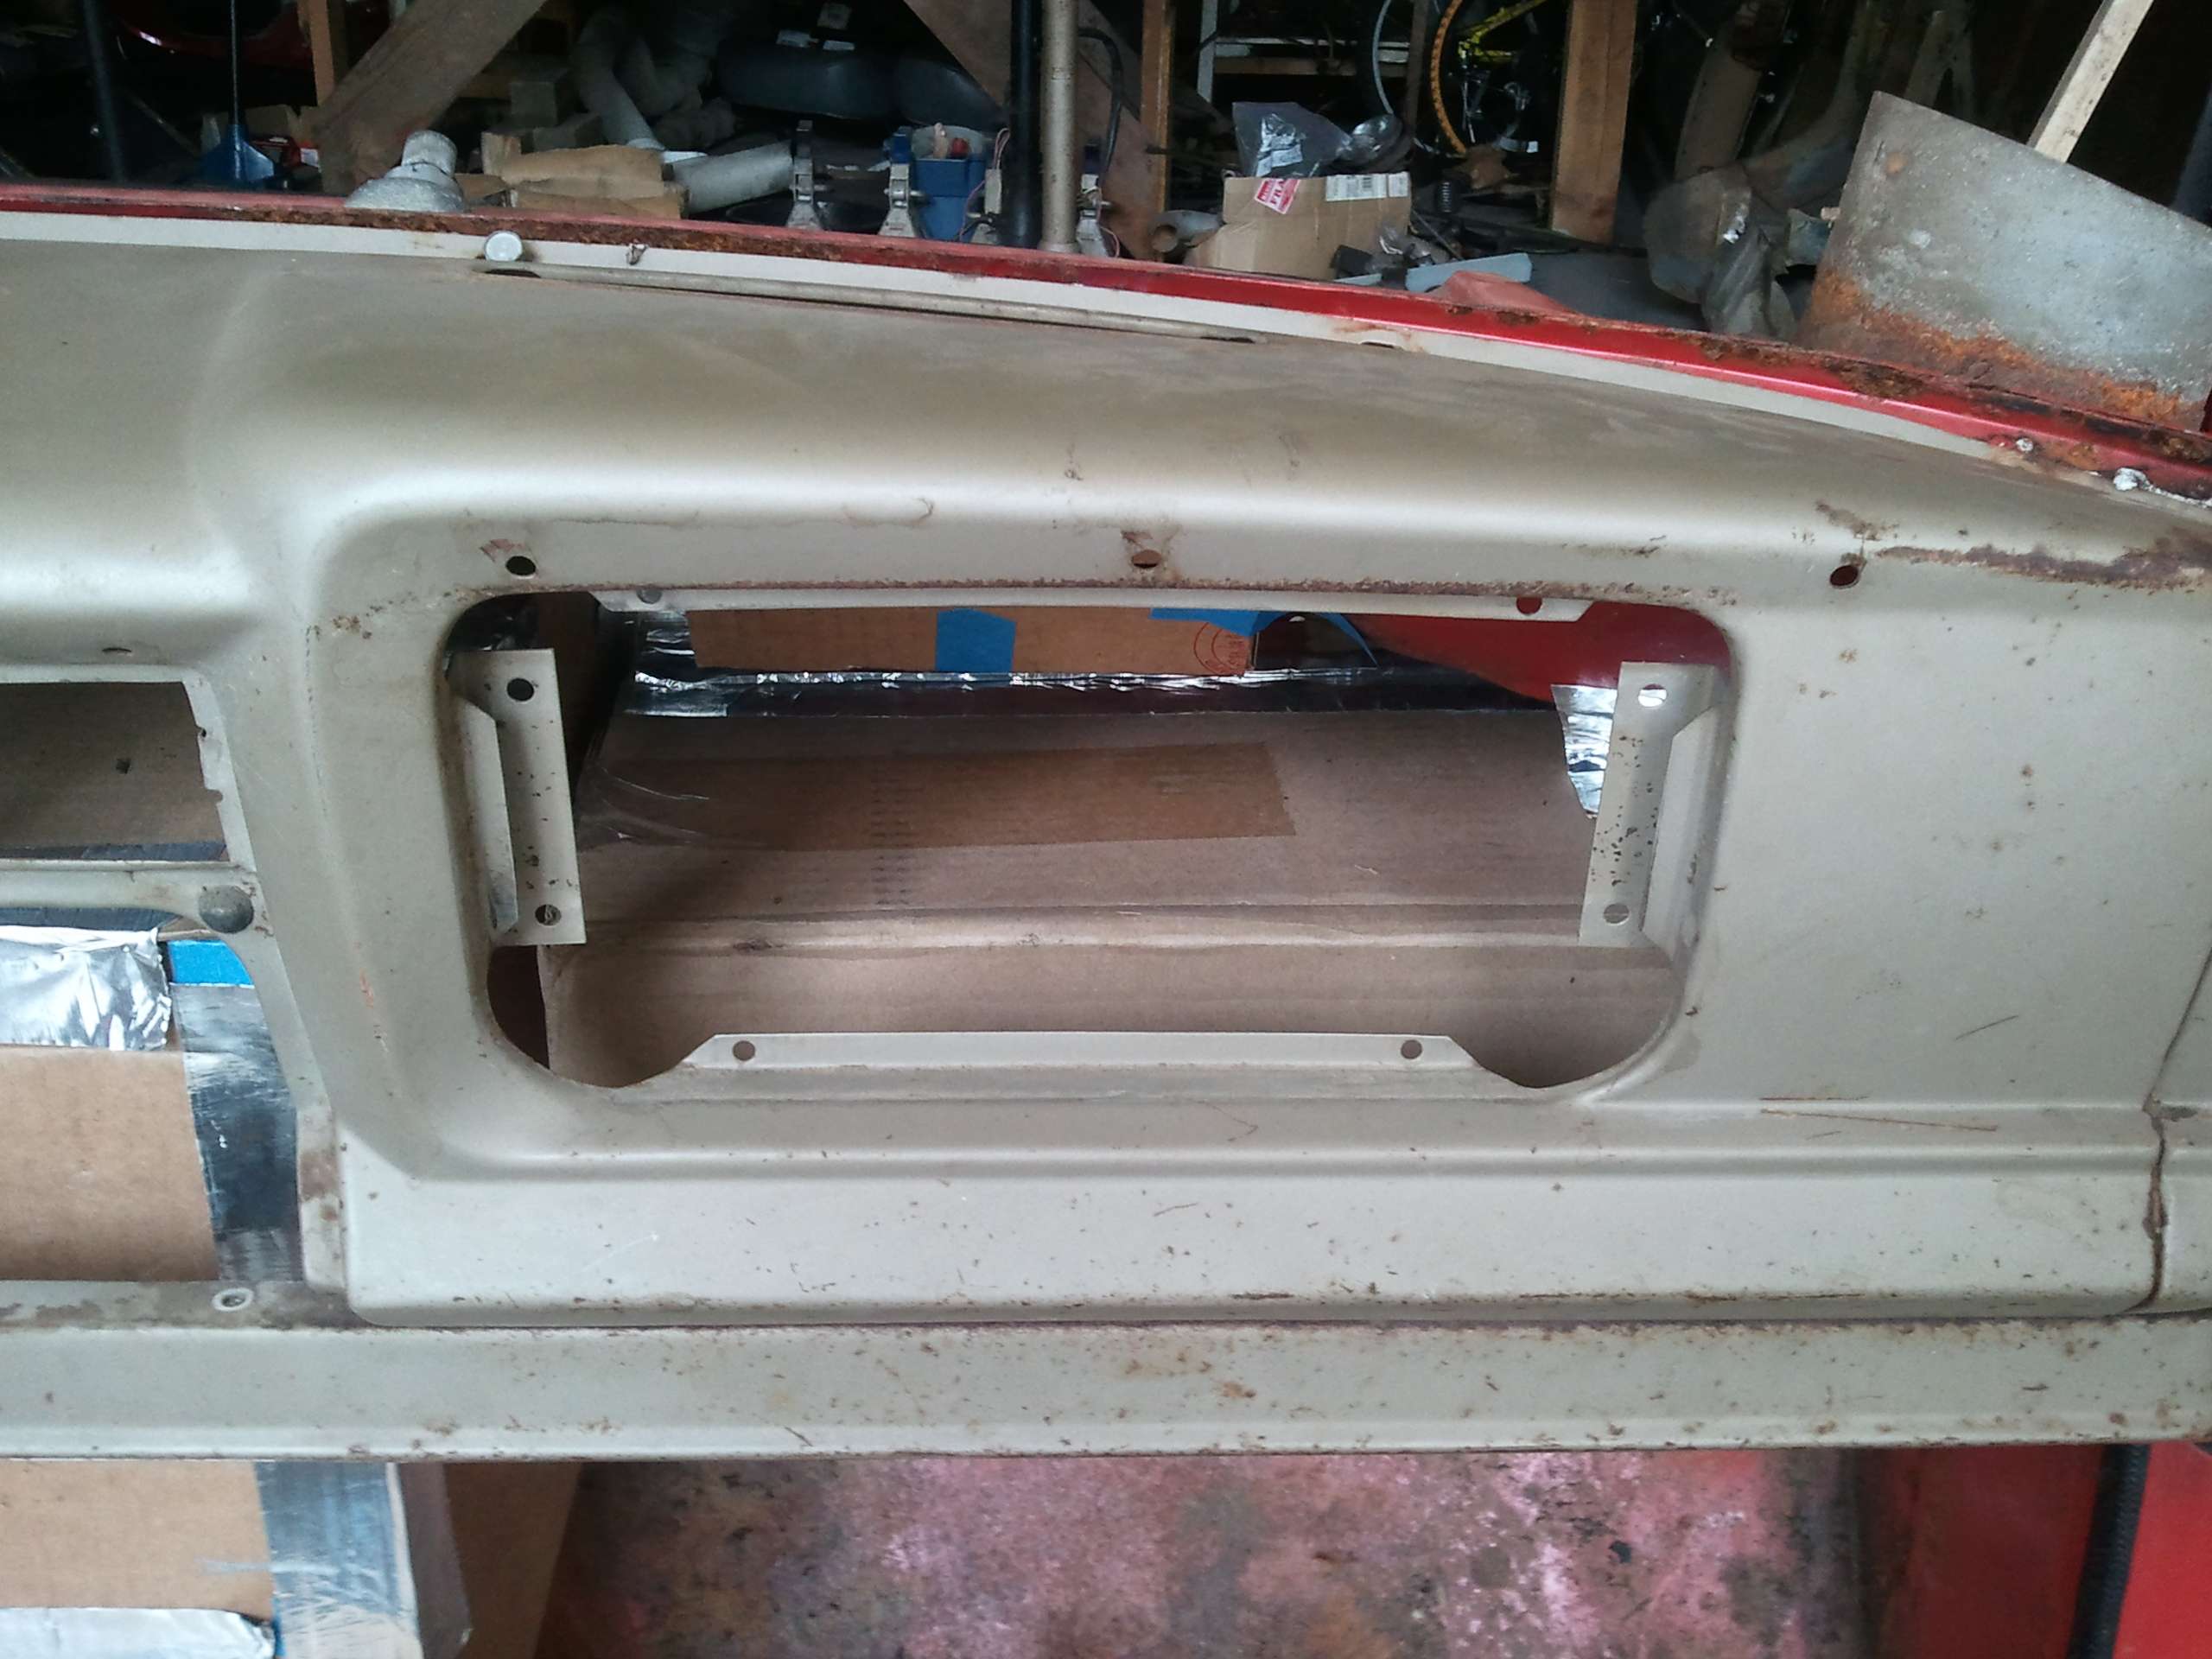
This is how it looks with the dash in place. While the dash was on I finalized the location for the motor.
Install the motor and temporarily put all the mechanical parts on. When everything is permanently installed there isn't one exposed moving part. I can butt other components right up to the wiper parts and have no moving part contacts. This is a really slick system.
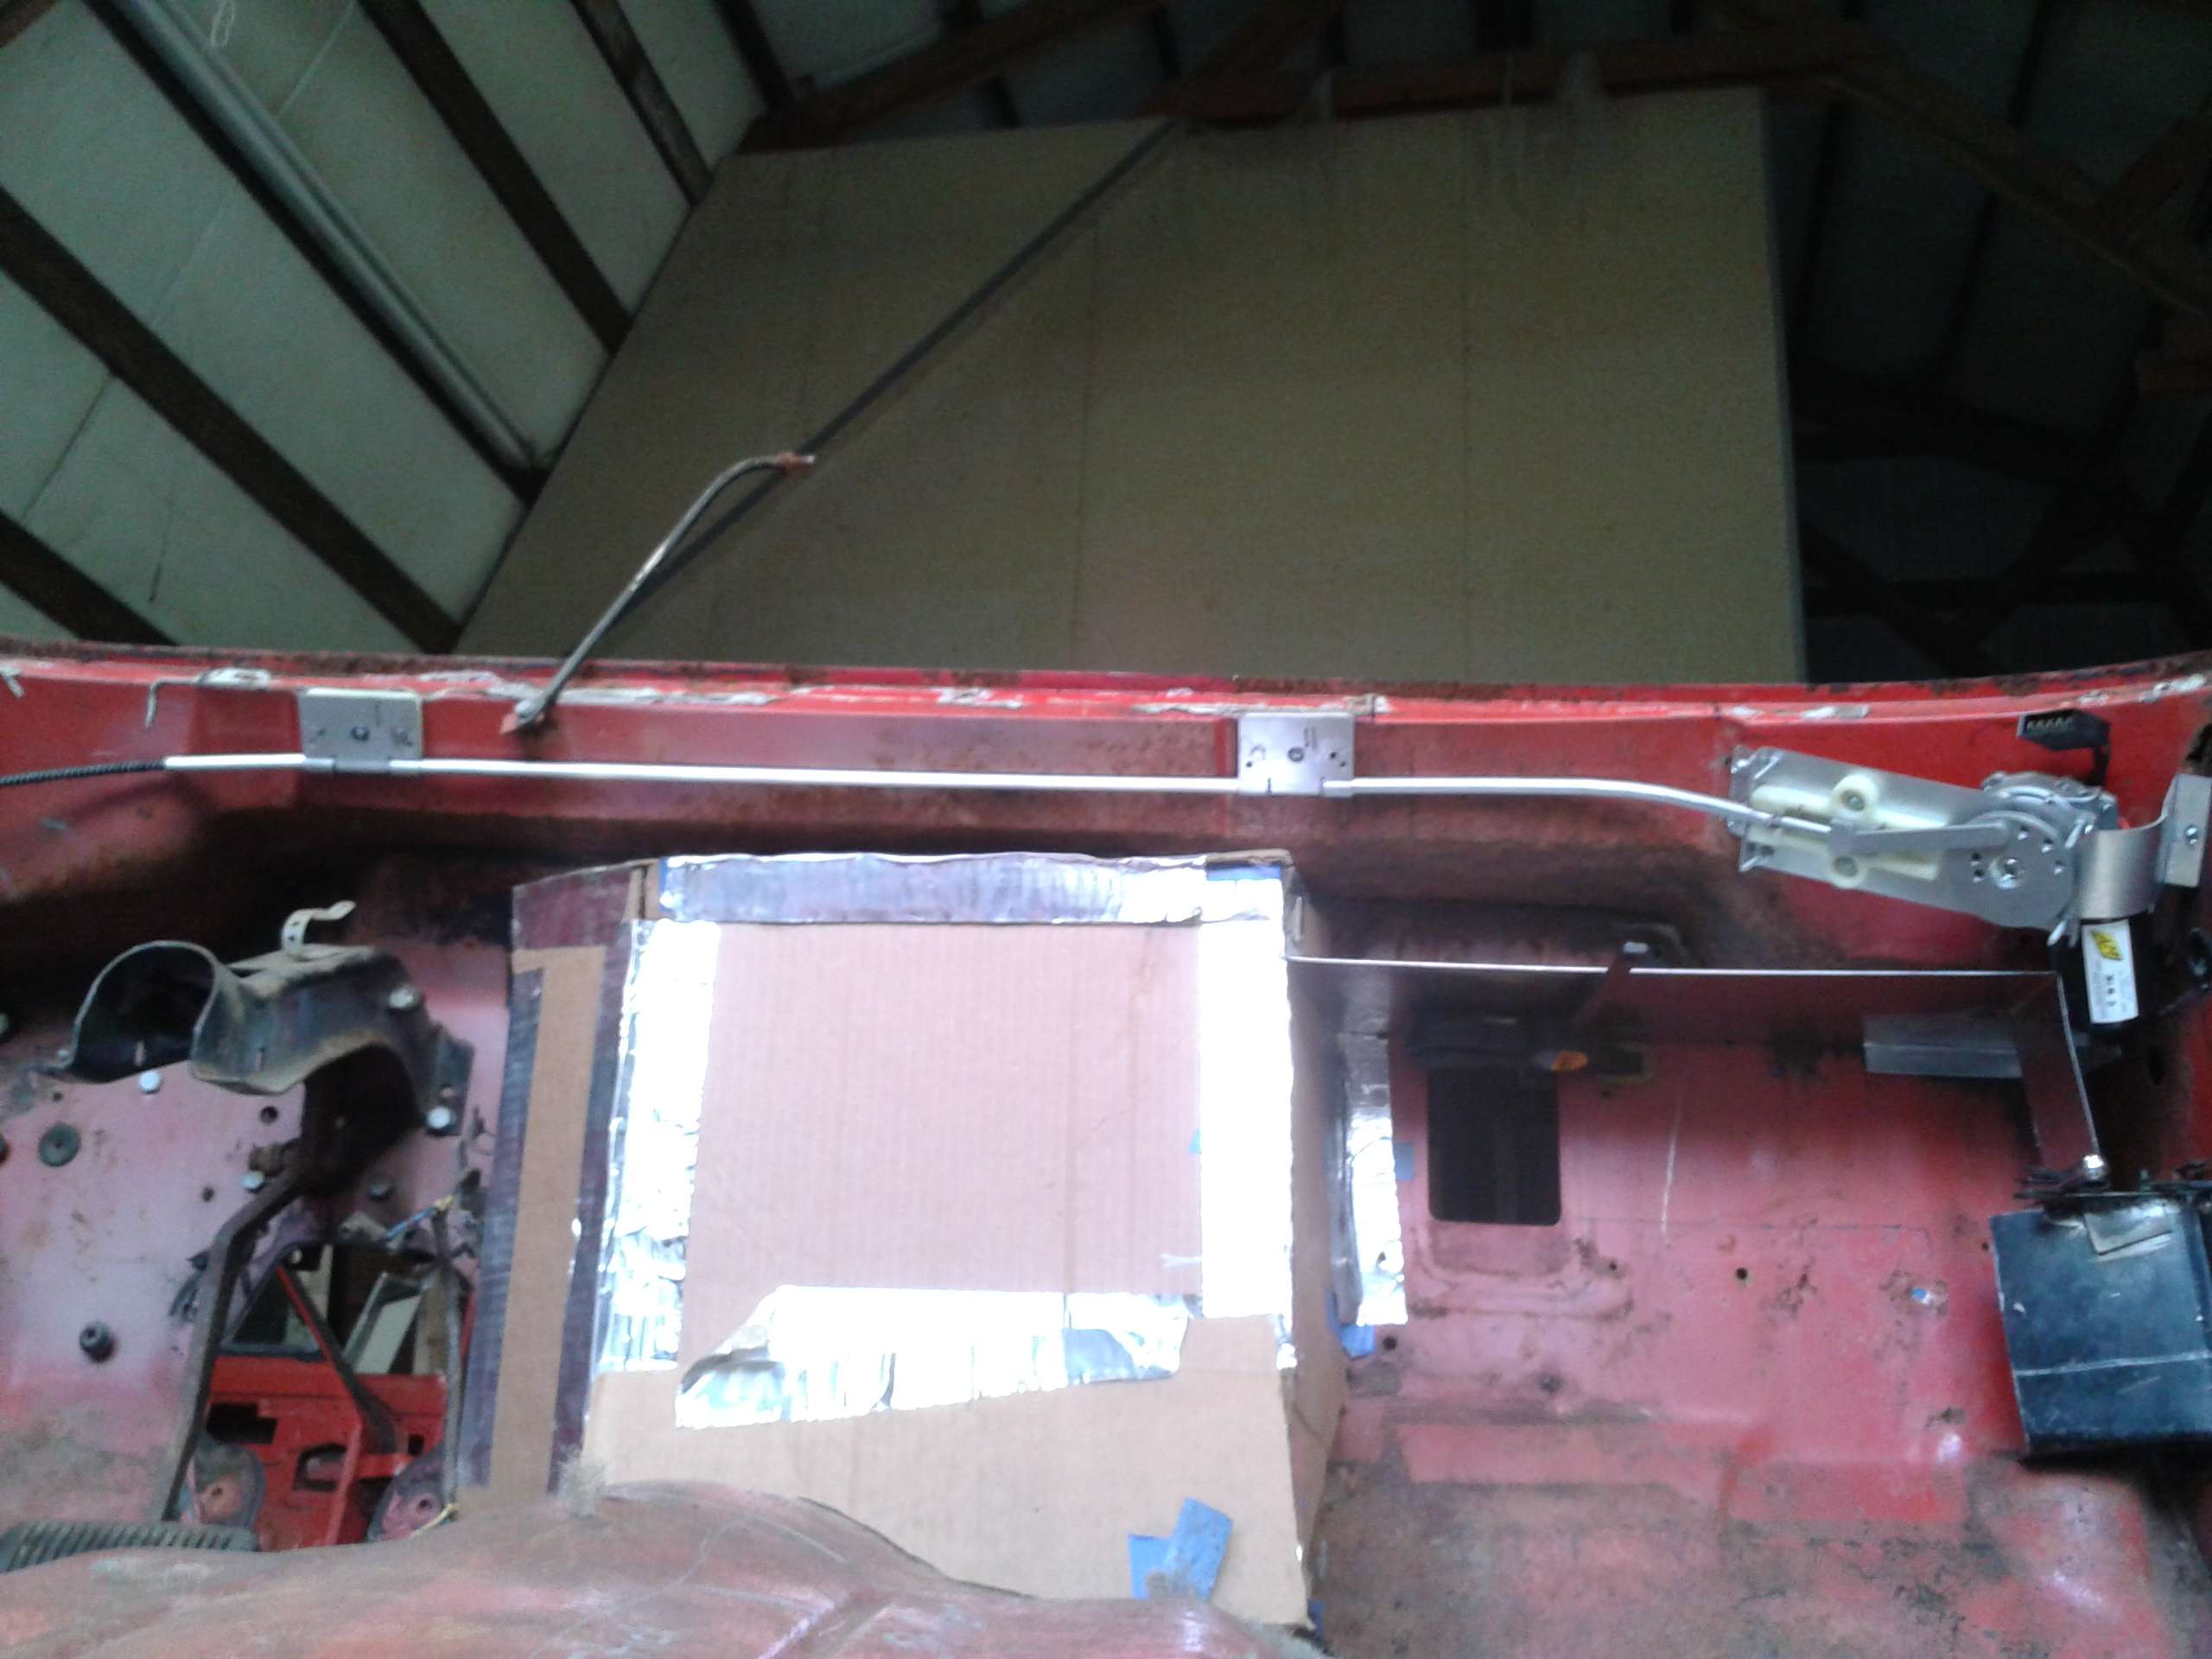
The white piece of sheetmetal is the top panel for the heater. All the space above it, except for the passenger side defroster duct, can now be turned into a glovebox with its door where the old speaker use to be.

Now I can finish mocking up the heater and cable controls. When I get the truck back it will be a simple matter of transferring all the hardware over to the new cab.
Resbum

Run the tubing for the gear drive between the housings.

This is how it looks with the dash in place. While the dash was on I finalized the location for the motor.

Install the motor and temporarily put all the mechanical parts on. When everything is permanently installed there isn't one exposed moving part. I can butt other components right up to the wiper parts and have no moving part contacts. This is a really slick system.

The white piece of sheetmetal is the top panel for the heater. All the space above it, except for the passenger side defroster duct, can now be turned into a glovebox with its door where the old speaker use to be.

Now I can finish mocking up the heater and cable controls. When I get the truck back it will be a simple matter of transferring all the hardware over to the new cab.
Resbum
Last edited by Resbum on Sat Apr 06, 2013 8:15 am, edited 2 times in total.
Originally Posted by Resbum
"What year is my truck?... Which part?" Build thread- http://www.fsjnetwork.com/forum/viewtop ... 290#p18290
"What year is my truck?... Which part?" Build thread- http://www.fsjnetwork.com/forum/viewtop ... 290#p18290
-
Resbum
Topic author - Posts: 466
- Joined: Fri Jun 08, 2012 9:45 am
- Location: North East Oregon
Re: 1970 Gladiator 1 Ton 6BT 12V Cummins Build
.
.
Originally posted by JeepinPete 04-07-2012 07:46 AM
________________________________________
At first I was thinking to myself, whats wrong with the factory wiper linkages? Then seeing your doghouse, the reason was obvious. The only thing I worry about is welding the shaft to the gear. Hard steel parts generally do not take welding very well, and that is a pretty highly stressed area. Hopefully it works out for you, because that is a very slick setup
One question, do you have a picture of the flexible gear rack that drives the gears?
.
Originally posted by JeepinPete 04-07-2012 07:46 AM
________________________________________
At first I was thinking to myself, whats wrong with the factory wiper linkages? Then seeing your doghouse, the reason was obvious. The only thing I worry about is welding the shaft to the gear. Hard steel parts generally do not take welding very well, and that is a pretty highly stressed area. Hopefully it works out for you, because that is a very slick setup

One question, do you have a picture of the flexible gear rack that drives the gears?
Last edited by Resbum on Sat Apr 06, 2013 8:18 am, edited 1 time in total.
Originally Posted by Resbum
"What year is my truck?... Which part?" Build thread- http://www.fsjnetwork.com/forum/viewtop ... 290#p18290
"What year is my truck?... Which part?" Build thread- http://www.fsjnetwork.com/forum/viewtop ... 290#p18290
-
Resbum
Topic author - Posts: 466
- Joined: Fri Jun 08, 2012 9:45 am
- Location: North East Oregon
Re: 1970 Gladiator 1 Ton 6BT 12V Cummins Build
Quote:
________________________________________
Originally Posted by JeepinPete
At first I was thinking to myself, whats wrong with the factory wiper linkages? Then seeing your doghouse, the reason was obvious. The only thing I worry about is welding the shaft to the gear. Hard steel parts generally do not take welding very well, and that is a pretty highly stressed area. Hopefully it works out for you, because that is a very slick setup
One question, do you have a picture of the flexible gear rack that drives the gears?
________________________________________
Yeah, me too. I wanted to make sure it was welded good. I kept the heat on a touch longer than normal and watched for good penetration. The gear actually accepted the weld stock really well. That's also why I decided not to remove the extra weld material and drilled a hole in the other gear housing plate to accommodate it. Then, as a last test, I used a small strap wrench I have on the gear, locked the shaft in place, and gave it a good twist. I figure if that didn't break it a good load of snow sitting on top of the wiper won't. Time will tell.:rolleyes:
There's a solid core wire wrapped in a felt-like material, then a second wire spiral wrapped around all of that with spacing between the spirals. The spirals go into the valleys of the gear teeth and the felt accepts the points of the gear teeth. It's flexible enough that the directions say it can handle up to a 3 inch radius bend in the housing. For comparison, the bend you can see near the motor on my setup is about a 6 inch radius.
Robbie and Keith, at SPW, say their kit is based on some European OEM designs and that their parts will last as long as any OEM system will. After scrutinizing their system I believe them. I'm going to be shocked if I ever have a problem with the wipers.
Resbum
________________________________________
Originally Posted by JeepinPete
At first I was thinking to myself, whats wrong with the factory wiper linkages? Then seeing your doghouse, the reason was obvious. The only thing I worry about is welding the shaft to the gear. Hard steel parts generally do not take welding very well, and that is a pretty highly stressed area. Hopefully it works out for you, because that is a very slick setup
One question, do you have a picture of the flexible gear rack that drives the gears?
________________________________________
Yeah, me too. I wanted to make sure it was welded good. I kept the heat on a touch longer than normal and watched for good penetration. The gear actually accepted the weld stock really well. That's also why I decided not to remove the extra weld material and drilled a hole in the other gear housing plate to accommodate it. Then, as a last test, I used a small strap wrench I have on the gear, locked the shaft in place, and gave it a good twist. I figure if that didn't break it a good load of snow sitting on top of the wiper won't. Time will tell.:rolleyes:
There's a solid core wire wrapped in a felt-like material, then a second wire spiral wrapped around all of that with spacing between the spirals. The spirals go into the valleys of the gear teeth and the felt accepts the points of the gear teeth. It's flexible enough that the directions say it can handle up to a 3 inch radius bend in the housing. For comparison, the bend you can see near the motor on my setup is about a 6 inch radius.
Robbie and Keith, at SPW, say their kit is based on some European OEM designs and that their parts will last as long as any OEM system will. After scrutinizing their system I believe them. I'm going to be shocked if I ever have a problem with the wipers.
Resbum

Last edited by Resbum on Sat Apr 06, 2013 8:21 am, edited 1 time in total.
Originally Posted by Resbum
"What year is my truck?... Which part?" Build thread- http://www.fsjnetwork.com/forum/viewtop ... 290#p18290
"What year is my truck?... Which part?" Build thread- http://www.fsjnetwork.com/forum/viewtop ... 290#p18290
-
Resbum
Topic author - Posts: 466
- Joined: Fri Jun 08, 2012 9:45 am
- Location: North East Oregon
Re: 1970 Gladiator 1 Ton 6BT 12V Cummins Build
.
Originally posted by budojeepr 04-07-2012 08:40 AM
________________________________________
Wow, that wiper setup is cool. Nice work. Having seen this, I probably won't be happy with my stock setup. Ah, well...
Originally posted by budojeepr 04-07-2012 08:40 AM
________________________________________
Wow, that wiper setup is cool. Nice work. Having seen this, I probably won't be happy with my stock setup. Ah, well...
Last edited by Resbum on Sat Apr 06, 2013 8:22 am, edited 1 time in total.
Originally Posted by Resbum
"What year is my truck?... Which part?" Build thread- http://www.fsjnetwork.com/forum/viewtop ... 290#p18290
"What year is my truck?... Which part?" Build thread- http://www.fsjnetwork.com/forum/viewtop ... 290#p18290
-
Resbum
Topic author - Posts: 466
- Joined: Fri Jun 08, 2012 9:45 am
- Location: North East Oregon
Re: 1970 Gladiator 1 Ton 6BT 12V Cummins Build
Actually, both sets of the Jeep wiper parts showed almost no wear and still turned as smooth as silk after more than 40 years. Jeep sure built 'em right back in those days.
Resbum
Resbum
Originally Posted by Resbum
"What year is my truck?... Which part?" Build thread- http://www.fsjnetwork.com/forum/viewtop ... 290#p18290
"What year is my truck?... Which part?" Build thread- http://www.fsjnetwork.com/forum/viewtop ... 290#p18290
-
Resbum
Topic author - Posts: 466
- Joined: Fri Jun 08, 2012 9:45 am
- Location: North East Oregon
Re: 1970 Gladiator 1 Ton 6BT 12V Cummins Build
It's hard to believe the cab and bed came off the same truck. The cab was so far gone I had to buy a donor truck so I had a good cab to work with. It was rusted through all of the floor, the air ducting areas, and all the way around the windshield.
Last edited by Resbum on Sat Apr 06, 2013 8:22 am, edited 2 times in total.
Originally Posted by Resbum
"What year is my truck?... Which part?" Build thread- http://www.fsjnetwork.com/forum/viewtop ... 290#p18290
"What year is my truck?... Which part?" Build thread- http://www.fsjnetwork.com/forum/viewtop ... 290#p18290
-
Resbum
Topic author - Posts: 466
- Joined: Fri Jun 08, 2012 9:45 am
- Location: North East Oregon
Re: 1970 Gladiator 1 Ton 6BT 12V Cummins Build
Quote:
________________________________________
Originally Posted by lobie
... what happened to the cab the school worked on?
________________________________________
lobie, you didn't miss anything. There's just not been much to post about the new cab lately. It's part of doing business with the school. Student needs come first and foremost. It didn't get worked on for a week or so between quarters. With the new quarter they were doing more academic classroom time for new learning material. They have been finishing it up, but the progress slowed down. For the last week they've been finishing up the filler work and smoothing everything up.
I did swing by the school yesterday and Kurt and I set next Wednesday as the pick up date. :dancingbanana: It'll be nice to have it back.
Considering what they've gotten accomplished I couldn't be happier with them keeping it as long as they have.
On I gave them the cab with no promise other than they were going to fix the rusted area around the throttle pedal. I told Kurt if they could do more feel free to keep the cab longer.
In 7 weeks(5 1/2 working weeks) they've repaired/replaced:
-The whole floor
-The passenger side rocker panel
-Created a new tunnel
-Widened the rear exit of the tunnel
-Created a new notch in the firewall
-Removed the old wiper motor mount
-Filled the old heater core opening in the firewall
-Filled an old gas tank filler opening behind the passenger door
-Fixed some rust on one of the windshield pillars
-Relocated the frame x-member near the rear axle
-Removed any surface rust that could be found
-And fixed a lot of minor things all over the cab
One very BIG to all the guys that got their hands dirty on my cab. They're giving me a brand new one back. I'm going to treat the 5 or so students that worked on it to the local Round Table Pizza lunch buffet.
For me, the school keeping the cab so long turned out to be a blessing in disguise. It's allowed me to turn my attention to things that, until now, I had only thought about in the most general sense. Wiring, dashboard, heater, wipers, body work, everything else I've posted about since they started work on the cab. I got a whole mess load of parts ordered that will be needed in the future and things are going to go together much faster now.
Resbum
________________________________________
Originally Posted by lobie
... what happened to the cab the school worked on?
________________________________________
lobie, you didn't miss anything. There's just not been much to post about the new cab lately. It's part of doing business with the school. Student needs come first and foremost. It didn't get worked on for a week or so between quarters. With the new quarter they were doing more academic classroom time for new learning material. They have been finishing it up, but the progress slowed down. For the last week they've been finishing up the filler work and smoothing everything up.
I did swing by the school yesterday and Kurt and I set next Wednesday as the pick up date. :dancingbanana: It'll be nice to have it back.
Considering what they've gotten accomplished I couldn't be happier with them keeping it as long as they have.
On I gave them the cab with no promise other than they were going to fix the rusted area around the throttle pedal. I told Kurt if they could do more feel free to keep the cab longer.
In 7 weeks(5 1/2 working weeks) they've repaired/replaced:
-The whole floor
-The passenger side rocker panel
-Created a new tunnel
-Widened the rear exit of the tunnel
-Created a new notch in the firewall
-Removed the old wiper motor mount
-Filled the old heater core opening in the firewall
-Filled an old gas tank filler opening behind the passenger door
-Fixed some rust on one of the windshield pillars
-Relocated the frame x-member near the rear axle
-Removed any surface rust that could be found
-And fixed a lot of minor things all over the cab
One very BIG
to all the guys that got their hands dirty on my cab. They're giving me a brand new one back. I'm going to treat the 5 or so students that worked on it to the local Round Table Pizza lunch buffet.For me, the school keeping the cab so long turned out to be a blessing in disguise. It's allowed me to turn my attention to things that, until now, I had only thought about in the most general sense. Wiring, dashboard, heater, wipers, body work, everything else I've posted about since they started work on the cab. I got a whole mess load of parts ordered that will be needed in the future and things are going to go together much faster now.
Resbum
Originally Posted by Resbum
"What year is my truck?... Which part?" Build thread- http://www.fsjnetwork.com/forum/viewtop ... 290#p18290
"What year is my truck?... Which part?" Build thread- http://www.fsjnetwork.com/forum/viewtop ... 290#p18290
-
Resbum
Topic author - Posts: 466
- Joined: Fri Jun 08, 2012 9:45 am
- Location: North East Oregon
Re: 1970 Gladiator 1 Ton 6BT 12V Cummins Build
.
.
Originally posted by twisted frame 04-23-2012 07:41 PM
________________________________________
Those students did a fabulous job. Wow. It brings new meaning to that Custom Cab badge.
________________________________________
Yes, they did. I'm pleased with how it turned out.
Resbum
.
Originally posted by twisted frame 04-23-2012 07:41 PM
________________________________________
Those students did a fabulous job. Wow. It brings new meaning to that Custom Cab badge.
________________________________________
Yes, they did. I'm pleased with how it turned out.
Resbum
Last edited by Resbum on Sat Apr 06, 2013 8:24 am, edited 1 time in total.
Originally Posted by Resbum
"What year is my truck?... Which part?" Build thread- http://www.fsjnetwork.com/forum/viewtop ... 290#p18290
"What year is my truck?... Which part?" Build thread- http://www.fsjnetwork.com/forum/viewtop ... 290#p18290
-
Resbum
Topic author - Posts: 466
- Joined: Fri Jun 08, 2012 9:45 am
- Location: North East Oregon
Re: 1970 Gladiator 1 Ton 6BT 12V Cummins Build
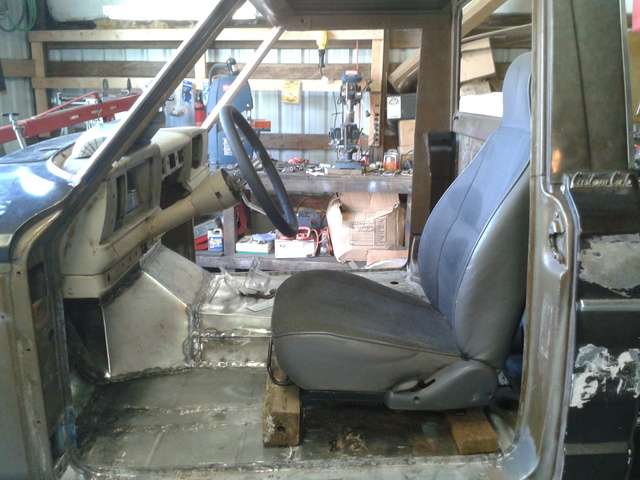
I spent the weekend mocking up the locations of all the controls. i.e. Seats, steering wheel, shifters, and foot pedals. Took all the measurements, marked the locations, and took mess loads for pictures. Now the cab doesn't need to be on the frame in order for me to work on either. I need to take the cab back off to finish the mechanicals on the frame and do prep work and paint on the bottom of the cab.

Last edited by Resbum on Sat Apr 06, 2013 8:25 am, edited 1 time in total.
Originally Posted by Resbum
"What year is my truck?... Which part?" Build thread- http://www.fsjnetwork.com/forum/viewtop ... 290#p18290
"What year is my truck?... Which part?" Build thread- http://www.fsjnetwork.com/forum/viewtop ... 290#p18290