AMC 360 Rebuild

Area to show off your Custom Build threads.
User avatar

Billyj7175
Posts: 147
Joined: Thu Sep 20, 2012 4:34 pm

Re: AMC 360 Rebuild

Post by Billyj7175 »

As if this thread isn't pic heavy already...

Here you go?

My disclaimer...any of the more experienced builders have any inputs, please let me know...I am no way, shape or form an expert...

Image

Image

Image

Image

Image

Image

Image

Image

Image

Image

Image

Image
User avatar

Stuka
Site Admin
Posts: 11806
Joined: Thu May 12, 2011 5:53 pm
Location: CA
Contact:

Re: AMC 360 Rebuild

Post by Stuka »

Very nice job so far!


Sent from my iPhone using Tapatalk
2017 JKU Rubicon
Pevious Jeeps: 1981 J10, 1975 Cherokee, 2008 JK, 2005 KJ, 1989 XJ
User avatar

yjsquareguy
Posts: 106
Joined: Fri Nov 23, 2012 5:16 am
Location: Jacksonville, FL
Contact:

Re: AMC 360 Rebuild

Post by yjsquareguy »

Wow. Great job. The ppt presentation is super. Thanks
Rob
rob.fischer@matanzasjeepclub.com

2007 JK Rubicon
2005 Grand Cherokee 5.7L
1989 Grand Wagoneer
User avatar

Topic author
pharmdut
Posts: 49
Joined: Thu Feb 21, 2013 1:17 pm
Location: Franklin, TN

Re: AMC 360 Rebuild

Post by pharmdut »

Billyj7175, that is an awesome ppt!! I just happen to have an adjustable pushrod to do this test. I will do this test very soon and post pics. This is EXACTLY what I needed.

My plan today is to assemble my engine hoist and get the garage prepared for pulling the old 360 next weekend. Wish me luck!!!

BTW...any pointers from the forum or any helpful little pearls for pulling a 360 out of an '88 GW would be greatly appreciated.
User avatar

jaber
Vendor
Posts: 3066
Joined: Sat Aug 27, 2011 5:24 pm
Location: Chino Valley, Az.

Re: AMC 360 Rebuild

Post by jaber »

Be gentle around the heater box, it will break easy. 4 nuts and it will come off the firewall. ;)
Jeff

'46 cj3a
'51 Willys p/u
'51 Willys Parkway Conversion
'74 CJ5
'75 J-20 Wrecker
'75 J-20 Cummins service truck
'77 J-10 p/u
'79 Cherokee
'88 Grand Wagoneer
http://s252.photobucket.com/albums/hh14/jeffaber/
User avatar

Billyj7175
Posts: 147
Joined: Thu Sep 20, 2012 4:34 pm

Re: AMC 360 Rebuild

Post by Billyj7175 »

jaber wrote:Be gentle around the heater box, it will break easy. 4 nuts and it will come off the firewall. ;)
X10...especially if you don't remove the exhaust manifolds.

Two nuts can be accessed from under the hood, the other two are inside. If you have A/C, the easiest way I found to access them was to remove the glovebox and go in through there.
User avatar

Topic author
pharmdut
Posts: 49
Joined: Thu Feb 21, 2013 1:17 pm
Location: Franklin, TN

Re: AMC 360 Rebuild

Post by pharmdut »

Hey billyj7175......should I perform this test on hydraulic lifters or solid lifters? What exactly is zero lash? I did this today on hydraulic lifters on the number one cylinder at TDC. The testing rod seems to just be pushing the heel of the lifter down as I lengthen it. I am still able to turn the pushrod between my fingers. Given, it is tight to turn though. I apologize if this is such an amateur question.

Thanks in advance for the help!!
User avatar

Billyj7175
Posts: 147
Joined: Thu Sep 20, 2012 4:34 pm

Re: AMC 360 Rebuild

Post by Billyj7175 »

pharmdut wrote:Hey billyj7175......should I perform this test on hydraulic lifters or solid lifters? What exactly is zero lash? I did this today on hydraulic lifters on the number one cylinder at TDC. The testing rod seems to just be pushing the heel of the lifter down as I lengthen it. I am still able to turn the pushrod between my fingers. Given, it is tight to turn though. I apologize if this is such an amateur question.

Thanks in advance for the help!!
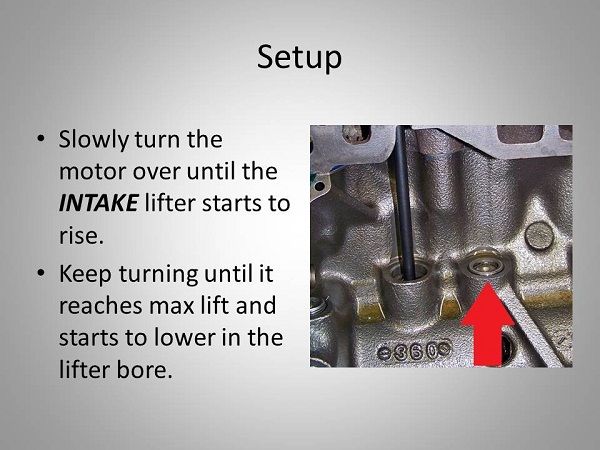
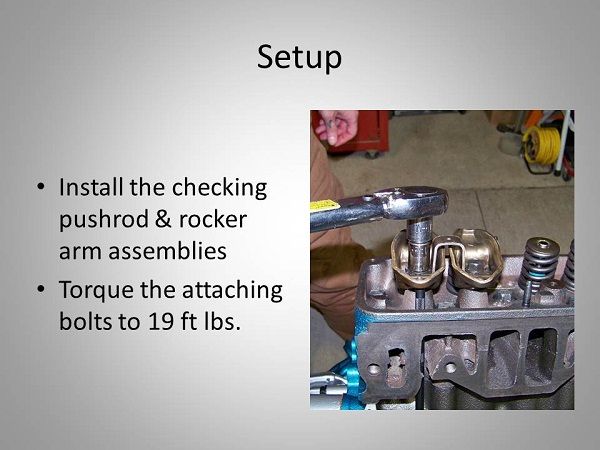
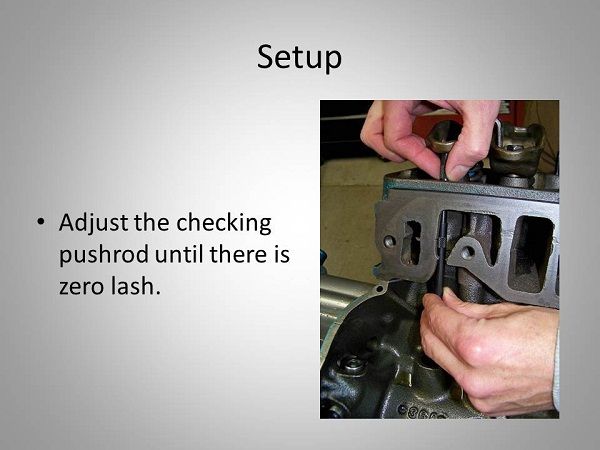
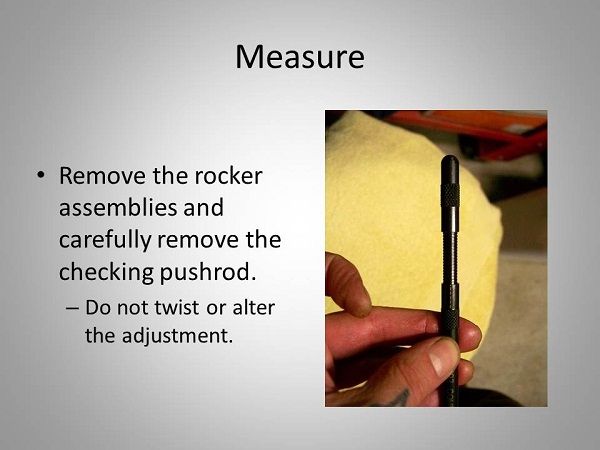
1) Should be done with hydraulic lifters.

2) Zero lash is when there is no longer any vertical movement. You should still be able to spin the pushrod with only a small amount of resistance. If the lifter is starting to depress, you've got too far. You'll get a feel for it...

3) No worries...I only know this from learning from other FSJ'rs. I've done a few others, but this is my first AMC build too and it's been a learning process for sure...


As soon as I get my stem sweep patterns right... :banghead: I'll do another ppt on how to do it as well. As it stands right now, the patterns are about .050" off center towards the exhaust side. Pedestal shims should be here soon...
User avatar

Topic author
pharmdut
Posts: 49
Joined: Thu Feb 21, 2013 1:17 pm
Location: Franklin, TN

Starting to pull engine

Post by pharmdut »

Last night I pulled the GW into the garage to start pulling the engine. Last night I drained the radiator, pulled the fan shroud, pulled the radiator, and pulled the fan. Oh, I also pulled the battery and it's tray. Doesn't sound exciting, i know, but it was fun! Here are some more pics.

This is a picture of the engine before I started. I will use this as my "BEFORE" pic when I compare the new engine at the end of this build.
IMG_0724.jpg
IMG_0723.jpg
Fan shroud is gone.
Radiator is gone.
IMG_0738.jpg
Fan and clutch is gone.
IMG_0744.jpg
What color scheme should I use on the fan? Any ideas?
IMG_0745.jpg
You do not have the required permissions to view the files attached to this post.
User avatar

Topic author
pharmdut
Posts: 49
Joined: Thu Feb 21, 2013 1:17 pm
Location: Franklin, TN

Engine is OUT!

Post by pharmdut »

Well I was able to get the engine out today. Wasn't as hard as I thought.
IMG_0801.jpg
Here it is on the floor. Time to start swapping over the accessories.
IMG_0811.jpg
You do not have the required permissions to view the files attached to this post.
Last edited by pharmdut on Fri May 17, 2013 11:56 am, edited 2 times in total.
User avatar

Topic author
pharmdut
Posts: 49
Joined: Thu Feb 21, 2013 1:17 pm
Location: Franklin, TN

.

Post by pharmdut »

.
Last edited by pharmdut on Fri May 17, 2013 11:57 am, edited 1 time in total.

theQman
Posts: 7
Joined: Mon Oct 08, 2012 7:29 pm
Location: Valpo IN

Re: AMC 360 Rebuild

Post by theQman »

http://www.carcraft.com/techarticles/11 ... ewall.html

Check this out. I saw your video and I think something is off too but I'm not sure what to do.
User avatar

Topic author
pharmdut
Posts: 49
Joined: Thu Feb 21, 2013 1:17 pm
Location: Franklin, TN

Re: AMC 360 Rebuild

Post by pharmdut »

theQman wrote:http://www.carcraft.com/techarticles/11 ... ewall.html

Check this out. I saw your video and I think something is off too but I'm not sure what to do.

Thanks QMan. That was a good read.
User avatar

Billyj7175
Posts: 147
Joined: Thu Sep 20, 2012 4:34 pm

Re: AMC 360 Rebuild

Post by Billyj7175 »

Keep in mind that video covers a stud mounted (ie adjustable pivot height) rocker arm setup. Late model AMC's are fixed, therefore the only thing different pushrod lengths do, is change the amount of preload on the lifter. Pushrod length does not affect the stem pattern on on a pedestal paired setup (ie late model AMC). The idea on checking the pattern is the same though.

I don't have enough builds under my belt to pass personal judgement on that sweep pattern...

If you want to get a better idea on your stem pattern, you can take an old lifter apart, remove the spring and stack washers underneath the plunger. That will only allow the plunger to depress only so far and not completely collapse.
User avatar

Topic author
pharmdut
Posts: 49
Joined: Thu Feb 21, 2013 1:17 pm
Location: Franklin, TN

Re: AMC 360 Rebuild

Post by pharmdut »

I finally got around to putting the valve train together. I tested my pushrod length and then installed the components. I had soaked the lifters in oil the night before and used the Royal Purple assembly lube where the pushrods contacted the rockers. I also added a squirt of oil between the rocker and forcrum (sp?), then tightened it to 19 ft lbs. DONE!

Here is the sweep pattern
IMG_0819.jpg
Here is a before pic
IMG_0824.jpg
Here is an after
IMG_0830.jpg
Here is a picture of the progress up to now with the old engine in the back ground.
IMG_0831.jpg
Next is a lot of clean up. Sanding old rusty parts. Blasting and then painting. Since I like to post pics I will have some of those later.
You do not have the required permissions to view the files attached to this post.
User avatar

Topic author
pharmdut
Posts: 49
Joined: Thu Feb 21, 2013 1:17 pm
Location: Franklin, TN

Re: AMC 360 Rebuild

Post by pharmdut »

Well, here are some pictures of some of the cleaned up parts. There was a ton of wire wheel, boas cabinet, and sanding involved! Should have gotten some before pics. Oh well. I still need to work on the radiator, fan blades, fan shroud, battery tray, and heater box. The radiator needs a few tack welds too. The side bracket is loose.
IMG_0833.jpg
IMG_0834.jpg
IMG_0835.jpg
Needs work still
IMG_0836.jpg
IMG_0837.jpg
You do not have the required permissions to view the files attached to this post.

cherren
Posts: 1
Joined: Fri Mar 15, 2013 3:11 am

Re: AMC 360 Rebuild

Post by cherren »

great read will be following with interest
User avatar

Moosepuck
Posts: 1
Joined: Tue Apr 02, 2013 4:55 am

Re: AMC 360 Rebuild

Post by Moosepuck »

Had to register just to say post an update! See you this weekend!
No FSJ's currently, several in the past
User avatar

Topic author
pharmdut
Posts: 49
Joined: Thu Feb 21, 2013 1:17 pm
Location: Franklin, TN

Re: AMC 360 Rebuild

Post by pharmdut »

I've done some work on cleaning up the intake. I took it to the local machine shop and the cleaned the grease and dirt off.

First I prepared the intake to sand blast it in my 40lb blaster.
IMG_0840.jpg
After blasting I painted it with some VHT paint that I got at the parts store.
IMG_0855.jpg
Assembled some of the parts.
IMG_0862.jpg
This is what I plan to use to install the engine. Hope it works!!
IMG_0869.jpg
You do not have the required permissions to view the files attached to this post.
User avatar

Topic author
pharmdut
Posts: 49
Joined: Thu Feb 21, 2013 1:17 pm
Location: Franklin, TN

Re: AMC 360 Rebuild

Post by pharmdut »

The radiator needed some repair. The driver side bottom bracket had come loss from the radiator. My original plan was to tack weld it back, but after I wire wheeled the radiator it looked like the radiator was made of brass. I'm no radiator expert, so it's just a guess. I figured brass might not like to be tack welded so I used some JB Weld. The JB did REALLY well and I'm happy with the results. Of course here are some pics!!
IMG_0836.jpg
IMG_0853.jpg
IMG_0860.jpg
IMG_0861.jpg
And a final pic to show what I had decided to do with the fan
IMG_0858.jpg
You do not have the required permissions to view the files attached to this post.
Post Reply