1985 J20 slow build/resto: The Enprissening

Area to show off your Custom Build threads.
Post Reply
User avatar

Topic author
DarkMonohue
Posts: 148
Joined: Sun Dec 09, 2012 12:45 am
Location: PNW

1985 J20 slow build/resto: The Enprissening

Post by DarkMonohue »

This is a very slow-moving project on a very low budget. The goals are to make the truck more usable and reliable while keeping it fairly close to stock in spirit and appearance.

When I first joined here, I started a thread (click here) to introduce myself and my J20. We are now well past the intro stage, so it seems like a good time to start a build and restoration thread and pick up where the intro thread left off.

Over the last couple of years I've been collecting parts and making mental lists of things to work on. From here forward they'll be listed as they are addressed. Other issues that have been dealt with but not yet documented may sneak in here and there as well.


Project #1: auxiliary fuel tanks

These trucks only have about an 18 gallon gas tank, which typically gives you less than 200 miles of range between gas stations. One of the POs had some auxiliary tanks installed in the bed of this truck. Together they should hold about 28 gallons of fuel. That would more than double the range of the vehicle.

Try to ignore the leaves and clutter. It has since been removed. Here are the tanks.

Image


However, there are some issues to sort out before the tanks can be used:

1) The forward corners of the truck bed have some surface rust and paint damage. They need to be cleaned up and protected before the tanks go back in.
2) The tanks are rusty on the inside and must be cleaned out.
3) The tanks have to be notched to clear the tool box that is now in the truck.
4) These tanks were filled separately, one at a time. I want to fill them both at the same time from one filler on the left side.

The big obstacle is #4. I'm not sure whether to build a crossover pipe that runs underneath the bed floor or one that connects the tanks near the top. Right now I'm leaning toward connecting them at the top with a length of 1.5" or 2.0" tubing, using a vertical section of tube to pick fuel up near the floor of the driver's side tank and transfer it to the tank on the passenger side, as such:

Image

Hopefully, if the tanks are connected that way, there will be less tendency for fuel to slosh from one side to the other, and the crossover will be well protected in the bed of the truck, forward of the tool box.

Thoughts?
'85 J20 Old Man Truck, bought @ 65K miles. Not great, but better than nothing at all.
High quality dumb stuff in the intro thread and the slow build thread
Prospect, FSJ Prissy Restoration Association
Bad Company, 360th Misfire Regiment, 161st Haiku Assault Division

Tech Tip: there is no apostrophe in Willys. The more you know...

SJTD
Posts: 1930
Joined: Tue May 21, 2013 12:02 pm
Location: Lompoc, Sunland or somewhere between

Re: 1985 J20 slow build/resto: The Enprissening

Post by SJTD »

You would need a vent on the far tank or it wouldn't fill, preferably back into the primary. Even with a vent I think you would have trouble filling the far tank at a decent rate.

I don't think you'd get much sloshing between them with a low crossover.
Sic friatur crustulum

'84 GW with Nissan SD33T, early Chev NV4500, 300, narrowed Ford reverse 44, narrowed Ford 60, SOA/reversed shackle in fornt, lowered mount/flipped shackle in rear.
User avatar

Topic author
DarkMonohue
Posts: 148
Joined: Sun Dec 09, 2012 12:45 am
Location: PNW

Re: 1985 J20 slow build/resto: The Enprissening

Post by DarkMonohue »

SJTD wrote:You would need a vent on the far tank or it wouldn't fill, preferably back into the primary. Even with a vent I think you would have trouble filling the far tank at a decent rate.

I don't think you'd get much sloshing between them with a low crossover.
Thanks. I did not illustrate it, but the tanks are vented.
'85 J20 Old Man Truck, bought @ 65K miles. Not great, but better than nothing at all.
High quality dumb stuff in the intro thread and the slow build thread
Prospect, FSJ Prissy Restoration Association
Bad Company, 360th Misfire Regiment, 161st Haiku Assault Division

Tech Tip: there is no apostrophe in Willys. The more you know...

Cassidy
Posts: 187
Joined: Fri Jun 06, 2014 2:59 pm
Location: louisville
Contact:

Re: 1985 J20 slow build/resto: The Enprissening

Post by Cassidy »

Honesty there is no reason for the down tube's. It would cause the fuel to siphon to the empty side or possibly transfer fuel if the truck is leaning. The vent will have to be higher than the highest point of both tanks even if your on a steep sideways incline. I gave up on this concept as I was tired of gas leaking out of the vent and cap when I turned corners with a full tank.
Using Tapatalk
User avatar

Topic author
DarkMonohue
Posts: 148
Joined: Sun Dec 09, 2012 12:45 am
Location: PNW

Re: 1985 J20 slow build/resto: The Enprissening

Post by DarkMonohue »

Thinking more about this, it seems that a high crossover would not begin filling the right side tank until the left tank was nearly full. A low crossover under the bed floor may be the better way to go.

The auxiliary tanks will vent into the factory tank vent system. A check valve will be installed if necessary to prevent fuel spillage.
'85 J20 Old Man Truck, bought @ 65K miles. Not great, but better than nothing at all.
High quality dumb stuff in the intro thread and the slow build thread
Prospect, FSJ Prissy Restoration Association
Bad Company, 360th Misfire Regiment, 161st Haiku Assault Division

Tech Tip: there is no apostrophe in Willys. The more you know...
User avatar

Topic author
DarkMonohue
Posts: 148
Joined: Sun Dec 09, 2012 12:45 am
Location: PNW

Re: 1985 J20 slow build/resto: The Enprissening

Post by DarkMonohue »

Someone was cranky this morning. Or, more accurately, not cranky. The starter would engage and turn the engine for just a second, and then the drive would disengage, leaving the starter motor whirring away.

A local parts house had a Delco Remy reman starter in it (part number 25203) so I chucked that in. Problem solved. No pics because, really, it's just an ugly old starter.
'85 J20 Old Man Truck, bought @ 65K miles. Not great, but better than nothing at all.
High quality dumb stuff in the intro thread and the slow build thread
Prospect, FSJ Prissy Restoration Association
Bad Company, 360th Misfire Regiment, 161st Haiku Assault Division

Tech Tip: there is no apostrophe in Willys. The more you know...
User avatar

Topic author
DarkMonohue
Posts: 148
Joined: Sun Dec 09, 2012 12:45 am
Location: PNW

Re: 1985 J20 slow build/resto: The Enprissening

Post by DarkMonohue »

Since this is an old truck, it sometimes gets used as such. Today it assumed the role of yard waste hauler. The back yard is steep here and there. 4WD is handy.

Image

Here's a better shot showing off the very nice muscle grille HOOT was kind enough to sell me a while back. I like this a lot better than the Final Edition GW setup I initially put in.

Image


Seems I have the Midas touch today. The coil on my string trimmer pooped the bed shortly after these photos were taken - in other words, as soon as the work area was in the shade and I could get some work done. Ain't that the way.
'85 J20 Old Man Truck, bought @ 65K miles. Not great, but better than nothing at all.
High quality dumb stuff in the intro thread and the slow build thread
Prospect, FSJ Prissy Restoration Association
Bad Company, 360th Misfire Regiment, 161st Haiku Assault Division

Tech Tip: there is no apostrophe in Willys. The more you know...

twisted frame
Posts: 637
Joined: Wed Mar 27, 2013 9:41 am
Location: Massachusetts

Re: 1985 J20 slow build/resto: The Enprissening

Post by twisted frame »

I enjoy using my truck for various tasks like this. My dad uses it more than I do these days and I believe it just went for it's annual mulch run - which saves my folks the delivery cost from the supplier. That's how my truck earns its parking space in my folks' driveway.

Anyway, did you end up backing up or pulling forward after this shot was taken? If it was reverse, did you tear up the grass at all or were you able to creep back?
73 J4000. 360, MC 2100, T18A, D20, stock closed knuckle Dana 44 front, 60-2 rear. Warn Lock-O-Matics, Warn/Belleview electric winch, true duals with glasspacks, old-school front diff skid plate, used 265 Toyos on 16" AR wheels.
User avatar

Topic author
DarkMonohue
Posts: 148
Joined: Sun Dec 09, 2012 12:45 am
Location: PNW

Re: 1985 J20 slow build/resto: The Enprissening

Post by DarkMonohue »

Copy that. Got a couple of yards of mulch last week :-bd

I backed into that position and drove forward to get out. No loss of traction in that exercise, but I do usually spin a little getting up the other side and out the gate. The grass is more nuisance than lawn and should really be torn out. The whole yard is overgrown and weirdly shaped. Maybe Santa will bring me a D3 this year...
'85 J20 Old Man Truck, bought @ 65K miles. Not great, but better than nothing at all.
High quality dumb stuff in the intro thread and the slow build thread
Prospect, FSJ Prissy Restoration Association
Bad Company, 360th Misfire Regiment, 161st Haiku Assault Division

Tech Tip: there is no apostrophe in Willys. The more you know...
User avatar

Topic author
DarkMonohue
Posts: 148
Joined: Sun Dec 09, 2012 12:45 am
Location: PNW

Re: 1985 J20 slow build/resto: The Enprissening

Post by DarkMonohue »

Time to remove the rust from the auxiliary tanks. I have had success with electrolysis before and decided to give it a try again. The basic procedure is to run a 12V DC electric current through an electrolytic solution (washing soda in water), with the rusty part connected to ground and a sacrificial anode connected to positive. This effectively floats the rust off the part and basically transfers it to the anode.

First attempt: Power was supplied by a car battery and battery charger working together. Used old rebar (wire brushed clean) for the anode and filled the tank with solution to let it work on the interior. Got a steady flow of bubbles (hydrogen), but had the reset the battery charger frequently to keep the solution working.

Image


Second attempt: filled a wading pool with solution and laid the tank in it. Used two rebar anodes. This exposed the exterior of the tank to the solution, theoretically removing rust from the outer surfaces as well as the interior. Got bubbles off the anodes, but they refused to get rusty. Still had to reset the charger often.

Third attempt: converted an old computer power supply to a 5V/12V bench power supply. Hooked that up in place of the car battery and charger. Tons of bubbles off the anodes, but they still did not attract rust.

Fourth attempt: replaced the rebar anodes with scrap pieces of plain sheet steel. These bubbled furiously and started collecting rust almost immediately.

The setup:

Image


I will have to flip the tank after a while to clean the whole thing, but I think this will be the most successful method. This is a fairly slow process and it may take a week or so to get the tanks down to clean metal again.
'85 J20 Old Man Truck, bought @ 65K miles. Not great, but better than nothing at all.
High quality dumb stuff in the intro thread and the slow build thread
Prospect, FSJ Prissy Restoration Association
Bad Company, 360th Misfire Regiment, 161st Haiku Assault Division

Tech Tip: there is no apostrophe in Willys. The more you know...
User avatar

Topic author
DarkMonohue
Posts: 148
Joined: Sun Dec 09, 2012 12:45 am
Location: PNW

Re: 1985 J20 slow build/resto: The Enprissening

Post by DarkMonohue »

Apparently I have some catching up to do...

The electrolysis showed that these tanks have already rusted through. They're junk. Rather than try to patch, hack, mod and chop, I'm (eventually) going to build some new ones.


Project #2: heater core repair and water pump replacement (04-17-2016)

My water pump had been leaking badly, and rather than pour antifreeze through it, I'd been refilling it with water. Well, that bit me. Winters here are normally pretty mild, but last December was chilly, and one night the heater core split open in the below-freezing temps. It produced a spectacular gusher from the heater box when I tried to leave home in the morning.

Here's the offending hole. That dog, as they say, won't hunt.

Image


Other than the hole, the heater core was in good shape, so I decided to try to fix it. First I brushed the metal clean, then hammered (gently) both sides of the split as close together as I could get them.

Image


Then came a little acid core solder.

Image


Once that was back together, I got rid of the gnarly old water pump. For some reason I apparently didn't have the presence of mind to take photos of the job after this glamor shot of the old pump. Or maybe this was just meant to act as a reference for reassembly. Anyway, this is the old pump. It's gone now, and a loomnum pump lives here now. Also, new belts, because the old ones had part numbers written in Roman numerals and had lost some (all) of their youthful glow.

Image


Project #3: cleaned the cowl vent pockets

I found my round tuit and finally, after years of denial and procrastination, de-trashed the kick panel vent pockets. Like in every other FSJ, these were packed tight with pine needles, seed cones, leaves, and various other components, all rotting together and forming several pounds of really neat organic compost. The junk makes its way through the cowl louver into the plenum, which feeds fresh air to the vents in the kick panels, and then it all just collects at the lowest point. Here are the what the left and right vent pockets looked like with the grilles and dampers removed.

Image

Image

I also got started on a real end-all, be-all cowl vent screen to keep this from happening again, but got sidetracked. Probably better remember to finish that thing...


Project #4: fuel leak repair

This was an easy one. Started with a slight aroma of fuel now and then, and rapidly developed into liquid gasoline puddling on the intake manifold in front of the carburetor. Well, when you can see daylight through the accelerator pump diaphragm, that kind of thing will happen.

Image


Chucked a new diaphragm on. No more leaks. I do love an eight dollar fix.


Project #5: new radiator

This was tonight's project. I knew the radiator on this truck was not in great shape, but didn't realize quite how nasty it was. Say "ahhhh"...

Image


And that was one of its better angles. Here's an unflattering shot of its less-than-attractive backside:

Image


So that obviously ain't gonna work. Step one: run some radiator flush through it, then drain, fill with water, run, repeat until clear water comes out. Follow with step two: remove everything that doesn't look like a new radiator.

Image


Step three: installation is the reverse of removal. Brand new all-metal rad from BJ's Offroad:

Image


So far, I like it. It fits perfectly and seems well-made. And at least I know it can be repaired if an issue should arise.

Step four: fill with the finest (and only) antifreeze available at this end of town on a Sunday evening. Unfortunately, I'm still seeing a whole lot of dirt and/or cooling system cleaner in the coolant. Well, at least the finest antifreeze is also very cheap. I'll throw a flush tee in it and blast the whole system clean later in the week, and then replace the coolant one last time. Hopefully, I will then be able to leave the cooling system alone for a couple of years.

I think I missed a couple other ... yeah, I know I missed a couple other little jobs. But we'll get it caught up sooner or later. This is enough for now.


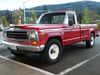
Project #6: new tires (04-22-2016)

Well, not much of a project so much as handing someone some money and letting them do their job. But it needed to be done, so...here it is. I finally got/had to bite the bullet and get some new rubber under this old tractor.

Gave the old pig a quick warsh and got over to the tire store in the morning. Basking in the sun, waiting for the doctor to see her:

Image


After waiting way too long (they were deep in the weeds), they finally made some room in the shop.


Image


And shortly thereafter, the deed was done.

Image


Went with Cooper Discoverer S/T MAXX in the same LT255/85R16 size. I would have liked them to have a narrower tread, more like the old-style Discoverer ST, but I wanted the three-ply sidewalls. I almost chose the old STs anyway for their more retro-looking tread pattern, but these should be just fine. All I can say for now is that they are pretty quiet at speed, and a whole lot rounder than the old ones. Which is a good start, really.

Couple more. Still no really good shots to show the true size and width of the tires, but...well, they're just tires.

Image

Image


Project #7.1: 4" spring lift - front

You know how things tend to drag out if you let them? That's the problem. I let them.

When I bought this poor old truck four and a half years ago, I thought it might need shocks soon. Well, it did. But I also wanted to lift it a little, which meant longer shocks, so I waited. I found a suitable (read: cheap) set of used springs, did the math, bought the shocks, and promptly did nothing but drive the truck and complain about the miserable ride quality.

A couple of weeks ago I decided enough was enough and dug out the parts. It was time to get the thing put together. So I ripped into the front. And that's what I got done. The front.

So we got this for now:

Image


It's a couple inches low in the back because there's a ton (well, 2400 pounds, actually) of Daddy Weekender landscaping materials in the bed. But even without the load, it's still dopey looking, and still rides like poo with 8400# rear springs and nearly no damping on the rear axle.

Just looking through my old PMs, apparently I bought the springs in late 2013. There's nothing like procrastination, is there?

I'll get the rear lifted pretty soon. Probably.
'85 J20 Old Man Truck, bought @ 65K miles. Not great, but better than nothing at all.
High quality dumb stuff in the intro thread and the slow build thread
Prospect, FSJ Prissy Restoration Association
Bad Company, 360th Misfire Regiment, 161st Haiku Assault Division

Tech Tip: there is no apostrophe in Willys. The more you know...
User avatar

az chip
Posts: 1433
Joined: Tue Jul 14, 2015 8:59 pm
Location: Mesa, AZ

Re: 1985 J20 slow build/resto: The Enprissening

Post by az chip »

LOL. I cannot wait to procrastinate! Looks nice. Thanks for the update. I like your grille.
'81 Cherokee Chief 81 WT Chief/MSD 6/Holley Sniper/ Rusty 4" Spring lift/ Bulltear oil adapter/K&P Engineering Oil Filter/ NP 208/ Serehill Light Harness/KC LED Headlights/ Evil Twin Fab Roof Rack and sliders/ Ross mirror mounts.
Post Reply