I think I will put it back on just polished and see how it looks for awhile. I will get some pics up, hopefully next week.
Sent from my iPhone using Tapatalk
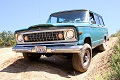
'76 Wagon Rebuild Adventure
-
rherndon
Topic author - Posts: 142
- Joined: Mon Aug 11, 2014 5:25 pm
- Location: Houston, TX
Re: '76 Wagon Rebuild Adventure
'76 Wagoneer w/401; Restoration in progress
-
rherndon
Topic author - Posts: 142
- Joined: Mon Aug 11, 2014 5:25 pm
- Location: Houston, TX
Re: '76 Wagon Rebuild Adventure
More progress. I am going back with stock exhaust. For now. Should I coat the exhaust manifolds?

Sent from my iPhone using Tapatalk

Sent from my iPhone using Tapatalk
'76 Wagoneer w/401; Restoration in progress
-
 ProTouring442
- Posts: 673
- Joined: Sat Mar 23, 2013 10:28 am
- Location: Harriman, Tennessee
- Contact:
Re: '76 Wagon Rebuild Adventure
Believe it or not, I have had great luck rubbing cast iron exhaust manifolds down with sliver colored antiseize. They'll smoke a bit when you first start it, but after that, it keeps a nice, fresh-cast look. If a thin spot appears, reapply.
They mostly come at night.
Mostly...
http://www.facebook.com/william.k.elliott.7
http://www.WilliamKElliott.com
My LY5/4L60E swap: http://www.fsjnetwork.com/forum/viewtop ... =12&t=1850
Mostly...
http://www.facebook.com/william.k.elliott.7
http://www.WilliamKElliott.com
My LY5/4L60E swap: http://www.fsjnetwork.com/forum/viewtop ... =12&t=1850
-
Jtruax3
- Posts: 85
- Joined: Sun Jul 19, 2015 8:08 pm
Re: '76 Wagon Rebuild Adventure
Looking good!
Sent from my iPhone using Tapatalk
Sent from my iPhone using Tapatalk
-
rherndon
Topic author - Posts: 142
- Joined: Mon Aug 11, 2014 5:25 pm
- Location: Houston, TX
Re: '76 Wagon Rebuild Adventure
Now just waiting on the MTS tank and then install Hamilton TBI system, then back to finishing interior.

Sent from my iPhone using Tapatalk

Sent from my iPhone using Tapatalk
'76 Wagoneer w/401; Restoration in progress
-
rherndon
Topic author - Posts: 142
- Joined: Mon Aug 11, 2014 5:25 pm
- Location: Houston, TX
Re: '76 Wagon Rebuild Adventure
Srayed the exhaust manifolds with POR-15 high temp manifold grey. Put them in oven at 400 degrees for 2 hours to cure. Wife was not happy. 
No real reason, just thought it looked good that way.
No real reason, just thought it looked good that way.
'76 Wagoneer w/401; Restoration in progress
-
rherndon
Topic author - Posts: 142
- Joined: Mon Aug 11, 2014 5:25 pm
- Location: Houston, TX
Re: '76 Wagon Rebuild Adventure
Getting close. Engine install complete. TBI next, installing Serehill's headlight harness, grill, gas tank, interior, etc

Sent from my iPhone using Tapatalk

Sent from my iPhone using Tapatalk
'76 Wagoneer w/401; Restoration in progress
-
rherndon
Topic author - Posts: 142
- Joined: Mon Aug 11, 2014 5:25 pm
- Location: Houston, TX
Re: '76 Wagon Rebuild Adventure
Finally getting to Hamilton fuel injection. Still have full interior to tackle. I hope to have some time over the holidays to tackle that.
Also, I am going with a new MTS tank and liquid check valve. Going back with vapor canister. The family always hated the gasoline smell. So I am going stock. They called her "gassy nelly". We will see if this helps any.

Sent from my iPhone using Tapatalk
Also, I am going with a new MTS tank and liquid check valve. Going back with vapor canister. The family always hated the gasoline smell. So I am going stock. They called her "gassy nelly". We will see if this helps any.

Sent from my iPhone using Tapatalk
'76 Wagoneer w/401; Restoration in progress
-
rherndon
Topic author - Posts: 142
- Joined: Mon Aug 11, 2014 5:25 pm
- Location: Houston, TX
Re: '76 Wagon Rebuild Adventure
Finally back at home in the garage. Ran well on the maiden voyage home. New kickdown switch worked well. Will be working on the interior through the holidays.

Sent from my iPhone using Tapatalk

Sent from my iPhone using Tapatalk
'76 Wagoneer w/401; Restoration in progress
-
Jtruax3
- Posts: 85
- Joined: Sun Jul 19, 2015 8:08 pm
Re: '76 Wagon Rebuild Adventure
Nice job!
Sent from my iPhone using Tapatalk
Sent from my iPhone using Tapatalk
-
WaggyGuy
- Posts: 77
- Joined: Sun Feb 22, 2015 7:50 am
- Location: Roswell, NM
Re: '76 Wagon Rebuild Adventure
This thing is absolutely beautiful. Really gives me inspiration for my Waggy, although mine will never be anywhere near as beautiful for a number of reasons.
-
rherndon
Topic author - Posts: 142
- Joined: Mon Aug 11, 2014 5:25 pm
- Location: Houston, TX
Re: '76 Wagon Rebuild Adventure
Almost done...... Down to punch list items. Think I have everything needed to pass inspection.


Sent from my iPhone using Tapatalk


Sent from my iPhone using Tapatalk
'76 Wagoneer w/401; Restoration in progress
-
rherndon
Topic author - Posts: 142
- Joined: Mon Aug 11, 2014 5:25 pm
- Location: Houston, TX
Re: '76 Wagon Rebuild Adventure
Original spare...going back under.
A Firestone Steel Radial 500
HR 78-15

Sent from my iPhone using Tapatalk
A Firestone Steel Radial 500
HR 78-15

Sent from my iPhone using Tapatalk
'76 Wagoneer w/401; Restoration in progress
-
rherndon
Topic author - Posts: 142
- Joined: Mon Aug 11, 2014 5:25 pm
- Location: Houston, TX
Re: '76 Wagon Rebuild Adventure
Hood insulation going in. Fits perfect. Recommend the 3M 90. Great stuff.

Sent from my iPhone using Tapatalk

Sent from my iPhone using Tapatalk
'76 Wagoneer w/401; Restoration in progress
-
GaJeep94YJ
- Posts: 313
- Joined: Fri Dec 18, 2015 12:00 pm
Re: '76 Wagon Rebuild Adventure
Where'd you get the hood insulation from?
Sent from my Nexus 5 using Tapatalk
Sent from my Nexus 5 using Tapatalk
-
rherndon
Topic author - Posts: 142
- Joined: Mon Aug 11, 2014 5:25 pm
- Location: Houston, TX
-
 Cataldo
- Posts: 287
- Joined: Mon Mar 30, 2015 8:13 am
- Location: San Bernardino, California
Re: '76 Wagon Rebuild Adventure
Looks wonderful! Very envious of your build!
Jay
1975 Jeep Wagoneer: 350 SBC, TH400, Q/T, D44's 3.54:1's. Hell Creek 4" lift with BFG KO2 33x10.5s.
1988 Jeep Wrangler: 305 SBC, TBI, 700r4, NP231c with SYE, 9" w/ Detroit and 4.11:1, 5.25" of lift, 31's. Done up as a Jurassic Park Jeep (Her's)
1973 Chevy Camaro: Vortec 350, 200-4r, GM 8.5 3.23's. 12.4 @ 108mph.
1965 Ford Mustang: Aluminum Headed 347, c4, 3.00:1 gears, High 12's (Her's).
Looking for 1 good factory Kidney Bean Mag in Southern California for use as a matching spare
-
candymancan
- Posts: 3684
- Joined: Tue Mar 22, 2016 11:32 pm
Re: '76 Wagon Rebuild Adventure
Wish i had the funds and tools you do to restore mine like that. I live in a Townhouse so i had to work with a Flux core welder, and basic hand tools and electric tools lol.. But hey at least my floors dont have hole in them and fresh metal. I will never get mine to be 100% like yours though.. Parts of the frame need fixing too and im not sure how im going to do that..
How do you remove the rear quarter window ? Mine is leaking there, and i think thats the leak that caused the 10 holes in my passenger floor.. Awsome 1 or two of the 5 previous owners clearly didnt care about fixing a water leak.. So they let it get so bad that i had 10 big holes in the floorboard, thankfully i cut out and welded new peices in.. but I cant figure out how to fix the leaking seal.. The seal is in actually good shape.. its soft.. rubbery.. so i dont get how its leaking.. but water is getting passed the seal.. If i push on the window i can push the window in and out a few mm maybe 1-2mm its kinda freaky to see that.. im not sure if thats normal or not.
If i lift on the outside seal lip there is old silicone under it. Im thinking of scraping that old stuff off and using some 3M window silicone 08059 i think and squirt it in there. What do you think ?
1998 Jeep Grand Cherokee 5.9L Limited 219k
1998 Jeep Grand Cherokee 4.0 I6 laredo 430k
1990 Jeep Grand Wagoneer 155k
1976 Jeep J10.. 85k(repaired)
1998 Jeep Grand Cherokee 4.0 I6 laredo 430k
1990 Jeep Grand Wagoneer 155k
1976 Jeep J10.. 85k(repaired)