I couldn't find a single location or post with a comprehensive description how to convert the stock ammeter to a voltmeter, so I want to provide that resource for others.
I completed the ammeter to voltmeter conversion yesterday and want to share my experience. The total ordeal took about 7 hours after spending several hours researching and making sure I had the right tools. 3 hours to remove the gauge cluster, 1 hour looking at wiring diagrams, and 3 hours for the conversion and reassembly.
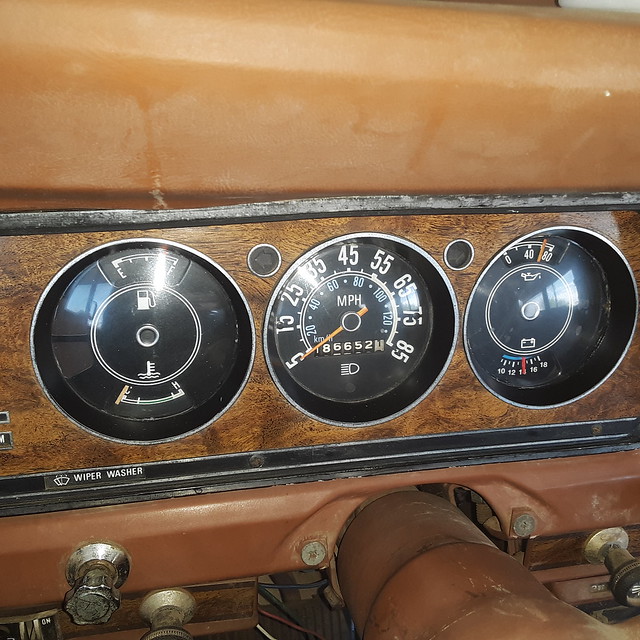
Voltmeter: Sunpro CP7985 (use a small flat head screw driver to tediously fold back the black trim/bezel's lip that houses the gauge0
Critical tools that made the job easier: Dremel, step-drill bit, soldering iron, heat gun, wire stripper, circular/rounded hand file, a long philips-head screw driver.
Disconnect your battery! I already rewired my alternator prior to this conversions, so I will not cover that in this write up.
Removing the gauges:
Disconnect the speedometer cable from the speedo-junction box in the engine compartment. This will allow you to pull the speedo cable out from inside the cabin and give you more "play" in pulling the cluster.
Removing the screws and bolts to pull out the cluster is straight forward, but lowering the steering column helps drastically. There are two "hidden" screws that hold together the upper and lower plastic trim pieces around the column that need to be removed from under the steering column. When all screws/hardware are removed and the cluster is ready to be pulled out, gingerly start pulling out the cluster while disconnecting the electrical connectors from behind the dash. I found the primary, 11-pin circular connector to be the most difficult to remove and required time and patience. It's not bolted or held in by anything - it's just stubborn.
The dumbest/most frustrating part of removing the cluster is the sliding cable mechanism for the environment/heat controls. It's connected to the cluster by a single screw behind the controls and is conveniently placed in the most inconvenient location for a screw driver. Time and patience is all I can really recommend. This is a great time to replace the vacuum hoses for the heater controls if they are worn and cracked.
The Conversion:
I only disassembled the ammeter side of the cluster, though many can/will use this opportunity to clean up the entire cluster. I disassembled the cluster until the metal backing plate was fully removed. Use the dremel or similar tool to file/sand down the 6 small metal tabs used to mount the ammeter, or else the voltmeter will sit too far "forward" for the front gauge plate to mount. Use the step-drill bit to drill two 5/16" holes approximately 3/8" below the centerline of the ammeter holes. It's okay if the holes are a bit large - you do not want the threaded studs of the voltmeter to contact the metal backing plate or the reading will be incorrect. Use the circular hand file to file down the ammeter holes in the cardboard circuit board to accommodate the voltmeter. I performed numerous fit checks as I filed down the circuit board and ultimately used the cardboard as the piece to determine the voltmeter's mount location. I liked the hand file over the step-bit for this procedure to greatly minimize the risk of destroying the circuit board connection below the ammeter holes.
Wiring:
In the 11-pin circular connector, pin "E" is ignition (for 1978s). I spliced into the ignition wire as my positive voltage source. It's critical to monitor the voltage off the ignition - a voltmeter will monitor volts/draw current constantly if wired directly to the battery and slowly drain your battery overtime. For ground, I spliced into the ground wire coming off the connector off the backside of the oil pressure gauge. Tom 'Oljeep' Collin's webpage was a godsend, https://oljeep.com/gw/elec/GW_wiring.html.
As for the two red and yellow 10-ga wires coming off the ammeter, when I rewired my alternator, I left the red wire hot (connected to the positive starter solenoid terminal but not running an alternator current) and disconnected the yellow wire entirely. Behind the gauge cluster, I used electrical tape and heat shrink to "seal" the connectors used to the attach to the ammeter. The red wire is a hot wire for many components under the dash, so it must be connected to a 12v source. I left the yellow wire under the dash - if needed, I can use it as another hot wire for accessories.
Reassembly:
Reverse the disassembly procedure. Again, the heater control wire is the most frustrating part because a screwdriver cannot easily reach the screw location. I also used the opportunity with the dash removed to reorient some of the wires to make cluster install/removal easier in the future.
Reconnect the speedo cable to the junction box in the engine compartment
This procedure may vary depending how you rewire your alternator. Some splice the 10-ga red and yellow wires together to maintain the circuit. I rewired my alternator so it goes directly to the battery and no longer sends a charging current through the firewall, so I left the two red and yellow wires disconnected behind the cluster.
Sorry for the lack of pictures. The Sunpro voltmeter isn't as wide spanning as the stock ammeter, so you can see behind and into the bezel if you look into at an angle.
Voltmeter Conversion Write-Up
-
WillyWagoneer
Topic author - Posts: 9
- Joined: Sat Jun 17, 2023 4:21 pm
Voltmeter Conversion Write-Up
1978 Jeep Wagoneer [360 cu.in., all stock]
-
 devildog80
- Posts: 1124
- Joined: Wed Apr 13, 2022 2:41 pm
- Location: Apache Junction AZ
Re: Voltmeter Conversion Write-Up
This is helpful, and I was able to find enough info a few months back when I did mine.
But I did leave the amp wires connected in the dash as not sure how to re-wire my alternator like you did.
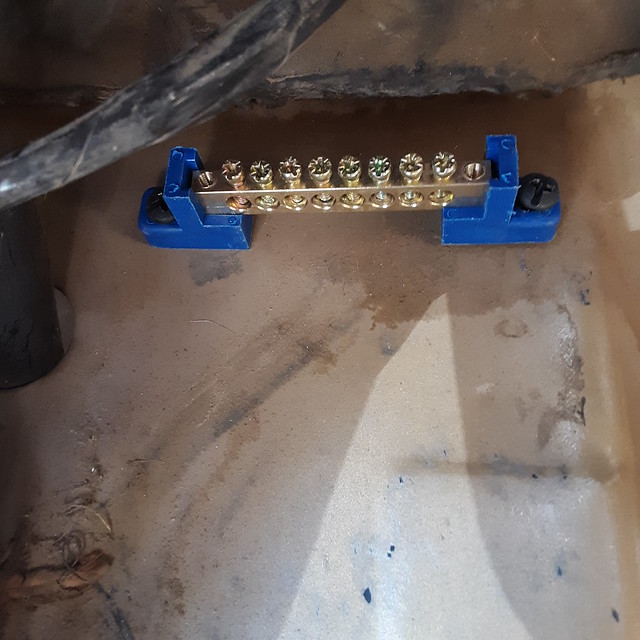
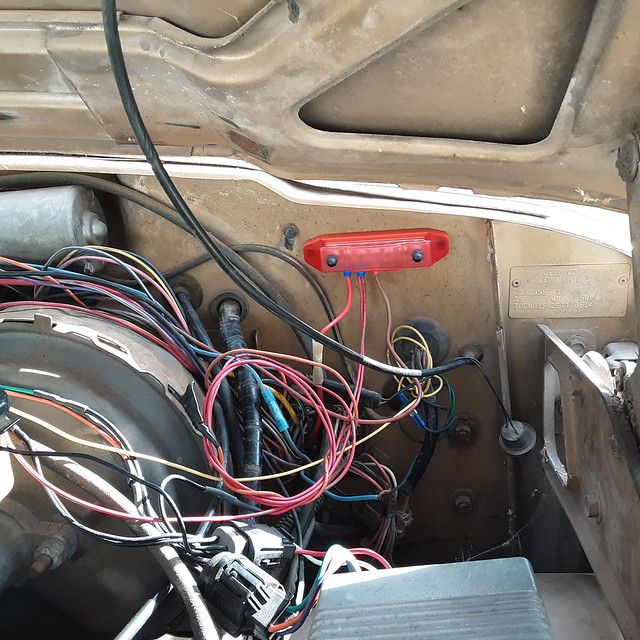
I added a grounding strip inside the drivers kick board area and an ignition "ON" strip in engine well I connected new volt meter through.
 20230618_120310 by Scott Weckerly, on Flickr
 20221127_142915 by Scott Weckerly, on Flickr
 20230107_152249 by Scott Weckerly, on Flickr
But I did leave the amp wires connected in the dash as not sure how to re-wire my alternator like you did.
I added a grounding strip inside the drivers kick board area and an ignition "ON" strip in engine well I connected new volt meter through.
20230618_120310 by Scott Weckerly, on Flickr20221127_142915 by Scott Weckerly, on Flickr20230107_152249 by Scott Weckerly, on Flickr'81 CJ5 Base, 258 I6, MC2100, T176 4 spd, 300 TC, D30 Front NT, 3.31, 2-Piece AMC 20 rear NT, 3.31, 4" high arc spring lift
'84 Grand Wagoneer, 401 V8 (.030 over), Edelbrock clone 1406, 727 auto, Selec-trac NP229, AMC 20 REAR - D44 FRONT - WT 3.31, 4" high arc spring lift
Rather be driving, than waiting to be modified
'84 Grand Wagoneer, 401 V8 (.030 over), Edelbrock clone 1406, 727 auto, Selec-trac NP229, AMC 20 REAR - D44 FRONT - WT 3.31, 4" high arc spring lift
Rather be driving, than waiting to be modified
-
sonoraed
- Vendor
- Posts: 674
- Joined: Sun Apr 07, 2013 7:38 am
- Location: Sonora,Ca
- Contact:
Re: Voltmeter Conversion Write-Up
Thanks for posting really good info to know, always hated all that amperage running behind the dash esp when it finally shorts out!
-
 tgreese
- Posts: 7197
- Joined: Fri Jun 08, 2012 6:31 am
- Location: Medford MA USA
Re: Voltmeter Conversion Write-Up
Good to have the voltmeter conversion description in its own thread.
IMO this is one of three (maybe four) little jobs you can do to upgrade these instrument clusters:
1) replace the ammeter with a voltmeter (described and shown above).
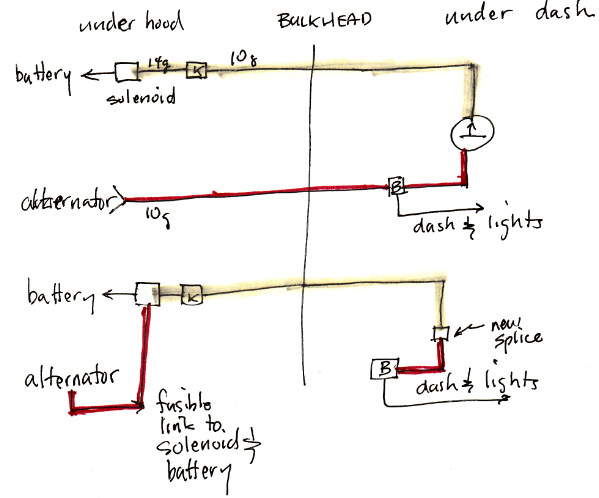
2) change the wiring to send the charge current from the alternator directly to the battery, instead of sending all that current across the firewall, through the bulkhead connector, across the dash (to where the ammeter was), back across the dash, through the bulkhead connector, across the firewall and to the starter solenoid which connects to the battery. You must do this if you upgrade the alternator.
3) replace the on-off "voltage regulator" in the temperature gauge with an integrated circuit voltage regulator (7805 or 7806 chip).
4) maybe add an alternator light.
IMO this is one of three (maybe four) little jobs you can do to upgrade these instrument clusters:
1) replace the ammeter with a voltmeter (described and shown above).
2) change the wiring to send the charge current from the alternator directly to the battery, instead of sending all that current across the firewall, through the bulkhead connector, across the dash (to where the ammeter was), back across the dash, through the bulkhead connector, across the firewall and to the starter solenoid which connects to the battery. You must do this if you upgrade the alternator.
3) replace the on-off "voltage regulator" in the temperature gauge with an integrated circuit voltage regulator (7805 or 7806 chip).
4) maybe add an alternator light.
Tim Reese
Maine beekeeper's truck: '77 J10 LWB, 258/T15/D20/3.54 bone stock, low options (delete radio), PS/PDB, hubcaps.
Browless and proud: '82 J20 360/T18/NP208/3.73, Destination A/Ts, 7600 GVWR
Copper Polly: '75 CJ-6, 304/T15, PS, BFG KM2s, soft top
GTI without the badges: '95 VW Golf Sport 2000cc 2D
Dual Everything: '15 Chryco Jeep Cherokee KL Trailhawk, ECO Green
Blockchain the vote.
-
WillyWagoneer
Topic author - Posts: 9
- Joined: Sat Jun 17, 2023 4:21 pm
Re: Voltmeter Conversion Write-Up
@devildog80, this is a quick overview how I rewired my alternator.
**Disconnect the battery and disconnect the yellow wire from the starter solenoid that's coming from the gauge cluster ammeter. It may/should have a brown fusible link attaching it to the starter solenoid.
1) Disconnect the red wire going to the alternator from the firewall and connect it to the positive terminal on the starter solenoid. I spliced on a 14ga fusible link (https://www.summitracing.com/parts/aww-500427) to the red wire and attached the ring terminal to the solenoid to protect the in-cabin components. You will need to cut/severe the alternator exciter wire (typically a narrow gauge red wire connected to a plastic connector in the alternator) from the red wire.
2) Create a new alternator wire with 10ga wire, and splice in the cut exciter wire to the new 10ga alternator wire. I used another 14ga fusible link connected to the positive terminal of the starter solenoid to protect the solenoid if the alternator shorts.
**Leave the narrow gauge alternator black wire connected. It's connected to the ignition, somehow.
That's pretty much it. If you rewire the alternator this way, you can disconnect the red and yellow ammeter wires behind your dash to remove the yellow wire entirely, or leave the yellow wire in place and use it as a 12v wire for accessories.
BTW, I'm in the East Valley. Maybe I'll run into you and your Jeep at a show this coming fall.
1978 Jeep Wagoneer [360 cu.in., all stock]
-
tgreese
- Posts: 7197
- Joined: Fri Jun 08, 2012 6:31 am
- Location: Medford MA USA
Re: Voltmeter Conversion Write-Up
Not dissing WillyWagoneer. Great to have his contribution to the thread. However...
There is an entire thread of ammeter bypass discussion at IFSJA. It's been gone over and over, so much that the thread there was locked against further contributions. I have a contribution there, but I can't reach it right now for some reason (??) The site seems to be throttling me as a non-member. I recall it's at the top of the "General FSJ Tech" section.
After a long pause, it let me in: https://forums.ifsja.org/forum/tire-kic ... rce-thread
This is me: https://forums.ifsja.org/forum/tire-kic ... ost2198756
You don't need to add any new wires, though you should add a new 14ga fusible link to protect the new alternator connection.
USUALLY you have a 10 ga red wire that goes from the alternator to the dash and ammeter, and a yellow 10 ga wire that goes from the starter solenoid to the ammeter. The ammeter connects these wires together at its two terminals. Both wires go across the top of the firewall and penetrate the firewall at the big bulkhead connector.
To eliminate this loop, take the red wire that goes from the alternator to the bulkhead connector and send it through a new fusible link to the starter solenoid. This is your new charging connection. Leave the yellow wire with its fusible link in place and splice together the two wires that went to the ammeter. The yellow wire now supplies the dash and lights.
Tim Reese
Maine beekeeper's truck: '77 J10 LWB, 258/T15/D20/3.54 bone stock, low options (delete radio), PS/PDB, hubcaps.
Browless and proud: '82 J20 360/T18/NP208/3.73, Destination A/Ts, 7600 GVWR
Copper Polly: '75 CJ-6, 304/T15, PS, BFG KM2s, soft top
GTI without the badges: '95 VW Golf Sport 2000cc 2D
Dual Everything: '15 Chryco Jeep Cherokee KL Trailhawk, ECO Green
Blockchain the vote.
Maine beekeeper's truck: '77 J10 LWB, 258/T15/D20/3.54 bone stock, low options (delete radio), PS/PDB, hubcaps.
Browless and proud: '82 J20 360/T18/NP208/3.73, Destination A/Ts, 7600 GVWR
Copper Polly: '75 CJ-6, 304/T15, PS, BFG KM2s, soft top
GTI without the badges: '95 VW Golf Sport 2000cc 2D
Dual Everything: '15 Chryco Jeep Cherokee KL Trailhawk, ECO Green
Blockchain the vote.
-
devildog80
- Posts: 1124
- Joined: Wed Apr 13, 2022 2:41 pm
- Location: Apache Junction AZ
Re: Voltmeter Conversion Write-Up
tgreese,
Chasing a parasitic bleed, since replacing my AMP gauge with new Volt gauge, and seeming to find the alternator connections is where it keeps coming back to.
Just did not know how to rewire the alternator so it would work, and this is an answer to that prayer for help from the Jeep god of electrical solutions.
Of course this could still not resolve the parasite issue with my system, but sure looks like it might, as when I would put the ground cable on the battery with the truck cold, the alternator will warm up noticeably to the touch within a few minutes, and 24 hrs sitting the fairly new battery is too low to start.
Thanks for the note here
'81 CJ5 Base, 258 I6, MC2100, T176 4 spd, 300 TC, D30 Front NT, 3.31, 2-Piece AMC 20 rear NT, 3.31, 4" high arc spring lift
'84 Grand Wagoneer, 401 V8 (.030 over), Edelbrock clone 1406, 727 auto, Selec-trac NP229, AMC 20 REAR - D44 FRONT - WT 3.31, 4" high arc spring lift
Rather be driving, than waiting to be modified
'84 Grand Wagoneer, 401 V8 (.030 over), Edelbrock clone 1406, 727 auto, Selec-trac NP229, AMC 20 REAR - D44 FRONT - WT 3.31, 4" high arc spring lift
Rather be driving, than waiting to be modified
-
tgreese
- Posts: 7197
- Joined: Fri Jun 08, 2012 6:31 am
- Location: Medford MA USA
Re: Voltmeter Conversion Write-Up
This sounds like a problem with the alternator, not a problem with the wiring. Alternators have been known to fail internally and drain batteries. BTDT.
Glad if my post above helps.
Glad if my post above helps.
Tim Reese
Maine beekeeper's truck: '77 J10 LWB, 258/T15/D20/3.54 bone stock, low options (delete radio), PS/PDB, hubcaps.
Browless and proud: '82 J20 360/T18/NP208/3.73, Destination A/Ts, 7600 GVWR
Copper Polly: '75 CJ-6, 304/T15, PS, BFG KM2s, soft top
GTI without the badges: '95 VW Golf Sport 2000cc 2D
Dual Everything: '15 Chryco Jeep Cherokee KL Trailhawk, ECO Green
Blockchain the vote.
Maine beekeeper's truck: '77 J10 LWB, 258/T15/D20/3.54 bone stock, low options (delete radio), PS/PDB, hubcaps.
Browless and proud: '82 J20 360/T18/NP208/3.73, Destination A/Ts, 7600 GVWR
Copper Polly: '75 CJ-6, 304/T15, PS, BFG KM2s, soft top
GTI without the badges: '95 VW Golf Sport 2000cc 2D
Dual Everything: '15 Chryco Jeep Cherokee KL Trailhawk, ECO Green
Blockchain the vote.
-
devildog80
- Posts: 1124
- Joined: Wed Apr 13, 2022 2:41 pm
- Location: Apache Junction AZ
Re: Voltmeter Conversion Write-Up
Ordered a 14ga fuse link off Amazon for $5, and going to do the above steps this weekend, to fix it right.
Thanks again for the info
Thanks again for the info
'81 CJ5 Base, 258 I6, MC2100, T176 4 spd, 300 TC, D30 Front NT, 3.31, 2-Piece AMC 20 rear NT, 3.31, 4" high arc spring lift
'84 Grand Wagoneer, 401 V8 (.030 over), Edelbrock clone 1406, 727 auto, Selec-trac NP229, AMC 20 REAR - D44 FRONT - WT 3.31, 4" high arc spring lift
Rather be driving, than waiting to be modified
'84 Grand Wagoneer, 401 V8 (.030 over), Edelbrock clone 1406, 727 auto, Selec-trac NP229, AMC 20 REAR - D44 FRONT - WT 3.31, 4" high arc spring lift
Rather be driving, than waiting to be modified