Holy cow that looks sharp! Let me know if you need any help wiring it up.
Sent from my iPhone
Meet Road Trip
-
 jaber
jaber
- Vendor
- Posts: 3067
- Joined: Sat Aug 27, 2011 5:24 pm
- Location: Chino Valley, Az.
Re: Meet Road Trip
Really like that color, congrats. 
Jeff
'46 cj3a
'51 Willys p/u
'51 Willys Parkway Conversion
'74 CJ5
'75 J-20 Wrecker
'75 J-20 Cummins service truck
'77 J-10 p/u
'79 Cherokee
'88 Grand Wagoneer
http://s252.photobucket.com/albums/hh14/jeffaber/
'46 cj3a
'51 Willys p/u
'51 Willys Parkway Conversion
'74 CJ5
'75 J-20 Wrecker
'75 J-20 Cummins service truck
'77 J-10 p/u
'79 Cherokee
'88 Grand Wagoneer
http://s252.photobucket.com/albums/hh14/jeffaber/
-
Road Trip
Topic author - Posts: 313
- Joined: Mon Jun 11, 2012 8:46 am
- Location: Bryan, Texas
Re: Meet Road Trip
I got some small stuff done today. It feels good to be making visible progress. I'll get pictures up next week when I get to go back to work on the Jeep.
Robert
-
Road Trip
Topic author - Posts: 313
- Joined: Mon Jun 11, 2012 8:46 am
- Location: Bryan, Texas
Re: Meet Road Trip
Well I finally got some time to spend in the garage this weekend. I got an 8" buffer wheel and was working on some stuff for RT, and I may have gone overboard...
It polished up nicely and is shiny, but is it too much?

It polished up nicely and is shiny, but is it too much?
Robert
-
Road Trip
Topic author - Posts: 313
- Joined: Mon Jun 11, 2012 8:46 am
- Location: Bryan, Texas
Re: Meet Road Trip
Ok, bought a steering column from a late 80's Waggie so I could have cruise, wipers and hi/lo on the column. UPS buys must have dropped it on the shaft because the nylon lock pin was broken and the shaft slides up and down.
Ok, had a tilt column from the 82, took it apart and sourced the shaft. Took the newer one apart and had it painted.
Friday I started putting it back together, sort of. I learned 5 ways to "NOT" put it together in the almost 9 hours I spent on it Friday. Only to realize I left the light for the PRNDL out of the housing.
So this morning I tore it back down to get the wire for the PRNDL into the housing. Let's just say that it didn't go well. The wire was too short, old one was cut at the end of the first housing, so I couldn't have used it without tearing it down anyway. Anyway, another 3 hours on it and it was DONE! Oh wait, I looked at the end of the shaft where it is supposed to attach to the rag joint, and it is too short.
It appears the shaft for the 82 is about 1" shorter than the late 80. I'm getting another late 80 for a comparison and the shaft if I do in fact need it.
What a weekend! And I thought I was going to get a lot done on RT this weekend.
Robert
-
NachoJeep
- Posts: 10
- Joined: Sat May 31, 2014 6:02 am
Re: Meet Road Trip
How bout ya Road Trip? Any progress since October?
Sent from my iPhone
Sent from my iPhone
-
Road Trip
Topic author - Posts: 313
- Joined: Mon Jun 11, 2012 8:46 am
- Location: Bryan, Texas
Re: Meet Road Trip
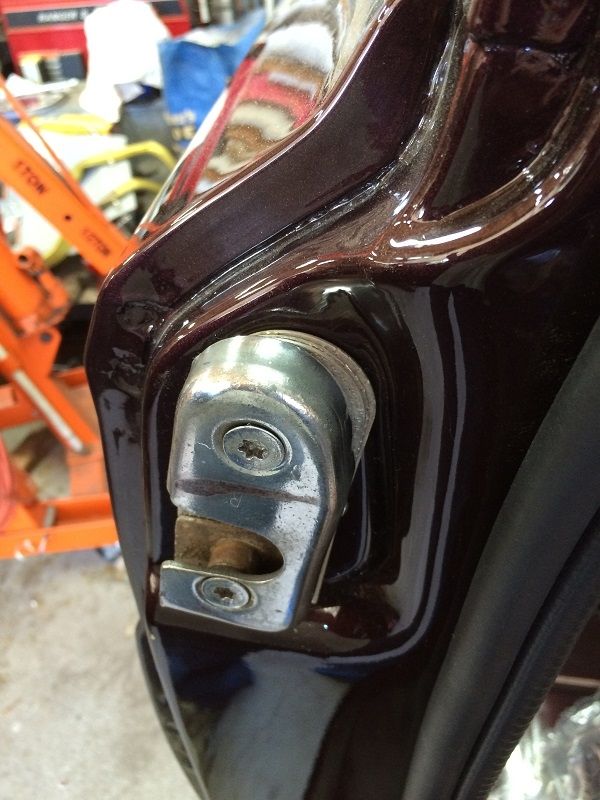
Got to work on RT a little this weekend. Started on the tailgate. I bought the NOS tailgate that was Pre 78 or something and didn't know it. So I found out that the latches would not fit, the screw holes weren't in the right location.
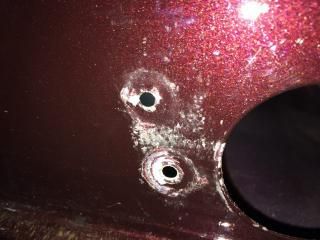
So I finally broke down and decided to use it anyway. So the first thing I did was to try and "press" it flat with a small bolt and some flat spacers. It would have worked, but I only had soft bolts and kept stripping the threads. So I manned up and got out the hammer and dolly. Dolly on the inside and hammering on the outside and they flattened out really nice I think. The paint will need touch up, but the final product is a tailgate that shuts and opens properly.
The extra hole will get left as I didn't want to weld it up.

So I finally broke down and decided to use it anyway. So the first thing I did was to try and "press" it flat with a small bolt and some flat spacers. It would have worked, but I only had soft bolts and kept stripping the threads. So I manned up and got out the hammer and dolly. Dolly on the inside and hammering on the outside and they flattened out really nice I think. The paint will need touch up, but the final product is a tailgate that shuts and opens properly.

The extra hole will get left as I didn't want to weld it up.
Robert
-
NachoJeep
- Posts: 10
- Joined: Sat May 31, 2014 6:02 am
Meet Road Trip
TTT How bout that Road Trip?
Sent from my iPhone
Sent from my iPhone
-
Road Trip
Topic author - Posts: 313
- Joined: Mon Jun 11, 2012 8:46 am
- Location: Bryan, Texas
Re: Meet Road Trip
Got to put a couple of hours on RT, so it was a good weekend.
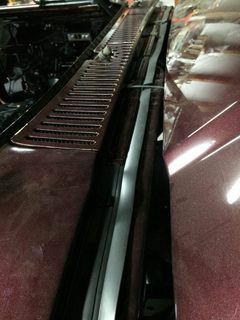
First, I got the black expanded metal gutter drain cover installed as a leaf catcher. I will post pictures of it next week as I didn't take any today. IT looks good behind that maroon paint. Now I need to know how the windshield squirts mount - over or under the cowl gasket and the cowl.
I spent several hours yesterday re-building the steering column for what I hope is the last time. YES, the shaft in a 89 steering column is in fact about 3/4" longer than a 82 tilt column. Who knew! Anyway, it's together and the key turns, the tilt tilts, the dimmer clicks, now I need power to check and make sure it all works.
That's next. I'll start the wiring. I've procrastinated and put it off as long as I can. I got Serehill's driving light loom and tailgate loom and I figured out which was which! I have the painless harness and the LS1 engine harness all laid out with labels. So I really have to start running wires, unless I start on....
Robert
-
Road Trip
Topic author - Posts: 313
- Joined: Mon Jun 11, 2012 8:46 am
- Location: Bryan, Texas
Re: Meet Road Trip
I got to spend almost 8 hours with Road Trip weekend before last. Not bad considering everything. As life would have it, I'm building a house, shop and taking care of a sick wife, while still working. However, every once in a while things work out.
Here are some pictures of what I've been up to. I actually started on some electrical. First up Serehill's tailgate switch, of course it is attached to the harness he built.

This one isn't great, but it shows that I got the rider's side window in. I got the electric motor arm down and the glass installed along with the new window gaskets.
I got the black expanded metal gutter cover cut and glued under the cowl, and I got the cowl and squirts installed.
And then I went to the front and I got Serehill's headlight harness installed - sort of. I got the stuff in the valance mounted, but I left the rest of the wire sitting on the battery tray until I can get some of the other motor compartment wiring in.
Then it was back to the tailgate to start on that harness. I got the defroster wiring in. Oh, and you may see some sound deadening in the tailgate and doors. Really made a difference in the tin sound.

I also had time to talk Jeeps with a couple of members. It was a great weekend!
Here are some pictures of what I've been up to. I actually started on some electrical. First up Serehill's tailgate switch, of course it is attached to the harness he built.

This one isn't great, but it shows that I got the rider's side window in. I got the electric motor arm down and the glass installed along with the new window gaskets.

I got the black expanded metal gutter cover cut and glued under the cowl, and I got the cowl and squirts installed.

And then I went to the front and I got Serehill's headlight harness installed - sort of. I got the stuff in the valance mounted, but I left the rest of the wire sitting on the battery tray until I can get some of the other motor compartment wiring in.

Then it was back to the tailgate to start on that harness. I got the defroster wiring in. Oh, and you may see some sound deadening in the tailgate and doors. Really made a difference in the tin sound.

I also had time to talk Jeeps with a couple of members. It was a great weekend!
Robert
-
NachoJeep
- Posts: 10
- Joined: Sat May 31, 2014 6:02 am
Meet Road Trip
Looking good cuz! Have you had any time to work on her lately?
Sent from my iPhone
Sent from my iPhone
-
Road Trip
Topic author - Posts: 313
- Joined: Mon Jun 11, 2012 8:46 am
- Location: Bryan, Texas
Re: Meet Road Trip
I know some of you think I'm flaking out. But before you get the torches out, it has been one tough year. Laura had surgery in April and while she was not doing well, she is doing great now. We started building a new house with a shop for me to finish RT. Then we had to move out of our old house in July while the new house is still 3 maybe 4 months away from being finished. I also picked up a new client to help pay for all the above, so my work load has picked up, oh and my commute went from 30 minutes each way to 1 hour and 45 minutes each way! Before I lived over an hour from RT and while I live here with RT now, I am not in any mood to work on it after work.
However, today I got a solid 8 hours in. I found all the stuff I lost, at least most of it.
I got the two doors put together, windows and electrical. Locks work, windows go up and down, etc. It's amazing, when you do something 5 or 6 times to get it done right, after you found out you were out of order the first few times, that second door was EASY!
Then I started on the tailgate again. I've got to find Serehill. As bad as I hate to admit it I forgot what he told me about where to mount the plate and how to hook up the electric motor and the defroster.
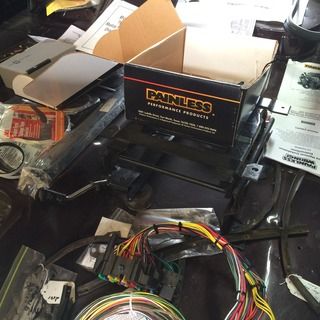
I got the Painless book out and started looking at it, pulled the parts out of the box and looked at them, and promptly put it all back in the box. Another day when I can start early.
I started under the hood with the washer and overflow bottles, so I could start locating the ECM.
Oh, did I mention I went through ALL the parts looking for well, the parts I needed to do the doors. Moving into your garage with all the stuff the movers won't store is a pain! There is no room left to work.
Anyway, I've got to repair fence tomorrow to keep my bull from going over to the neighbors and checking out his cows, and whipping up on his bull. He thinks it's a game.
I'm still looking for someone who can get me some measurements for mounting a Vintage Air. I have a mock up unit, but without the dash in place, it's hard to see where to mount it.
However, today I got a solid 8 hours in. I found all the stuff I lost, at least most of it.
I got the two doors put together, windows and electrical. Locks work, windows go up and down, etc. It's amazing, when you do something 5 or 6 times to get it done right, after you found out you were out of order the first few times, that second door was EASY!
Then I started on the tailgate again. I've got to find Serehill. As bad as I hate to admit it I forgot what he told me about where to mount the plate and how to hook up the electric motor and the defroster.
I got the Painless book out and started looking at it, pulled the parts out of the box and looked at them, and promptly put it all back in the box. Another day when I can start early.
I started under the hood with the washer and overflow bottles, so I could start locating the ECM.
Oh, did I mention I went through ALL the parts looking for well, the parts I needed to do the doors. Moving into your garage with all the stuff the movers won't store is a pain! There is no room left to work.
Anyway, I've got to repair fence tomorrow to keep my bull from going over to the neighbors and checking out his cows, and whipping up on his bull. He thinks it's a game.
I'm still looking for someone who can get me some measurements for mounting a Vintage Air. I have a mock up unit, but without the dash in place, it's hard to see where to mount it.
Robert
-
Road Trip
Topic author - Posts: 313
- Joined: Mon Jun 11, 2012 8:46 am
- Location: Bryan, Texas
Re: Meet Road Trip
Finally had a weekend on Road Trip. It was very relaxing, except that I was doing mostly electrical, rewiring the whole thing and I don't know squat about electrical! Ask Serehill, I had him on the phone Saturday and Sunday.
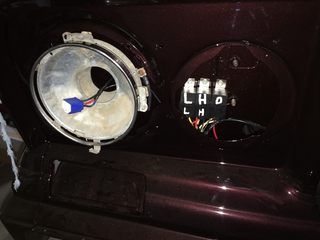
First, I finished up the front lights. I have to wait until I have the new Painless harness installed to finish hooking them up.
Then I went to this.
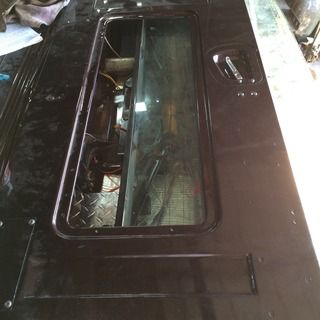
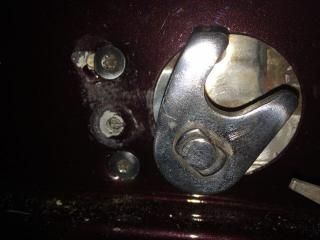
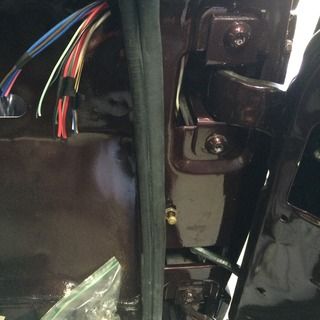
That my friends is a fully functional tailgate and window. I used Serehill's harness to "upgrade" the electrical in back. However, you may remember that I got a NOS tailgate only to find out it was before Jeep changed to the newer tailgates and I had to re-build the holes for the latches to work. Well, I had to change how the harness fit by adding in these spacers.

You can see it in the top right part of the picture. It shows to be a channel iron I had in the scrap heap, cut to width and then drilled and set in to force the panel to the outside of the tailgate. This worked well and the window goes up and down without a problem.
After hours of electrical, I re-built the side windows. I had some parts from the 79 that I either re-built or painted to use in the side windows. I liked the reflective color of the 82 glass better so I used that glass.
I noticed the windows were not locking down.

With a little persuasion the windows lock nicely and seem to seal, of course only a road test will tell if they do, and only God knows when that will happen!
I also hooked up the thinned out engine harness from PSI, but I had a couple of problems. Like two of the connectors didn't fit, and more importantly, there is a connector on the back of the engine that I can't find where it hooks up.

I've sent PSI an email asking for their help.
Next time I get to work on Road Trip, I'll start the Painless loom installation. I hear I should just hire someone. Anyone?
First, I finished up the front lights. I have to wait until I have the new Painless harness installed to finish hooking them up.
Then I went to this.

That my friends is a fully functional tailgate and window. I used Serehill's harness to "upgrade" the electrical in back. However, you may remember that I got a NOS tailgate only to find out it was before Jeep changed to the newer tailgates and I had to re-build the holes for the latches to work. Well, I had to change how the harness fit by adding in these spacers.

You can see it in the top right part of the picture. It shows to be a channel iron I had in the scrap heap, cut to width and then drilled and set in to force the panel to the outside of the tailgate. This worked well and the window goes up and down without a problem.
After hours of electrical, I re-built the side windows. I had some parts from the 79 that I either re-built or painted to use in the side windows. I liked the reflective color of the 82 glass better so I used that glass.
I noticed the windows were not locking down.

With a little persuasion the windows lock nicely and seem to seal, of course only a road test will tell if they do, and only God knows when that will happen!

I also hooked up the thinned out engine harness from PSI, but I had a couple of problems. Like two of the connectors didn't fit, and more importantly, there is a connector on the back of the engine that I can't find where it hooks up.

I've sent PSI an email asking for their help.
Next time I get to work on Road Trip, I'll start the Painless loom installation. I hear I should just hire someone. Anyone?
Robert
-
Road Trip
Topic author - Posts: 313
- Joined: Mon Jun 11, 2012 8:46 am
- Location: Bryan, Texas
Re: Meet Road Trip
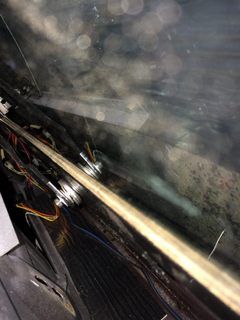
Ok, finally stopped procrastinating and started
I've never done wiring so I have been putting it off. So today I started it.
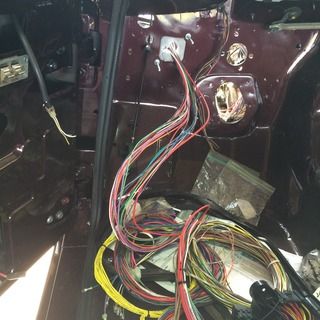
Yes, that is the first run through the firewall to the engine compartment.
The next picture is for Todd. He wanted to see what it was like to work in an empty Jeep.
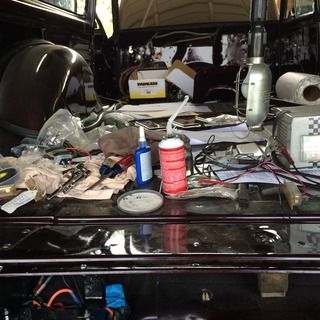
Broke for lunch, hopefully more later.

I've never done wiring so I have been putting it off. So today I started it.

Yes, that is the first run through the firewall to the engine compartment.
The next picture is for Todd. He wanted to see what it was like to work in an empty Jeep.

Broke for lunch, hopefully more later.
Robert
-
Road Trip
Topic author - Posts: 313
- Joined: Mon Jun 11, 2012 8:46 am
- Location: Bryan, Texas
Re: Meet Road Trip
Got a little more done, but it is now officially a mess!
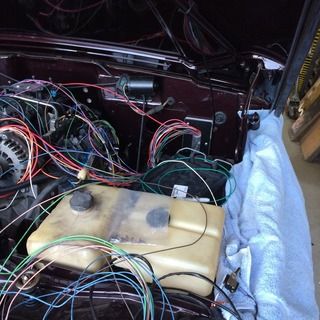
OH yeah, and it gets worse!

But there is some good news, the doors are rewired and ready to be hooked into the new harness - when I get it there!!

OH yeah, and it gets worse!

But there is some good news, the doors are rewired and ready to be hooked into the new harness - when I get it there!!

Robert
-
Road Trip
Topic author - Posts: 313
- Joined: Mon Jun 11, 2012 8:46 am
- Location: Bryan, Texas
Re: Meet Road Trip
Ok, I worked on the 3 piece bumpers yesterday. I've been told I have to cut the front frame horn off to mount that bumper.
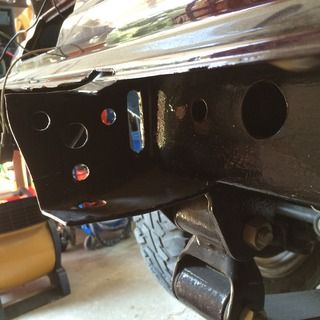
I guess I cut it off as close to flush to the cross piece as I can get it, right?
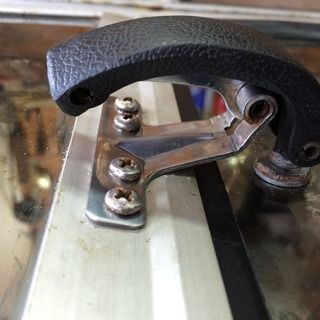
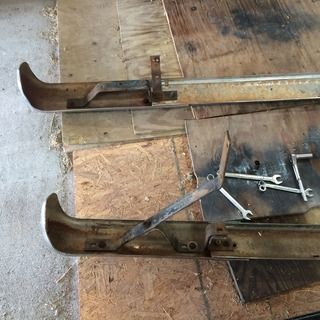
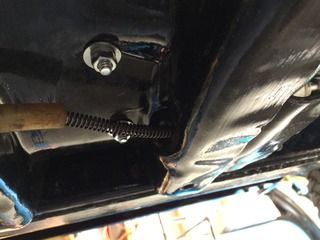
In a previous post I was lamenting my new Ebrake cable not connecting up to the cross member properly. So today I fabbed a new bracket.
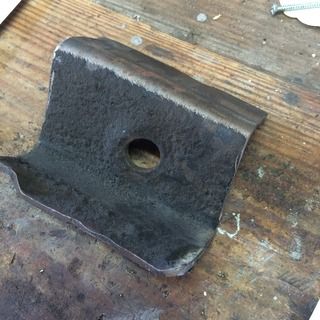
Started with this
An old crossmember with the correct "hole" for the Ebrake.
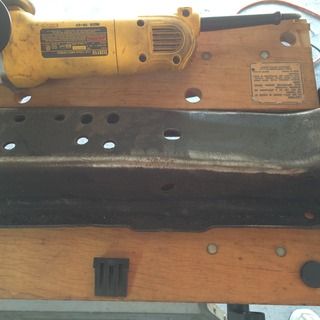
Cut this as my new bracket. Of course when I tried to fit it in place, I cut the top lip too short. So I cut another piece out of the old crossmember and welded it to my bracket.
And here's a couple of pictures of the bracket with the Ebrake cable through it.
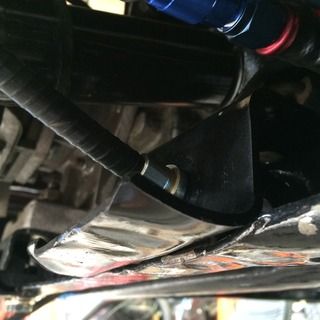
I'm still trying to figure out how to shorten the "Y" cable that connects the two sides. I guess a very small cable clamp (or 2).


I guess I cut it off as close to flush to the cross piece as I can get it, right?
In a previous post I was lamenting my new Ebrake cable not connecting up to the cross member properly. So today I fabbed a new bracket.
Started with this

An old crossmember with the correct "hole" for the Ebrake.
Cut this as my new bracket. Of course when I tried to fit it in place, I cut the top lip too short. So I cut another piece out of the old crossmember and welded it to my bracket.

And here's a couple of pictures of the bracket with the Ebrake cable through it.


I'm still trying to figure out how to shorten the "Y" cable that connects the two sides. I guess a very small cable clamp (or 2).
Robert
-
Road Trip
Topic author - Posts: 313
- Joined: Mon Jun 11, 2012 8:46 am
- Location: Bryan, Texas
Re: Meet Road Trip
Another Painless Question
One step forward....
Here is the newest one. I have the electric diagram for some year FSJ. On it is the wiring for the two front windows. The diagram shows:
From the fuse box there is a wire - Red with white trace and it shows splitting off and going to both window switches. I presume this is the power wire.
It shows there is a pink wire and a light blue wire that runs between the two switches (doesn't connect anywhere else that I can see).
Then it shows the dark blue and the brown running from each switch to each respective window motor.
The new Painless harness has 2 wires one labeled Left power window and one labeled Right power window. I expect these to be running power to the switch, but they are light gauge wire, not as large as the Red with white trace listed above, so I don't know if they are power for the window motor.
I would like to use the Jeep body harness between the two doors. It is in very good condition and has connectors in it for the radio, clock, ashtray, etc., maybe even the ac unit which would make some of the wiring easier.
1) Does anyone know if I could use one of the two painless wires or if I need to run each to 2) WHAT?
I don't know how to integrate the Painless into the Jeep harness. Anyone have any help here?
Thanks
Robert
-
Road Trip
Topic author - Posts: 313
- Joined: Mon Jun 11, 2012 8:46 am
- Location: Bryan, Texas
Re: Meet Road Trip
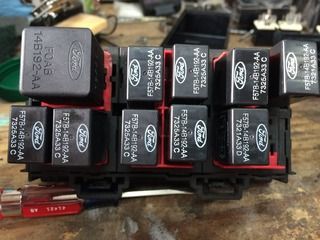
With help from some of you (you know who you are and I hope I haven't been to much of a pest), I have managed to wire up the underhood fuse box. Note the wires have labels telling me where they go. I forget things.
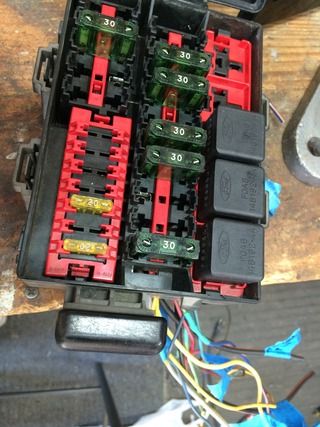
This box has 3 relays, one for the low temp fan, one for the high temp fan and one for the pusher fan that will come on with the AC. Each one is fused with a 30 amp maxi fuse powered through the fuse box. It also has 2 - 30 amp maxi fuses, one for the headlight harness and one for the tailgate harness. Then lastly it has 1 - 20 amp fuse and one 30 amp maxi fuse just in case I want to add something else under the hood.
I was working on the mini relay box to go under the dash to handle some of the inside relay work, like the window motors and the door locks when my solder gun developed a short. So I'll get back on this next weekend, but today at least I got the door locks set up with their relays.
This is the box before I stripped it and started back. It will provide space for two more mini relays (max amps 20) and one standard relay.
After I get the 4 mini's for the window motors, next up will be actually mounting them, fuse box under the hood and the mini relay box under the dash.0.photobucket.com/albums/i379/rmoorman8/IMG_06851.jpg[/IMG][/URL]

This box has 3 relays, one for the low temp fan, one for the high temp fan and one for the pusher fan that will come on with the AC. Each one is fused with a 30 amp maxi fuse powered through the fuse box. It also has 2 - 30 amp maxi fuses, one for the headlight harness and one for the tailgate harness. Then lastly it has 1 - 20 amp fuse and one 30 amp maxi fuse just in case I want to add something else under the hood.
I was working on the mini relay box to go under the dash to handle some of the inside relay work, like the window motors and the door locks when my solder gun developed a short. So I'll get back on this next weekend, but today at least I got the door locks set up with their relays.
This is the box before I stripped it and started back. It will provide space for two more mini relays (max amps 20) and one standard relay.

After I get the 4 mini's for the window motors, next up will be actually mounting them, fuse box under the hood and the mini relay box under the dash.0.photobucket.com/albums/i379/rmoorman8/IMG_06851.jpg[/IMG][/URL]
Robert
-
 Mdcptman
- Posts: 400
- Joined: Sat Jun 09, 2012 5:15 am
- Location: New Orleans
Re: Meet Road Trip
Good goin Robert. I cant imagine the pain you are going thru with that wiring. But its getting there!
88 Grand Wagoneer
360/727/208
Edelbrock 2131, non-EGR
Holley 600
Hydroboost
Hedman headers
Dual exhaust
MSD 6A
TFI conversion
Rusty's 2" Add-a-Leaf kit
31 x 10.5 LT15 Goodyear Wrangler Authority Tires
S-10 Steering Box Mod
Quote From Friend's Mom:
"You don't rely on that vehicle do you?"
360/727/208
Edelbrock 2131, non-EGR
Holley 600
Hydroboost
Hedman headers
Dual exhaust
MSD 6A
TFI conversion
Rusty's 2" Add-a-Leaf kit
31 x 10.5 LT15 Goodyear Wrangler Authority Tires
S-10 Steering Box Mod
Quote From Friend's Mom:
"You don't rely on that vehicle do you?"
-
Road Trip
Topic author - Posts: 313
- Joined: Mon Jun 11, 2012 8:46 am
- Location: Bryan, Texas
Re: Meet Road Trip
Spent the weekend working on the fuse box/relay boxes and switches. The switches look similar, but there are differences I found out.
79 door switches had 5 connectors and it took 5 wires to make them work. Late 80's switches have only 3 wires, power and contacts for up and down. MUCH easier to wire to a relay.
While I haven't made progress on RT, I at least figured out how I want to wire the doors to the Painless harness, using relays for windows and locks. Ordered electrical supplies from DelCity and Amazon. When it comes in I'll finish what I started and see if I can make locks and windows work.
Since I was in the garage anyway, and it was RAINING (over10" from Thursday night to Sunday morning) I decided to check out how my tailgate window worked. It works great, but the left side latch decided to not unlock, so I had to dissemble the tailgate again, and rebuild it again. Now that I know how to adjust the release for the latch on each side, I think I'll be ok without getting back into it.
I also started thinning out the wiring harness, deciding what how to run the harness. I think I have the rear figured out as to how I want to run and connect it. I have the doors figured out. The headlights are done thanks to Serehill's harness, so I'm down to the cabin and then the LS1 wiring for the engine. That should be fun...
Robert