Advice for Welding thin Sheet Metal

This is a place to share about tools and workspaces
User avatar

Topic author
Nutz-n-Bolts
Posts: 313
Joined: Thu Dec 05, 2013 12:06 pm
Location: Strattanville,PA

Advice for Welding thin Sheet Metal

Post by Nutz-n-Bolts »

I have been doing some welding for a while and producing some pretty good work. However, every thing I have worked on so far has been 1/8" or thicker. I need to do some body repair to the J-Beast's bed and also weld the two mirror mounting holes on the door closed.

I'll start with the door holes. I pretty sure I'll need to get one of those copper blocks (don't know what they're called) to hold against the back side, then do I just weld around the edge of the hole to close it up? Sand smooth after that? I'm also guessing it's time to ditch the .030 wire for the .024 ?


Now on to the bed. All four corners of my bed have rusted out along the horizontal seam where the bed side comes down to meet the portion that bumps out right before the bottom. ( does that make sense? :P ) Basically a flat sheet of tin laid on and slightly bent to match the curve of the side should fix all 4 spots. My thought is to to get this tool from HF (saw in another thread here on FSJ):

http://www.harborfreight.com/air-punch- ... -1110.html

Then flange any area that would need to be smooth (top and sides) Then just lay in and weld. Since the bottom weld/seam is down in the dip that should hide the weld or do I need to weld that from the back some how? I'm sorry If none of this makes sense, I'll get a pic tonight that should help explian.
Lover of all Old Iron

60-79 CJ5 The best parts from several years combined to make one tough ALL JEEP CJ
81 J10 Pickup My newest acquisition undergoing a complete restoration
User avatar

tndonor
Posts: 191
Joined: Fri Mar 29, 2013 2:55 pm
Location: Denver, CO

Re: Advice for Welding thin Sheet Metal

Post by tndonor »

Thinner wire does help greatly. Depending on guage 0.030 wire can do sheet metal, 0.024 will do it better with more precision.

Welding sheet is a whole different animal from say plate, you dont have to build heat into the pieces and let the weld flow, its more keeping the heat down and not burning through what you are trying to join.

Beswt advice I could give is to get some pieces the same guage you are going to work with and practice and learn some of the new ways the metal responds and talks to you. Its a different skill set for sure. Practicing on scrap will make your end result look better and save time dressing up the mistakes you make as you learn on the fly.
1967 Jeep M715. Cummins HX35/HT3B NV4500 203/205 Doubler. HP60/14B. OBW. OBA.
Ive done my part to jump start the economy
User avatar

tndonor
Posts: 191
Joined: Fri Mar 29, 2013 2:55 pm
Location: Denver, CO

Re: Advice for Welding thin Sheet Metal

Post by tndonor »

Forgot, when working with sheet, you cant lay a bead down on one side and then go to the next run, the metal will deform and end up not fitting. You have to do spot welds around the piece on opposite faces and work you way in with short beads or all tacks. Keep as much heat out as you can and you will end up with a better looking piece that will fit better. Better fitting means better mating surfaces where the wleds are not under constant tension from misalignment....... you get the picture.
1967 Jeep M715. Cummins HX35/HT3B NV4500 203/205 Doubler. HP60/14B. OBW. OBA.
Ive done my part to jump start the economy
User avatar

Topic author
Nutz-n-Bolts
Posts: 313
Joined: Thu Dec 05, 2013 12:06 pm
Location: Strattanville,PA

Re: Advice for Welding thin Sheet Metal

Post by Nutz-n-Bolts »

Thanks Tndonor, That's good advice. I'll definitely practice some beforehand and get some .024 wire. I read you loud and clear on your second post too, going to try to do that the best I can.


I went out tonight to try and take pictures but it's raining buckets and it's so dark you can't see a thing in the "barn" where the bed is. I couldn't get a picture worth posting. :-?
Lover of all Old Iron

60-79 CJ5 The best parts from several years combined to make one tough ALL JEEP CJ
81 J10 Pickup My newest acquisition undergoing a complete restoration

Fleg
Posts: 195
Joined: Fri Aug 09, 2013 10:52 am
Location: Rio Rathole, NM

Re: Advice for Welding thin Sheet Metal

Post by Fleg »

I'm terrible at sheet welding as well but what I have learned is keep your beads as short as possible.
User avatar

jaber
Vendor
Posts: 3066
Joined: Sat Aug 27, 2011 5:24 pm
Location: Chino Valley, Az.

Re: Advice for Welding thin Sheet Metal

Post by jaber »

I use the lowest heat setting, and never weld for more then 1 mississippi. In most cases, I can touch the last weld with a bare finger before I put the next spot weld on it. The smaller the spot weld, the less heat built up when sanding it down. ;)
Jeff

'46 cj3a
'51 Willys p/u
'51 Willys Parkway Conversion
'74 CJ5
'75 J-20 Wrecker
'75 J-20 Cummins service truck
'77 J-10 p/u
'79 Cherokee
'88 Grand Wagoneer
http://s252.photobucket.com/albums/hh14/jeffaber/

Jeeptchr
Posts: 167
Joined: Sat Nov 16, 2013 8:12 pm

Re: Advice for Welding thin Sheet Metal

Post by Jeeptchr »

As said above .023-24 wire with gas, no flux core and short stitches way away from each other. It gets annoying to jump around, but it's very well worth it in the end (I'm on my 2nd 2 lb spool on my chief right now.) I also keep a roll of .035 around for my heavier projects and switch between them as needed.
Also buy good wire from a welding supply, not hobart or other cheap wire, there isn't much cost difference but there is a lot of difference in quality. When I ran out of my pro-star wire from prax-air I picked up a roll of hobart wire at orscheln farm and home. It took different heat settings and no consistency in the flow doing the same welds. I took it back and went and bought the better wire. welding went perfectly with exact same settings. All of these things become majorly more important the thinner the metal.

I have that exact flanger. it works pretty well.

just my .02
User avatar

Topic author
Nutz-n-Bolts
Posts: 313
Joined: Thu Dec 05, 2013 12:06 pm
Location: Strattanville,PA

Re: Advice for Welding thin Sheet Metal

Post by Nutz-n-Bolts »

Thanks Guys! Got it on the short stitches and low heat. No worries about flux core or gas either. I'm running a Millermatic 180 that has a good full gas bottle hooked up. I think I'll just practice until I feel comfortable.

Anybody have input on that btm seam? When I was trying to get pictures last night I noticed that there is a 3/4" ledge in the bottom panel that comes up behind the top panel. Is this one of those deals where you put a bunch of holes in the new panel and fill the holes? Won't that leave and "open" seam at the bottom the water could wick up into? Maybe that's why all 4 corners rusted this way.
Lover of all Old Iron

60-79 CJ5 The best parts from several years combined to make one tough ALL JEEP CJ
81 J10 Pickup My newest acquisition undergoing a complete restoration

Jeeptchr
Posts: 167
Joined: Sat Nov 16, 2013 8:12 pm

Re: Advice for Welding thin Sheet Metal

Post by Jeeptchr »

I fully welded mine, for the same reason, but I think if you used a quality seam sealer very liberally that would do just fine. As I'm thinking about it, I'll have to do that myself on one seam that was,directly over the frame rail that I couldn't get the lead into. What is your gas mixture?


Sent from my iPad using Tapatalk
User avatar

Topic author
Nutz-n-Bolts
Posts: 313
Joined: Thu Dec 05, 2013 12:06 pm
Location: Strattanville,PA

Re: Advice for Welding thin Sheet Metal

Post by Nutz-n-Bolts »

OK got more time to look and take pictures, and thing make lots more sense now. There are actually 3 pieces of metal that dive in the seam together Upper and lower visible side and a part of inner structure) and all protrude out the back side about an inch and a half were they are welded in the hole fashion described earlier. Jeepthcr, I think I'll fully weld the edges of mine too.

Image

Image

So doing it in this fashion then do you use seam sealer in the seam on the out side? Putty or bondo? Or is the paint supposed to seal that tiny gap?

Thanks guys!
Lover of all Old Iron

60-79 CJ5 The best parts from several years combined to make one tough ALL JEEP CJ
81 J10 Pickup My newest acquisition undergoing a complete restoration
User avatar

jaber
Vendor
Posts: 3066
Joined: Sat Aug 27, 2011 5:24 pm
Location: Chino Valley, Az.

Re: Advice for Welding thin Sheet Metal

Post by jaber »

Nutz-n-Bolts wrote:they are welded in the hole fashion described earlier.
"Spot welds" or "plug welds" to be clear. ;)

The product is automotive seem sealer, its a bond type paste that is spread liberally across seams in the factory. You can buy it in tubes or pints and it can be applied with a paint brush. Heres a link to what Eastwood has, shop around, I'm sure you can find it cheaper. :-bd

http://www.eastwood.com/autobody/seam-s ... fgodwGMApg
Jeff

'46 cj3a
'51 Willys p/u
'51 Willys Parkway Conversion
'74 CJ5
'75 J-20 Wrecker
'75 J-20 Cummins service truck
'77 J-10 p/u
'79 Cherokee
'88 Grand Wagoneer
http://s252.photobucket.com/albums/hh14/jeffaber/

Jeeptchr
Posts: 167
Joined: Sat Nov 16, 2013 8:12 pm

Re: Advice for Welding thin Sheet Metal

Post by Jeeptchr »

I'm going to seam seal everything possible inside and out on mine. I was talking with the local bodyman and they use a 1 part seam sealer for interior and a 2 part for exterior. I'd definitely use seam sealer on the outside in that seam, I believe it has it from the factory. here is a great link with application tips. https://www.autobody101.com/content/art ... am-sealer/. I haven't started worrying about the visible body panels yet, right now I'm concentrating on the interior and underneath. My father in law told me I was responsible for anything inside the door jam's and he'd take care of the exterior. :) ) therefore I haven't worried a lot about it yet.

On that area in your pic I would probably rebuild it exactly as OE and use spot/plug welds then seam seal/epoxy/chassis saver. With it being 3 flanges I'd be worried about warpage and blow thru. I plug welded my floorpan to door seal seams and it sealed up pretty well and was strong. I will be seam sealing it though.
User avatar

Topic author
Nutz-n-Bolts
Posts: 313
Joined: Thu Dec 05, 2013 12:06 pm
Location: Strattanville,PA

Re: Advice for Welding thin Sheet Metal

Post by Nutz-n-Bolts »

Thanks guys! I was out looking at it again and I can see where the seam sealer is in there now. I can even get a hold of a piece and pull it out.

Spot welding the 3 layer build up may not be all that bad given some of your reasons Jeeptchr. I intend to coat the entire bottom of the bed with Herculiner anyhow so that should probably seal it all up pretty well too. We'll see. This will definitely be a new challenge for me. :D
Lover of all Old Iron

60-79 CJ5 The best parts from several years combined to make one tough ALL JEEP CJ
81 J10 Pickup My newest acquisition undergoing a complete restoration
User avatar

Jjkage84
Posts: 220
Joined: Wed Apr 30, 2014 10:38 pm
Location: Show Me State

Re: Advice for Welding thin Sheet Metal

Post by Jjkage84 »

All I have is a gassless welder and Flux core is the only wire I can get to lay a good bead on steel. Am I SOL?
Keep Calm and Jeep On!

http://www.youtube.com/JeepKage101

depogrig
Posts: 50
Joined: Wed May 01, 2013 7:37 am

Re: Advice for Welding thin Sheet Metal

Post by depogrig »

Flux is for gasless mig. The flux is providing the shielding since you have no gas to shield the puddle.

racerx12003r1
Posts: 406
Joined: Sun Dec 29, 2013 8:12 am
Location: China Grove NC

Re: Advice for Welding thin Sheet Metal

Post by racerx12003r1 »

I welded in my floor patch panels with flux core wire in a HF special. It came out ok. It took a lot of grinding to clean it up and get the spatter off though. Now I'v stepped up in the world. Brought home a Snap on MM140 welder Wednesday. This thing is SWEEEETTT! Will do MIG and TIG work. I hope my welding will get better now. Just in time for my motor swap. :-bd
Daniel

1980 J10 Thunderbolt Grease slapper (formerly Beast II)

MP&C
Posts: 28
Joined: Tue Aug 26, 2014 3:53 am
Location: Southern MD

Re: Advice for Welding thin Sheet Metal

Post by MP&C »

Nutz-n-Bolts wrote:I have been doing some welding for a while and producing some pretty good work. However, every thing I have worked on so far has been 1/8" or thicker. I need to do some body repair to the J-Beast's bed and also weld the two mirror mounting holes on the door closed.

I'll start with the door holes. I pretty sure I'll need to get one of those copper blocks (don't know what they're called) to hold against the back side, then do I just weld around the edge of the hole to close it up? Sand smooth after that? I'm also guessing it's time to ditch the .030 wire for the .024 ?

You have quite a bit going on here, so I thought I'd answer one part at a time to keep everything from getting too confusing.

Didn't read what you have for a welder, but if it's doing 1/8" steel, it will be sufficient for most items on a vehicle. Most body panels are 19 (.0418) or 18 ga (.0478) thick, so it should be more than capable in handling sheet metal parts. As to the wire, as long as your machine has shielding gas, I wouldn't rush out and change to a different sized wire because Joe Smith is using it on his machine, which btw, is likely different from yours. .030 is a good "happy medium" size and is still well within the range for either thickness. So don't rush out and change just to change. A wise man once told me to fix any problem, look at the cheap fixes first. Your machine should have enough adjustment to accommodate anything you'll encounter, so the REAL cheap fixes at this point would be machine settings and user technique.

Just to show an example, here are some welds that were done with .035 wire, and the 220V welder heat is set for 3/16 thick steel. The actual "applied heat" is regulated by how long the "zap" is applied to the panel. The wire feed is set just slightly above what is normally used for the 3/16 metal.. Anytime I do a wire size change or other change, it pays to use some practice coupons to check your welder setup and your technique setup prior to jumping in with two feet on your Jeep. As the body panels are sitting in free air, then so should your practice pieces. Sheet metal laying on a steel work bench for practice adds a nice heat sink, and doesn't duplicate what is on the vehicle. To get proper welder setup for your body panels you need to duplicate the properties of what is on the vehicle (minus the rust of course)


Here dialed in the settings for 3/16 thick steel, and ran some test welds on 19ga... note the test samples in "free air".


Image


Front side weld dots....


Image


Image


Rear side weld dots show full weld penetration....


Image


The weld duration for each dot was about 1/2 second. I've played with various settings on MY welder, and am not saying to rush out and use these settings on yours. But by the same token, I doubt seriously that you will get a full penetration weld if you follow the manufacturer's guidelines. The weld will likely be cold, as the settings included for your machine are more geared to a full weld pass. With sheet metal and the Mig, that is the last thing you should do, you need to weld one dot at a time and set the machine hot enough for full weld penetration when doing so. The welds above at the 3/16 setting were done just to demonstrate what could be done at the higher settings, but typically my machine is used at the 14 gauge to 1/8 setting and control applied heat with weld duration.

So if you haven't done so, I would cut some scrap sheet metal and practice with your machine at a setting or two above what is the norm for 18ga steel. This should get you a full penetration weld. Next, if you start to see issue with weld "blowout", then turn up the feed speed. Because if the heat applied doesn't have enough filler going in, it is going to burn away at the parent metal. So if you do see blowout, bump up the speed slightly to "feed" the weld puddle. Next, control the weld "dot" size by weld duration. Once you start to see success in what settings you have done on your practice pieces, try to keep all you processes consistent: weld duration, distance of tip to panel, etc, etc. Consistency in methods will yield consistency in results...

MP&C
Posts: 28
Joined: Tue Aug 26, 2014 3:53 am
Location: Southern MD

Re: Advice for Welding thin Sheet Metal

Post by MP&C »

Nutz-n-Bolts wrote: I need to do some body repair to the J-Beast's bed and also weld the two mirror mounting holes on the door closed.

I'll start with the door holes. I pretty sure I'll need to get one of those copper blocks (don't know what they're called) to hold against the back side, then do I just weld around the edge of the hole to close it up? Sand smooth after that?

For any sheet metal welding, I prefer a tight fitting, zero gap joint (or as close as humanly possible). For holes, if you get up into anything larger than a #10 hole, you are getting to a point that the size of the weld "blob" is going to shrink so much that you are adding deformation to the panel, especially a low crown panel like a door skin. I'm going to guess this is 1/4 or better in size, my recommendation is to cut some plugs out of 18 or 19 gauge cold rolled steel (crs) and weld them in place. Typically with a tight fitting joint, you won't need a copper backing plate that is going to act as a heat sink (and in many cases give you a cold weld joint on the back side). With your welder set up properly as per my last post, you should have good weld penetration that you don't need any gap.


A sample for using a plug in the holes:


This was the final process in removing a hood ornament and peaking the hood on a 55 Chevy. The hood ornament had 4 holes to fill, and a hood is not an area you want to experience excessive shrinking for fear of a loose oil can. Using my Roper Whitney hand punch to make some plugs for the holes, but the punch part has the locating center point, which will tend to distort the plugs. I found the correct size and ground off the point.


Image


Plug held in place with a couple strips of tape on the bottom, long enough to tack in place.... Remove tape remnants after the first tack..


Image


Image


Welded in place, planished, and welds dressed....


Image


Image


Here is the process I use to grind down and dress the welds...


https://www.youtube.com/watch?v=V2WHT_z ... BO040NdL1g


....and here are the final results of the hood to show good crown and support remains.....


https://www.youtube.com/watch?v=ZHLFo4M ... BO040NdL1g


For a larger hole, sometimes it helps to add a "handle" to the plug piece, or use tape again on the back side as shown above..


Here is a 38 Chevy front end that I removed rectangular marker lights (among other things).


I had asked the owner why he had rectangular lights on the front of a rounded car, he blamed it on a previous owner. So shaving the lights was added to the list.


Image


Image


Image


Image


Same process was used as shown above to clean up the welds..

MP&C
Posts: 28
Joined: Tue Aug 26, 2014 3:53 am
Location: Southern MD

Re: Advice for Welding thin Sheet Metal

Post by MP&C »

Nutz-n-Bolts wrote: Now on to the bed. All four corners of my bed have rusted out along the horizontal seam where the bed side comes down to meet the portion that bumps out right before the bottom. ( does that make sense? :P ) Basically a flat sheet of tin laid on and slightly bent to match the curve of the side should fix all 4 spots. My thought is to to get this tool from HF (saw in another thread here on FSJ):

http://www.harborfreight.com/air-punch- ... -1110.html

Then flange any area that would need to be smooth (top and sides) Then just lay in and weld. Since the bottom weld/seam is down in the dip that should hide the weld or do I need to weld that from the back some how? I'm sorry If none of this makes sense, I'll get a pic tonight that should help explian.


Nutz-n-Bolts wrote:OK got more time to look and take pictures, and thing make lots more sense now. There are actually 3 pieces of metal that dive in the seam together Upper and lower visible side and a part of inner structure) and all protrude out the back side about an inch and a half were they are welded in the hole fashion described earlier. Jeepthcr, I think I'll fully weld the edges of mine too.

Image

Image

So doing it in this fashion then do you use seam sealer in the seam on the out side? Putty or bondo? Or is the paint supposed to seal that tiny gap?

Thanks guys!


I would suggest to save your money on the HF flanger. Looking at your pictures above, take note of where the majority of the rust starts and accumulates. Lapped seams.

These seams are primarily used by the factory to expedite the assembly process. Period. In many vehicles until more recent times, they didn't even have any paint between to help protect from rust issues. So I must ask, why do a flanged repair and add that rust generator back into another area? Secondly, anytime you perform a flanged repair, you will have two thicknesses of metal heating and cooling at a slower rate than the single thickness on the other side of the joint. So you will therefore have different expansion rates on either side of the joint, and this differing expansion rate will eventually result in a ghost line in the middle of the joint, visible in the final finish, where everyone will be able to see exactly where your seam is. Where even present day manufacturers use flanged seams in joining panels, it is only used in areas such as the tops of quarter/edge of roof seam and any overlap is in a channel, covered by a flowable seam sealer. They do not use it in the flanging and overlapping of an exposed exterior panel if it needs to be finished as an "invisible" seam, because that can't be done with any permanency..


It's obvious that the seam between those two panels needs to come apart. My suggestion is to fabricate a new lower panel. It has primarily straight bends (from what I can see in the pictures) and this gives you much needed new metal. On the upper portion, go up about an inch and trim off the old rusty portion, providing that distance removes all of the rot. Then butt weld in a new piece with the lower fold already formed. Planish and dress the weld, and cover both pieces in epoxy primer before welding the two together. Drill holes for plug welds in the upper flange (easier to weld downward than on your back with weld splatter dropping everywhere) and clean the paint from the adjacent panel through the plug weld holes with this little gem:

The primer shown was painted on the rear tailgate opening, and also on the underside of the tailpan. This provides rust protection where in many cases the factory process does not add any paint until after assembly. In cars like this 55, in many cases the inner voids such as in the rockers or floor cross-members never receive any paint finish inside, making them especially prone to moisture and rust issues. You will need to clean the paint off the adjacent panel within the drilled plug weld hole for a good weld.


Image


Which is what brought about the need for this tool, the same size drill bit I used for plug weld holes is flattened and backfaced to resemble an end mill cutter.


Image


Image


This shows how it works, cleans the paint from the metal surface, but having a flat face on the cutter, it doesn't remove the metal as a regular drill bit would. Notice most of the "chips" are paint....


Image


And welded......


Image


Some guys will use a weld through primer to accomplish this same process, I prefer the epoxy as I read an issue of Auto Restorer magazine quite a few years back that a study showed epoxy offered better long term protection from rust. No matter whether you choose weld through or epoxy, either will be better than nothing at all.


For normal application, I spray inside my paint booth. For a small application like you see here, I'll mix up some epoxy and brush it on. (note brush strokes in first pic above) Again, the application process won't matter much as any exposed epoxy will be sanded and re-applied later, but now that we have some epoxy between the two panels, there is better rust protection regardless of how it got there.


Here is a video on plug welds...


https://www.youtube.com/watch?v=F0SQagY ... BO040NdL1g

MP&C
Posts: 28
Joined: Tue Aug 26, 2014 3:53 am
Location: Southern MD

Re: Advice for Welding thin Sheet Metal

Post by MP&C »

And finally, welding and weld placement...


Regardless of appearance, all body panels will have crown in at least one direction to help hold the shape of that panel. A flat sheet of metal has no support and will flap in the breeze, so ALL panels will have crown somewhere. If we were to look at the horizontal weld seam along the top of the quarter in a cross-section view (top-down) you would see that despite appearing flat, that panel actually has crown from front to back. It looks like a slight arc. Now, anytime you apply the heat from welding, you are going to get a shrink as that weld cools. When we weld one dot at a time (using the MIG), each and every dot is going to pull at the metal around it, from all directions, causing a shrink. Once you've added all those shrinks from all those weld dots together, along the entire weld seam, it adds up to a substantial amount of shrink such that what used to look like an arc is now more closely resembling a straight line. This is why the panel is pulling inward, the crown is shrinking. If this seam were in the middle of the panel, it would appear as a more pronounced valley. As to the gap question, I prefer no gap at all. The weld seam has a tendency to shrink, and the use of a gap between will permit more movement as this shrinking occurs. This risks losing more crown and will require more effort in planishing to restore the panel's crown. If you can properly set up the welder with more heat, you don't need any gap to get a full penetration weld.


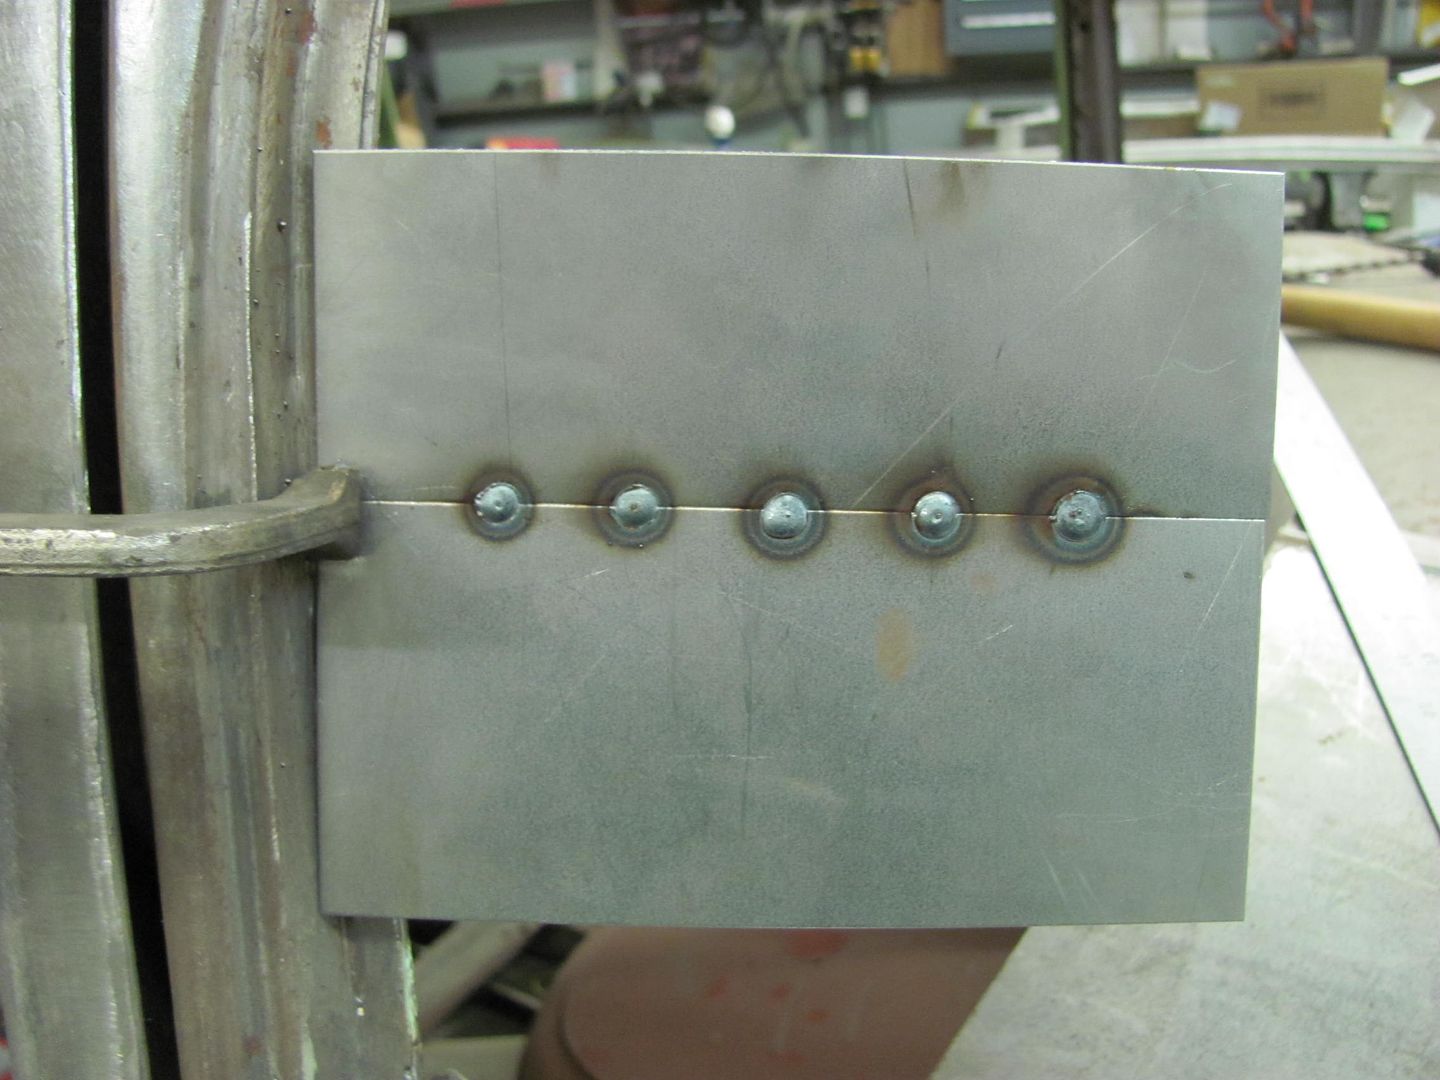
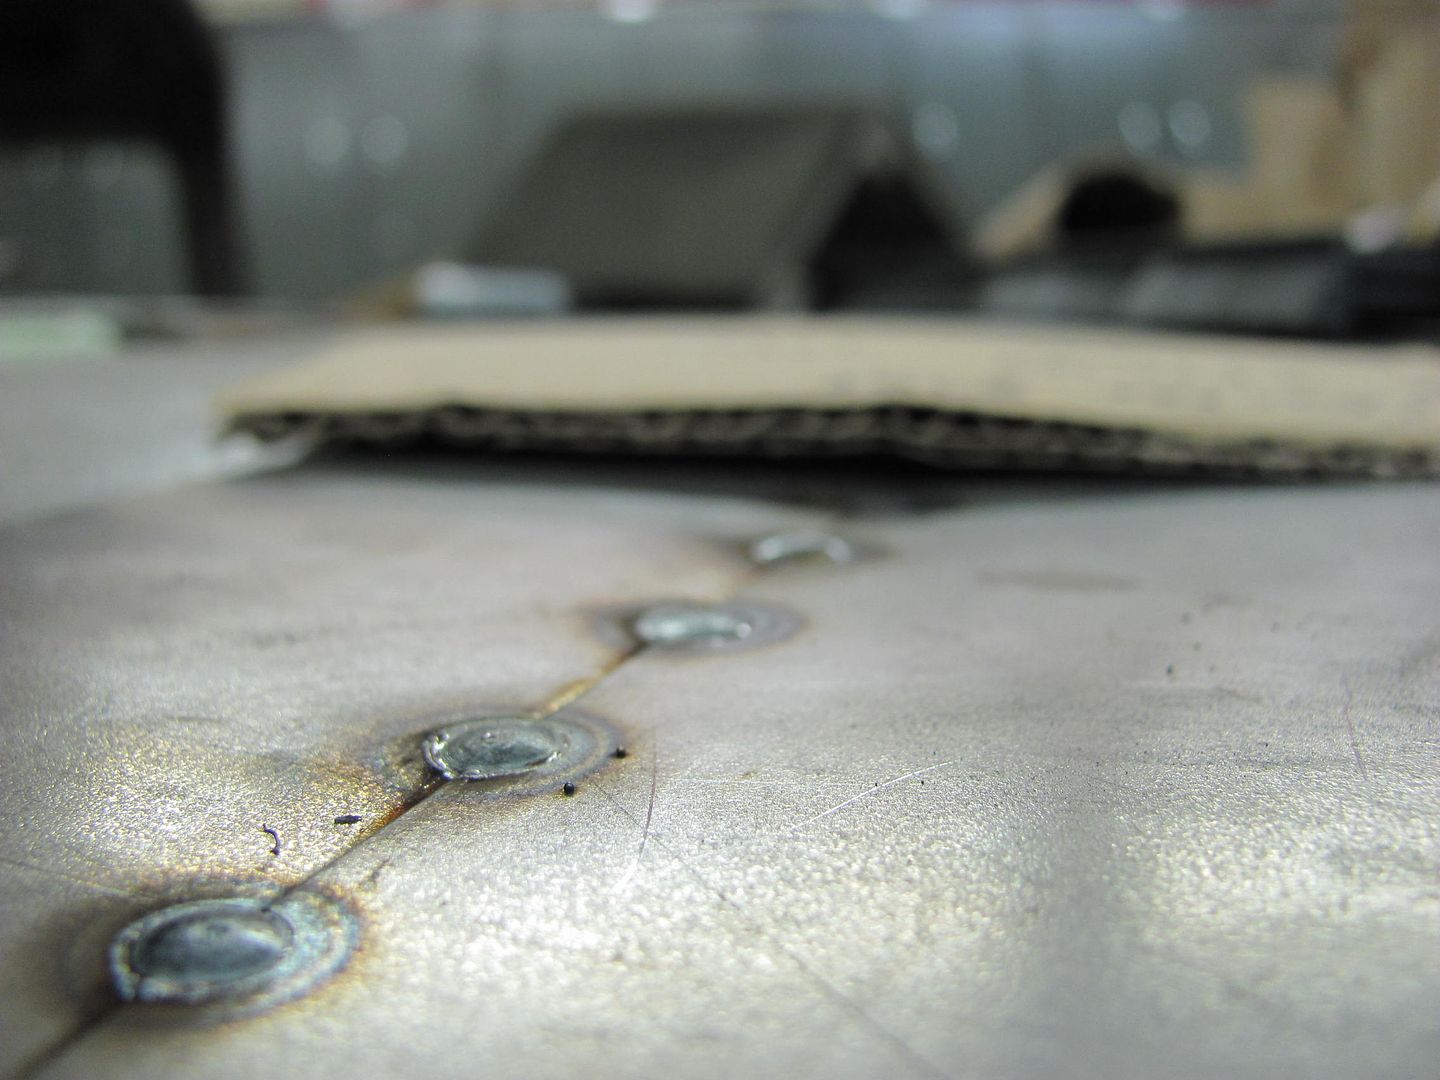
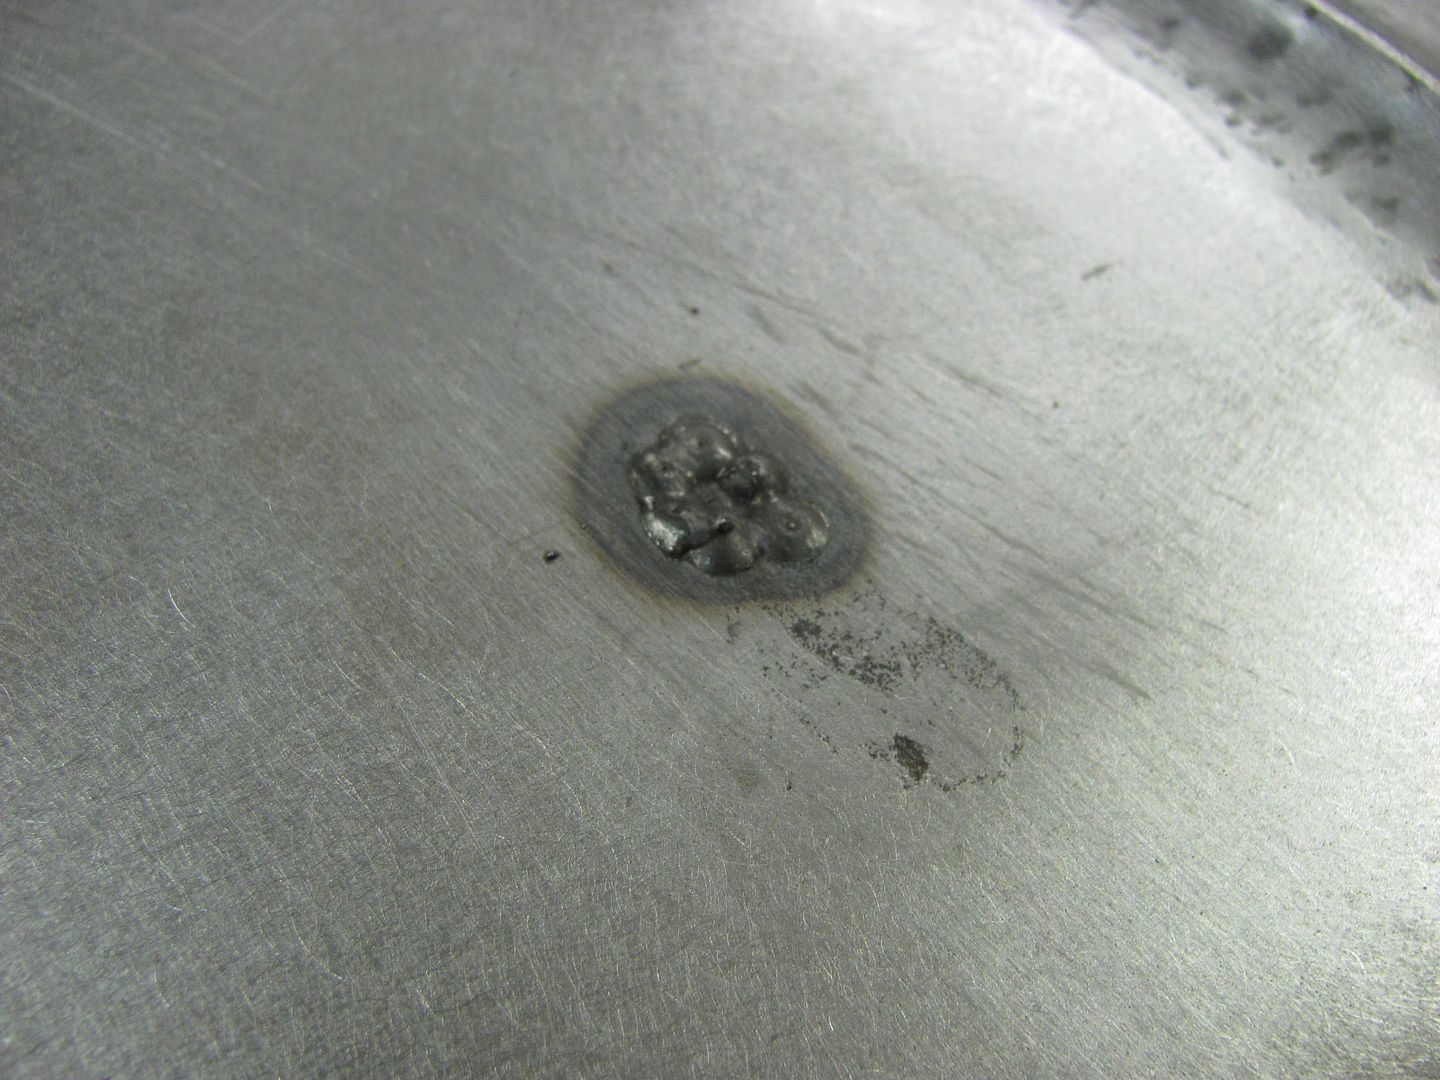
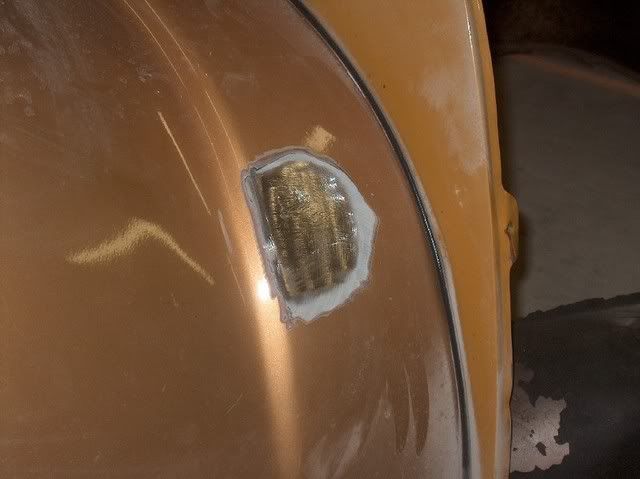
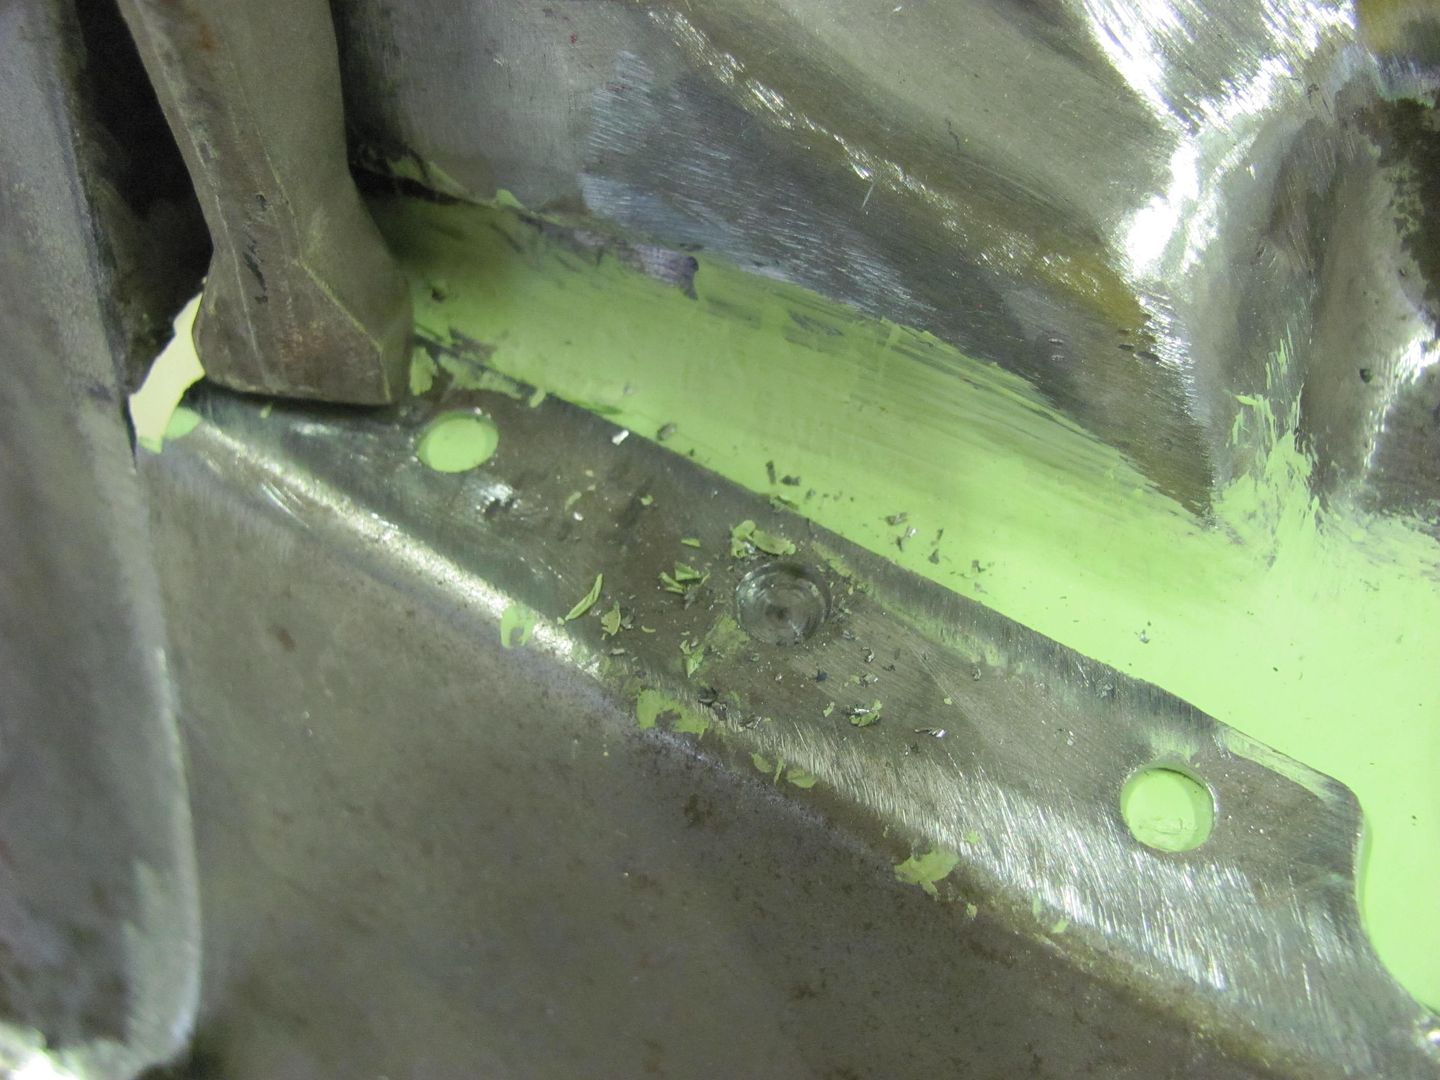
As to how I address the weld dots, lets look at this again:
When we weld one dot at a time (using the MIG), each and every dot is going to pull at the metal around it, from all directions, causing a shrink.

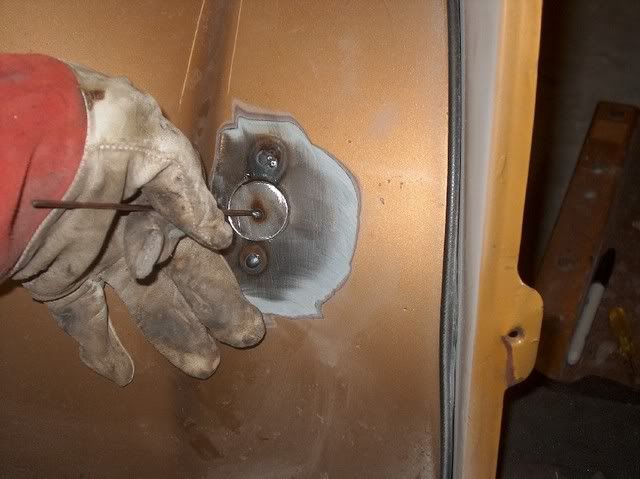
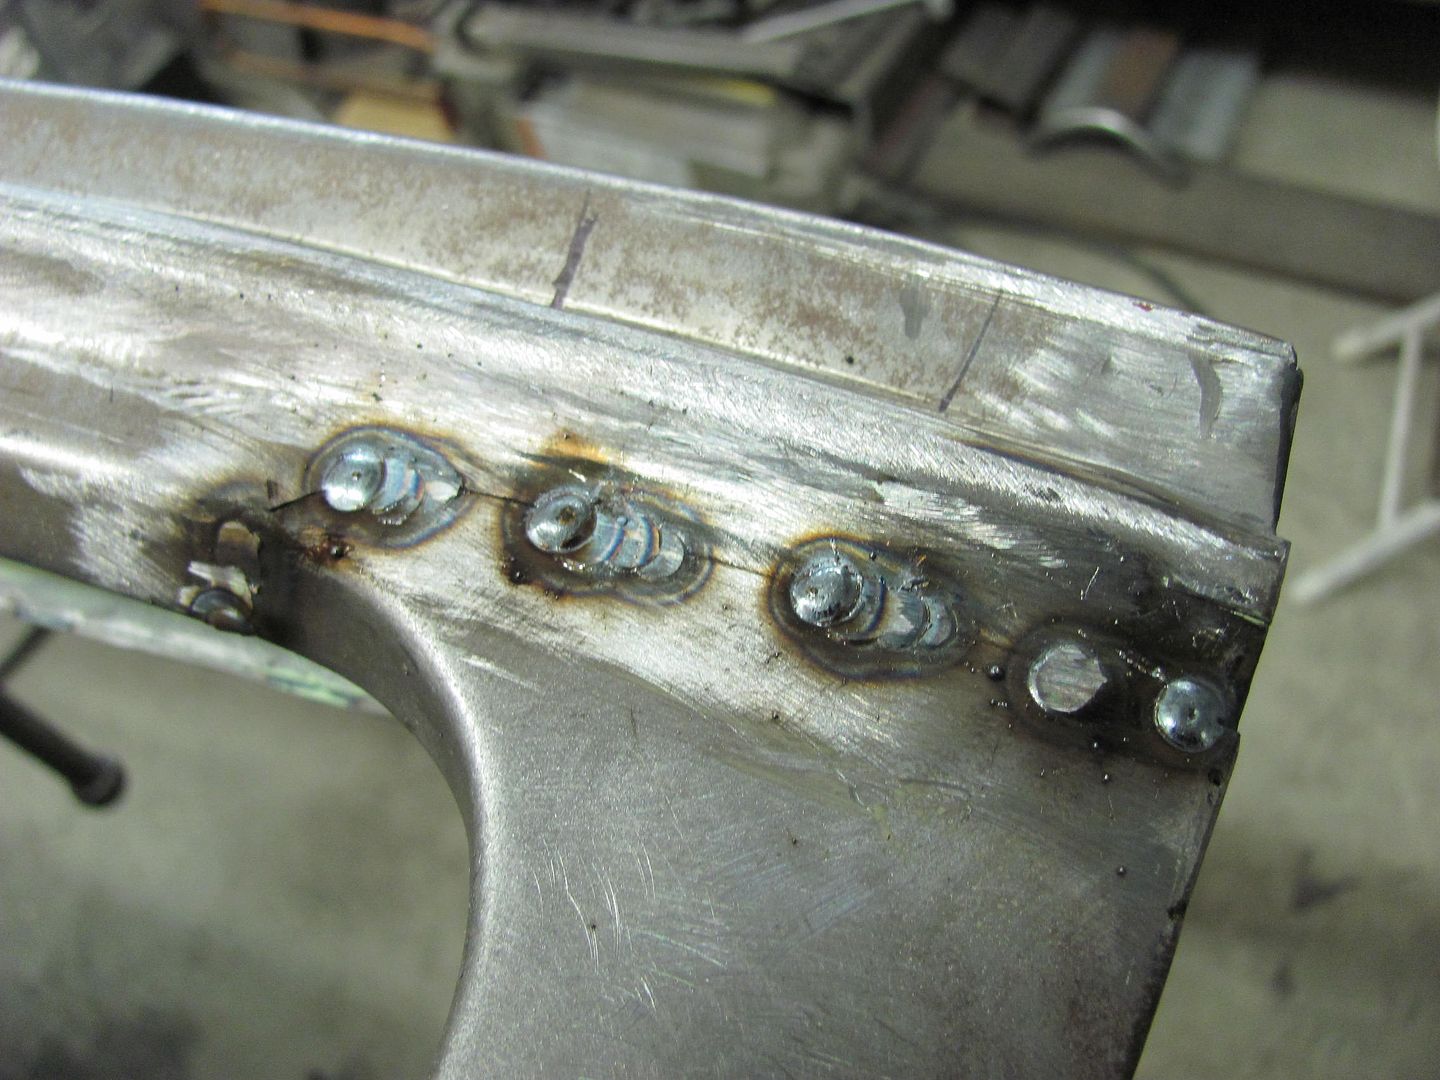
I have found that due to the manner in which each weld dot shrink pulls from ALL directions, you will have better luck in planishing to remove said shrinking effects if you can planish the weld dots while they are singular, sitting all by their lonesome. This will more effectively STRETCH that weld dot back out in all directions. And by stretching as you go, you eliminate the panel being pulled into a valley as your picture shows. As far as tacking the panel, you would want to start your tacks at one end and work toward the other. I know many people will tell you to skip around to minimize heat buildup, and I have been one of those. But if you tack one end and then move to the opposite end, you run a greater risk that one panel may have more material than the other. Once things get all tacked up, this results in a panel bulge on one side of the weld. So tacking from one end and working progressively to the other will help to eliminate this by being able to align the panels together as you go. Now that the panel is tacked and weld dots are spaced about (2 or 3"), go back and planish each weld dot individually, to add a bit of stretch. At this point, I use a 3" cutoff wheel to grind down the dots to just above flush. This gets them out of the way for planishing the next sets of dots, and by leaving them just above flush, you can do the final cleanup with a roloc sander all at once. by trying to grind things down to perfectly smooth after each, you run a greater risk of inadvertent sanding of the metal to the sides of the welds, which may thin and weaken the panel. So I hold off on this until the end. For your grinding disc, I prefer to use cutoff wheels about 1/16 thick. This gives a much smaller contact area than most any other method, so you will have less heat buildup from the grinding process.


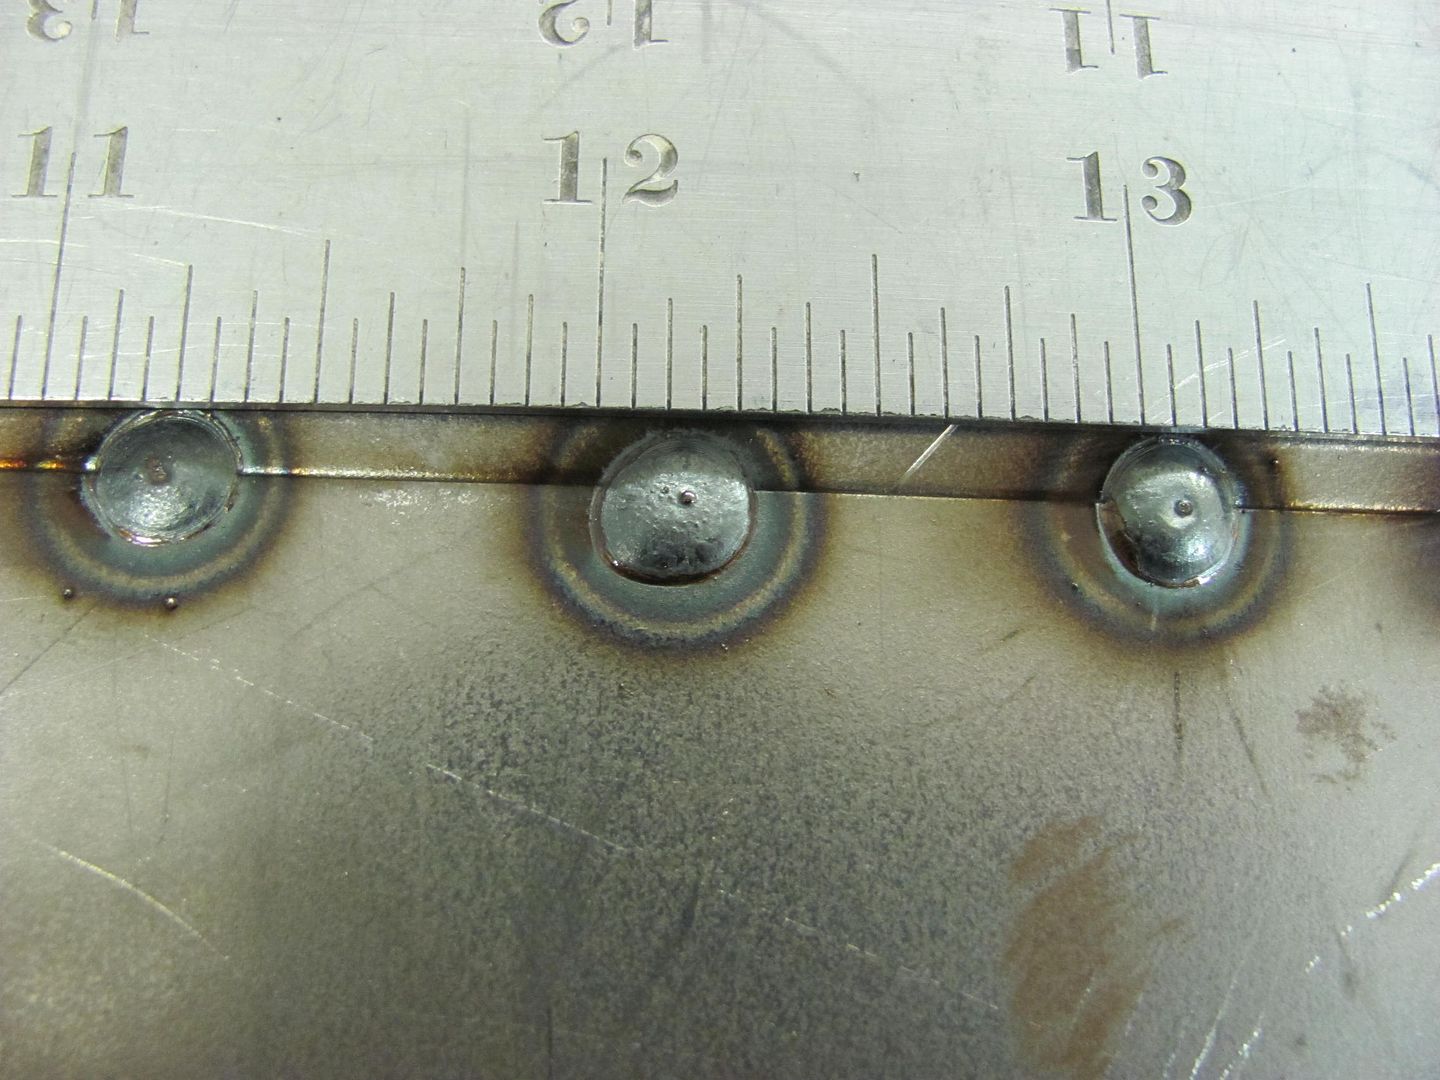
Once these initial welds are planished and ground down just above surface, then continue, adding a weld between each one until your welds are spaced about 1" apart. At this point (still planishing and grinding after each time) instead of hitting the center between for weld location, start overlapping by about 1/3 of the last welds. By overlapping, you will have less risk of missed spots or pin holes. Continue with the weld, planish, grind, repeat until the seam is done. I typically weld from start to finish using weld dots only, none of the longer passes at the end, in order to keep everything consistent throughout the process.


For the cutoff wheels, I spend the extra coin and get ones rated for stainless steel. This makes them last longer and put less of that brown haze in the air that you see from the cheap HF or swap meet specials. By the time you figure out the cost of how quickly the cheap ones wear away, you haven't saved a thing. With the bulk of the welds being removed by a cutoff wheel, we are only dressing what little remains of the weld and blending that into the parent metal. I use a 60 or 80 grit roloc, that should be as coarse as you need to go.


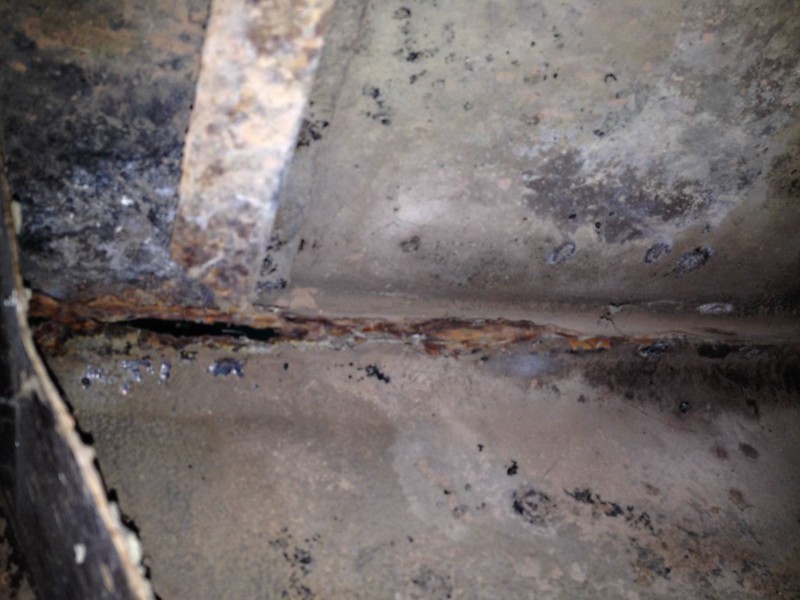
There are a few different considerations in locating weld seams on low crown panels, such as the quarter panel or a door skin. In most cases, as mentioned above, a seam horizontally through the middle of the panel is just asking for trouble as there is little shape (strength) in the panel to resist any movement/distortion from the shrinking, and why a weld here normally results in a severely caved in valley. (given no planishing to counteract the shrinking). For the most part one would put the weld up as high as possible, as most quarters have more shape toward the top where the quarter slopes inward to help resist movement and distortion. It also puts the seam up where most if not all is better accessible for planishing. Alternatively, a bodyline crease often serves the same benefit. That is the normal scenario.

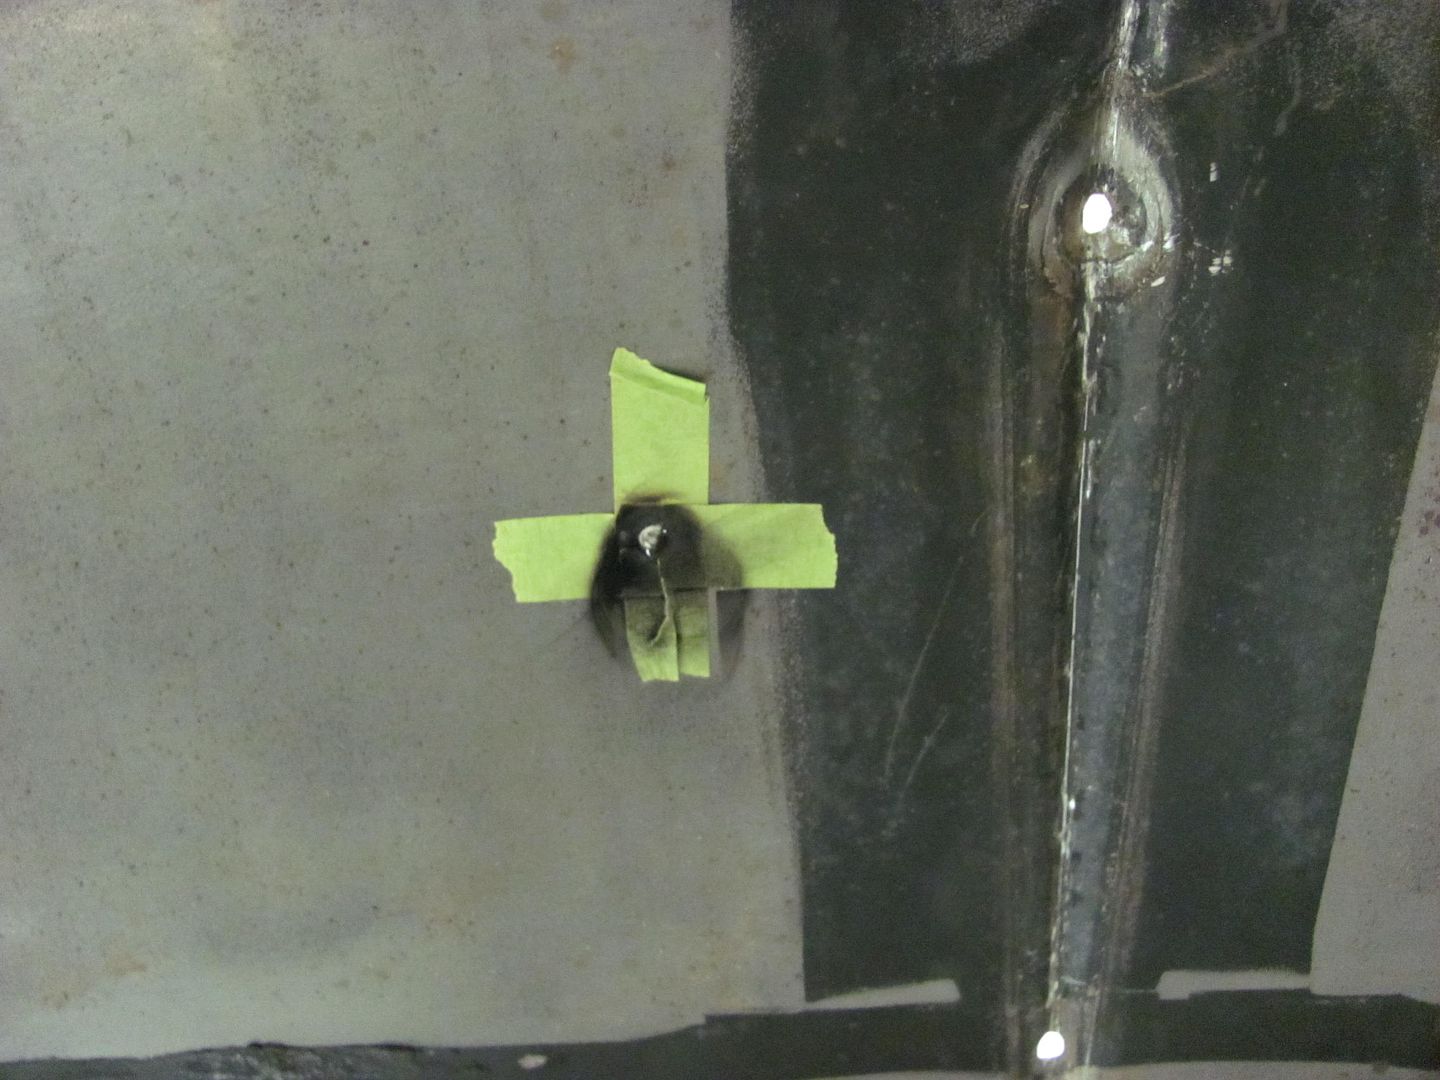
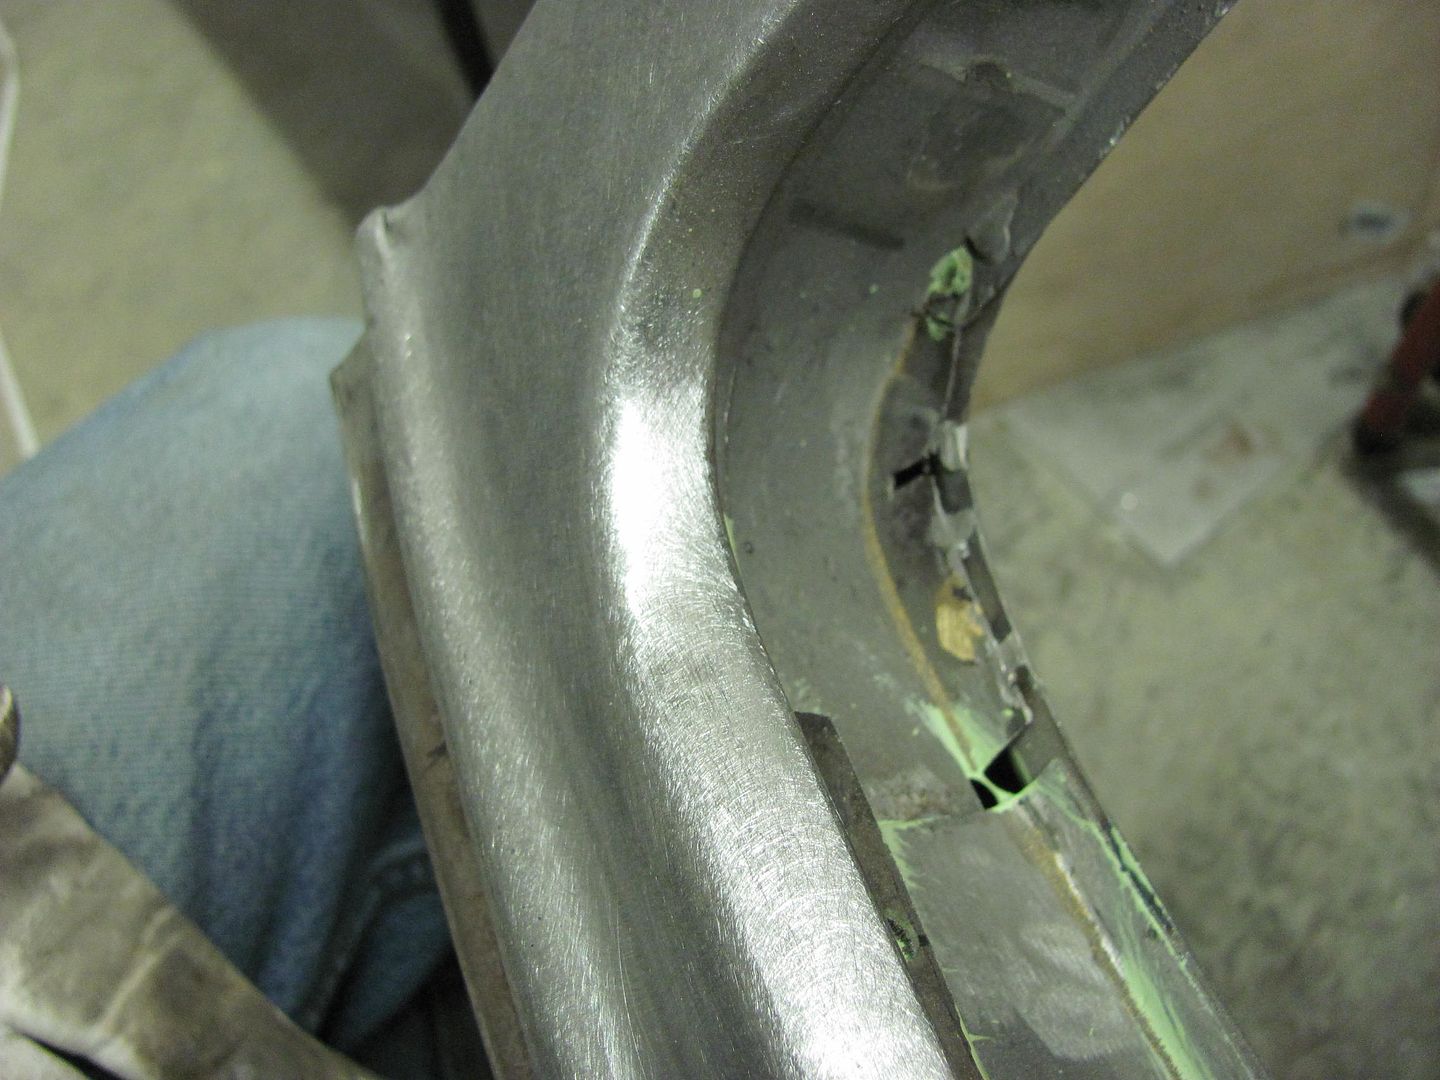
In other cases, where the panel is blocked by an inner wheelwell or other structure that prevents/discourages planishing the weld. In this case, one can be creative in making a dolly on a stick, say a piece of steel flat bar that would fit in the void, welded to a pipe to allow better reach. I've also employed the assistance of my nephew in remote cases where his youth permitted more of a contortionist approach over what my body refuses to do anymore. This is also why it is important to planish those weld dots individually, and then grind them out of the way, front and back. This way two people can better work together on either side of a panel to planish out the welds, and find the correct weld dots in doing so. Next, you have the option of removing the outer wheelwell to better address an exterior panel that everyone will see, and then replace the wheelwell after you are satisfied with the metal bumping and finish work on the quarter.


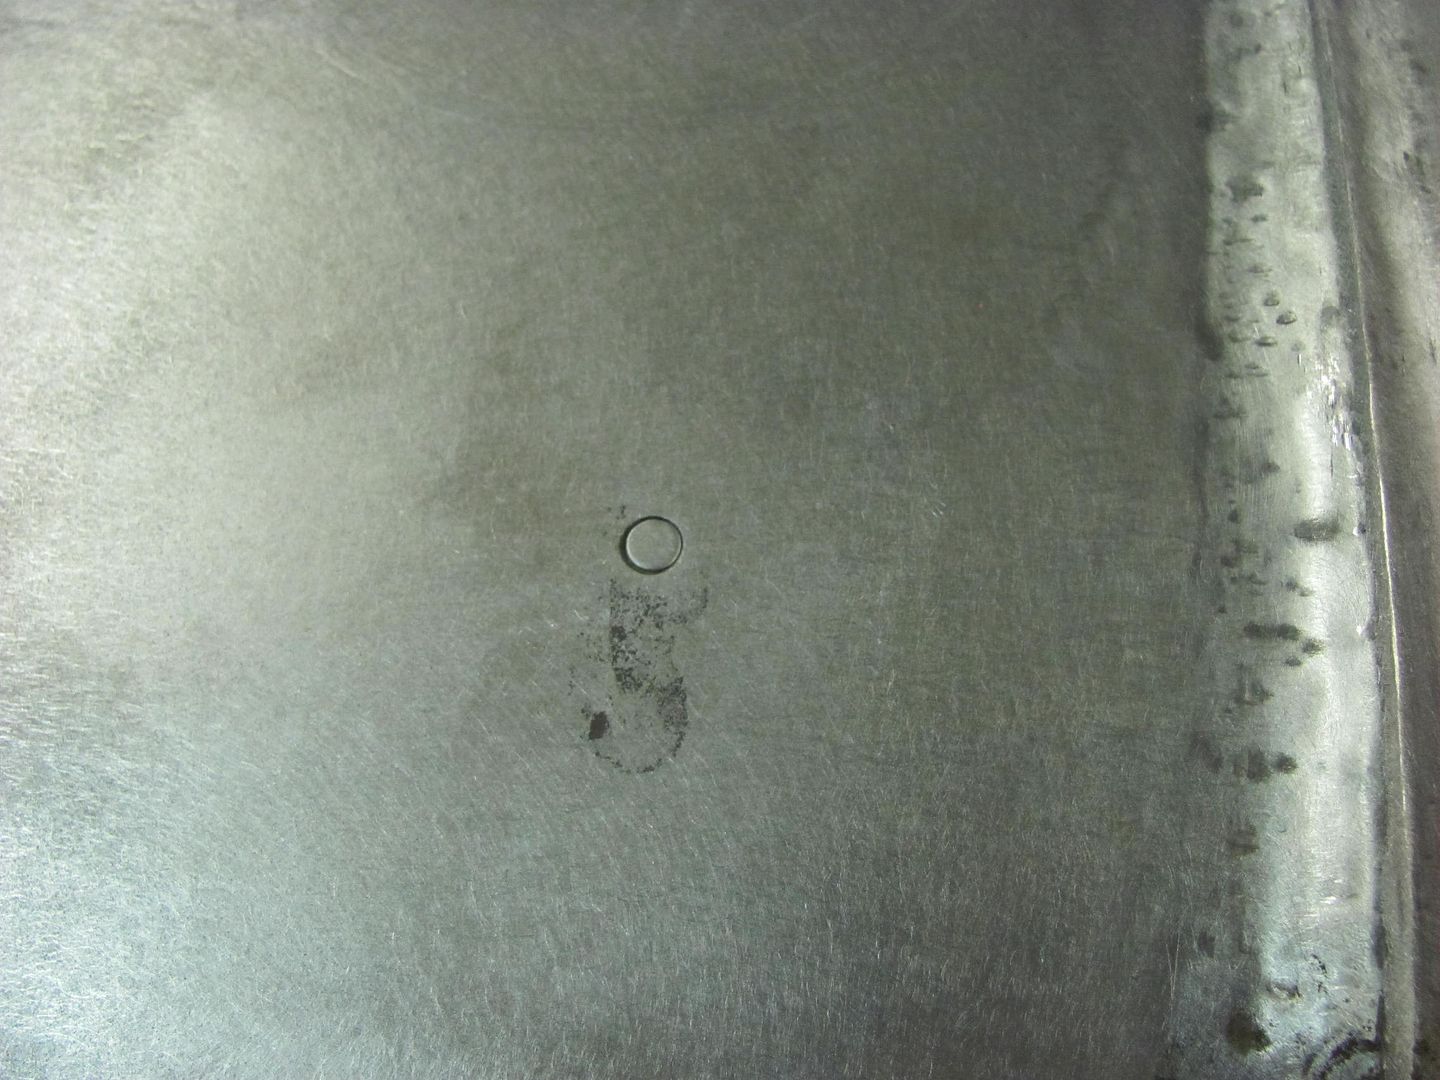
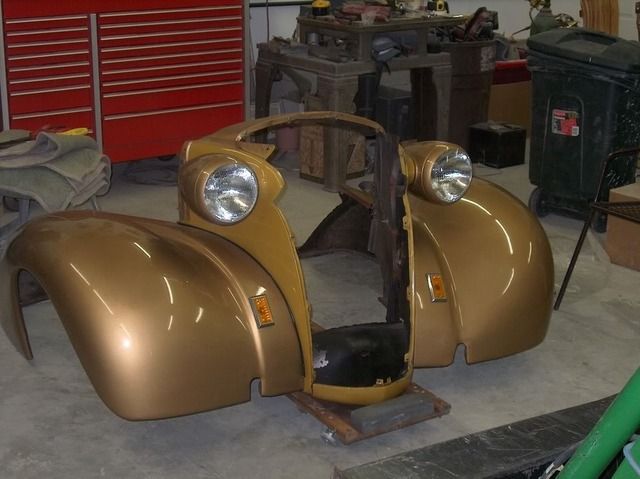
Next, you can use features of the panel in your favor. As an example, here is a lower replacement panel that I fabricated for the bottom of a 55 Chevy wagon lift gate, that has had no planishing performed, and looks to be virtually flawless...


Image


Image


Image


Image


Image


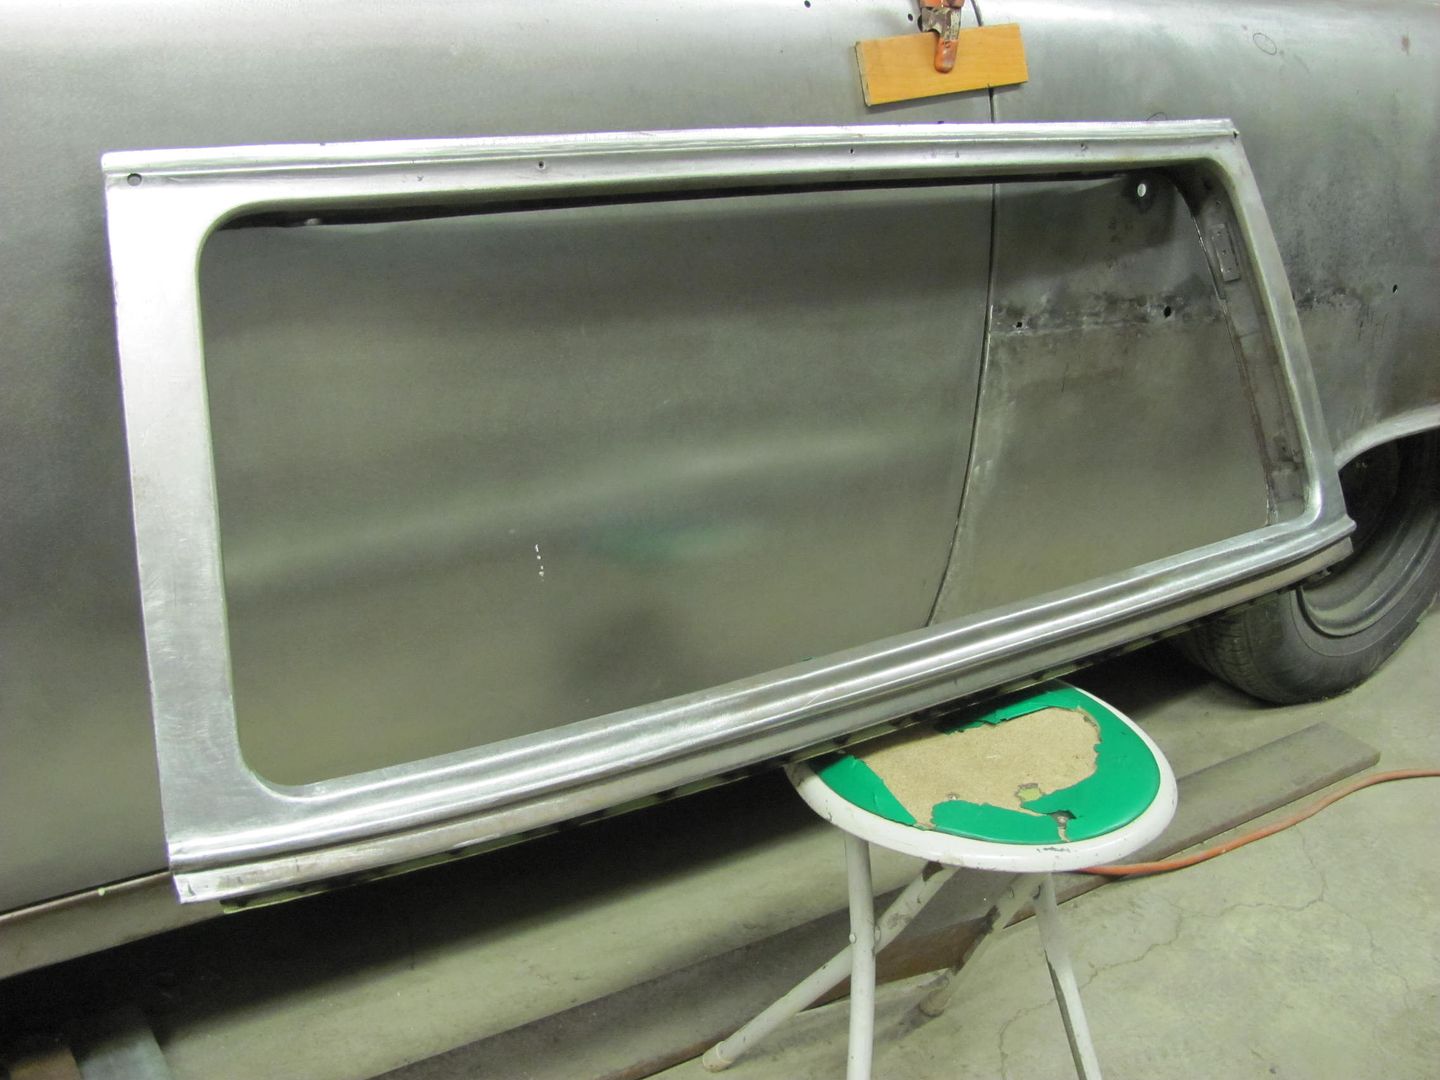
Any imperfection are slight enough that epoxy primer will take care of them. But as you can see, the panel where the weld travels through has a crown that protrudes outward in the horizontal plane, and inward in the vertical plane. So the shrinking forces tended to counteract each other, and the panel stayed exactly where it was. The weld's limited length also help out to limit the shrinking effects. So this shows a good example of using panel profiles in weld placement to limit distortion/panel movement while using the mig. Sorry to bombard you with so much info at one time, but hopefully it will steer you towards success in welding in your panels. Any questions or clarifications, please ask away..
Post Reply