1983 Wagoneer restoration project (AZ)

Show off your FSJ photos and videos!

Topic author
alanzona
Posts: 31
Joined: Sat Jul 18, 2015 8:50 pm

Re: 1983 Wagoneer restoration project (AZ)

Post by alanzona »

Well, it's been six (eventful) months since my last update, so I'm sorry for all the threads, but there was a lot of activity, then no activity. LOL.

--- Dec 2015 ---

Next on the list after the lift, was body work. My goal was to strip it, paint it, and get the new wood trim on prior to King of the Hammers.

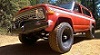
Step one: Removing the 30 year old vinyl. Here was the condition I started in:

Image


I started out using an erasure tool from my friend Jimmy. Tedious, but effective.

Image


Image


For the most part, no surprises. There was a tiny bit of surface rust just under where the trim was on some panels, but nothing cancerous...

Image


That is... until I found the frickin' BONDO. I was really disappointed, but there was a ton of bondo on both front quarter panels. Evidently, there is more to the story of this vehicle the seller told me. :-/

Image


Part of the tear down for paint was to remove all the chrome and trim pieces. Fairly easy and no surprises under stuff. Yay!

Image


Image


Image


Image


So, with all the vinyl removed, I took it (like it is below) to a local chain paint store the had quoted me a great rate with a "special" going on. Well, long story short... they are crooks. I showed up to drop the Waggy off and the price was TRIPLE what they had quoted me on the phone. Dirty rotten bastards. I will not be ever working with them again. I should have stuck with my original plan (and paid the money that was well worth it) and have my friend Geoff (outstanding paint and body man) do the work.

Image


Long story short, I had run out of time if I was going to get the Waggy white with new wood in time for KOH... so I decided that the next step was to just strip it down myself, primer it, and get go to KOH with a bit of "character". It was NOT worth it to rush the paint simply for KOH. This is a longer term restoration, so better to do things in stages than to rush it.

Topic author
alanzona
Posts: 31
Joined: Sat Jul 18, 2015 8:50 pm

Re: 1983 Wagoneer restoration project (AZ)

Post by alanzona »

Since the plan had now evolved, I headed over to Daniel's house (on Bob's work day for his Cherokee Chief), and we stripped it even more and applied the primer. Again, the goal was simply to protect the bare metal and get ready for King of the Hammers.

Stripped and taped up:

Image


Image


Post primer and on the trailer. STOKED, actually, with how it turned out. Not a "final product", but pretty cool for KOH.

Image


Once I got home, I also completely undercoated the whole thing with rattle can undercoat. This is what I used.

Image


So... over the last couple of years (actually, my whole life), I've dealt with short jokes. They kinda became a "think" once I started doing more photography at races and was everything from the "shutter hobbit" to the "rock gnome". After a few laughs and some gifts (like a lot of garden gnomes), I finally just owned it and accepted the fact. LOL. Hence, the Waggy has been named "Gnome 1".

Image


Image


Image


AND... to top it all off, my official Welsh garden gnome from Wales is the new dash ornament/mascot:

Image


After all this work, I had to drive her to church. Very happy with the lift, the tires, the ride, and the car. Next steps: continue KOH prep.

Image

Topic author
alanzona
Posts: 31
Joined: Sat Jul 18, 2015 8:50 pm

Re: 1983 Wagoneer restoration project (AZ)

Post by alanzona »

In prepping for KOH, I wanted to build something that would protect and hide my camera gear as well as transform into a sleeping deck once the middle seat was folded forward.

While not fancy, this worked great for KOH. I simply built a frame with a removable top. Final version had TWO sheets of plywood on top. When I folded the middle seat forward, the top sheet of plywood slides forward and creates a sleeping deck that I put my air mattress and sleeping bag on. Gear still stores beneath. Best part? It's all removable for when I'm not on trips. Again, not fancy, but functional. I used some left over headliner material to cover the top of the thing so it matches. Not seen in these photos, but I pulled it tight and clued it down, so when everything is buttoned up, it looks like factor cover in the back, just slightly lower so I can put things on the top and the back of the seat keeps them from sliding forward. Very useful at KOH.

Image


Image


Image


Image


Image


Image


Image


Image

Topic author
alanzona
Posts: 31
Joined: Sat Jul 18, 2015 8:50 pm

Re: 1983 Wagoneer restoration project (AZ)

Post by alanzona »

If you've ever been to Johnson Valley or Baja, you know it gets dark FAST in the middle of nowhere. I mounted a 20" LED light bar on the front bumper. Obviously, I'm not going fast in a Waggy, so having good visibility in front of the vehicle down low was most important to me (hence the bumper mount instead of a roof mount decision). The light and mount are removable and have a quick disconnect, so when I'm not out in the desert I can maintain a factory look.

Image


Image


Image


Again, with an eye toward portability and keeping the Waggy factory as much as possible, I opted to make a "center console" - again, just functional for KOH, I plan to do a better center console long term, but same concept applies - that would hold my Rugged Radio race radio, as well as house the switch for the LED light bar. Also... um, no cup holder, so I wanted a place to put my Monster. haha.

Everything quick disconnects behind the center console, so the entire assembly can be easily removed with no permeant evidence on the Waggy, yet the wires are neatly tucked away for quick assembly when needed.


Image


Image


Image


Now, this may sound goofy, but as I kept looking at the Waggy with the grey primer and the white top, all I could think of was an old timey delivery vehicle - like an old milk truck or something. Those things always had the company name on the side. My media and marketing company is named White Collar Publishing, so my friend Michael D'Avy - who also designed the logo, is a graphic artist, and owns a print shop - crated some vinyl for the side of the truck. Armchair Crisis Design to the rescue!

Image


Image


Image


Finally, I had done everything I had time to do and it was time to load and head off to Johnson Valley for the King of the Hammers 2016 week. We had lift, 33's, lights, radio, sleeping arrangement, new headliner, and sweet hand painted center caps... despite the paint and wood not being complete, I felt great about the progress on the Waggy. It was running great and we were off to the great wide open for an adventure!

Image

Topic author
alanzona
Posts: 31
Joined: Sat Jul 18, 2015 8:50 pm

Re: 1983 Wagoneer restoration project (AZ)

Post by alanzona »

King of the Hammers in Johnson Valley was a BLAST. The Waggy hauled all the gear and often times up to four full grown men all over the desert.

Image


Image


Image

Bouncing through parts of the desert, however, I did have rubbing issues. We did simply, non-invasive fixes to get through the week. The permanent answer is a body lift, which did arrive this week and will be installed in the next week or so. Here is Jay threatening to SawzAll the Waggy, but then doing modifications with a trusty hammer.

Image


Image


Now.

I know what you're saying to yourself...

"This whole build has been entirely too easy... I mean, it's a WAGONER for crying out loud! Where's the anger? Where's the frustration? Where the...

.... FIRE!"

yep. Fire. Thank goodness for Shawn Smith and his quick thinking. Something in the electrical (imaging that... a Waggy with an electrical issue) caught fire. Thanks to Shawn's quick thinking (I was away shooting race photos but Shawn saw it in the parking lot on Chocolate Thunder), the whole thing didn't burn down... but it was nasty, that's for sure.

Image


Image


Image


Image


Image

Topic author
alanzona
Posts: 31
Joined: Sat Jul 18, 2015 8:50 pm

Re: 1983 Wagoneer restoration project (AZ)

Post by alanzona »

More fire damage...

Image


Image


Image


So... after the fire, the next issue was how to get her home. We were able to roll her downhill and tug her onto Bob's trailer (my truck was 2WD and couldn't get back to where it was left), then we had to figure out how to move it between trailers... gravity is our friend. We set up a suspect bridge system, then just rolled her downhill from Bob's trailer to mine.

Image


Image


Image


Even on the trailer, our HG4x4 found time to camp and have a great time out in JV.

Image


So far, I have replaced the master cylinder so that I could have brakes...

Image


I also realized I am NOT a electrical guy, so I connected with my friend Shawn Hurst - an electrical genius - ordered a full wiring kit from the block back from BJ's, and made arrangement to send the truck to Shawn's for a complete re-wire.

Image


Image


and that's where she stands as of today. Wiring kit is in, she's being re-wired, and should be home soon.

Next up (order and/or arrived already):

Body Lift (2" BJ's) to eliminate the tire rub
New gearing from Yukon Gear and Axle for the 33's
Front selectable locker
Solid axles shafts for the rear
Locking front hubs to eliminate the vacuum system
Fix the additional fire damage
Begin the fall body work cycle to get ready for real paint and the wood!

Now, you too are up to speed as of July 1st, 2016.

I'm sure there will be more updates as the year continue.
User avatar

Renodemona
Posts: 917
Joined: Wed Jan 01, 2014 9:55 pm
Location: Sparks, NV

Re: 1983 Wagoneer restoration project (AZ)

Post by Renodemona »

Wow, pretty eventful indeed! Everything looks pretty good so far.
"Wait, what's on fire!?" KJ7TCT
--------------------------------------------------------------
1976 Cherokee w/t 'Susan' 401/TH400/QT(PT)
FiTech Go EFI, Edelbrock Performer intake
3" Rough Country Springs, HEI Dizzy
-------------------------------------------------------------
2018 Cherokee Trailhawk V6 'Sedna'

will e
Posts: 5103
Joined: Sat Aug 18, 2012 8:21 am

Re: 1983 Wagoneer restoration project (AZ)

Post by will e »

hey, I saw your post on vjc too. I am curious about your 'solid axles for the rear'.
81 Waggy 'WILL E' Retired
82 Cherokee WT - SOA/SF/high steer/Alcan springs/agr box/Borgeson steering shaft/AMC 401/performer/holley TA/HEI/BeCool/727/ALTAS (2.0/2.72/5.44)/D60 Snofighter(Yukon Zip,hubs,stubs,4.56)/14 Bolt (FF,BF shave, Discs, ARB,Artec Truss)/MTR 37X12.5/Corbeau XRS Baja & 5 point retractable harness/Hella Aux lights/tuffy console/killer32 sliders/Evil Twin bumpers, rack and roll cage/WARN 8000/TT Fabworks steering brace/dual batts/custom TC skid plate/ARB fridge

Topic author
alanzona
Posts: 31
Joined: Sat Jul 18, 2015 8:50 pm

Re: 1983 Wagoneer restoration project (AZ)

Post by alanzona »

will e wrote:hey, I saw your post on vjc too. I am curious about your 'solid axles for the rear'.
I am keeping the AMC 20, but instead of the two piece shaft, I'm switching to a 1 piece from Yukon (they are sponsors, after all). Andrew's suggestion. This article isn't the full kit we're using, but you get the idea: http://www.fourwheeler.com/how-to/39578-amc-20-axle/

will e
Posts: 5103
Joined: Sat Aug 18, 2012 8:21 am

Re: 1983 Wagoneer restoration project (AZ)

Post by will e »

alanzona wrote:
will e wrote:hey, I saw your post on vjc too. I am curious about your 'solid axles for the rear'.
I am keeping the AMC 20, but instead of the two piece shaft, I'm switching to a 1 piece from Yukon (they are sponsors, after all). Andrew's suggestion. This article isn't the full kit we're using, but you get the idea: http://www.fourwheeler.com/how-to/39578-amc-20-axle/

I didn't realize there was such a thing. Ya learn something every day!

My understanding is the FSJ axles are welded, unlike the CJ's which are pressed. So we don't spin the hub like they can. I ran 35's with my AMC for a few years without issues. That being said I purchased some upgraded shafts too.
81 Waggy 'WILL E' Retired
82 Cherokee WT - SOA/SF/high steer/Alcan springs/agr box/Borgeson steering shaft/AMC 401/performer/holley TA/HEI/BeCool/727/ALTAS (2.0/2.72/5.44)/D60 Snofighter(Yukon Zip,hubs,stubs,4.56)/14 Bolt (FF,BF shave, Discs, ARB,Artec Truss)/MTR 37X12.5/Corbeau XRS Baja & 5 point retractable harness/Hella Aux lights/tuffy console/killer32 sliders/Evil Twin bumpers, rack and roll cage/WARN 8000/TT Fabworks steering brace/dual batts/custom TC skid plate/ARB fridge
User avatar

Gumby
Posts: 1433
Joined: Sun Jan 29, 2012 10:20 am
Location: Tucson, AZ

Re: 1983 Wagoneer restoration project (AZ)

Post by Gumby »

Great thread... KOH. I need to see that first hand one day. Sorry about the fire, I came close to having one from the PO's work. You need to get ready for Turkey in the desert, really great time with the local FSJ folks.
1984 GW 360/727/208.... 4"/ 31"
2004 CRD QC SRW 3500 4X4 (DD)
1983 "project Dubya" (long term)

Topic author
alanzona
Posts: 31
Joined: Sat Jul 18, 2015 8:50 pm

Re: 1983 Wagoneer restoration project (AZ)

Post by alanzona »

Gumby wrote:Great thread... KOH. I need to see that first hand one day. Sorry about the fire, I came close to having one from the PO's work. You need to get ready for Turkey in the desert, really great time with the local FSJ folks.
Turkey in the desert? I'll search for it, but I'm assuming it's a Thanksgiving thing? Tell me more! My buddy Bob and I becoming the "Fool Size Brothers", so looking for FSJ activities.
Post Reply