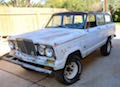
GL's 1970 J4800 Gladiator
-
nightglide
- Posts: 268
- Joined: Wed Dec 24, 2014 8:04 pm
- Location: Reno, Nevada
Re: GL's 1970 J4800 Gladiator
What's the seat from?
77 J10 360/T18/Dana20
Fitech fuel injection
4" Lift....3" body lift....35" ats
Fitech fuel injection
4" Lift....3" body lift....35" ats
-
 glake
glake
Topic author - Posts: 177
- Joined: Mon Feb 09, 2015 9:57 pm
- Location: Escondido, CA
Re: GL's 1970 J4800 Gladiator
I believe they are from a 2014 Honda Odyssey. Picked them up at the Big 3 swap meet here in San Diego. They were take out seats from handicap accessible vehicles.nightglide wrote:What's the seat from?
1970 Jeep Gladiator: Daily Driver!
1963 Jeep Wagoneer: In progess
1972 Jeep Wagoneer: waiting in the wings
1963 Jeep Wagoneer: In progess
1972 Jeep Wagoneer: waiting in the wings
-
glake
Topic author - Posts: 177
- Joined: Mon Feb 09, 2015 9:57 pm
- Location: Escondido, CA
GL's 1970 J4800 Gladiator
It's been a busy week. I've built the fuel tank cradle, ran the brake lines, and got the exhaust run, as well as a lot of little things here and there. Driveshafts are also in place. I had to have the rear one shortened as the truck originally had the T90 and the TH400 is a bit longer. The front driveshaft was missing so that one had to be made.
I swapped my transfer case to the correct model. The one I had was from a CJ, this is one from a wagoneer that has the correct front cone.

I didn't like the idea of the fuel tank hanging from the bottom of the truck bed so I built a basket for it to sit in the frame. It's bolted in place so that the tank can be dropped if necessary. I had a sheet of 1/4" stainless that I used on the bottom for protection. I plan to add a sheet of aluminum to the side as well.


Next were the brake lines. I bought a K Tool Professional Brake Flaring Tool from Summit Racing. Flaring fittings has never been easier! I moved the rear feed line from the passenger side to the driver's side away from the exhaust, making use of my new fuel tank basket for attach the brake line. I also used the Lokar emergency brake kit and ran that to the driver's side as well.


I have to admit, I kind of like building exhaust. This is the second system I've built, and for some reason, I enjoy creating it.
I brought the driver's side pipe to just behind the t-case so that it can be dropped without removing the exhaust. I may add a couple of collectors. I put in a balance pipe for back pressure relief. I left the tubes long coming out of the back for now until I get the rear bumper built. Then I'll shorten them and add a pair of tips. There's plenty of plenty of distance between the gas tank and mufflers, but I'm going to add a sheet of aluminum to the side of the tank basket for added heat protection (I'm into overkill). I'm also going to add a piece of aluminum bent into an L shape on the driver's side pipe for heat protection for all of the lines and wires that run down that side.


I'm hoping to get the cab and bed back from the blaster early next week so that I can start on that process.
Last edited by glake on Sat Mar 26, 2016 9:02 am, edited 5 times in total.
1970 Jeep Gladiator: Daily Driver!
1963 Jeep Wagoneer: In progess
1972 Jeep Wagoneer: waiting in the wings
1963 Jeep Wagoneer: In progess
1972 Jeep Wagoneer: waiting in the wings
-
 66stepside
- Posts: 3793
- Joined: Sat Oct 13, 2012 9:59 pm
- Location: Spokane Valley, WA.
Re: GL's 1970 J4800 Gladiator
Sweet mother of God- that looks great!
Sent from my iPhone using Tapatalk
Sent from my iPhone using Tapatalk
1960 FC170 DRW 401/TH400/D20
1966 J3000 401/T18/D300
19?? Quadcab Thriftside, 5.3, 4L60-E, NP261XHD
1968 M715, 454, sm465, np205, 14 bolt rear, 60 front
1966 J3000 401/T18/D300
19?? Quadcab Thriftside, 5.3, 4L60-E, NP261XHD
1968 M715, 454, sm465, np205, 14 bolt rear, 60 front
-
 44bz
44bz
- Posts: 1081
- Joined: Fri Jun 08, 2012 6:17 pm
- Location: Oregon City, OR
Re: GL's 1970 J4800 Gladiator
Which bilsteins did you go with? Part #s?
Sent from my iPhone using Tapatalk
Sent from my iPhone using Tapatalk
1968 J2000 - AMC 327/T18/D20 (twin stick), stock D44s, 3" body lift, 35x12.50 Goodyear MTRs w/ Kevlar
-
twisted frame
- Posts: 637
- Joined: Wed Mar 27, 2013 9:41 am
- Location: Massachusetts
Re: GL's 1970 J4800 Gladiator
What an improvement that fuel tank cradle is over the factory strap! Very nice indeed.
73 J4000. 360, MC 2100, T18A, D20, stock closed knuckle Dana 44 front, 60-2 rear. Warn Lock-O-Matics, Warn/Belleview electric winch, true duals with glasspacks, old-school front diff skid plate, used 265 Toyos on 16" AR wheels.
-
glake
Topic author - Posts: 177
- Joined: Mon Feb 09, 2015 9:57 pm
- Location: Escondido, CA
Re: GL's 1970 J4800 Gladiator
Thanks!66stepside wrote:Sweet mother of God- that looks great!
Sent from my iPhone using Tapatalk
1970 Jeep Gladiator: Daily Driver!
1963 Jeep Wagoneer: In progess
1972 Jeep Wagoneer: waiting in the wings
1963 Jeep Wagoneer: In progess
1972 Jeep Wagoneer: waiting in the wings
-
glake
Topic author - Posts: 177
- Joined: Mon Feb 09, 2015 9:57 pm
- Location: Escondido, CA
Re: GL's 1970 J4800 Gladiator
Front = 33-18654244bz wrote:Which bilsteins did you go with? Part #s?
Sent from my iPhone using Tapatalk
Rear = 33-185552
1970 Jeep Gladiator: Daily Driver!
1963 Jeep Wagoneer: In progess
1972 Jeep Wagoneer: waiting in the wings
1963 Jeep Wagoneer: In progess
1972 Jeep Wagoneer: waiting in the wings
-
glake
Topic author - Posts: 177
- Joined: Mon Feb 09, 2015 9:57 pm
- Location: Escondido, CA
Re: GL's 1970 J4800 Gladiator
Thanks. I also have the aux. tank in the bed. Once I get the bed back from the blaster I want to change how it's mounted.twisted frame wrote:What an improvement that fuel tank cradle is over the factory strap! Very nice indeed.
1970 Jeep Gladiator: Daily Driver!
1963 Jeep Wagoneer: In progess
1972 Jeep Wagoneer: waiting in the wings
1963 Jeep Wagoneer: In progess
1972 Jeep Wagoneer: waiting in the wings
-
glake
Topic author - Posts: 177
- Joined: Mon Feb 09, 2015 9:57 pm
- Location: Escondido, CA
GL's 1970 J4800 Gladiator
Picked up the cab and bed on Monday. The cost wasn't too bad, $560.


Glad I had it done as it uncovered some of the shortcuts the PO tried to take. No, Bondo does not fix everything! I hate it when I find that it has been used to cover over rust eaten panels. The cab was good. There were some small cancer spots where the bed met the sidewall due to dirt and water collecting behind the aux. gas tank. There were also a few cracks in the floor of the bed - all of them in the four corners. There was definitely a cab over camper on this truck in the past and I think moisture collection and weight led to the cracks. I cut the floor under the aux. gas tank out completely and decided to leave it open to help eliminate the collection of debris and moisture. I used flat stock to reinforce the floor. There is also a cover that goes over the tank, so it will be plenty strong.

I decided to fill in the stock gas fill hole as it isn't used and gets covered by the aux. tank. When the aux. tank was installed, they didn't get the hole quite right, so they elongated it. I took the opportunity to close the hole up a bit. Once I had all the welding done, I rolled it outside for a bath. I used a bare metal prep from the local auto paint store that impregnates the metal to prohibit rust.


Then it was on to priming. I set the bed up on end to make it easier to get good coverage. I ended up putting using a little over a gallon on these two pieces.


At the end of the day yesterday, I set the cab in place. Today I plan on working on making the new seats fit.

Last edited by glake on Sat Apr 02, 2016 7:38 am, edited 2 times in total.
1970 Jeep Gladiator: Daily Driver!
1963 Jeep Wagoneer: In progess
1972 Jeep Wagoneer: waiting in the wings
1963 Jeep Wagoneer: In progess
1972 Jeep Wagoneer: waiting in the wings
-
glake
Topic author - Posts: 177
- Joined: Mon Feb 09, 2015 9:57 pm
- Location: Escondido, CA
GL's 1970 J4800 Gladiator
Did a little work on fabricating the seat mounts. I had to remove all of the tumble brackets and then made a simple rectangle mounting bracket. The center hump was too tall for the middle seat/arm rest, so that led to removing some floor. Once that was done, it fit pretty well and very comfortable. It's still a very rough bracket with a lot of work yet to do, and I get to recreate a new floor pan.


Yesterday's UPS delivery brought something very nice.

I couldn't resist setting it on the Dauntless.


Yesterday's UPS delivery brought something very nice.

I couldn't resist setting it on the Dauntless.

Last edited by glake on Tue Apr 05, 2016 5:32 pm, edited 2 times in total.
1970 Jeep Gladiator: Daily Driver!
1963 Jeep Wagoneer: In progess
1972 Jeep Wagoneer: waiting in the wings
1963 Jeep Wagoneer: In progess
1972 Jeep Wagoneer: waiting in the wings
-
66stepside
- Posts: 3793
- Joined: Sat Oct 13, 2012 9:59 pm
- Location: Spokane Valley, WA.
Re: GL's 1970 J4800 Gladiator
Looking good- Did I miss what type of seats you used?
1960 FC170 DRW 401/TH400/D20
1966 J3000 401/T18/D300
19?? Quadcab Thriftside, 5.3, 4L60-E, NP261XHD
1968 M715, 454, sm465, np205, 14 bolt rear, 60 front
1966 J3000 401/T18/D300
19?? Quadcab Thriftside, 5.3, 4L60-E, NP261XHD
1968 M715, 454, sm465, np205, 14 bolt rear, 60 front
-
glake
Topic author - Posts: 177
- Joined: Mon Feb 09, 2015 9:57 pm
- Location: Escondido, CA
Re: GL's 1970 J4800 Gladiator
Post #22. I believe they are middle row seats.66stepside wrote:Looking good- Did I miss what type of seats you used?
1970 Jeep Gladiator: Daily Driver!
1963 Jeep Wagoneer: In progess
1972 Jeep Wagoneer: waiting in the wings
1963 Jeep Wagoneer: In progess
1972 Jeep Wagoneer: waiting in the wings
-
66stepside
- Posts: 3793
- Joined: Sat Oct 13, 2012 9:59 pm
- Location: Spokane Valley, WA.
Re: GL's 1970 J4800 Gladiator
Import seats. I would've never guessed. I dig the mid-back seats.
1960 FC170 DRW 401/TH400/D20
1966 J3000 401/T18/D300
19?? Quadcab Thriftside, 5.3, 4L60-E, NP261XHD
1968 M715, 454, sm465, np205, 14 bolt rear, 60 front
1966 J3000 401/T18/D300
19?? Quadcab Thriftside, 5.3, 4L60-E, NP261XHD
1968 M715, 454, sm465, np205, 14 bolt rear, 60 front
-
glake
Topic author - Posts: 177
- Joined: Mon Feb 09, 2015 9:57 pm
- Location: Escondido, CA
GL's 1970 J4800 Gladiator
Haven't had time or energy to update, but I have been working on the truck. I test fit the dash and AC/Heat and found that I needed a bit more room (I'm using the Vintage Air Gen-II Compac unit) so that led to cutting out more firewall.


Filled in the hole and finished up the new center hump.


Followed by some filler. I also finished up the body work on the cab and bed, finishing up with another coat of primer.


I sealed up the bottom of the cab and then got some undercoating on both the cab and the bed.


Filled in the hole and finished up the new center hump.


Followed by some filler. I also finished up the body work on the cab and bed, finishing up with another coat of primer.


I sealed up the bottom of the cab and then got some undercoating on both the cab and the bed.


Last edited by glake on Tue May 03, 2016 8:15 pm, edited 3 times in total.
1970 Jeep Gladiator: Daily Driver!
1963 Jeep Wagoneer: In progess
1972 Jeep Wagoneer: waiting in the wings
1963 Jeep Wagoneer: In progess
1972 Jeep Wagoneer: waiting in the wings
-
 mud89
mud89
- Posts: 641
- Joined: Sun Jun 10, 2012 1:09 pm
- Location: Burgundy, France
Re: GL's 1970 J4800 Gladiator
Awesome work, good you kept the black and yellow sticker
J10 81, J10 77, CJ7 80, Gladiator 64, Wagoneer 65, ZJ 5.9
parts vehicles : wagoneer 63, cherokee Golden eagle
parts vehicles : wagoneer 63, cherokee Golden eagle
-
glake
Topic author - Posts: 177
- Joined: Mon Feb 09, 2015 9:57 pm
- Location: Escondido, CA
GL's 1970 J4800 Gladiator
Worked on the dash this week. Soda blasted it, welded in some holes, added a catch-spot where the speaker used to be (copied from the Wilderness Gladiator), made the Vintage Air controller fit, and primed it.


I also got the AC unit all mounted and placed the bulkhead plate.

I set the bed in place to check fit and that's when I found out I made an error on my gas tank cradle. One of the bed cross supports was held up by the cradle so I had to create a notch. Then Everything fit fine, except that the cab needs to be about 3/8 of an inch higher.


Last edited by glake on Sun May 08, 2016 5:55 pm, edited 3 times in total.
1970 Jeep Gladiator: Daily Driver!
1963 Jeep Wagoneer: In progess
1972 Jeep Wagoneer: waiting in the wings
1963 Jeep Wagoneer: In progess
1972 Jeep Wagoneer: waiting in the wings
-
glake
Topic author - Posts: 177
- Joined: Mon Feb 09, 2015 9:57 pm
- Location: Escondido, CA
GL's 1970 J4800 Gladiator
Had a lot going on during the last month, but I have accomplished quite a bit. I was hoping to keep the original steering column and wheel, but after getting the seats in it was not really going to be comfortable. The column also had some other issues, so in the end I decided to upgrade. I got a GM tilt column and wheel from Summit Racing, and swapped out the rag joint.


I didn't like the idea of cutting the dash up for a better stereo, so I'm keeping the stock am radio in place just for nostalgia. I tabbed up a lower console to house an updated stereo, CB, and air gauge for on-board air. I'll also put a couple of air vents in the sides.


I finished up the fuel filler. I found a grommet at a local Ford/Mercury hot rod shop here in town that fit perfect. I also discovered that the gas cap is the same as 32-48 Mercury cars, 32-47 Pickup, and 48-50 F-1, F-2, F-3. So I was able to get a locking gas cap for it (not in the picture). It's part number 01A-18416-B.

This last weekend I began work on the front. Due to the A/C compressor, I had to rework the battery mount. I got the radiator close to being installed. I took a cue from later model J Trucks and Waggoneers and notched my support to gain the needed clearance. The radiator is Summit's brand model SUM-381328 with a built in Trans cooler.


Next up is finishing the radiator mount, mounting the A/C condenser, and aux. trans cooler.
Last edited by glake on Wed Jun 08, 2016 4:56 pm, edited 4 times in total.
1970 Jeep Gladiator: Daily Driver!
1963 Jeep Wagoneer: In progess
1972 Jeep Wagoneer: waiting in the wings
1963 Jeep Wagoneer: In progess
1972 Jeep Wagoneer: waiting in the wings
-
 Dusty
Dusty
- Posts: 486
- Joined: Wed Apr 18, 2012 11:41 pm
Re: GL's 1970 J4800 Gladiator
I need to come down to North County for a new exhaust I thinks? 
This is a really cool build.
This is a really cool build.
If God is your co-pilot, you need to switch seats!
-
 Tatsadasayago
- Posts: 3684
- Joined: Thu Aug 28, 2014 2:22 pm
- Location: Sacramento, CA
Re: GL's 1970 J4800 Gladiator
Dang! a BOP 350, TH400 and Dana 20! Sweet build Sir!
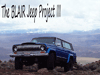
1977 Cherokee Chief - The Blair Jeep Project III
A collection of parts flying in close formation
A collection of parts flying in close formation