Ok, let me start this section by saying that I owe Tad an apology.
I had inquired to him about using the 95 Suburban springs and said that I was going to get one of his rear kits.
Jerred and I talked about the subject and decided to build our own from material we had in the shop and put the money toward a high steer kit.
So Tad, I am sorry I did not get the kit.
We decided that if we were doing things big on this build we might as well do the 63" Chevy 1/2 ton spring swap.
I found a 95 K1500 Suburban locally that was being parted out. AWSOME! 1/2 ton Chevy springs and I got them at a great price.

What I found out after I got home and measured them is that they are actually shorter than the 1/2 ton
truck springs. They measure eye to eye 60", pin centered in the spring at 30" each side.
Tad replied back to me and said that yes they would work.
I also found an old thread on IFSJA where Todd gave a break down of how he had RiverBeast at the time. He was using Suburban springs. Unfortunately there are no surviving images in that thread so I had nothing to go by.


I unfortunately do not have any pics of us taking the original rear axle and suspension out.
I think Jerred had called it quits and I decided to keep going.
The rear was a bit different than the front on removal.
We had our tallest jack stands supporting the rear of the Waggy on the rear frame rail.
We removed the upper shock from its mount on the frame, disconnected the rear brake line and park cables, took the wheels off of the axle, and removed all 4 spring eye bolts but, when we removed the rear, we removed the shackle hanger and kept them with the spring. We then slid the axle assembly out from the driver side.

If you are doing a swap like this, at this point get your engine hoist if you have one and hook it up so that you can support the back of the truck. I use a set of axle strap tie downs and a spreader bar that I built to pull engines and other things with.
We originally were going to use jack stands in front of the front spring pocket. When we took the support out from under the axle, it wanted to teeter to the rear, so we went a different way.
We probably did it completely wrong but, we installed the entire Dana 70 assembly as 1 unit, the same way we took the AMC20 out. Only difference is that we left the tires on so we could roll it around some to get it positioned.
While I was doing the engine swap the previous week, Jerred built the new front spring pocket and rear flip bracket. He used 3/16" X 3" strap and some 2" X 3" X 1/4" L channel. They were just straight cuts and drilled bolt holes with no shape. We just wanted to see what they would do. We did the initial axle placement with them in this form.

If you look close, you can see that the spring hangar bracket and front pocket are just straight cut.


When Jerred was originally working on the brackets for the front, he decided to not cut the lower section of the box off as is done during the install of Tads kit. This is so that if we need to undo something, at least during our mock up stages, we can go back to a "base starting point".
When I started to adjust for placement, I used a speed square and made a mark perpendicular to the bracket top surface, against the squared side of the spring eye bolt. I then used the square to line up the bolt in the new mount with a bolt in the original mount.
I then used a section of 1/4" plate to clamp the two exteriors in alignment and set some tack welds.
Once we were OK with the placement of all brackets, I came up with a contour shape I could live with, then went back and cut and shaped them.


I pretty much did the same alignment procedure for the rear flip brackets. I tried moving them around some but I couldn't really tell if I made any changes. This is the position they are currently in, but I still have them clamped in, I have not done any tack welds.


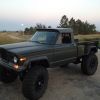
This is where the axle sits in the wheel well. it has moved the axle back @ 4".


This is how it sits now.
Jerred is 5'-10" and we are still using the complete 4 leaf spring pack and the overload.

I am not sure if the method is right, but I measured the shackle angle with a string line going straight from eye to eye and then up to the hangar bracket. I had seen instructions stating center to center to center, but top to top and along the same side should be the same. I ended up with @ 53*.


The rear pinion is @ 5*.


The front is @ 2*

From the bottom of the frame, the center of the tail shaft on the transfer case is 8".

Here is where I need some input. With what I am showing, are we in the ball park or seriously screwed?
I can get other measurements if needed, just let me know.
Dan