84 Grand Wagoneer- LT1/ 4L60E/ NP241/ Dana 60F/ Dana 70/ SOA

Area to show off your Custom Build threads.
User avatar

Stuka
Site Admin
Posts: 11811
Joined: Thu May 12, 2011 5:53 pm
Location: CA
Contact:

Re: 84 Grand Wagoneer- LT1/ 4L60E/ NP241/ Dana 60F/ Dana 70/

Post by Stuka »

Somehow I missed this thread when you first posted it up. Love how many photos you are posting.

I agree with BigJ200 on the drive shaft clearance on trans pan. Normally these transmissions came with driver drop t-cases for the IFS trucks.

As a side note, I found it a bit comical that you put a Camaro engine in it when you apparently do a lot of work on Mustangs :) BTW: Is that a GT500 sitting behind it in one of the upper photos, or just a GT with the Shelby lights and trunk?
2017 JKU Rubicon
Pevious Jeeps: 1981 J10, 1975 Cherokee, 2008 JK, 2005 KJ, 1989 XJ
User avatar

Topic author
Mustang Shooter
Posts: 165
Joined: Mon Sep 30, 2013 6:28 pm
Location: Harper, TX

Re: 84 Grand Wagoneer- LT1/ 4L60E/ NP241/ Dana 60F/ Dana 70/

Post by Mustang Shooter »

Hey Stuka!
Glad you finally saw this thing.
I wanted to try to document as much of this thing as I can. I have always liked the threads that are a presentation of "educational" info as much as a "Check out what I just did!".

I like cars in general, if its cool, its cool, so I have lost most of my loyalties.

Like I stated early in the thread, I totaled my 94 Camaro in late 2000 and had been hauling it around keeping it for a project. If I would have had a Ford powertrain I would have used it.
Most of the builds we have done over the years for clients have been Chevy based and I lived and breathed this stuff for years. Until we built that Blue 66 Mustang convertible you may see in a few shots, I had never swapped an EFI Ford into anything.

It looks like what we had in the shop at the first of the year was a 67 GT350 (usually seen behind the Waggy), 67 GT500, 70 Boss 302, 68 GT500, 70 GT500, 66 resto-mod convertible and I think another 67 GT500. We have sent out a car or two and swapped out the 302 for a 69 Boss9. Right now we have 3 more Boss 9 cars in the shop that we are working on and Jerred just finished shooting a fourth car yesterday. All of them are the real cars no clones. We have had some incredibly historic cars, low production and only one offs in the shop and, we are extremely fortunate and grateful to work with the collector that owns them.

Dan

csuengr
Posts: 1290
Joined: Sun Mar 24, 2013 10:24 am
Location: Sterling, CO

Re: 84 Grand Wagoneer- LT1/ 4L60E/ NP241/ Dana 60F/ Dana 70/

Post by csuengr »

I like LT1's, though they are odd ducks. $185 for a water pump is a bit much, stupid 2 way thermostat. :x I have one in my CJ backed by a Waggy TF727, 1/2 NP231 and Dana 300. It's a 95' from a B Body. OBD I is a much easier swap. Less ECU tweeking. My Cherkoee has a 1997 5.0 from an Exploder, which is mated to a five speed and BW 1356 transfer case. A no adapter drive train. It has to be emission compliant, so four O2 sensors, four cats, and OBDII EVAP. The EVAP was the hard part.

I would replace the power steering pump and crank pulley/damper while they are still easily accessed. Especially the PS pump. Also reseal the intake manifold. They really like to leak.
1977 Cherokee S, Ford 5.0, 5 speed, BW 1356, 33 x 10.50 BFG's. No longer my DD.
2007 Mercury Milan, 2.3L, 5-speed, now my DD. 29 mpg average.
User avatar

Topic author
Mustang Shooter
Posts: 165
Joined: Mon Sep 30, 2013 6:28 pm
Location: Harper, TX

Re: 84 Grand Wagoneer- LT1/ 4L60E/ NP241/ Dana 60F/ Dana 70/

Post by Mustang Shooter »

I think in August I decided to figure out what to do with my steering column. I am using a 4L60E from a 95 K1500 and I didn't think that the shift detents in the original GW column would work, since it was originally controlling a 727.
I found a 87-94 Chevy truck column on Craigslist locally and purchased it with the intentions of using it on the build.
Both my 84 Jeep and the 87-94 Chevy columns are nearly identical. They are both Saginaw columns, so most of the internals should be the same.

I have used this guide http://www.crankshaftcoalition.com/wiki ... ebuild.pdf in the past if I forgot how something was removed, it might be something that you can download and keep for your own files.

I also have an exploded diagram from the service manual.
Image

When I compared them side by side, the differences were apparent.
Image

Image

When I lined them up at the column mount, which is the same on both; the lengths are similar, but the Chevy is about an 1 1/2 inches longer.
The Chevy has a built in fire wall mount that is permanently attached and the Jeep is smooth. The linkage shift arm are also on opposite sides of each other.
Well, OK, I guess I will tear them both down and see if I can make the column that I want and needed.
I have to say first, the later 86-91 Grand Wagoneer column is pretty close to what I finally ended up with, so that may be a better option for your project. I believe they have the dimmer, wiper switch and cruise control mounted on the side of the column, the same way it is on my Chevy donor column.

Remove the Horn Spring Cup
Image

Remove the Steering Wheel Nut
Image

Install a steering wheel puller onto the wheel and tighten the puller shaft. This puts pressure against the column and pulls the wheel up and off.
I know some guys have just yanked on the wheel to remove it.
Be carefull using this method for the chance that there is not much tension holding the wheel on and you pop yourself in the face!
Image

Remove the Steering Shaft Snap Ring.
I have used two small screwdrivers to do this. You will need to get under the ring with one, taking a second screwdriver and start walking the ring out of its groove. It may take some time and several tries this way. I have also used a pair of snap ring pliers, but sometimes the ring can be damaged, becoming a little larger and then doesn't want to stay in place.
Image

Once the Snap Ring is off, remove the Lock Plate Cover and the Canceling Cam
Image

You now have access to the Turn Signal/ Cruise Control Lever and the Turn Signal Switch
Remove the screw that holds the lever to the switch, and pull the lever out of the housing. You probably wont be able to completely remove the wires and lever until after the Turn Signal Switch is loosened and out of the way. For now just leave it hanging on the side.
Image

You also have access to the 3 screws that hold the switch in place. You can easily remove 2 of them, but the third is shrouded by the switch itself. Rotate the switch like it would be activating a right turn. This will completely expose the screw and you can then remove it.
Image

Image

You will also need to remove the Hazard Light Knob by simply unscrewing it.
Image

You can now remove the Turn Signal Switch and the wires that go through the column.
I've done this with two methods. I very carefully pulled the harness with the connector and I have de-pinned and removed the connector completely. If you remove it, make sure you take pictures of the wire colors, the bay that they go into and the orientation of the connector.
This can be done by sliding the end of a paperclip or a small cotter pin into the terminal which will cause the retaining tab to "unlock" the wire and, then pull it out of the connector.
Image

With the switch out of the way, you now have access to the Ignition Cylinder.
On the Jeep column, it is held in place by a tension tab. The tab is pressed in and the cylinder can be wiggled and pulled out.
The Chevy column had the cylinder retained by a screw, which fit into a recess on the cylinder. The screw was removed and the Ignition Cylinder pulled right out.
Image

Image

Image

Remove the 3 torx head screws that hold the Cover in place, and then pull up to remove the cover.
Image

Image

Remove the Sector Shaft by pulling on it with a set of pliers. Depending on the condition of the grease that is in the column, it may be a little "stuck". Give it some good tension and it will come out.
Image

Image

Image

Remove the Lock Sector, Lock Sector Tension Spring and, the Bolt Lock.
The spring has a horse shoe shape that wraps around a groove on the bottom of the bolt lock.
Make note of the way the spring also goes into the side of the Lock Sector.
Image

Image

Remove the Tilt Spring assembly by using a #3 or #4 Philips head screwdriver. Put the tip of the screwdriver into the hole, push down with a bit of weight and turn counter clockwise. Those springs will probably be nasty, so don't put it on your moms dinner table!

Image

Image

Image

Thread a 8-32 screw into the 2 Pivot Pins. You should not need to go very deep, just 4 or 5 threads. Use a pair of pliers or vice grips to grab the screw and pull the pins out. They will probably be a little tight, so you may need to give a them a little wiggle as you pull. You may also need to use something to pry up on them a little before you begin pulling.

Image

Image

You should now be able to rock the Housing loose and lift it over the Steering Shaft. You may need to reinstall the tilt lever and pull I forward to get the Housing to release.
Image

Remove the Lock Rack
Image

Pull out the Steering Shaft
Image

Use a punch to remove the pin that holds the Shift Arm and the Shift Arm
Image

Remove the 4 torx head screws that hold the Support to the Retainer Plate.
With the 4 screws removed, pull the Support out
Image

Image

This is the component that holds the shift detent or Retainer Plate
Image
User avatar

Topic author
Mustang Shooter
Posts: 165
Joined: Mon Sep 30, 2013 6:28 pm
Location: Harper, TX

Re: 84 Grand Wagoneer- LT1/ 4L60E/ NP241/ Dana 60F/ Dana 70/

Post by Mustang Shooter »

After I had disassembled both of the columns, I could set the parts side by side and see what the differences were.
The supports are nearly identical, there are just minor differences. Either component can be used.
I decided to use the Chevy support and not worry about swapping the Retainer Plates.
Image

Image

The difference in the two Retainer Plates is obvious.
Aside from the detent locations, the Chevy unit has a longer "void" which is what allows the transmission to be manually shifted into first gear
700R4 / 4L60E
Image

AMC 727
Image

I then compared the two Housings
The Chevy unit has a "window" in the side which allows the placement for the shaped upper portion of a metal rod. This rod is the link between the actual dimmer switch unit mounted to the column under the dash and the multi function lever.
The Jeep unit is solid because it had the floor mounted dimmer and wiper control in the dash.
Image

The other difference is on what would be the top of the Housings.
The Jeep has 2 threaded holes used to mount the Shift Indicator and light assemblies.
Image

I wanted to use the Jeep shift indicator along with the use of the multifunction switch and decided it would be easier to cut a large hole rather than hope I had two small holes drilled and threaded in the right spots or angles.
I used Gorilla brand tape to make the pattern of the area I wanted to remove. I layered 4 or 5 strips over the opening of the Chevy Housing, using the lipped edge as a guide. I also made it long enough to cover the receiver for the Pivot Pin. I could then take a razor blade and cut the tape for the openings, using the Pivot pin location as a second guide.
I don't have a picture of the template for this procedure, but will show one for the next section.
Once the template was cut and placed on the Jeep Housing, I used a Dremmel tool and die grinder to cut out and shape the opening.
Image

The modified Jeep Housing looks almost identical to the Chevy
Image

The final portion was to compare and modify the column Cover section.
Again the basic shape and dimensions are the same but, the Chevy unit has a partial "box" formed on the side of the Cover. This, along with a removable portion, houses the multifunction switch.
The Jeep unit is solid in this same area with only an opening for the turn signal arm, which also had the Cruise Control switch.
Image

This is the template I made in order to cut out for the Jeep Shift Indicator assembly. I did it the same way as described above.
Image

Image

Image

Image

After everything was modified, I reassembled the entire column.
Image

Something that I have looked into but not been able to confirm is the possible use of the 71-72 Chevy Truck column indicator.
The indicators can be purchased at nearly every classic truck supplier and can be purchased with the 700R4/ 4L60E shift pattern already printed on the lens.
These are attached by drilling two holes in the top of the column and then screwing into place, so there would not be a need to modify the Cover to fit the Jeep indicator mounting bracket.

I still have a few things that need to be done to the column.
I need to rework the metal dimmer switch rod from the Chevy column so it fits between the multifunction switch and dimmer switch. It is longer than the distance between the two points. When I checked on the same rod on my 94 Camaro column, all they did was bend the rod so it had enough bow that it made contact with the switches.
I may also change the lower two inches of the columns and swap the linkage arm from the Chevy to the Jeep.
Also, I am using the unmodified ECM from my 94 Camaro, so I will still need to install the special ignition cylinder. This cylinder reads the resistance of the chip on the key, sending a signal to the anti-theft module and activates the ignition and run sequence.

I installed the Camaro ignition cylinder late this fall, but still need to do the other changes.
I have decided to use a cable linkage between the steering column and the transmission, but not sure yet if I want to buy a Lokar or Ididit cable kit, or put one together on my own with builder parts from Jegs.
Image

I did find a listing for the rod linkages from a 96 Impala, the same column linkage for a Caprice could work also.
No matter what method I decide, a bracket of some sort will need to be bought or built.
User avatar

Topic author
Mustang Shooter
Posts: 165
Joined: Mon Sep 30, 2013 6:28 pm
Location: Harper, TX

Re: 84 Grand Wagoneer- LT1/ 4L60E/ NP241/ Dana 60F/ Dana 70/

Post by Mustang Shooter »

So, over the summer it gets pretty hot in the hill country of Texas. By the time the late afternoon rolls around, the last thing you want to do is stay in the shop for a few more hours after dinner. We didn't do a whole lot of work on the Waggy during this time, just piddle with or look at something and then decide to go inside and get cool.
We also needed a little time to build some $$funds$$ back up after the purchase of the high steer kit!

During this time I would spend an hour or two and some time on the weekends studying wiring schematics and go through the Camaro harness, tracking down circuits and components that I needed to keep in order to run the engine, along with a few other conveniences. Jerred would do some minor bodywork fixing some of the dents in the body or rockers from time to time.

I guess we started getting serious again in August, because that's when the dates on my pictures pick back up again.
While I would work on and off on the wiring modifications, Jerred decided it was time to get the rear wheel opening centered back up because we had moved the axle back 4 inches using the Suburban springs.
This is where we left off.
Image

Image

The question was where do we start, in order to fix the wheel opening.
We decided to go with...
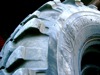
NEW BIGGER TIRES!

Image

In the picture above, a 16" x 7" rim with a 33" tall tire we got with the Dodge axles is next to one of the four 37" x 12.5" military tires we purchased.

We knew we were needing a 16.5" rim, but were not sure what we wanted to get. We could find Ford metric pattern wheels everywhere but the Dodge/ Chevy standard patterns were hard to locate. We were thinking we may just have to recenter H1 wheels but, just not completely in love with the idea.
The decision was made to deal with the matter later.

Jerred lifted the axles up and positioned the new wheel over the hub/ drum so it was centered. He then took a builder sauare and plum line and measured and marked for the change in the opening to be made.
He made a mark on the lower side of the quarter panel and layed out a visual line with some 1/4" fine line tape. It also serves as a guide line once the decision is made to begin cutting.
Image

We purchased both right and left replacement lower quarter panels from BJ's. Jerred then decided how much of the panel to remove in order for him to have the right amount to graft into place.
Image

He found the spot welds that tie the quarter panel skin to the structure of the outer wheel house. A lot of times you can do this by running a wire brush over the section you are working with. It will clean off any build up and make locating the factory spot welds easier. He will then mark the center of the spot weld the best he can with a center punch, and finally use a spot weld cutter to remove the weld. The concept is to remove enough weld that the two surfaces will separate without too much effort. You do sometimes end up going all the way through which leaves a hole that may need to be filled later.
Image

The next step is to begin cutting! Sometimes, this can scare the crap out of you. You need to take your time and plan the cuts and amount to be removed
Image

Jerred then cut out the section marked on the replacement panel and clamped it into the cut made in the quarter panel.
He can then adjust the panel and get it situated just the way he wants it. This also helps determine where the cuts to the wheel tubs and inner panel drops will need to be made.
Image

Next was to locate all of the spot-welds which joined the inner and outer wheel tub to the floor pan or the fender opening. Again they were marked and then removed with the spot weld cutter.
Image

Image

Image

We then moved to the cargo area and established a cut line with tape. For a procedure like this, you want to make the cut in the flattest area you can. We made ours to the rear of the factory stamped strength rib.
Image

Jerred made the first cut to the inner wheel tub from the floor to the welded flange that joins the inner to the outer wheel tub.
He then had to go back under the opening, mark a continuation line which would carry over from the first cut, and make the new cut from underneath.
When it is all done, there is a huge hole left that makes you wonder, "What the fraq did we just do?"
Image

He then finished trimming the rest of the quarter to fit the new section.
Image

This is after the cuts were made, if you compare a few of the images, you can see that the hole for the fuel filler hoses in the floor drop has been removed. This will be relocated later.
Image

The new panel was positioned and then welded in. This is done by placing an individual spot weld, move to another area as far as possible from the previous weld, do another spot and move again. This is done so that the chance of completely warping the panel is minimized.
He also figured out that a portion of the new panel would not fit properly along the bottom of the quarter. He then performed a "pie cut" which is removing an angled portion of metal.
The panel was adjusted and welded together.
Image

Image

Back into the cargo area! A pair of new lines need to be established in order to make a cut which will allow the movement of the wheel tub.
Image

Image

The cut was made to the floor and, the forward flanged portion of the floor which joins to the tub was set in place and welded in. The rear portion of the wheel tub was then set into place and clamped. We used a 1"x1" piece of angle iron to line up and clamp the top flange in place.
Image

Image

Templates were then made using a manila folder and then the patches were marked and cut from a salvaged Ford truck hood.
Image

The outer wheel tub panel was installed from the underside. The flange that joins the upper portion of the wheel opening was clamped and then the new panel was pushed against the two tub sections and clamped into place. Pushing against the panel allowed us to get the tightest fit possible.
It was then spot welded in place every 1/2", working from the wheel opening flange to the middle of the wheel tub.
Image

Image

The new inner tub section was formed the same way, clamped in place and spot welded.
Image

The inner portion of the tub was also welded in place, this time using rosette welds to fill the holes created by the spot weld cutter.
Image

This side is ready for some bodywork.
Image

The passenger side was modified the exact same way.
Image

During this time we are still looking for a wheel that we like. Jerred is still not big on using re-centered H1 wheels.
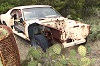
I found a set of wheels in Brownsville on Craigslist. They had been sitting in a pasture for many, many years, but I figured what the heck I was ok with the price.
My uncle lives in the area and said he would check them out and make an offer for me. Two weeks later he brought me 4 dirty and oxidized 16.5" x 9.75 HURICANES! He said I got them for less than half of what was being asked.
I can definitely work with that!
I blasted all four down to get them cleaned up.
Image

I then spent about 3 weeks off and on working on them.
I polished the veins and hub section by hand, I could not get my smallest sander to operate properly in the face of the wheel.
I used 36, 80, 180, 320, 400 and finally 600 on the veins. I could have gone further with the polishing, I have paper that goes to 3000, but that wasn't the look I wanted to achieve.
When I was done with the 600, I cleaned the surface and used some Mothers metal polish.
Image

I went to only 320 along the wheel edge. This gave me a polished center with a "machined" appearing lip.
This is a before and after shot
Image

When everything was polished, I cleaned all of the surfaces with wax and grease remover and then taped all of the polished surfaces. I then painted the bare cast portions of the face and the inner barrel of the wheels with VHT Cast Aluminum brake caliper paint.
Image

Image

Image

We took the rims and tires to get mounted.
Image

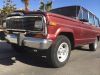
We purchased a set of Rancho lift springs for the front and mounted them with a set of Suburban shackles towards the end of July to level it out.
We have been happy with the result!
Image

Jerred then went back and started to do the bodywork for the new quarter areas.
Image

Image

He also applied a coat of DP epoxy primer when he was done. He has said that he wants to go back in and tweak the body line a little and clean it up.
Image
User avatar

Landman_MTX
Posts: 127
Joined: Sat Jul 05, 2014 10:08 pm
Location: west texas

Re: 84 Grand Wagoneer- LT1/ 4L60E/ NP241/ Dana 60F/ Dana 70/

Post by Landman_MTX »

Great work man! Thanks for all of the helpful pics as I will be making similar cuts here pretty soon! :-bd
1979 Grand Wagoneer, 360, TH400/QT, D44s
User avatar

Topic author
Mustang Shooter
Posts: 165
Joined: Mon Sep 30, 2013 6:28 pm
Location: Harper, TX

Re: 84 Grand Wagoneer- LT1/ 4L60E/ NP241/ Dana 60F/ Dana 70/

Post by Mustang Shooter »

Thanks for looking Landman!
Holler if you have any questions.
Where are you at?
User avatar

Landman_MTX
Posts: 127
Joined: Sat Jul 05, 2014 10:08 pm
Location: west texas

Re: 84 Grand Wagoneer- LT1/ 4L60E/ NP241/ Dana 60F/ Dana 70/

Post by Landman_MTX »

Mustang Shooter wrote:Thanks for looking Landman!
Holler if you have any questions.
Where are you at?
West of ya in Midland
1979 Grand Wagoneer, 360, TH400/QT, D44s
User avatar

243
Posts: 740
Joined: Sat Mar 16, 2013 7:32 am
Location: Texas

Re: 84 Grand Wagoneer- LT1/ 4L60E/ NP241/ Dana 60F/ Dana 70/

Post by 243 »

Mustang Shooter wrote:So, over the summer it gets pretty hot in the hill country of Texas. By the time the late afternoon rolls around, the last thing you want to do is stay in the shop for a few more hours after dinner. We didn't do a whole lot of work on the Waggy during this time, just piddle with or look at something and then decide to go inside and get cool.
We also needed a little time to build some $$funds$$ back up after the purchase of the high steer kit!

During this time I would spend an hour or two and some time on the weekends studying wiring schematics and go through the Camaro harness, tracking down circuits and components that I needed to keep in order to run the engine, along with a few other conveniences. Jerred would do some minor bodywork fixing some of the dents in the body or rockers from time to time.

I guess we started getting serious again in August, because that's when the dates on my pictures pick back up again.
While I would work on and off on the wiring modifications, Jerred decided it was time to get the rear wheel opening centered back up because we had moved the axle back 4 inches using the Suburban springs.
This is where we left off.

Image
If I had your shop I would be out there every doggone day, rain, shine, hot or cold :D
1978 Cherokee NT, 5.3/4L60/NP241 in Progress
User avatar

Topic author
Mustang Shooter
Posts: 165
Joined: Mon Sep 30, 2013 6:28 pm
Location: Harper, TX

Re: 84 Grand Wagoneer- LT1/ 4L60E/ NP241/ Dana 60F/ Dana 70/

Post by Mustang Shooter »

Hey 243!
Well even when we aren't doin the day job, we spend a lot of time working on the Waggy and other house projects in the shop.
When it gets hot during the summer, even though we have all the doors open, it will usually reach 100 in there by 2:00 pm. If we're lucky, the temp wild hold and level off, but it has hit 113 a few times. Filler and catalyzed components don't work very well when its that hot.
Something that also happens is that the car bodies in the shop soak up the heat and then work like infrared heaters. They will continue to radiate heat well into the night.
Ive been holed up in the office for the last few days due to the freezing temps and wet weather. Its been 24* with freezing fog and rain, and the shop was a sultry 34. We do have two overhead tube-o-ray infra red heaters that burn propane. We learned a few years ago that we could burn through 500gal on both ends in about a week and a half. With what we pay for propane, we decided that we shouldn't run them unless it was a dire need.
The freezing weather will be over in a few days and our winter will be over in a week or two, then we'll be back in the 60's and when I'm done working for the day I can stay out til 11:00 again.

By the way, I saw your squirter swap, that turned out cool! How high do the jets squirt on the glass?

Dan
User avatar

Gumby
Posts: 1433
Joined: Sun Jan 29, 2012 10:20 am
Location: Tucson, AZ

Re: 84 Grand Wagoneer- LT1/ 4L60E/ NP241/ Dana 60F/ Dana 70/

Post by Gumby »

This is coming along pretty well, the work you put in on those rims is stellar.
1984 GW 360/727/208.... 4"/ 31"
2004 CRD QC SRW 3500 4X4 (DD)
1983 "project Dubya" (long term)

twisted frame
Posts: 637
Joined: Wed Mar 27, 2013 9:41 am
Location: Massachusetts

Re: 84 Grand Wagoneer- LT1/ 4L60E/ NP241/ Dana 60F/ Dana 70/

Post by twisted frame »

I can't thank you enough for all those excellent, close-up, steering column pics. Those are really quite helpful! Nice choice on the Hurricanes too.
73 J4000. 360, MC 2100, T18A, D20, stock closed knuckle Dana 44 front, 60-2 rear. Warn Lock-O-Matics, Warn/Belleview electric winch, true duals with glasspacks, old-school front diff skid plate, used 265 Toyos on 16" AR wheels.
User avatar

66stepside
Posts: 3793
Joined: Sat Oct 13, 2012 9:59 pm
Location: Spokane Valley, WA.

Re: 84 Grand Wagoneer- LT1/ 4L60E/ NP241/ Dana 60F/ Dana 70/

Post by 66stepside »

I am digging the build and the level of craftsmanship- your Wagoneer is going to be amazing when it's done. Well done!

serehill
Vendor
Posts: 1953
Joined: Sun Nov 20, 2011 4:00 pm
Location: Mesquite Texas

Re: 84 Grand Wagoneer- LT1/ 4L60E/ NP241/ Dana 60F/ Dana 70/

Post by serehill »

Agree looks like the beginnings of a rockin waggin.
1980 Honcho 258 4 speed mostly stock with 4 " lift.

WIP

You know the rude dude from IFSJA


1980 Cherokee wrangled & mangled
MSD complete system
Eddy intake
Holley 650
Comp cam 270H
4" Rusty's
Ramsey 12K winch
208
Built to drive not sit in the garage.


No longer strangled. I didn't build it for anyone else.
If you can't improve it why waste your time?
User avatar

Topic author
Mustang Shooter
Posts: 165
Joined: Mon Sep 30, 2013 6:28 pm
Location: Harper, TX

Re: 84 Grand Wagoneer- LT1/ 4L60E/ NP241/ Dana 60F/ Dana 70/

Post by Mustang Shooter »

Thank you very much to everyone that has taken some time to look at our project and commented over the last few days!
I do hope that some of this will help you guys on your projects.
Dan
User avatar

jpswapmohn
Posts: 657
Joined: Sun Mar 02, 2014 6:08 pm
Location: CO

Re: 84 Grand Wagoneer- LT1/ 4L60E/ NP241/ Dana 60F/ Dana 70/ SOA

Post by jpswapmohn »

'Stang,
Ran back across this thread and was wondering how you guys ended up. Did the wag get finished?
b
One day I will wake up and realize that my jeep is complete...one day, I just know it.
88Wag, LT1/4L60E/NP242, J20 axles, etc. http://imgbox.com/g/rNuIasKYrS
95YJ, STaK, D44's, SOA, ARB's, Bilstein 5150s, 35" KM2's
50 CJ3A
77 J-10 (sold)

lurch1980
Posts: 22
Joined: Sun Sep 20, 2015 8:45 pm

Re: 84 Grand Wagoneer- LT1/ 4L60E/ NP241/ Dana 60F/ Dana 70/ SOA

Post by lurch1980 »

I'd really like to see an update on this, It looks great!

whoever
Posts: 4
Joined: Tue Nov 24, 2015 3:50 pm

Re: 84 Grand Wagoneer- LT1/ 4L60E/ NP241/ Dana 60F/ Dana 70/ SOA

Post by whoever »

Curious to see how you expand the front wheelwells. Going forward and back, or just back?
User avatar

Topic author
Mustang Shooter
Posts: 165
Joined: Mon Sep 30, 2013 6:28 pm
Location: Harper, TX

Re: 84 Grand Wagoneer- LT1/ 4L60E/ NP241/ Dana 60F/ Dana 70/ SOA

Post by Mustang Shooter »

Hey guys!

Thanks a lot for your interest and questions about our "Waggy"!
I have both good and bad news about it.

Yes, we still have it, we just haven't done any "big" modifications to it for a while and it is not done.

If I didn't say anything about it, I rigged up the 1 gallon test fuel tank from my run in stand, some water hose and PVC fittings, and fired the engine up with it sitting in the chassis last Christmas. That was the first time it had run since probably 2002.

Jerred and I spent a good portion of the year working on a couple of our customer cars and since its just the two of us, when we were ready to call it a day, we weren't wanting to do either Jeep body mods or wrenching.
Jerred by himself did the body work, sanding, priming, sanding, and sanding, and sanding (do you get the idea?) and finally paint on a 67 GT500 and a 1969 BOSS 9,

Image

Image

Image

while I was doing a drivetrain and chassis swap on a 68 Camaro.

Image

Image

Image

Image

We are also wanting to get a 58 Corvette finished before the end of the year.

Image

We are actually ready to shoot some primer in order to finish up a surface or two and start laying color, but looks like our weather will suck for another week!

I have done some stuff though.

I think you guys know I modified and rebuilt the steering column to work with the 4L60E shift detents. I also included the column controls for the cruise control, the multi speed wiper control, and anti theft system from the 94 Camaro along with installing a GM C/K wiper motor. I still need to get the correct size/ thread nut-zerts to finish the install. I have tried the wiper system and it worked without a hitch!

Image

Image

I went back this spring and removed the colum and modified the end of the housing and shaft, along with building a mounting bracket for the 97 Suburban shift cable I wanted to use.

Image

Image

I installed a 98 full size Blazer tank this spring and, sent the Blazer sending unit to Tri-Star Radiator for modification to work with the Jeep gauges. I guess that was in February.

Image

After that, the 68 Camaro we were converting was on the lift until October. We were able to get enough room in the shop 2 weeks ago so I could get it back on the lift and I pulled the transmission and transfer case.

In May, I bought a hydro-boost mount from Elliot and a boost unit from a 97 K2500 Suburban. I also built a new set of Hydraulic lines, added a steering cooler and set the hose routing in the Waggy chassis.

Image

Image

I have not installed any fluid in the system. I may end up swapping the boost unit for a new one, I found a leak on the floor this week that evidently came from it. For months it has been sitting dry in the same spot, then just a few days ago there is a mystery wet spot.

While I was doing Hydraulic lines, I also converted the Jeep A/C unit to 134a and installed a new drier and condenser and connected it to the Camaro A/C compressor. I am using Polar Seal II hoses and fittings on everything I do from now on. I can cut and route the hoses and fittings and then use a 2 band crimp system, eliminating the requirement of needing heavy crimpers or taking hoses to town to be crimped. The hand held crimp tool is a bit expensive, but in my opinion, well worth it.

I bent some new hard fuel lines, crimped new fuel fittings, installed a fuel filter an connected the Blazer tank to the LT-1 fuel rails.

Image

Image

Jerred and I took a Saturday road trip to Rockdale, TX to get a pair of Dana 70 Power-Lok differentials. It was a package deal and I was pleased with the price.

Image

I also ended up getting a Dana 60 Power-Lok a few months later for the front axle.

Image

I pulled the NP241C apart two weeks ago so I could send the main shaft in for a SYE kit from Tom Woods Driveshafts.

Image

I was supposed to have it back for this weekend, but I guess with the holiday and winter weather it has not come in yet. Hopefully it will be in early this week.

I also ended up modifying the transmission late this week.
It was originally a 95 K series 4L60E PWM transmission. My 94 Camaro ECM uses a non-PWM 4L60E. In order to get the two to work happily, I removed the valve body, transmission harness and pump from the 95 K series and installed the non-PWM units which I had been acquiring over the last few months.

Image

I also installed a VSS relocation kit from Advance Adaptors yesterday afternoon. The easiest part was drilling the hole in the transmission case. It took me a few hours to modify the sensor bung and set the clearance of the sensor to the 40 tooth wheel.

Image

Image

I ordered a set of new anti- wrap leaf spring perches from Barnes 4WD last week. We will cut the original perches from the Dana 70 and rotate the pinion up for a better shaft angle and then weld the perches on.

Image

The plan we decided on was to get the drivetrain mods done and reinstalled first, re-measure for shaft length and angle and then modify the axles and order shafts. We know that we will need to also adjust the front axle pinion angle along with correcting the caster angles. Maybe that can be done by the end of the year.

I will end up getting a modified Griffin radiator once the drive shafts are in. I have been very please with the modified 68 Camaro radiator I had them build.

There is still a bunch of stuff to get done, finish fuel filler tube and hose modification, install radiator and new radiator hoses, figure out an air cleaner assembly, finish axle modifications, mount shocks, clean axles and install new gears, decide on what to do with brakes, fab exhaust, etc., etc., etc. :banghead:

And we need to finish the body mods and body work!
whoever wrote:Curious to see how you expand the front wheelwells. Going forward and back, or just back?
The plan is to move both front and rear edges of the fenders, squaring the wheel with the new opening.
Over the summer, Jerred made some measurements and laid out some tape lines mimicking the cut he wanted to make. I want to say he will move each edge 3" to 3 1/2"?

Thanks again guys, holler if I need to explain anything.
I promise I will do some action pics when we do the next modifications.

Dan
Post Reply