ChrisHager's 79 J-10 Build Thread

Area to show off your Custom Build threads.
Post Reply
User avatar

Tatsadasayago
Posts: 3684
Joined: Thu Aug 28, 2014 2:22 pm
Location: Sacramento, CA

Re: ChrisHager's 79 J-10 Build Thread

Post by Tatsadasayago »

Time to step back a moment here...

You mentioned the outdoor temps changed since you last ran the truck...

Two thing immediately popped into my head:
First is winter fuel. If you live in an area that requires additives in the blend such as ethanol etc, that can cause leaner mixtures since they effectively add more oxygen to the gasoline.
The second is ambient temperature. To a point, an engine idle RPM will increase as the mixture is leaned...up to around 16:1 air fuel ratio where it will begin to drop. Cold weather and a cold engine require a richer mixture to maintain a given RPM compared to say a 80 degree summer day.

Not knowing when and where the engine was driven prior to your project, I would assume it's been awhile since it was last jetted for the locale.

Discarding everything I mentioned in my previous post...
I would do the following:
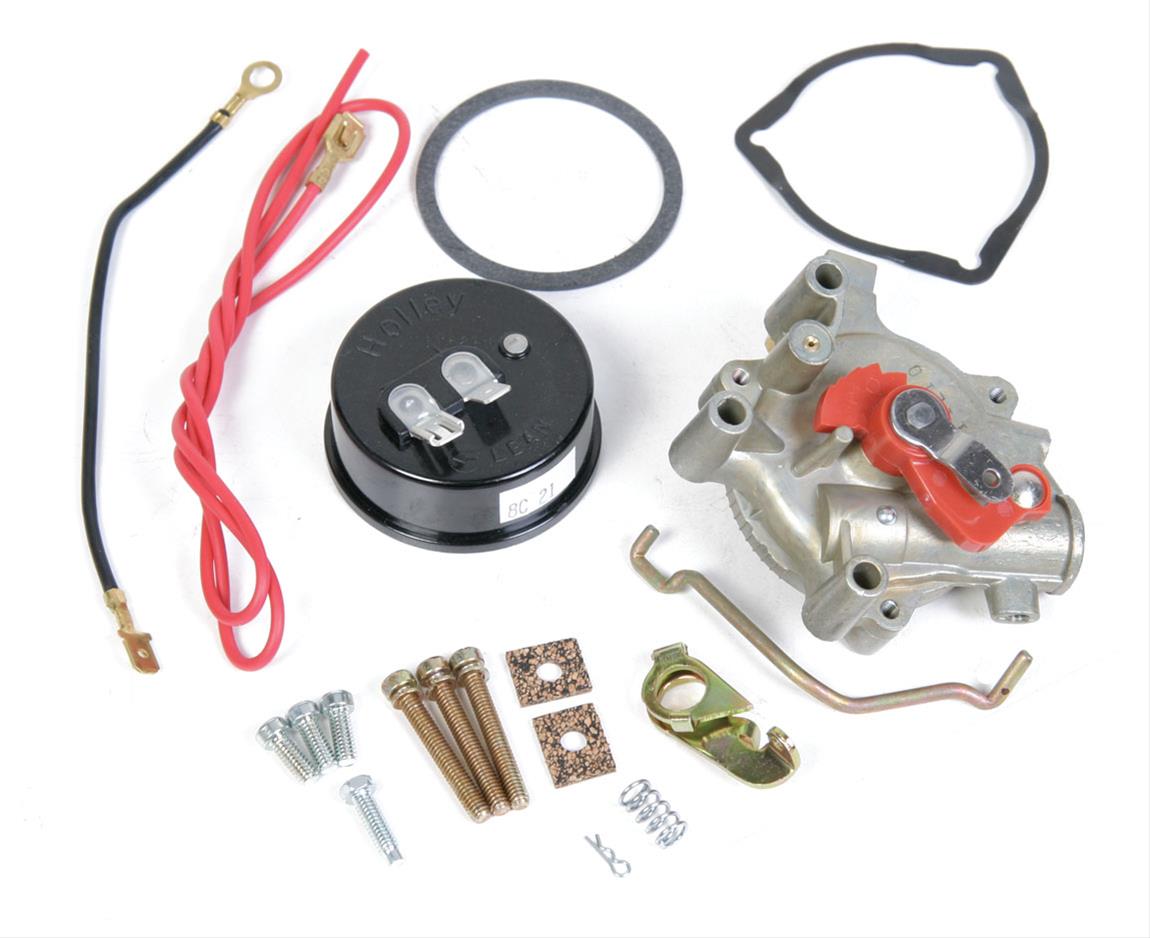
Check that the fast idle cam is dropping out after the choke is opened fully. The choke plate can be open but the fast idle can CAN stay engaged sometimes. It's the red plastic item in the top center of the photo.
Image
It that's not sticking then I would completely close the carb's throttle plates by backing out the idle speed screw.
I would close both idle mixture screws, then back them out 2 turns.
Next I would open the throttle plates with the idle speed screw until the engine would idle on it's own at about 650-700 RPM in neutral.
The proper setting should just uncover the bottom edge of the idle speed transfer slot. (Can't see this unless the carb is off the engine)
Once the engine was fully warmed up I would adjust the mixture screws 1/8th of a turn at a time until I found the highest manifold vacuum reading and/or smoothest idle. If no vacuum gauge is available, adjust mixture for highest RPM.
I would then adjust the idle speed screw to achieve the idle RPM desired.
You can find a quickie adjustment guide here: http://documents.holley.com/199r10268-4rev2.pdf

I'd let the engine cool down completely and run it to see if the idle changes after warmup.

Keep in mind that in a properly adjusted Holley, the main jets size is pretty much irrelevant as long as they are big enough to allow fuel to flow through them and into the idle and transfer circuits. If you can get the curb idle speed set and idle mixture adjusted the only other thing you may need to do is change main jets so your mixture is appropriate for your altitude.

Sorry for the dissertation sized posts.
1977 Cherokee Chief - The Blair Jeep Project III
A collection of parts flying in close formation

Topic author
ChrisHager
Posts: 182
Joined: Wed Sep 11, 2013 12:03 pm

Re: ChrisHager's 79 J-10 Build Thread

Post by ChrisHager »

That's an awesome amount of info! I appreciate your "dissertation sized posts". It gives me something to think about and reference!

As you pointed out, variables have changed since it was driving well. It's a heck of a lot colder now and we do have the winter blend fuel. I think you're on to something about setting the idle and what not again. I'll do some reading and start with that. Hopefully my results will be good!

Thanks for the help!
User avatar

Tatsadasayago
Posts: 3684
Joined: Thu Aug 28, 2014 2:22 pm
Location: Sacramento, CA

Re: ChrisHager's 79 J-10 Build Thread

Post by Tatsadasayago »

It was nice to chat with you and your dad today Chris!

Kinda personalizes things a bit.
1977 Cherokee Chief - The Blair Jeep Project III
A collection of parts flying in close formation

Topic author
ChrisHager
Posts: 182
Joined: Wed Sep 11, 2013 12:03 pm

Re: ChrisHager's 79 J-10 Build Thread

Post by ChrisHager »

Tatsadasayago wrote:It was nice to chat with you and your dad today Chris!

Kinda personalizes things a bit.
I agree. I greatly appreciate your help as well.

To follow up, I was antsy after cooking up the steaks Saturday evening so I stepped out to the garage, put the carb back together, and installed it on the truck. Even with torn gaskets, everything seemed to work well! The idle was no longer running up to 1,200 RPM! The problem was the fast idle cam was sticking in its fully upward position.

The assembled carb with torn gaskets is only temporary. I just placed an order for Holley's 37-119 rebuild kit. That should work with my 80457-1 build date 3167 carb. I intended to buy extra bowl gaskets and spacer gaskets but at the price some of these things run, it almost seems cheaper to buy the whole rebuild kit.

Oh and for the record, I found that I have 65 jets and drive at an altitude of 558'.

Topic author
ChrisHager
Posts: 182
Joined: Wed Sep 11, 2013 12:03 pm

Re: ChrisHager's 79 J-10 Build Thread

Post by ChrisHager »

I should start this post by thanking Tatsadasayago! You've been more than helpful and all the advice was greatly appreciated!


I just realized I never updated this thread! I fixed the idle issue! My father-in-law and I removed the carburetor and started poking around. It turns out, the choke fast idle cam was sticking at fully open. We sprayed some penetrating oil on it and worked it a little. That took care of it!

The red little bugger there was the problem:

Image

Other things I changed:

First off, this was open sucking air. Apparently, it has always been open. Plugging it with a finger or spraying carb cleaner didn't affect the idle.

Image

I went ahead and hooked that open port to this vacuum port.

Image

I also wired up a ground for the electric choke. It didn't have one out of the box. I should note, in the future, I'll be switching this electric choke to manual. For now, it seems to be working better for me.

I also switched my vacuum advanced to this port:

Image

Pictures are fun, huh? :)

I cleaned up a little rust and fixed some gaskets. This tore on its own...

Image

I also replaced the power valve with a labeled one from Holley. I'll now have a baseline for future tuning.

More pictures in case anyone can benefit.

Image

Image

Image

Tore a gasket. :(

Image

Float setup:

Image

I adjusted these a bit more to sit 'level'.

Image

Image

Image

Image

65 Jets:

Image

Image

I'm able to now get my idle very low! I actually need to bump it up a little. I dialed back the timing to 10° and at 600 RMP idle, I'm pulling a fluctuating vacuum around 19-21.

Image

Image

This current setup seems to have quite a bit more power! Now that I know a baseline, I can start tinkering and see what I can get out of this. I'm looking forward to getting a wide band O2 sensor in the future!
User avatar

Tatsadasayago
Posts: 3684
Joined: Thu Aug 28, 2014 2:22 pm
Location: Sacramento, CA

Re: ChrisHager's 79 J-10 Build Thread

Post by Tatsadasayago »

Nice pix Chris!
1977 Cherokee Chief - The Blair Jeep Project III
A collection of parts flying in close formation

Topic author
ChrisHager
Posts: 182
Joined: Wed Sep 11, 2013 12:03 pm

Re: ChrisHager's 79 J-10 Build Thread

Post by ChrisHager »

I haven't worked on the truck much lately but I have been enjoying it. I took it out fishing a few weeks ago and found the access path was rutted out. I was able to snag a similar picture as when I first bought it as well.

Sept 2013:

Image

May 2015:

Image

Image

Image

Image

Image

Image

Also, a friend of mine sent me this picture a few weeks ago. He saw it in Springfield! I haven't been lucky enough to catch a glimpse but another one is out there! :)

Image
User avatar

Tatsadasayago
Posts: 3684
Joined: Thu Aug 28, 2014 2:22 pm
Location: Sacramento, CA

Re: ChrisHager's 79 J-10 Build Thread

Post by Tatsadasayago »

Good to see you're driving the J-truck around and enjoying it!
1977 Cherokee Chief - The Blair Jeep Project III
A collection of parts flying in close formation

Topic author
ChrisHager
Posts: 182
Joined: Wed Sep 11, 2013 12:03 pm

Re: ChrisHager's 79 J-10 Build Thread

Post by ChrisHager »

:-bd

I tried replying to your PM but it says it's in my Outbox. Hope it makes it to you!

Topic author
ChrisHager
Posts: 182
Joined: Wed Sep 11, 2013 12:03 pm

Re: ChrisHager's 79 J-10 Build Thread

Post by ChrisHager »

Small update - I was over at the neighbors house and saw an old CB sitting on her shelf. She asked if I wanted it. I figured it'd be perfect in the truck!

SBE-29CB (Catalina III / Malibu) - http://www.cbtricks.com/radios/sbe/sbe_ ... /index.htm

I'm considering buying a 102" whip, mounting it in the bed near the cab, then installing a tie down near the rear. This will allow me to drive through the woods and park in the garage. The other alternative is a bendable 4' antenna like the Wilson Flex. Thoughts?
User avatar

Tatsadasayago
Posts: 3684
Joined: Thu Aug 28, 2014 2:22 pm
Location: Sacramento, CA

Re: ChrisHager's 79 J-10 Build Thread

Post by Tatsadasayago »

Nice vintage radio!
Regardless of which antenna style you choose you should keep the radiating element away from metal for best efficiency. When you place the antenna on the bed near the cab you create a null in the direction of the cab. Think of the antenna as a candle in a dark room. As it projects light outward, any metal in the way blocks it and you end up with shadows. With an antenna, your transmissions, and a portion of reception will be in the 'shadow' thus being reflected or absorbed in that direction creating a 'dead area'. Your best results would come from mounting directly on the center of the cab roof or on the bed rail toward the rear bumper. These locations allow the antenna to radiate in all directions (Mostly) while using the ground plane (The vehicle) most efficiently. If mounting on the body, try to keep the mount high so the antenna element clears the sheet metal.


I endorse the 102" steel whips with a quick release for storage. The whip, when tuned to the vehicle is a 1/4 wave radiator as opposed to the spiral wound units like the Firestik etc. A 1/4 wave vertical antenna mounted atop the body will outperform and shortened unit bigtime. All mechanically short antennas are compromises where you trade size for performance. That being said, if the farthest you expect to talk to others is measured in hundreds of feet, just about any antenna and mounting location will do. You can also roll with a stake pocket mount for the antenna that won't require drilling holes in the body. As long as the mount maintains a tight mechanical and electrical bond to the body and frame, it will work great and could quickly be stowed.
1977 Cherokee Chief - The Blair Jeep Project III
A collection of parts flying in close formation

Topic author
ChrisHager
Posts: 182
Joined: Wed Sep 11, 2013 12:03 pm

Re: ChrisHager's 79 J-10 Build Thread

Post by ChrisHager »

I overlooked the "shadow" the cab would create. I know it's ideal to locate an antenna central to the vehicle but it makes sense to not put it in a spot that will be blocked.

I'm really digging the stake pocket mount. I like the idea of not having to drill into the body.

Thanks for the advice!

Topic author
ChrisHager
Posts: 182
Joined: Wed Sep 11, 2013 12:03 pm

Re: ChrisHager's 79 J-10 Build Thread

Post by ChrisHager »

Small updates:

I'm considering spraying in a bed liner in the coming months before I beat up the bed too much. After talking it over and looking at some examples, I'll likely go with Amazon's "Custom Coat Bed Liner" in the tintable version and tint it to match the body. The Amazon product is basically U-POL Raptor liner.

I originally was going to go with black but color matching it sounds pretty cool. The bed itself is in pretty good shape so the project shouldn't take too much time. It's especially nice that I don't have any major rust to deal with.

Image

Let's see, I've had this truck for right at 2 years now. Last weekend was the FIRST time my wife has ever ridden in it. :shock:

Image

And just for fun, I snapped a picture of it growling at me while I sat in it's parking spot.

Image

That's about it for now. I hope in the coming months I can start tinkering with it again. Life has been keeping me busy lately! :)
User avatar

j10jim
Posts: 291
Joined: Wed Jul 25, 2012 12:05 am
Location: Simi Valley, CA

Re: ChrisHager's 79 J-10 Build Thread

Post by j10jim »

Look at Monstaliner before you decide. Check out this thread. Thats what I went with in my cab. Going to do the inside of the bed later this year when I get the rest put back together. Probably going to color match it to my Jungle Green.

12000 + replies but a good read

http://www.jeepforum.com/forum/f43/intr ... er-875162/
1980 J10/20
Rusty's 4" lift, 2" body lift, old Cliffhanger front bumper, 35" tires, 65 dash w Speedhut gauges.
Xtrusion Overland rack system, Tepui tent, 1/2 decked system.

LONG time member of ifsja.org, FSJ-List and some others...

Topic author
ChrisHager
Posts: 182
Joined: Wed Sep 11, 2013 12:03 pm

Re: ChrisHager's 79 J-10 Build Thread

Post by ChrisHager »

Thanks. I'll sift through that this morning!
User avatar

Atla
Posts: 303
Joined: Tue Jul 31, 2012 6:47 am
Location: North Carolina

Re: ChrisHager's 79 J-10 Build Thread

Post by Atla »

I used monstaliner on my 01 Jeep TJ's tub - I recommend it, seven years later.
~Atla. (I'm just here for the pictures)
1983 J-10
2001 TJ

My Build Thread - http://fsjnetwork.com/forum/viewtopic.php?f=12&t=2722

Topic author
ChrisHager
Posts: 182
Joined: Wed Sep 11, 2013 12:03 pm

Re: ChrisHager's 79 J-10 Build Thread

Post by ChrisHager »

Washed and sealed the J-10 over the weekend. We used Meguiars NXT Tech Wax 2.0 which is actually a synthetic sealant.

Image
User avatar

Atla
Posts: 303
Joined: Tue Jul 31, 2012 6:47 am
Location: North Carolina

Re: ChrisHager's 79 J-10 Build Thread

Post by Atla »

ChrisHager wrote: Also, a friend of mine sent me this picture a few weeks ago. He saw it in Springfield! I haven't been lucky enough to catch a glimpse but another one is out there! :)

Image

Sort of a hijack, but this truck is for sale.

http://www.jeeptruck.com/jss/sale15/adj035/adj035.html

$7800

Just realized I saw that truck earlier today. :)
~Atla. (I'm just here for the pictures)
1983 J-10
2001 TJ

My Build Thread - http://fsjnetwork.com/forum/viewtopic.php?f=12&t=2722

Topic author
ChrisHager
Posts: 182
Joined: Wed Sep 11, 2013 12:03 pm

Re: ChrisHager's 79 J-10 Build Thread

Post by ChrisHager »

Oh that's awesome! Thanks for letting me know!

Topic author
ChrisHager
Posts: 182
Joined: Wed Sep 11, 2013 12:03 pm

Re: ChrisHager's 79 J-10 Build Thread

Post by ChrisHager »

Update: My left rear brake destroyed itself. When I removed the drum, everything literally fell out and hit the floor. :shock:

I'm now on the look out for a left rear backing plate. Apparently they are no longer made and the remaining stock is sold. If I can't find one, I'll have to try bending this back out and welding up the cylinder mounting holes...

Also, I *may* have an issue with my power steering. I won't know until I can get the brakes taken care of.

Naturally, I have a bunch of pictures.

The part in question: J812 7778

Image

Image

Image

Image

Image

Image

Image

Image

Besides being rusty, which I think is the reason this all happened in the first place, the brakes weren't in too bad of shape.

Image

I also need to figure out what to do with this. It's what holds the parking brake in the backing plate. I'm not sure how it works. I had to attack it to get it out.

Image

As she sits now...

Image
Post Reply