http://s1099.photobucket.com/user/Clean ... %20Project
We are doing this project for a customer. 1976 wagoneer
The design goal is to modernize the suspension and drivetrain while maintaining a near stock appearance. The vehicle will be mostly for weekend trips in Northern Michigan /daily use and for moderate offroad trail use. The engine being swapped in is a 2007 GM 6.2 L92, 6spd auto, we are using Novak Conversion mounts, and ECM flash. The axles will be Dynatracs Dana 60 rear, Dana 44 front, both with ARB lockers. Front and rear supension geometry is stock TJ, with Rustys Offroad arms and brakets used along with our own custom brackets. Rear is coils, front will be coilovers and both will be holding ride height at a 3" lift over the stock leaf spring ride height. 31x10.50 tires, 15x8 rims. We are planning a few more custom touches here and there.
will post more soon, took us a while to get these pics downloaded , we started tear down the 1st of the year. last pics are from Monday 4/15/13.
1976 FSJ Project, 6.2 GM and Coils.
-
Clean Car Shop
Topic author - Posts: 73
- Joined: Wed Apr 17, 2013 11:25 am
-
 jaber
jaber
- Vendor
- Posts: 3067
- Joined: Sat Aug 27, 2011 5:24 pm
- Location: Chino Valley, Az.
Re: 1976 FSJ Project, 6.2 GM and Coils.
Looks like a sweet build. Cant wait for updates... 
Jeff
'46 cj3a
'51 Willys p/u
'51 Willys Parkway Conversion
'74 CJ5
'75 J-20 Wrecker
'75 J-20 Cummins service truck
'77 J-10 p/u
'79 Cherokee
'88 Grand Wagoneer
http://s252.photobucket.com/albums/hh14/jeffaber/
'46 cj3a
'51 Willys p/u
'51 Willys Parkway Conversion
'74 CJ5
'75 J-20 Wrecker
'75 J-20 Cummins service truck
'77 J-10 p/u
'79 Cherokee
'88 Grand Wagoneer
http://s252.photobucket.com/albums/hh14/jeffaber/
-
Clean Car Shop
Topic author - Posts: 73
- Joined: Wed Apr 17, 2013 11:25 am
Re: 1976 FSJ Project, 6.2 GM and Coils.
I will try to download pics as we go along, my buddy has the smart phone so he takes all the pics as we work. then we have to download at home.
Just to clarify, we are just two guys who do odd jobs and love to work on cars ( I run a detail shop). We have been mostly self taught, and have a small shop with limited tools. Luckily for us we live in an area where lots of "car guys" retire. Within in just a few miles of our shop we have a world class auto restoration shop, and an amazing little fab/machine shop. Both of these are run by long time friends. Anything we don't know how to do, or can not do at our shop, they help us with. We have been researching this project for many months prior to starting. This and other forums have helped us button down many ideas and set goals. This project is for a customer, we work on it 6 -7 days a week. It will continue to go together a little faster than most "after work/weekend projects" and with some pretty nice parts. I hope that does not make it any less interesting for this forum, Please feel free to ask questions, comment in general or offer advice. We will have lots of good used, rust free, spare parts left over, axles springs, trans transfer case, rims etc.
Just to clarify, we are just two guys who do odd jobs and love to work on cars ( I run a detail shop). We have been mostly self taught, and have a small shop with limited tools. Luckily for us we live in an area where lots of "car guys" retire. Within in just a few miles of our shop we have a world class auto restoration shop, and an amazing little fab/machine shop. Both of these are run by long time friends. Anything we don't know how to do, or can not do at our shop, they help us with. We have been researching this project for many months prior to starting. This and other forums have helped us button down many ideas and set goals. This project is for a customer, we work on it 6 -7 days a week. It will continue to go together a little faster than most "after work/weekend projects" and with some pretty nice parts. I hope that does not make it any less interesting for this forum, Please feel free to ask questions, comment in general or offer advice. We will have lots of good used, rust free, spare parts left over, axles springs, trans transfer case, rims etc.
-
 Stuka
Stuka
- Site Admin
- Posts: 11812
- Joined: Thu May 12, 2011 5:53 pm
- Location: CA
- Contact:
Re: 1976 FSJ Project, 6.2 GM and Coils.
Quite the shop, has me jealous! 
Great project!
Great project!
2017 JKU Rubicon
Pevious Jeeps: 1981 J10, 1975 Cherokee, 2008 JK, 2005 KJ, 1989 XJ
Pevious Jeeps: 1981 J10, 1975 Cherokee, 2008 JK, 2005 KJ, 1989 XJ
-
Clean Car Shop
Topic author - Posts: 73
- Joined: Wed Apr 17, 2013 11:25 am
Re: 1976 FSJ Project, 6.2 GM and Coils.
Added a few more pictures, kinda slow progress this week. I had to two days into fabricating exhaust from the headers to muffler, JD got the rear watts link mocked up. more pics of that later. Muffler skidplate and mounts should be finished and test fit soon. still waiting on watts link final locations before we can finish tailpipe section of exhaust. hoepfull by the end of this week it will all be in place for test fitting. http://s1099.photobucket.com/user/Clean ... %20Project
-
Clean Car Shop
Topic author - Posts: 73
- Joined: Wed Apr 17, 2013 11:25 am
Re: 1976 FSJ Project, 6.2 GM and Coils.


Muffler skid plate, looking down. I am having trouble getting the "good" pictures to download. This skid plate worked out well, and I should be able to finish the welds and round some of the edges in the a.m. We are mocking up a watts link for the rear axle, hope to have pics of that soon. Does anyone have pics of their skid plates? I will be starting to work on one for the trans/transfer case soon.
-
Clean Racing
- Posts: 26
- Joined: Thu Oct 04, 2012 7:08 pm
Re: 1976 FSJ Project, 6.2 GM and Coils.
Who's transfer case adapter is that? I am using the same powerplant in my 82 J20.
-
Clean Car Shop
Topic author - Posts: 73
- Joined: Wed Apr 17, 2013 11:25 am
Re: 1976 FSJ Project, 6.2 GM and Coils.
The transfer case adapter is a Novak Piece. 6l80E to NP231
-
Clean Car Shop
Topic author - Posts: 73
- Joined: Wed Apr 17, 2013 11:25 am
Re: 1976 FSJ Project, 6.2 GM and Coils.
[/u[URL=http://s1099.photobucket.com/us ... .jpg[/img]rl] 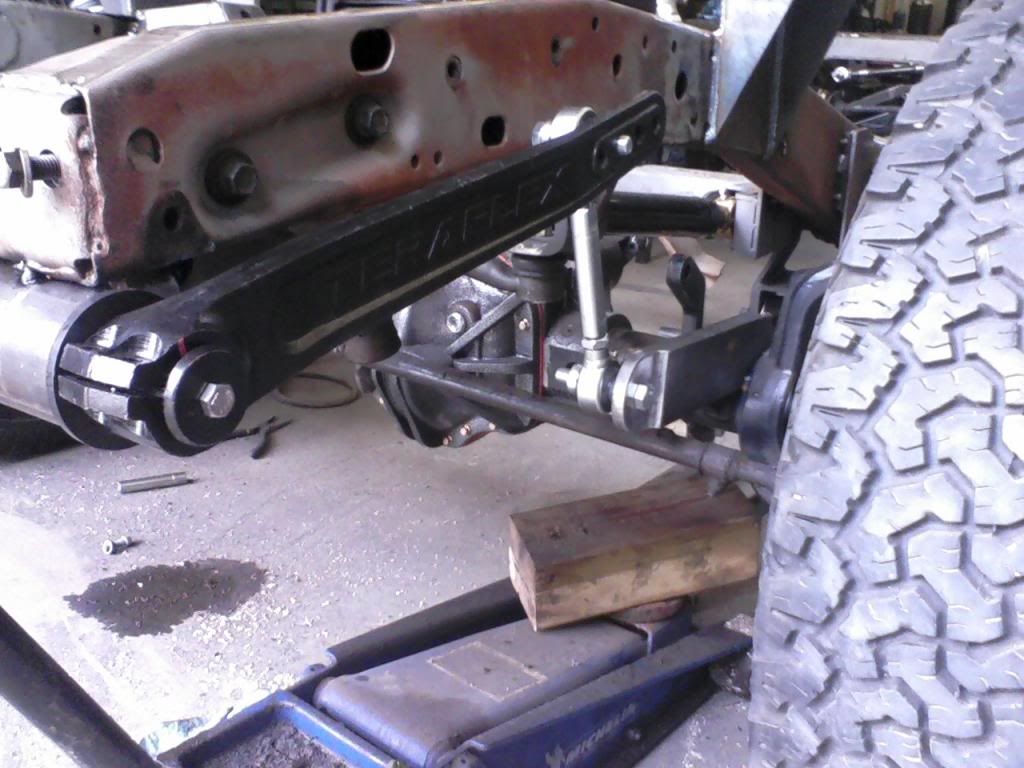
Watts link, still in mock up, but pretty much finalized as far as geometry and location. still need to build mounting points on chassis.
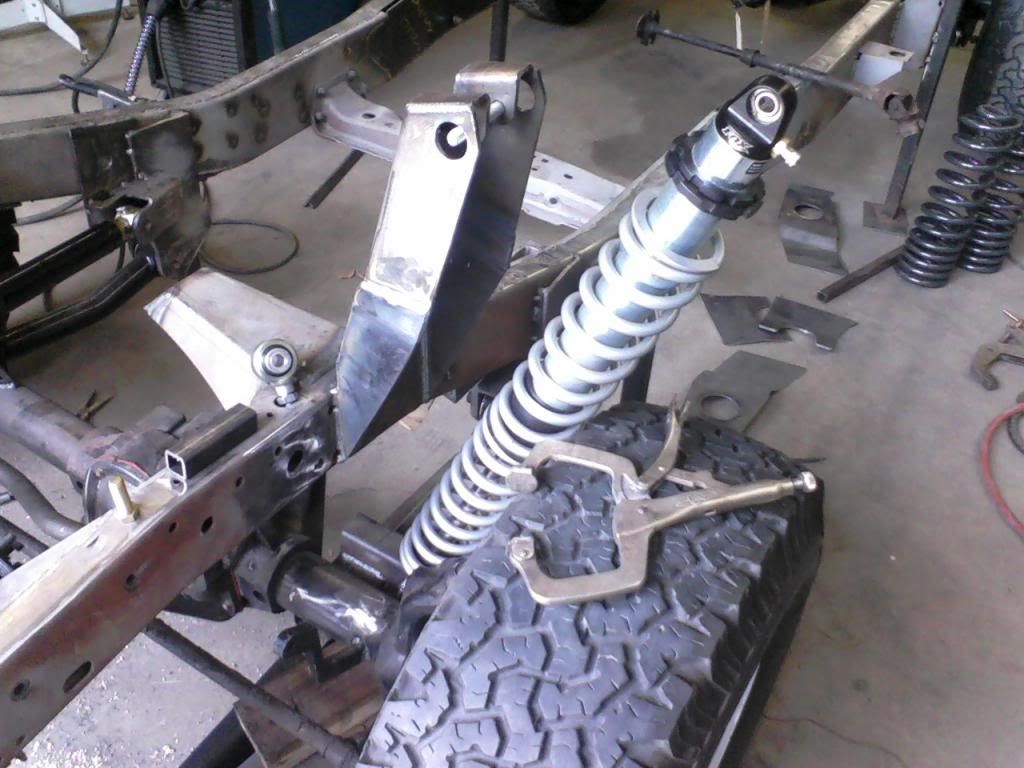
Shock/ coilover towers finalized.
Used a TJ/JK Terraflex front sway bar...it fits, but we had to put the disconnect on the passengerside, so the arms will bend out away from the frame...on TJs the arms bend in toward the frame. the tube will act as a guard for the steeringbox, and maybe a mounting point for a front
skid plate as well
![[/u[URL=http://s1099.photobucket.com/us ... .jpg[/img]](%5B/u%5BURL=http://s1099.photobucket.com/user/CleanCarShop/media/76%20FSJ%20Project/wagoneerwattslinkbellcrank.jpg.html%5D%5Bimg%5Dhttp://i1099.photobucket.com/albums/g396/CleanCarShop/76%20FSJ%20Project/wagoneerwattslinkbellcrank.jpg%5B/img%5D)


Watts link, still in mock up, but pretty much finalized as far as geometry and location. still need to build mounting points on chassis.
Shock/ coilover towers finalized.
Used a TJ/JK Terraflex front sway bar...it fits, but we had to put the disconnect on the passengerside, so the arms will bend out away from the frame...on TJs the arms bend in toward the frame. the tube will act as a guard for the steeringbox, and maybe a mounting point for a front
skid plate as well


-
 TrenchFoot
- Posts: 121
- Joined: Tue Aug 21, 2012 7:17 pm
- Location: Sno Valley, WA
Re: 1976 FSJ Project, 6.2 GM and Coils.
I'm digging that Watt's link. Kit it and you could sell a few.
'78 Waggy: 401/QT pulling the rust down the road. 6.2L +turbo waiting in the wings.
-
Clean Car Shop
Topic author - Posts: 73
- Joined: Wed Apr 17, 2013 11:25 am
Re: 1976 FSJ Project, 6.2 GM and Coils.
Thanks, It took some time to get it to work in that small space. We are hoping for 5 inches of up travel, and 6 inches of droop. So the reason for the s shape of the bell crank is extra length. I have seen so many watts links done so many different ways, but most are not in such a small area and attached to so much travel. Also, the main reason for using a watts link in the first place is to keep the tires 100% inside the wheel wells,( track bars do not) the better handliing is actually secondary, but should be nice!
-
Stuka
- Site Admin
- Posts: 11812
- Joined: Thu May 12, 2011 5:53 pm
- Location: CA
- Contact:
Re: 1976 FSJ Project, 6.2 GM and Coils.
Great work so far. I do think you are asking a lot of those really short TJ arms though. 11" of travel is a lot for them.
Will probably be one of the nicest riding FSJ's out there
Sent from my iPhone using Tapatalk
Will probably be one of the nicest riding FSJ's out there
Sent from my iPhone using Tapatalk
2017 JKU Rubicon
Pevious Jeeps: 1981 J10, 1975 Cherokee, 2008 JK, 2005 KJ, 1989 XJ
Pevious Jeeps: 1981 J10, 1975 Cherokee, 2008 JK, 2005 KJ, 1989 XJ
-
Clean Car Shop
Topic author - Posts: 73
- Joined: Wed Apr 17, 2013 11:25 am
Re: 1976 FSJ Project, 6.2 GM and Coils.
I agree that 11" is a lot for the tj arms and as it turns out, we ar slowly losing most of our planned up travel due to things getting in the way. but I think the droop will still be in the 6 inch range. They main goal of the project is to keep a near stock appearance and acheive a 50/50 mix of SUV on road and Jeep off road capability. I considered using long arms, however I felt that they would be very visible, and therefore, would be taking away from the near stock apperance theme. I am also using Metal Cloak six-pak shocks for the same reason. They allow us to have a lot of travel without having to modify the rear frame or inner wells. in fact they are being mounted in the stock location, just outboard. My idea is that this rig should be able to tow a trail Jeep to an event, and then follow that trail Jeep as far as possible.
-
Stuka
- Site Admin
- Posts: 11812
- Joined: Thu May 12, 2011 5:53 pm
- Location: CA
- Contact:
Re: 1976 FSJ Project, 6.2 GM and Coils.
I really like the idea of the project. Keep up the good work.
2017 JKU Rubicon
Pevious Jeeps: 1981 J10, 1975 Cherokee, 2008 JK, 2005 KJ, 1989 XJ
Pevious Jeeps: 1981 J10, 1975 Cherokee, 2008 JK, 2005 KJ, 1989 XJ
-
Clean Car Shop
Topic author - Posts: 73
- Joined: Wed Apr 17, 2013 11:25 am
Re: 1976 FSJ Project, 6.2 GM and Coils.
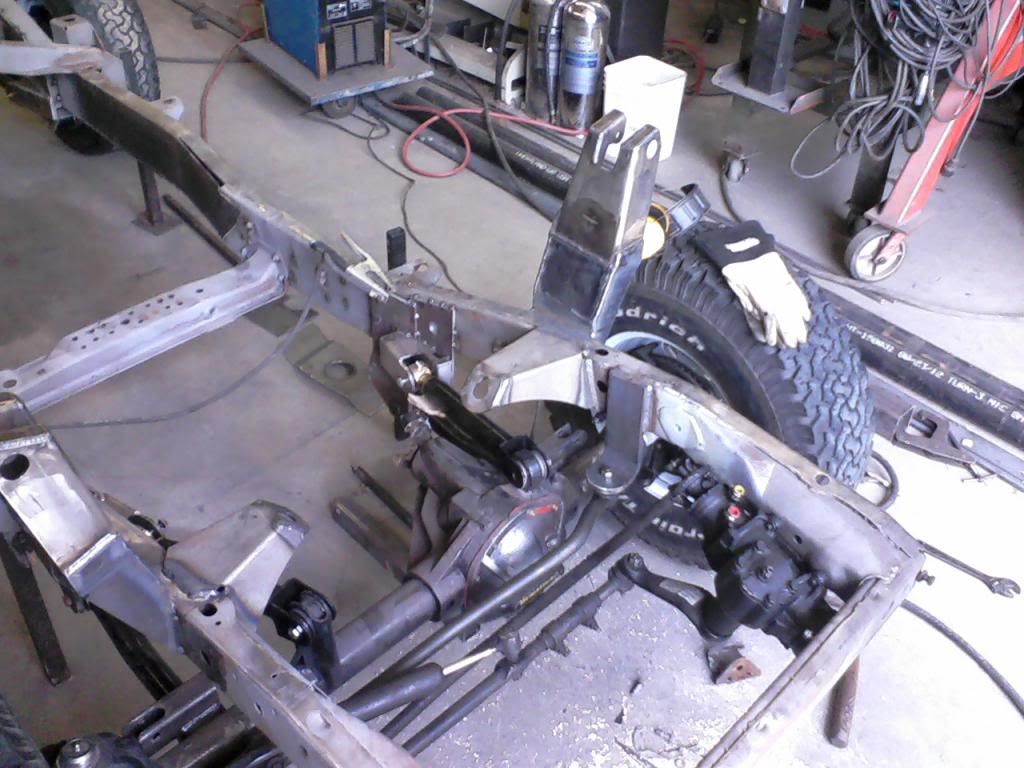
 this should be our front articulation, the front clip is in another building so we have to guess on fender clearance for now...but Im pretty happy. about 5" of up travel, 6 " of droop. the front drive shaft touches the exhaust cross over, and the driver side upper control arm mount touches the oil pan at about 4.5 inches up travel. the passenger side is clear all the way up. I didnt take a pic of the rear but we had about the same results back there. the exhaust gets in the way about the time the mounts are maxed out.
Finishing up the watts link and mounting the fuel tank are projects for the morning...will post more pics after work tuesday.
-
TrenchFoot
- Posts: 121
- Joined: Tue Aug 21, 2012 7:17 pm
- Location: Sno Valley, WA
Re: 1976 FSJ Project, 6.2 GM and Coils.
That's an impressive amount of articulation on a boxed frame. I'm pretty sure my stock frame and leafs would provide that much articulation if I took the body off!
'78 Waggy: 401/QT pulling the rust down the road. 6.2L +turbo waiting in the wings.
-
Clean Car Shop
Topic author - Posts: 73
- Joined: Wed Apr 17, 2013 11:25 am
Re: 1976 FSJ Project, 6.2 GM and Coils.


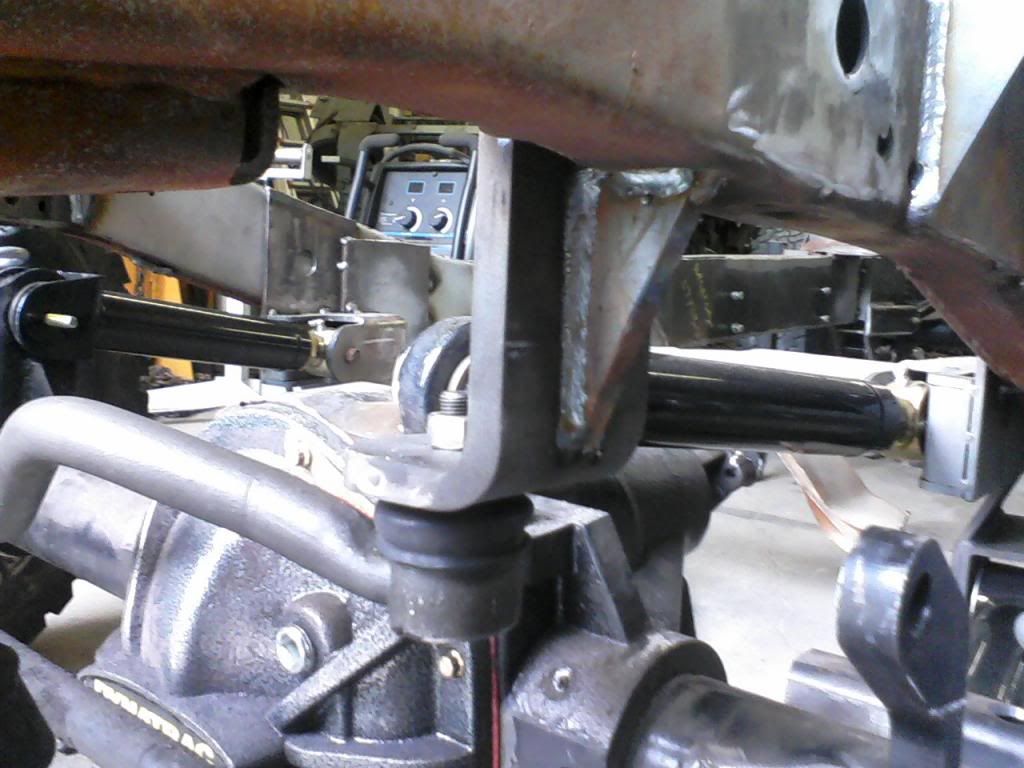
Got more done today than this...but did'nt have time to take pics. the watts link mounts are intergraded into the coils spring bucket gussets. the rear crossmember was moved forward about it's width to be closer to all the action. passenger side gusset/mount will have exhaust running through it. Really no way around it. some of the limitations of the overall design theme are holding us back, but in the end the total package should appear very close to stock, until you look underneath, or under the hood.
Last edited by Clean Car Shop on Thu Jun 27, 2013 8:53 pm, edited 1 time in total.
-
06_footy
- Posts: 18
- Joined: Fri Jun 07, 2013 8:01 pm
Re: 1976 FSJ Project, 6.2 GM and Coils.
I'm digging this. Subscribed.
1977 Jeep J10
AMC 360, Quadratrac, Long tubes w/ cat's deleted, True dual exhaust
AMC 360, Quadratrac, Long tubes w/ cat's deleted, True dual exhaust
-
surfwagoneer
- Posts: 579
- Joined: Fri Oct 05, 2012 6:09 am
- Location: Wilmington, NC
Re: 1976 FSJ Project, 6.2 GM and Coils.
awesome build. keep up the good work!
89 GW- Rebuilt 360 w RV camshaft, 4 inch Rustys spring lift, 1" body lift, dana 44HD front, 14 bolt rear 3.73's.
78 Cherokee Chief- work in progress
78 Cherokee Chief- work in progress
-
Clean Car Shop
Topic author - Posts: 73
- Joined: Wed Apr 17, 2013 11:25 am
Re: 1976 FSJ Project, 6.2 GM and Coils.


sorry the pictures are not so good, basically trying to tie it all together, the cross member was moved forward and incorporates the new coil buckets, and the watts link mounts. the control arm brackets are getting boxed in and finish welded...some welds will be ground smooth to make the brackets look like one peice..others where they attach to the frame, will be left as are.