3M 77 or better should hold it forever. 3M 88 is higher strength, etc.Florida83FSJCherokee wrote:whsii wrote:Roof condensation:
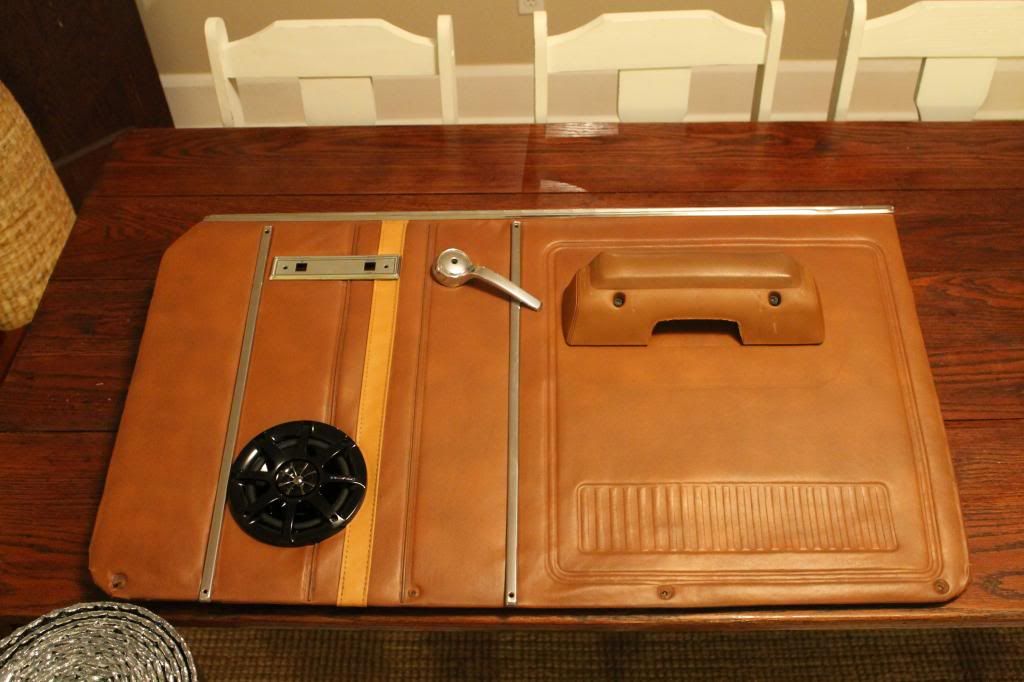
Consider insulating the roof panel. Yes there is dura mat, and this mat and that mat. but I felt temp was more important than sound deadening. I used a plastic bubble insulation with a foil backing that is used in pre engineered metal buildings. It has an un godly r rating, 20 plus with it only being 5/16" thick. The bubbles connect so you cannot pop them, press on one section and the others take the extra air.
You can look at it at Lowes, 3' wide by 25 ft long roll.
Sitting in a ten degree outside air, you will not get condensation, when the cab warms up, then you will get condensation. If you have insulation on the roof to keep the warm air inside the cab from contacting the cold metal, you should not get condensation.
Just a thought.
cool, I used that stuff behind my door panels and was thincking the same thing as far as using it on the roof... The eastwood stuff claims its not rated for the roof...dyanmatt claims theirs is rated for the heat level, but both claim alot of money for there stuff...
What adhesive did you use to apply the space foil"?
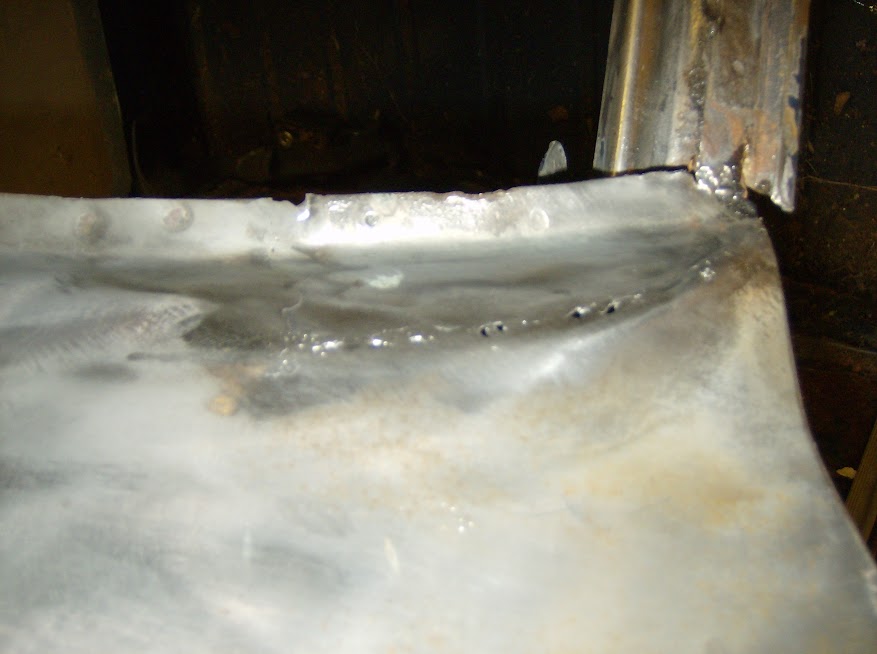
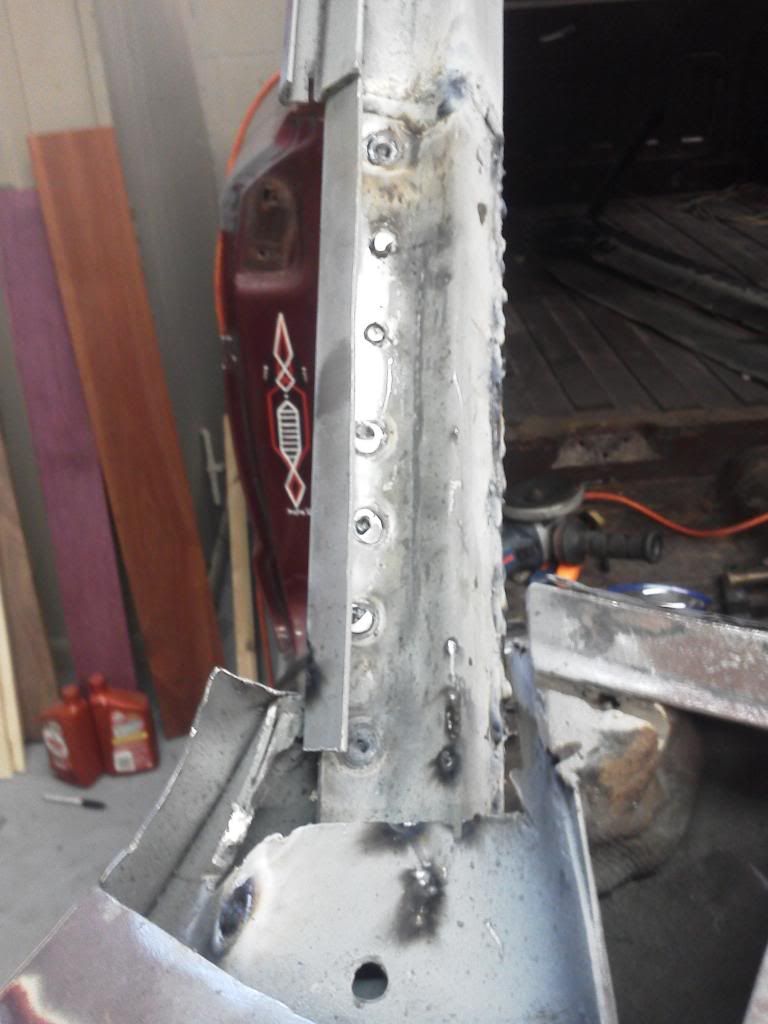
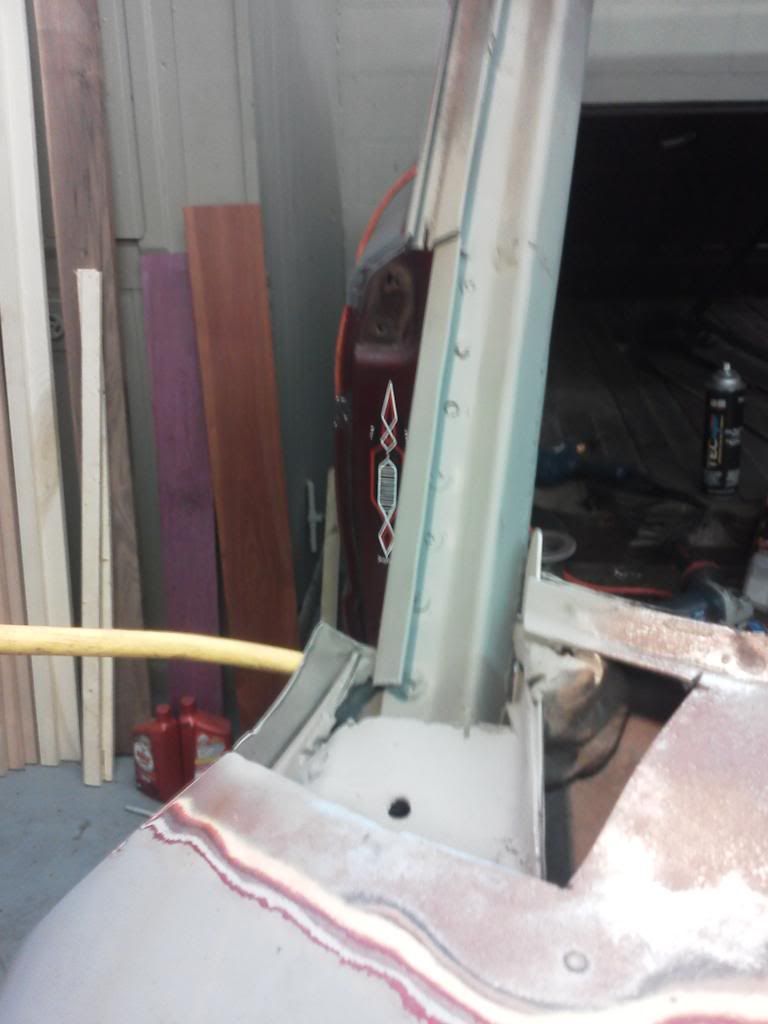
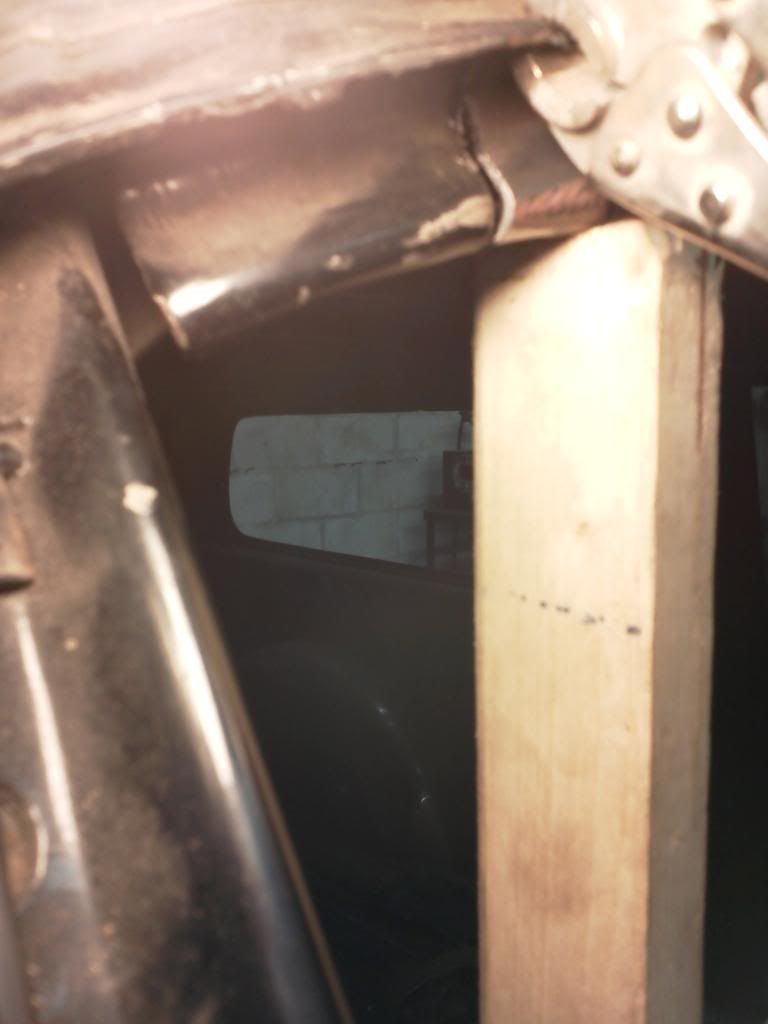
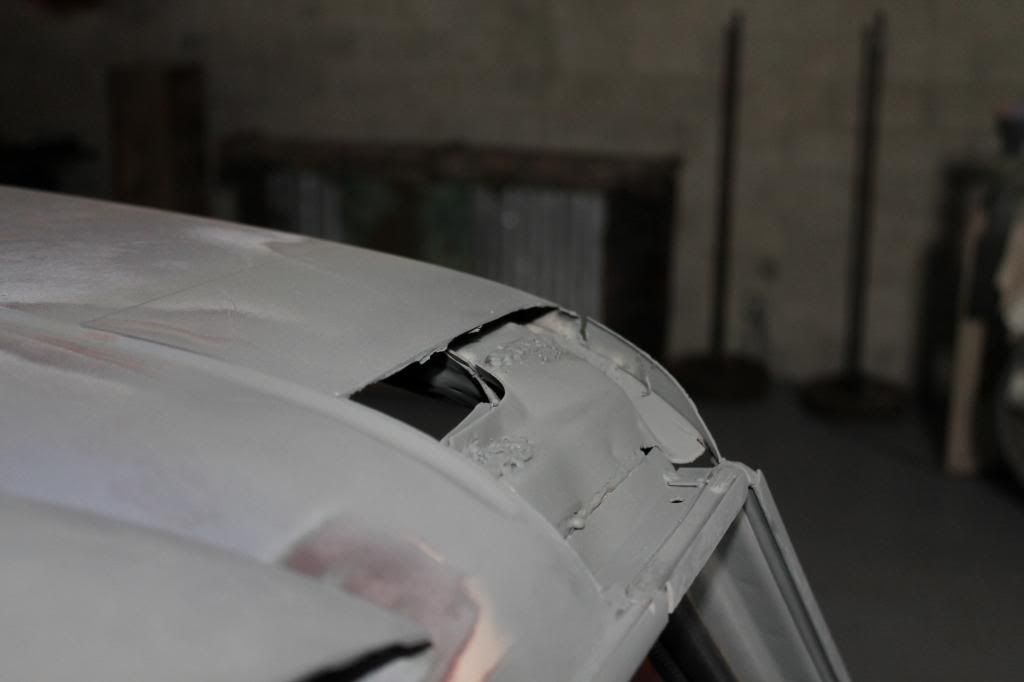
I took a better picture of the upper seem for you today, hopefully yours looks aliitle more intact than this one.
Thanks
JP
83 Cherokee education through restoration
-
 whsii
whsii
- Posts: 354
- Joined: Thu Sep 15, 2011 4:01 pm
- Location: Frankfort, KY
Re: 83 Cherokee education through restoration

Dad's J10
https://picasaweb.google.com/BBQ.WartHog/JeepJ10Honcho
Herbina
https://plus.google.com/photos/11307276 ... ZrslNCo3gE
Member FSJ Prissy Restoration Association
https://picasaweb.google.com/BBQ.WartHog/JeepJ10Honcho
Herbina
https://plus.google.com/photos/11307276 ... ZrslNCo3gE
Member FSJ Prissy Restoration Association
-
whsii
- Posts: 354
- Joined: Thu Sep 15, 2011 4:01 pm
- Location: Frankfort, KY
Re: 83 Cherokee education through restoration
Sorry this is probably too late. Hope this is the detail you needed.
Dad's J10
https://picasaweb.google.com/BBQ.WartHog/JeepJ10Honcho
Herbina
https://plus.google.com/photos/11307276 ... ZrslNCo3gE
Member FSJ Prissy Restoration Association
https://picasaweb.google.com/BBQ.WartHog/JeepJ10Honcho
Herbina
https://plus.google.com/photos/11307276 ... ZrslNCo3gE
Member FSJ Prissy Restoration Association
-
 Florida83FSJCherokee
Topic author - Posts: 196
- Joined: Sat Mar 09, 2013 7:53 pm
- Location: Lakeland , Central Florida
Re: 83 Cherokee education through restoration
nope, not to late at all...havent done that part yet... any pics that show whats sipposed to be there are helpfull. I think between that pic and the ones Brad sent I should be able to get the shape back into the missing sections...whsii wrote:
Sorry this is probably too late. Hope this is the detail you needed.
Thanks everyone for the compliments.
Working on the passenger side this weekend.
JP
Education through restoration thread link:
http://www.fsjnetwork.com/forum/viewtop ... =12&t=1366
Blacksmithing thread link:
http://www.fsjnetwork.com/forum/viewtop ... f=6&t=1381
http://www.fsjnetwork.com/forum/viewtop ... =12&t=1366
Blacksmithing thread link:
http://www.fsjnetwork.com/forum/viewtop ... f=6&t=1381
-
Florida83FSJCherokee
Topic author - Posts: 196
- Joined: Sat Mar 09, 2013 7:53 pm
- Location: Lakeland , Central Florida
Re: 83 Cherokee education through restoration
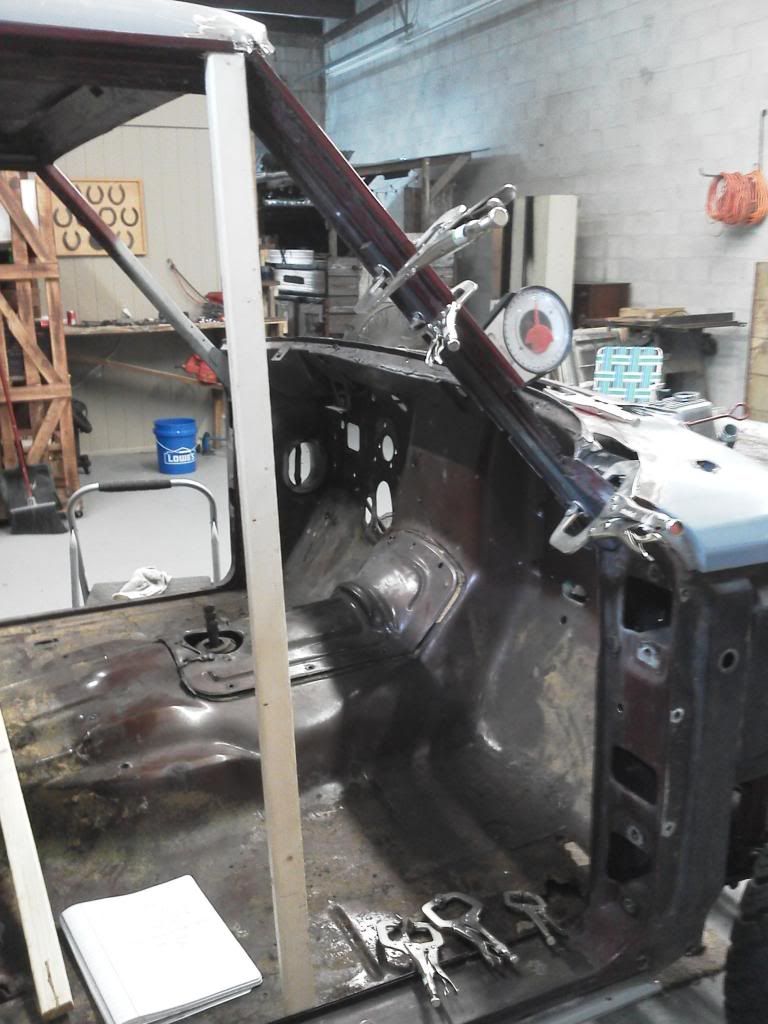
Took a much needed shop day today and got the passenger side a-pillar structural stuff welded up.
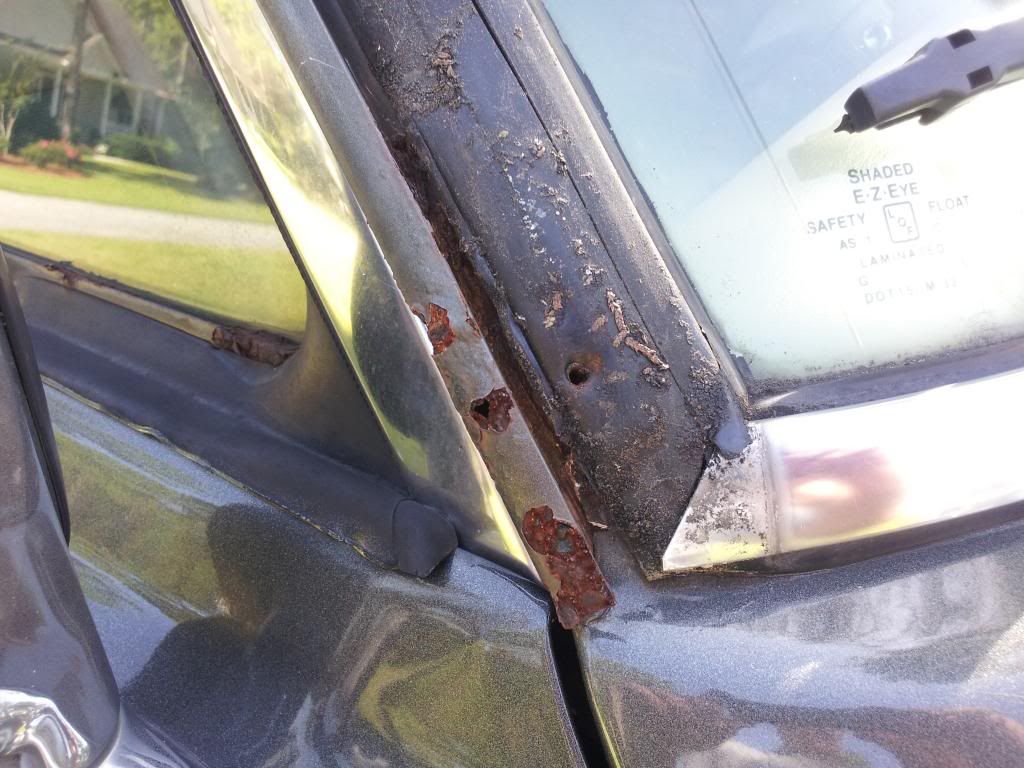
This side was quite a bit worse for wear than the drivers side. Since the drivers side still had a non rusted lower pillar layer I could build the rest of the pillar around it. This helped to keep the alignment exact...which when dealing with the windshield is "kinda" important.
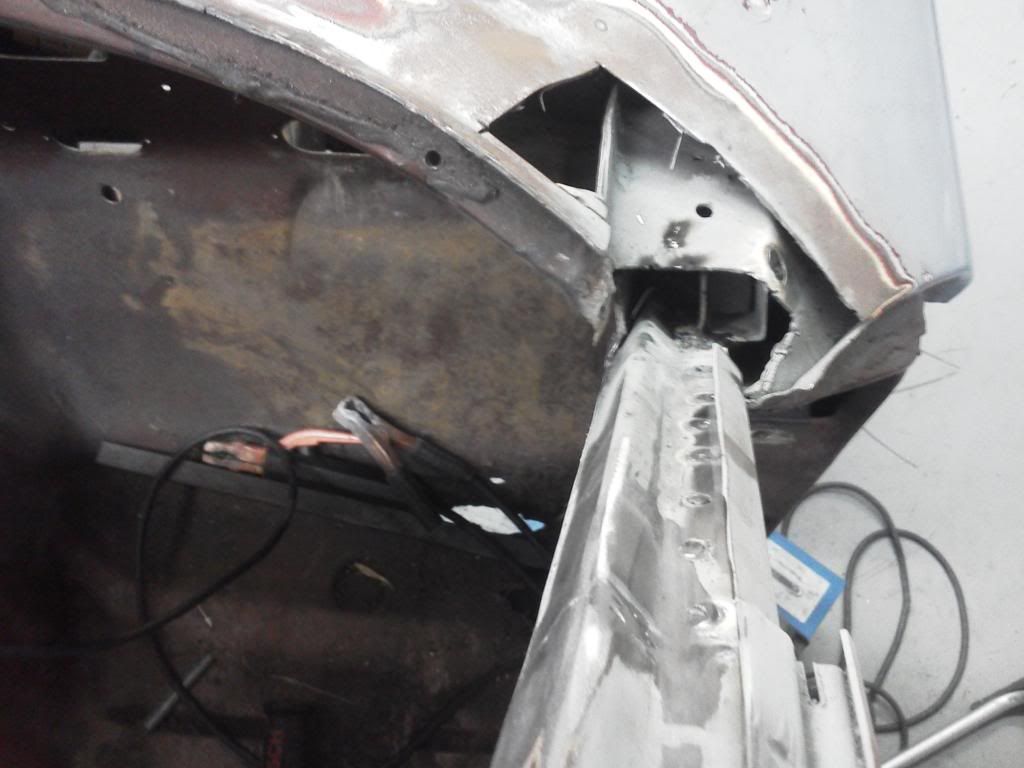
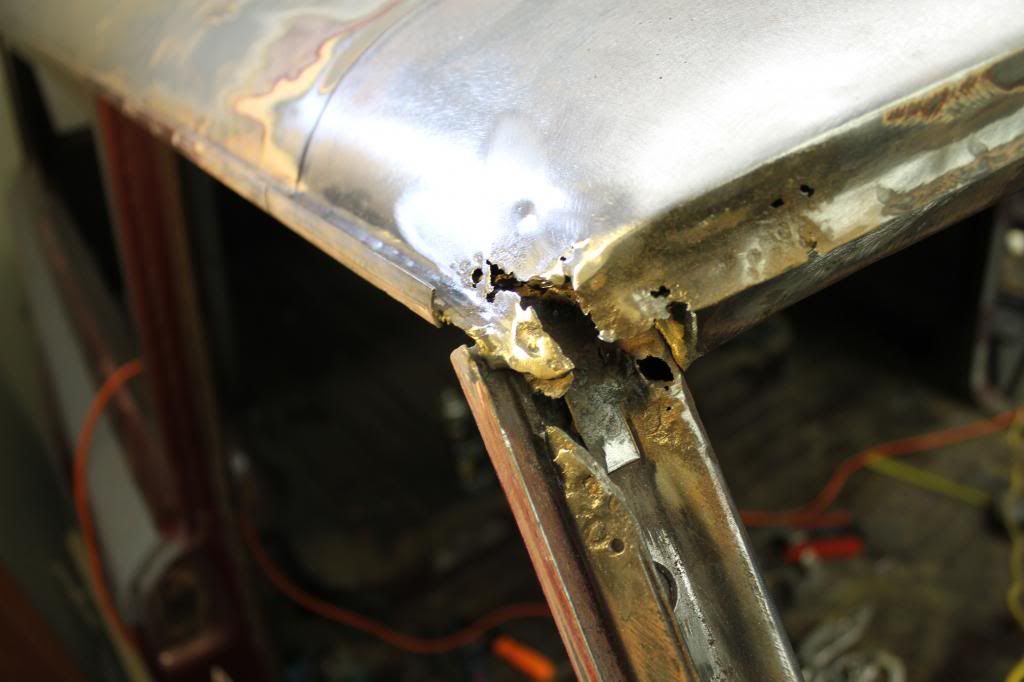
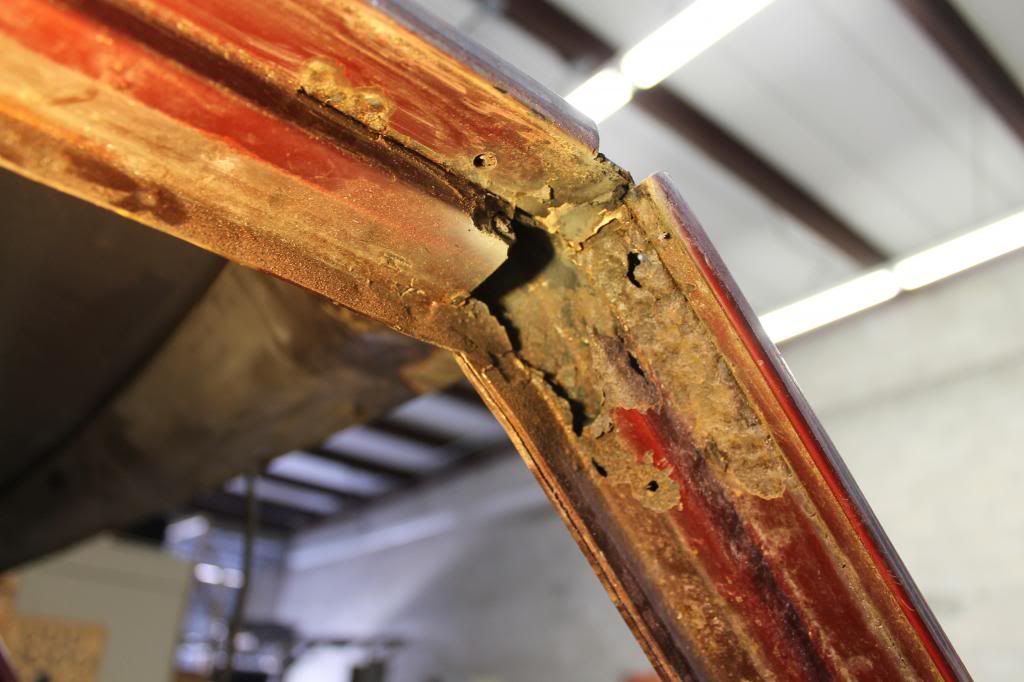
So here are a couple recap photos of the passenger side rust:
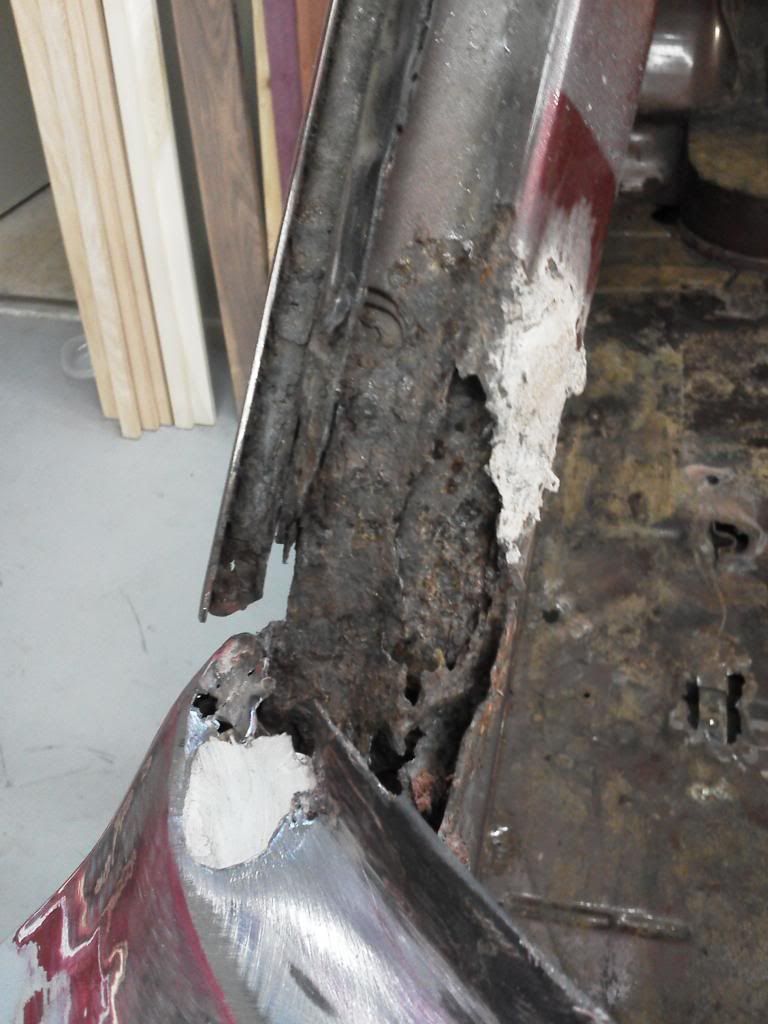
so definitly had some work cut out today...
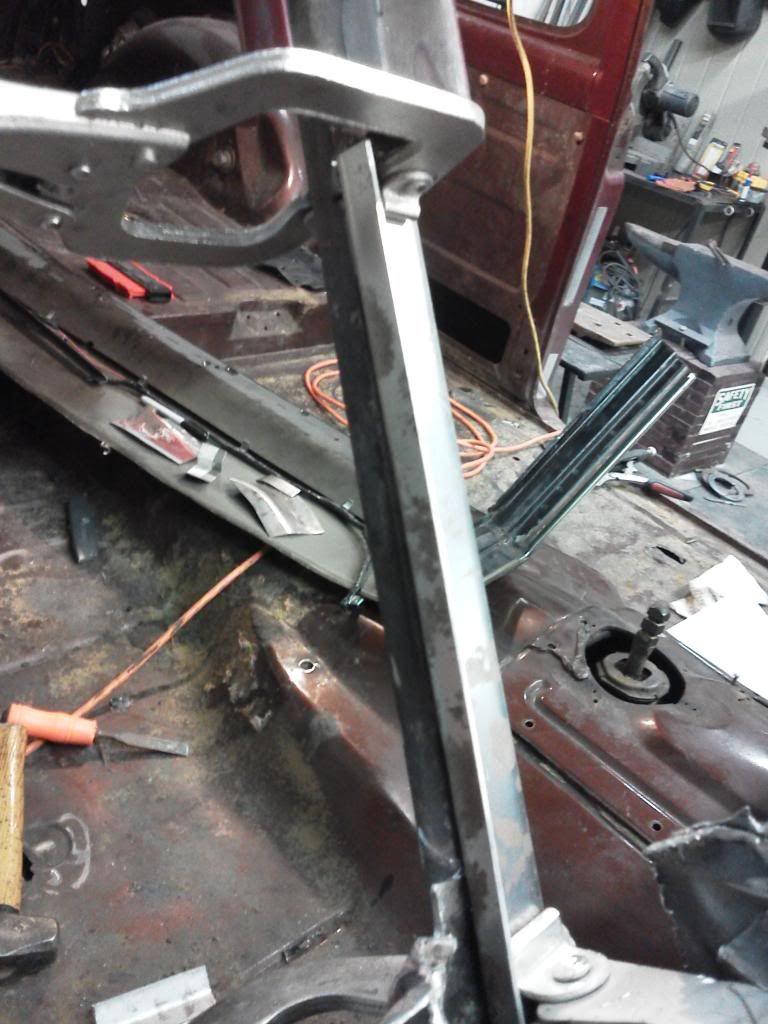
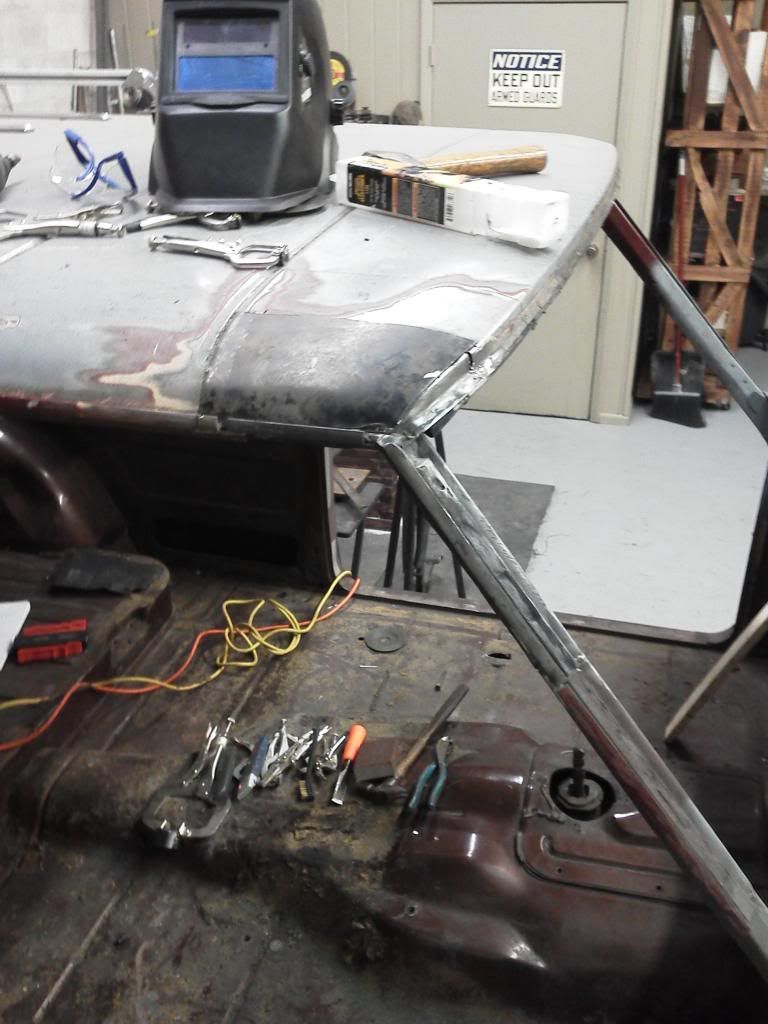
Since all three layers were going to have to be cut out this would completly disconnect the upper and lower corners from each other. I needed away to support the upper pillar once it was severed from the lower and keep the 50deg. angle. It also needed to stay in in place without dropping downward or bucking inward or outward when the tension was released.
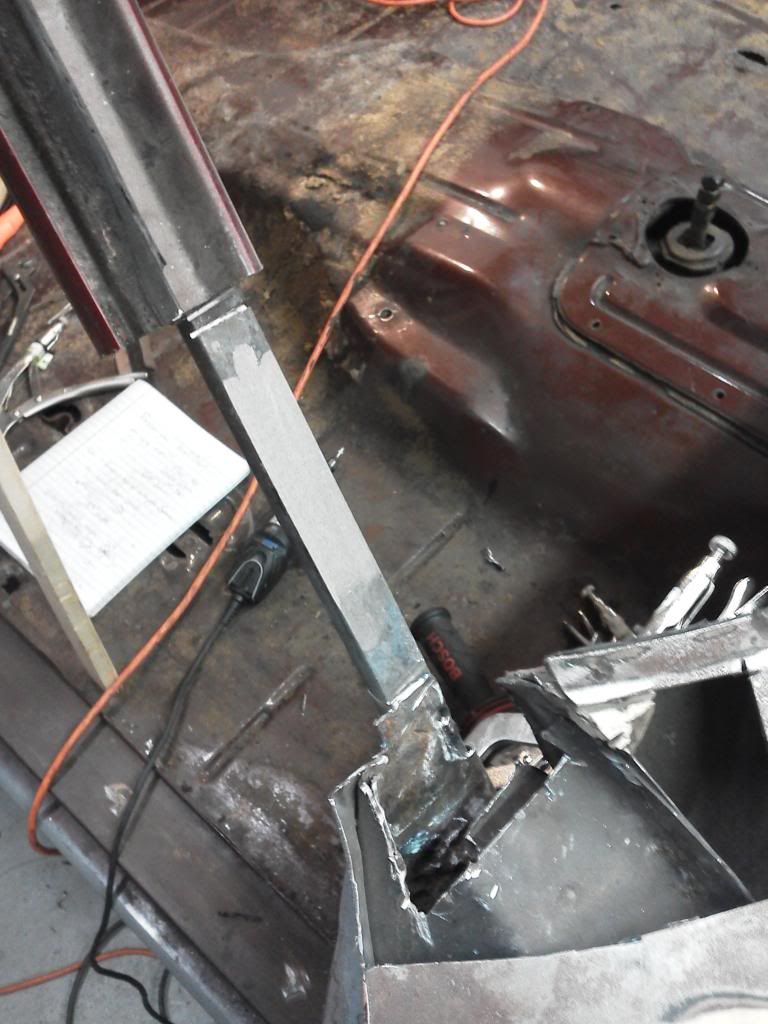
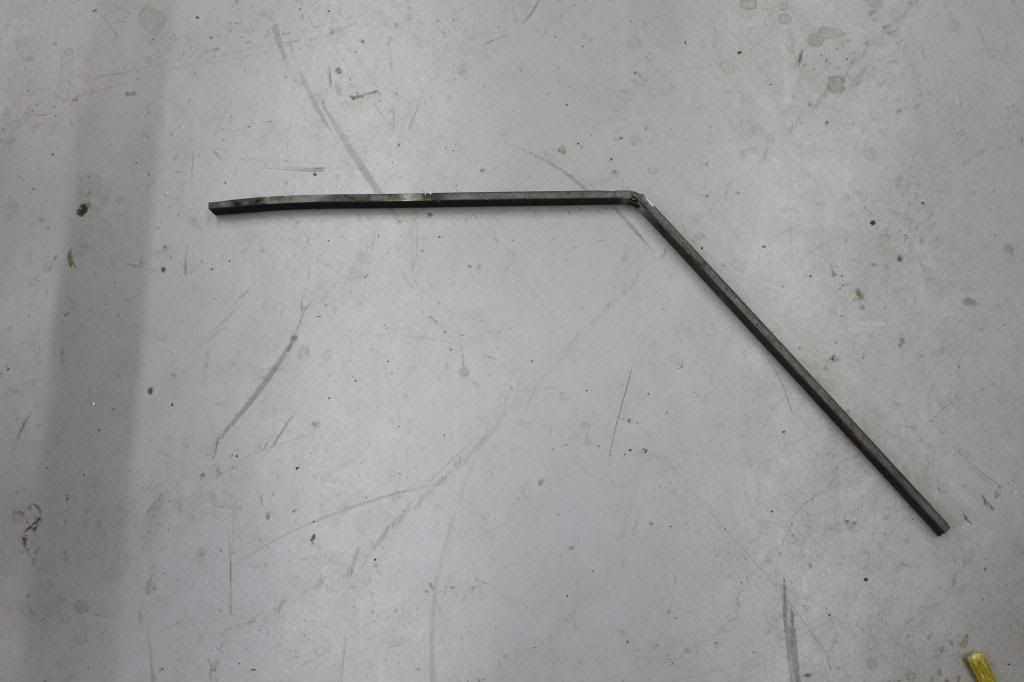
My solution was to take a thick piece of 3/8"x7/8" flat bar stock, and forge the lower section to match the countour and slope of the upper door jamb section. (this is the triangular section just below the A-pillar and above the top hinge mounting acces hole)
Look at your FSJ upper door jamb where it connects to the pillar and you will see the countour Im speaking of. Unfortunatly once you get below the actual pillar connection there is no more flat surface to brace against. This is why the stock had to be shaped before hand.
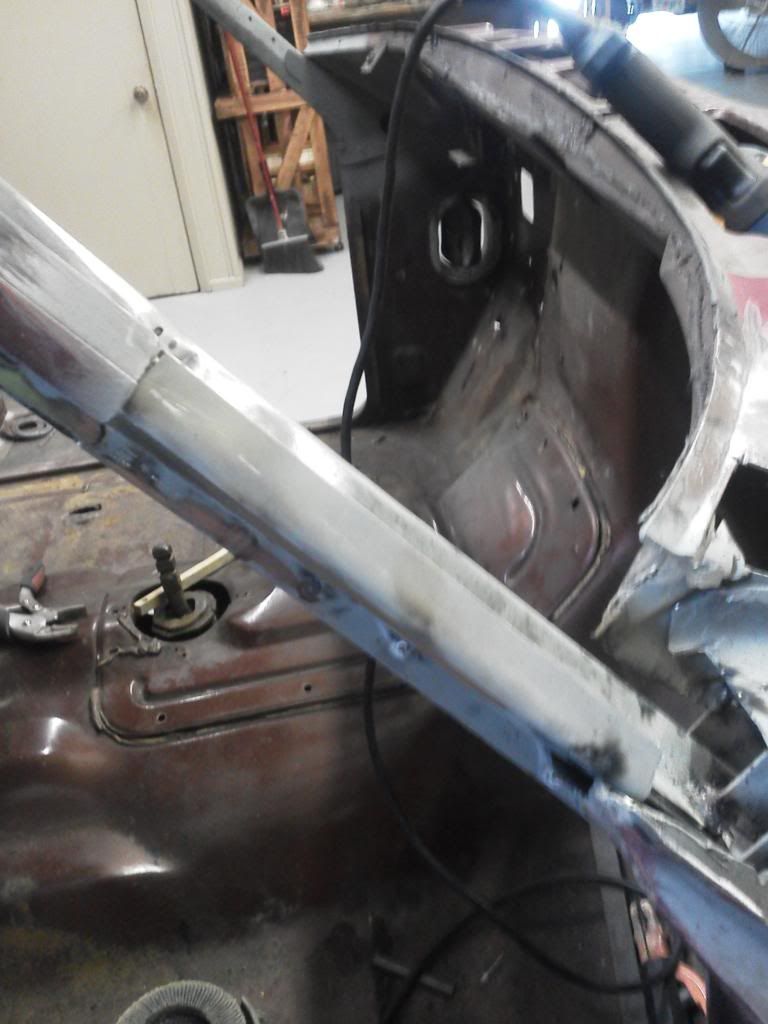
clamped in as tight as I could muster...

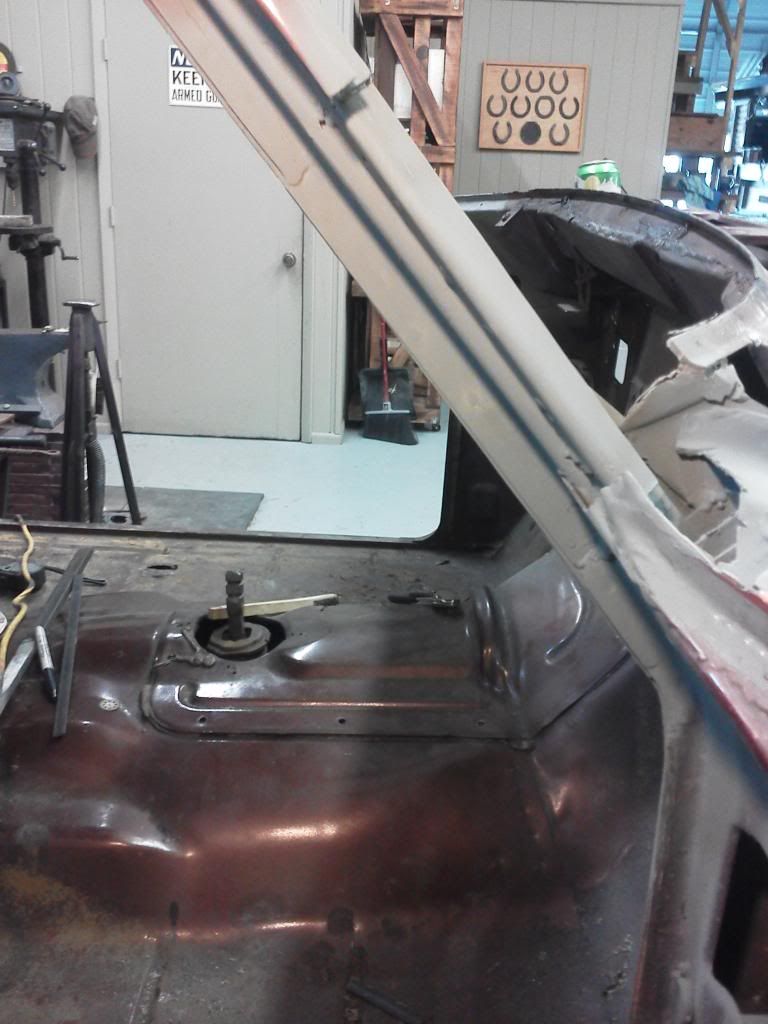
Because I am Me... I find it necessary to have back up plans for stuff even when the main plan is pretty much working exactly like I expected. So I measured and cut these two boards to have a reference for alignment if the bar stock failed and the roof shifted downward. I think if needed it would have been useful but all it did was provide things to bump my head on...
Moment of truth.. The A-pillar is officially disconnected from the lower cowl!!!!!!!!!!!! No going back now, its either get it right or bust...
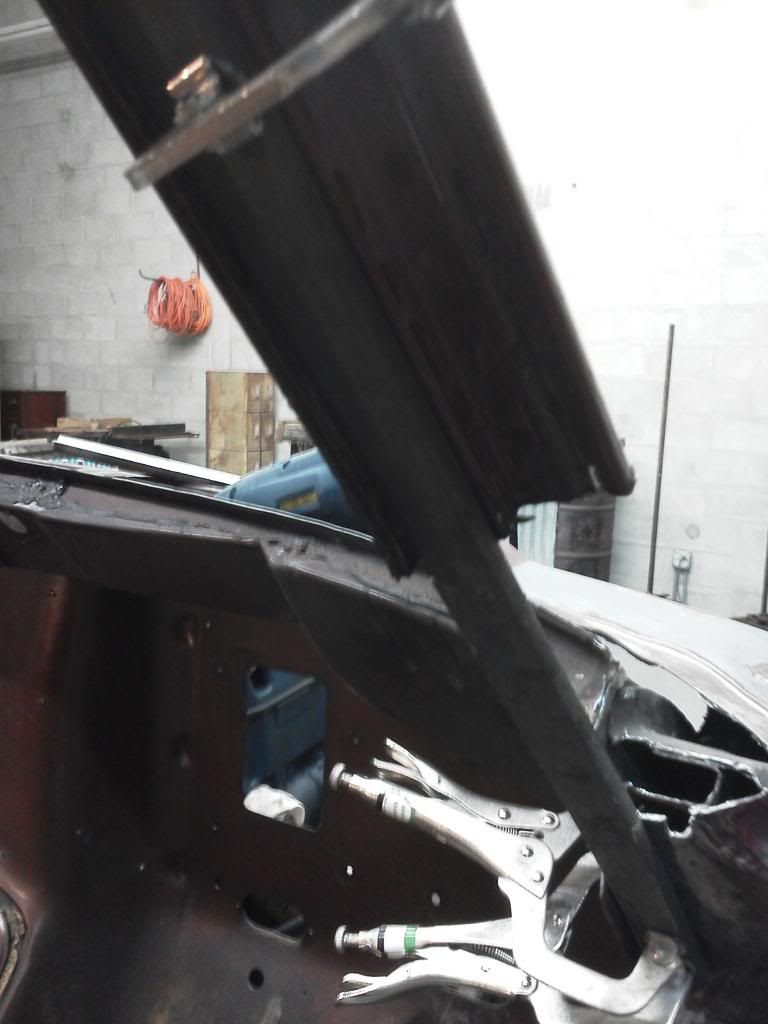
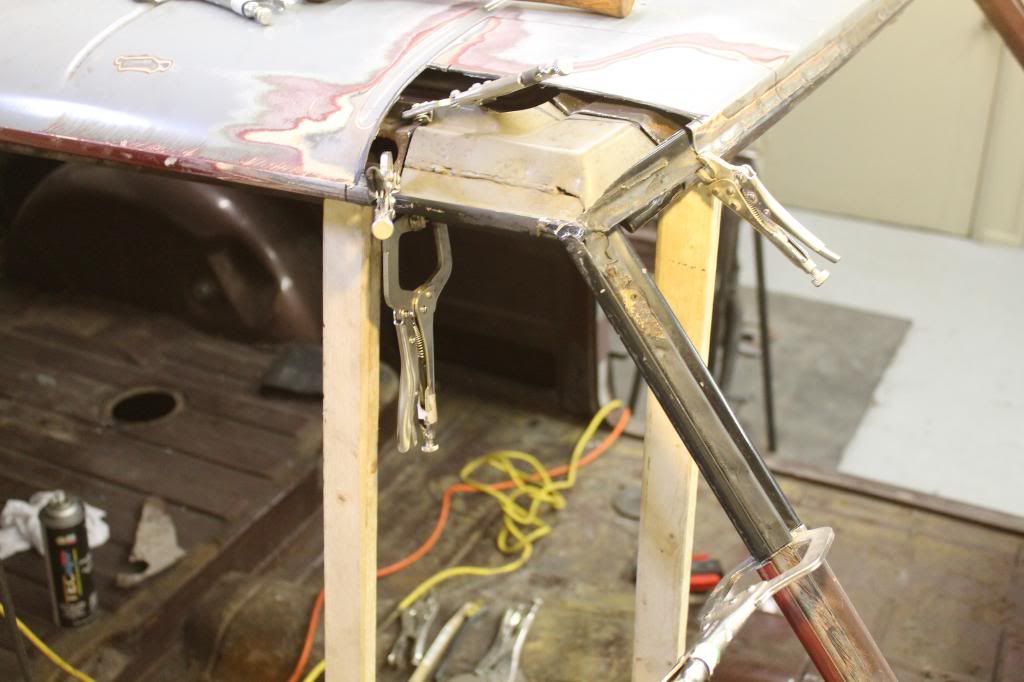
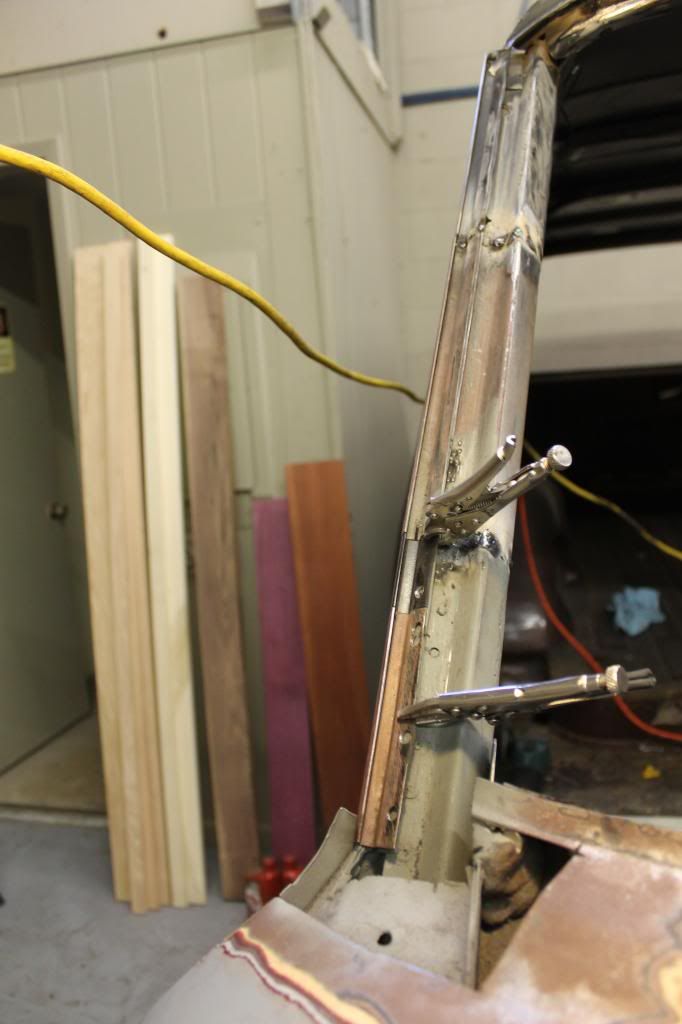
The lower section of the pillar assembly was cut to length and clamped in place. Using the bar stock as the supportive layer to build around...
the lower contact area was drilled for plug welds but the upper junction was unfortunatly limitied to a butt weld...
I got a decent seem and the weld was strong, but I decided to add a small brace inside the lower section since there was no over lap.. Its a small 90deg bend on a flat section of 12guage. It was plug welded on top of the new section (as pictured) and a hole was drilled through the bottom of the original lower section in order to plug weld thru to the inside where it was out of reach :;):
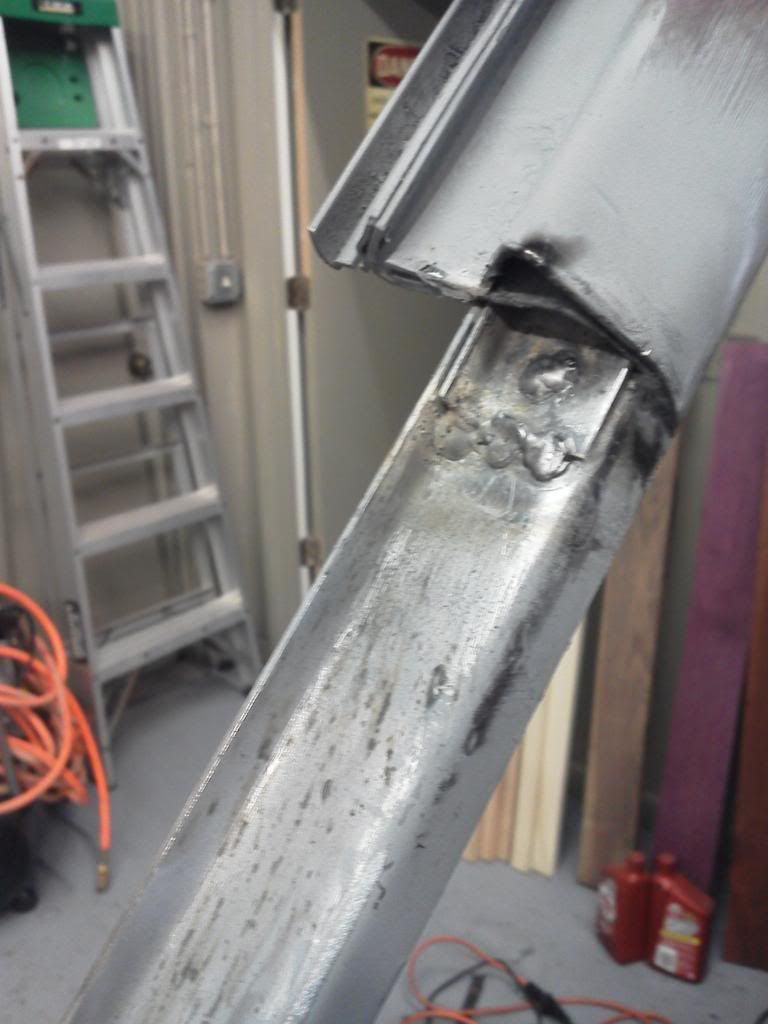
Added the middle and top layer in the same manner as the previous post
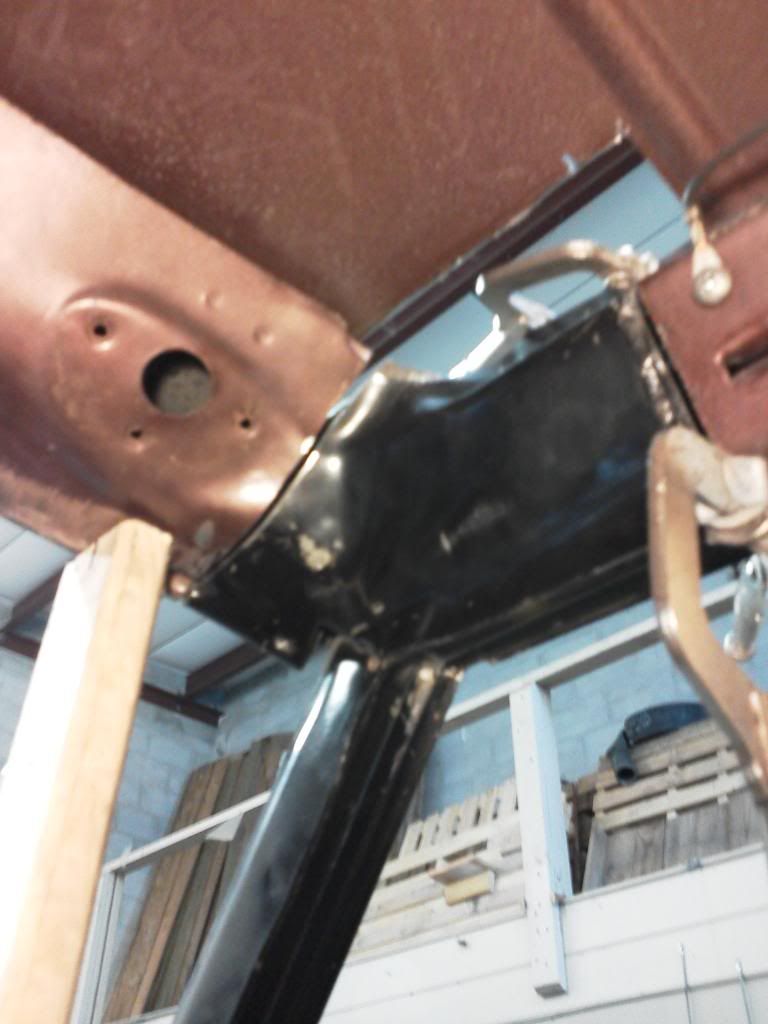
Did some General weld clean up and added the inner gasket rail and inner support bracket.
I still need to finish grinding the inner plug welds flush before the finish filler is applied but Im not doing the finshing work untill all the corners are repaired. Thats gonna be a few weeks still so for today it got primer coated to prevent it from rusting. (in florida right now, the bare sheet metal will literally develope a light rust coat overnight...even inside the shop)
What a relief! I have been dreading this part of the windshield repair... Onward to the Roof corners... ::):
Thanks
JP
This side was quite a bit worse for wear than the drivers side. Since the drivers side still had a non rusted lower pillar layer I could build the rest of the pillar around it. This helped to keep the alignment exact...which when dealing with the windshield is "kinda" important.
So here are a couple recap photos of the passenger side rust:


so definitly had some work cut out today...
Since all three layers were going to have to be cut out this would completly disconnect the upper and lower corners from each other. I needed away to support the upper pillar once it was severed from the lower and keep the 50deg. angle. It also needed to stay in in place without dropping downward or bucking inward or outward when the tension was released.
My solution was to take a thick piece of 3/8"x7/8" flat bar stock, and forge the lower section to match the countour and slope of the upper door jamb section. (this is the triangular section just below the A-pillar and above the top hinge mounting acces hole)
Look at your FSJ upper door jamb where it connects to the pillar and you will see the countour Im speaking of. Unfortunatly once you get below the actual pillar connection there is no more flat surface to brace against. This is why the stock had to be shaped before hand.
clamped in as tight as I could muster...

Because I am Me... I find it necessary to have back up plans for stuff even when the main plan is pretty much working exactly like I expected. So I measured and cut these two boards to have a reference for alignment if the bar stock failed and the roof shifted downward. I think if needed it would have been useful but all it did was provide things to bump my head on...

Moment of truth.. The A-pillar is officially disconnected from the lower cowl!!!!!!!!!!!! No going back now, its either get it right or bust...


The lower section of the pillar assembly was cut to length and clamped in place. Using the bar stock as the supportive layer to build around...


the lower contact area was drilled for plug welds but the upper junction was unfortunatly limitied to a butt weld...

I got a decent seem and the weld was strong, but I decided to add a small brace inside the lower section since there was no over lap.. Its a small 90deg bend on a flat section of 12guage. It was plug welded on top of the new section (as pictured) and a hole was drilled through the bottom of the original lower section in order to plug weld thru to the inside where it was out of reach :;):

Added the middle and top layer in the same manner as the previous post


Did some General weld clean up and added the inner gasket rail and inner support bracket.


I still need to finish grinding the inner plug welds flush before the finish filler is applied but Im not doing the finshing work untill all the corners are repaired. Thats gonna be a few weeks still so for today it got primer coated to prevent it from rusting. (in florida right now, the bare sheet metal will literally develope a light rust coat overnight...even inside the shop)


What a relief! I have been dreading this part of the windshield repair... Onward to the Roof corners... ::):
Thanks
JP
Education through restoration thread link:
http://www.fsjnetwork.com/forum/viewtop ... =12&t=1366
Blacksmithing thread link:
http://www.fsjnetwork.com/forum/viewtop ... f=6&t=1381
http://www.fsjnetwork.com/forum/viewtop ... =12&t=1366
Blacksmithing thread link:
http://www.fsjnetwork.com/forum/viewtop ... f=6&t=1381
-
Florida83FSJCherokee
Topic author - Posts: 196
- Joined: Sat Mar 09, 2013 7:53 pm
- Location: Lakeland , Central Florida
Re: 83 Cherokee education through restoration
One last thought and any advice or opinion is appreciated:
The inner patch panel was added in the same manner as the previous post and the entire inner area got blasted with high zinc primer before closing it up...Im regreting closing the side panel access at this point. Should I cut it back open and paint a top coat over the primered internals? they are not in contact with mosture openings in that location so will the primer be enough? (its freaking THICK coated Zinc based stuff) . I can still spray it with top coat through the upper cut away but I wont be able to get the bottom rear of the pillar butt or support brace... Hummm...
Thanks! tomorrow and sunday I hope to get one of the corners replaced so pray/speak to your respective powers that be, and send me some positve vibes!
have a good one
JP
Education through restoration thread link:
http://www.fsjnetwork.com/forum/viewtop ... =12&t=1366
Blacksmithing thread link:
http://www.fsjnetwork.com/forum/viewtop ... f=6&t=1381
http://www.fsjnetwork.com/forum/viewtop ... =12&t=1366
Blacksmithing thread link:
http://www.fsjnetwork.com/forum/viewtop ... f=6&t=1381
-
Florida83FSJCherokee
Topic author - Posts: 196
- Joined: Sat Mar 09, 2013 7:53 pm
- Location: Lakeland , Central Florida
Re: 83 Cherokee education through restoration
Upper passenger cab corner / windshield frame repair
Well... part of yesterday and today were spent with the repair of the rusted out A-pillar/ windsheld /cab corner. In all this repair took about 10 hours to complete so keep that in mind when working on your DD's.
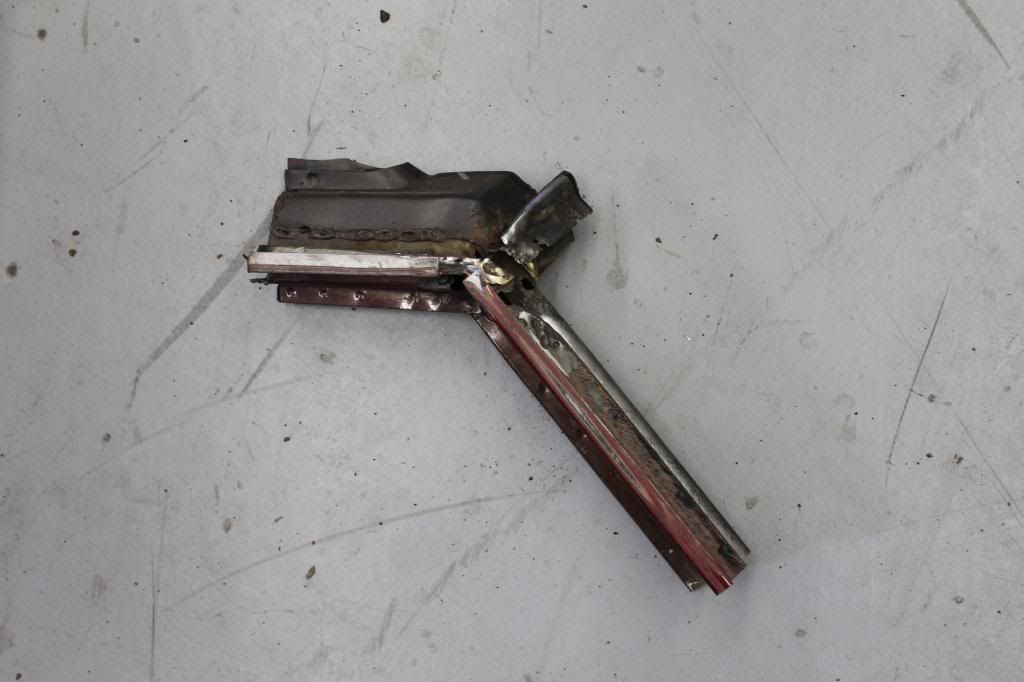
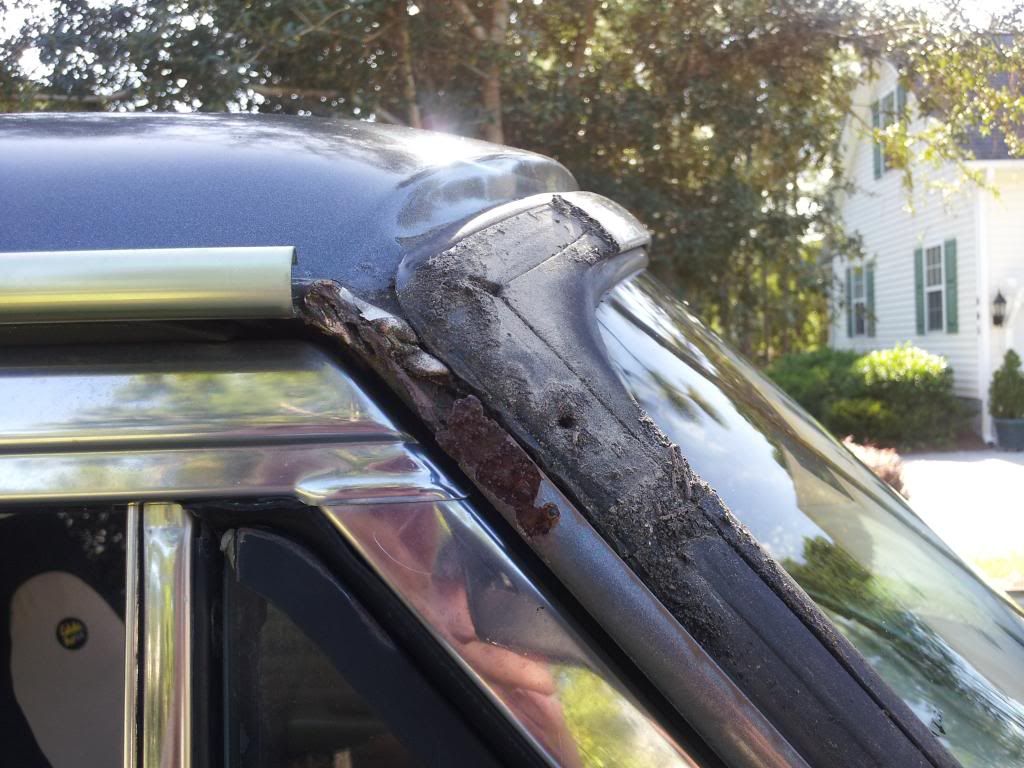
The upper corner was more of the same as far as my rust issues were concerned. All three layers of the pillar were toast and the cab corner also had a hole through it. The windshield gasket frame was weakend and had some breakthoughs from rust. So not to long untill it to would have been consumed.
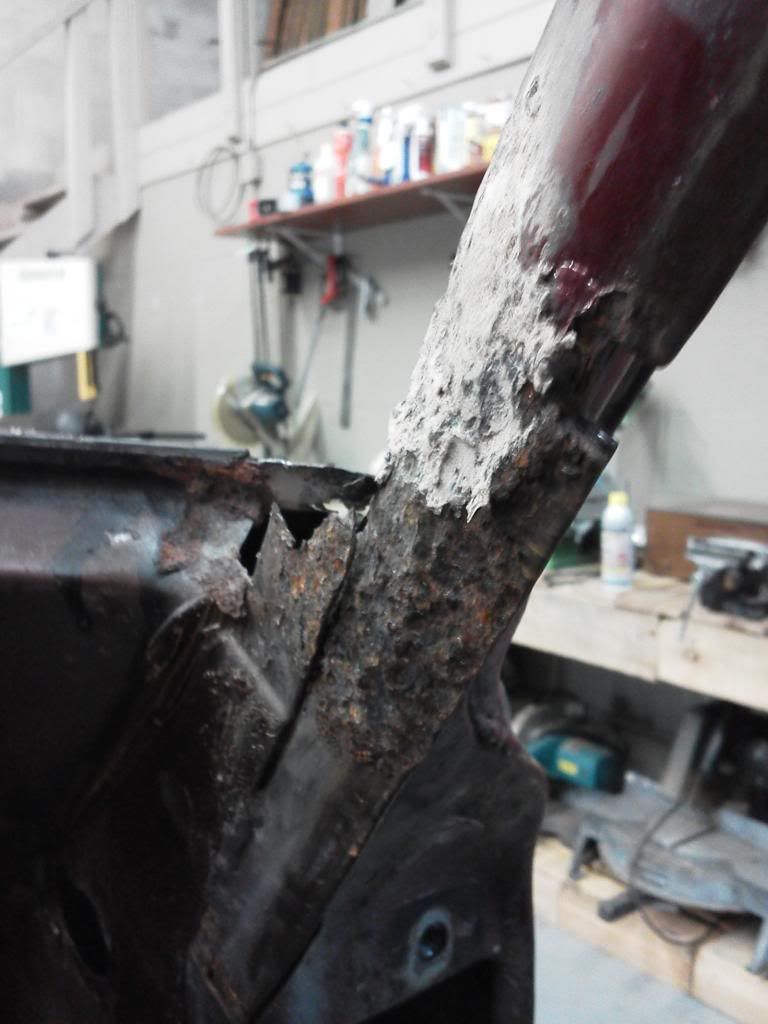
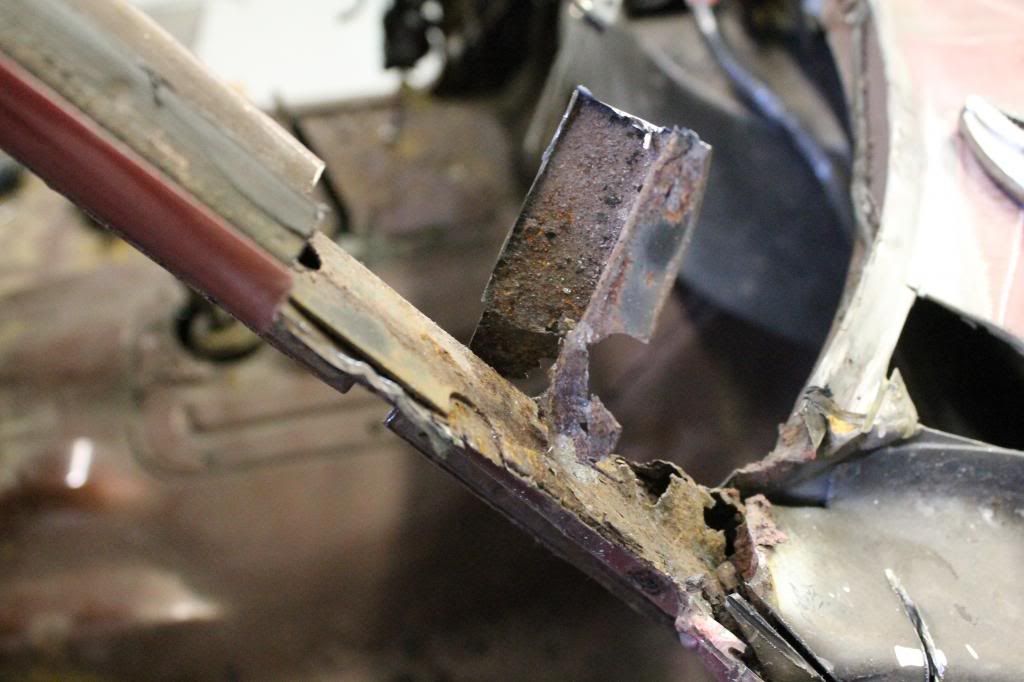
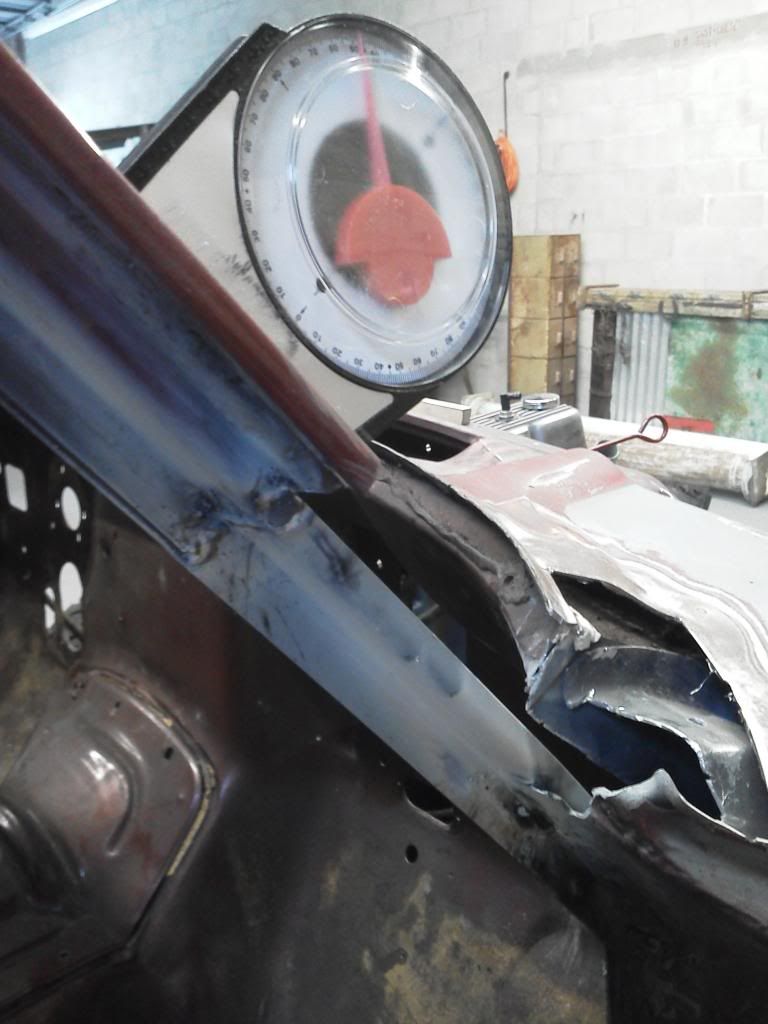
Here are some recaps of the upper corners rust:
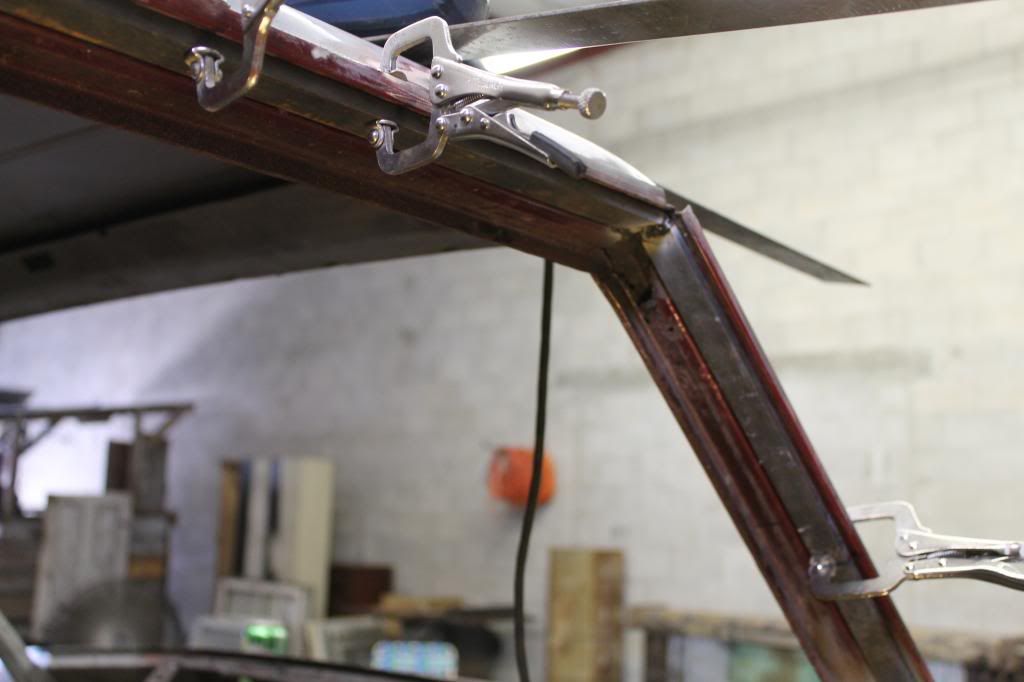
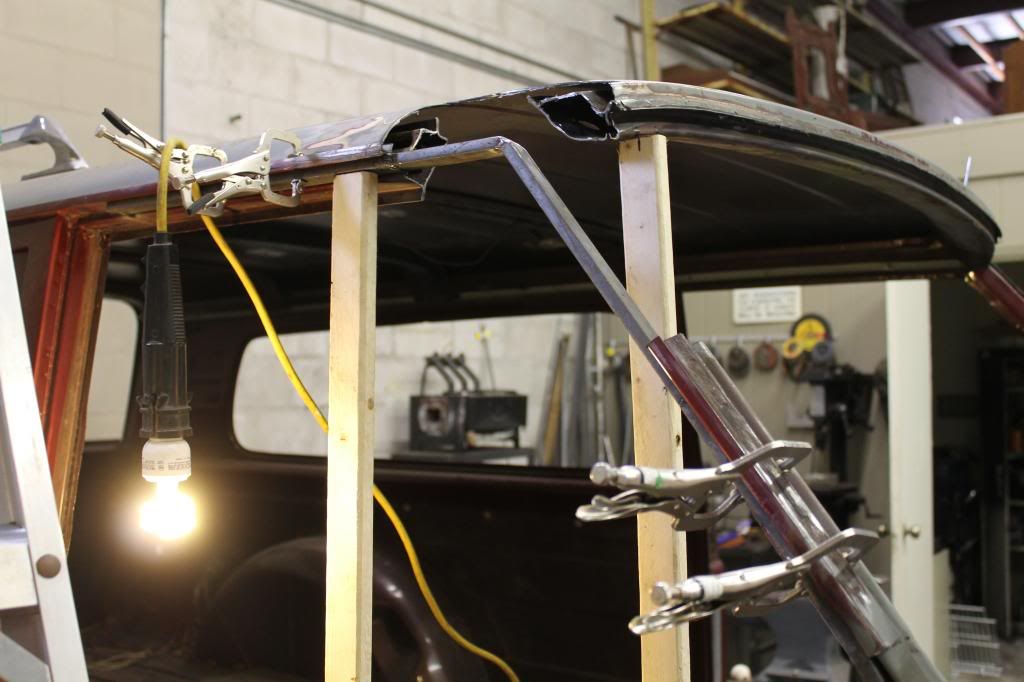
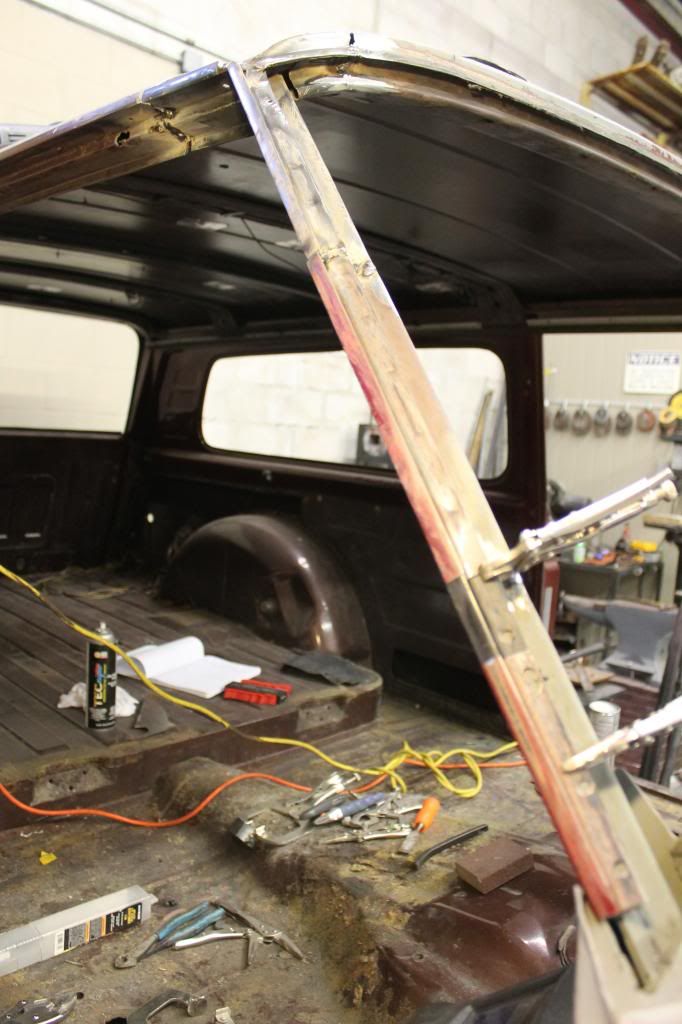
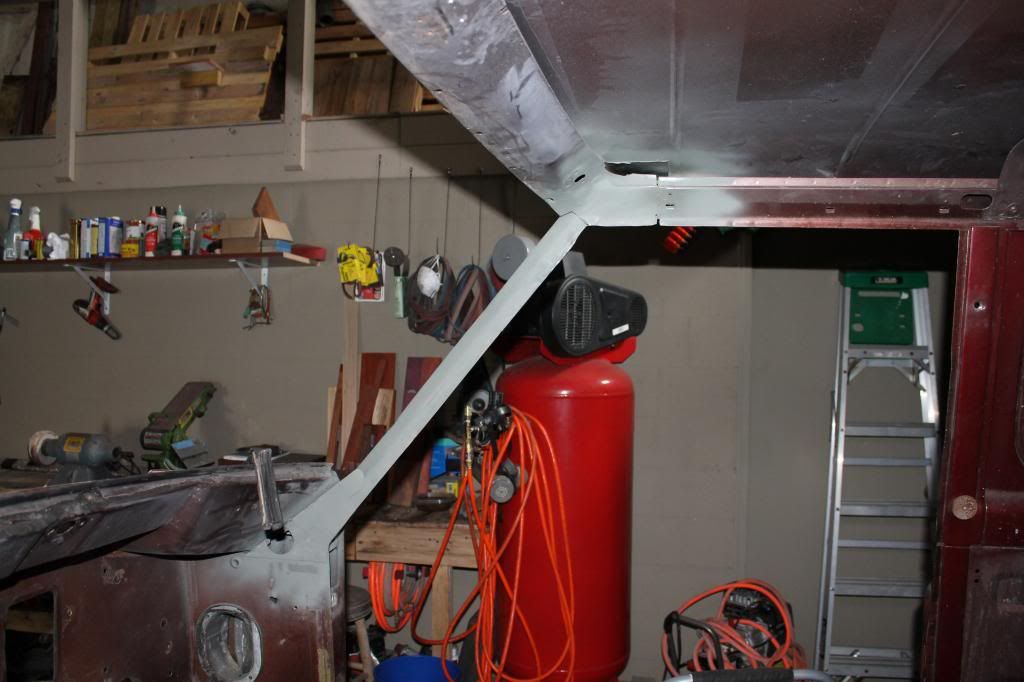
In order to replace this section the main junctions between the three main supports will have to be cut away. This obviously causes the problem of realignment, and since the windshield isnt very forgiving something needed to be done to maintain the current angles and levels. It needed to hold while the old metal was removed and the new replacement was being trimmed to size and welded in place.
To accomplish this a piece of 3/8"x7/8" bar stock was cut and welded in the same angle as the lower door frame. It was then clamped in place below and behind the repair area. With it locked in the upper cab rails and a-pillar measurements should not chage. That leaves the center windshield frame section, and my efforts at forming a brace to support it were wasted by the roundness of the metal brace and the curve of the windshield countour.
So high tech was abandoned for two sticks.
Seriously though, I measured the boards and inserted them into the frame untill the were under pressure and slightly loaded. To ensure this could be reproduced in the case of myself knocking it out on accident during the repair(very possible) I marked the locations of the board on the floor and on the windshield frame. If I was to knock it out aligning the marks should put it back in the same spot.
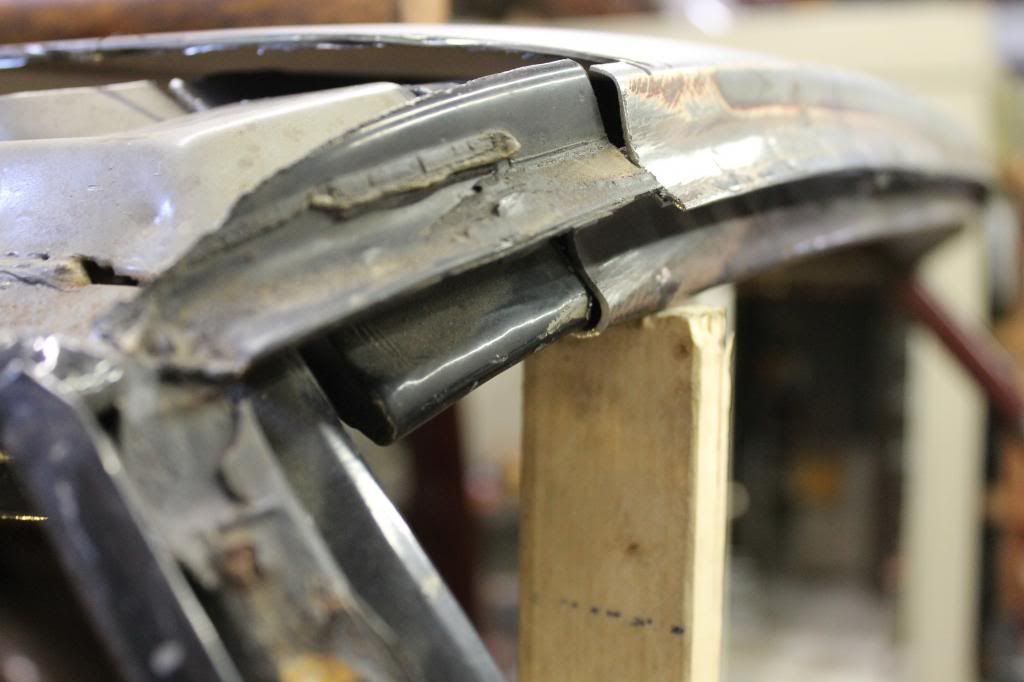
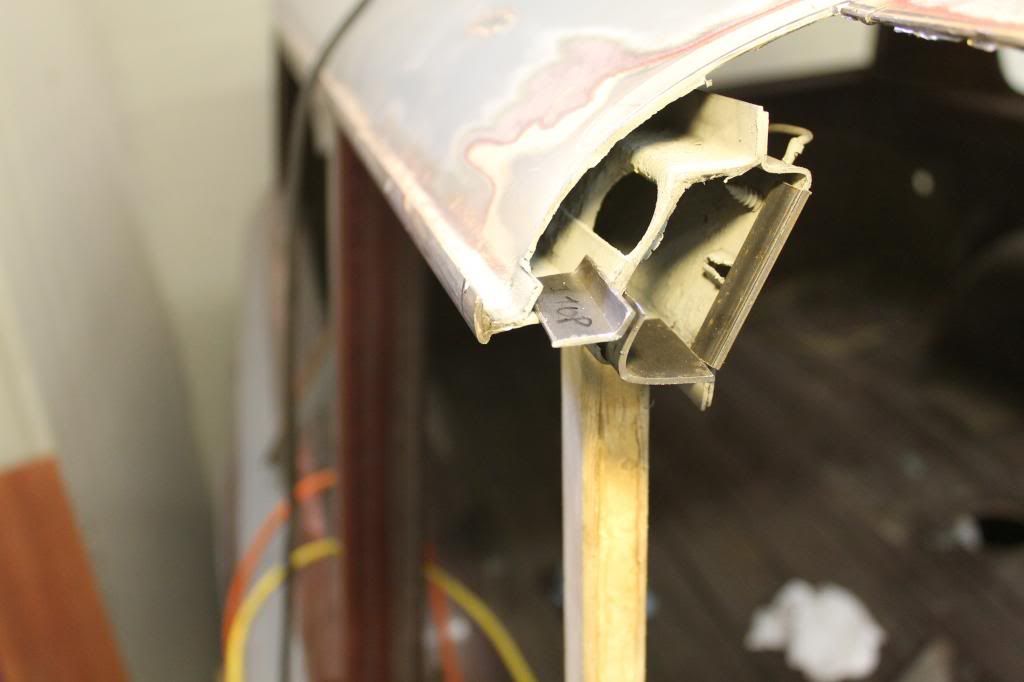
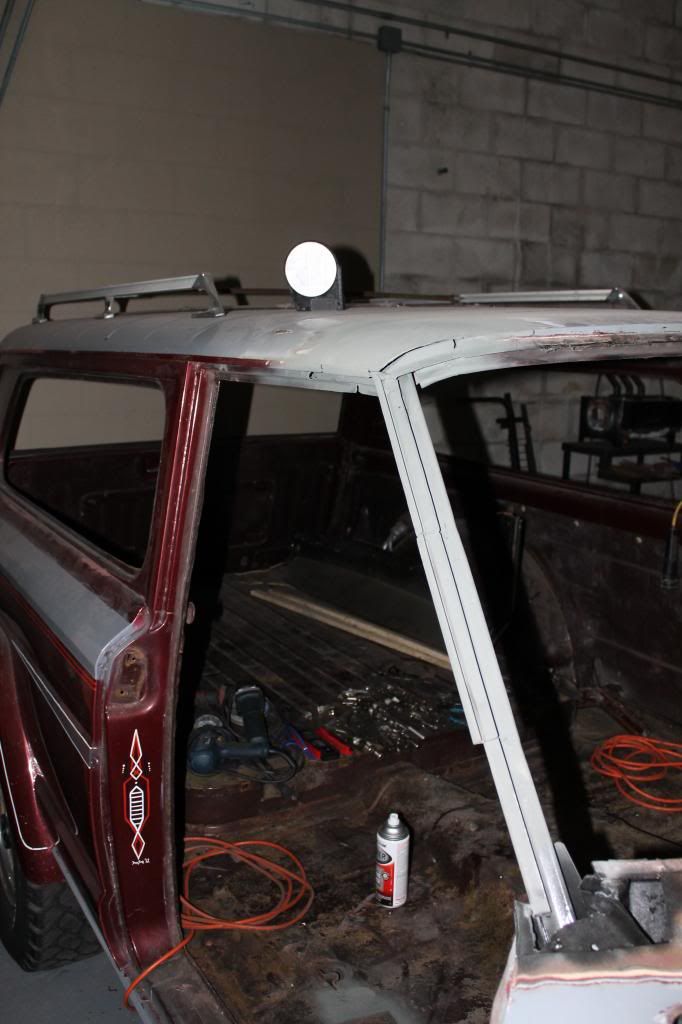
With the support in place the donor roof was measured for clearence of the rusted areas it was replacing. Its important to realize that this 3 way joint has a double wall and inorder to weld in the upper frame connections you have to cut away an access panel above it.
This panel was measured, cut , and then used to template the roof for its cut. The roof was cut to the inside of my mark to ensure that I have enough metal to trim the patch and have a nice tight! fit for welding it in later.
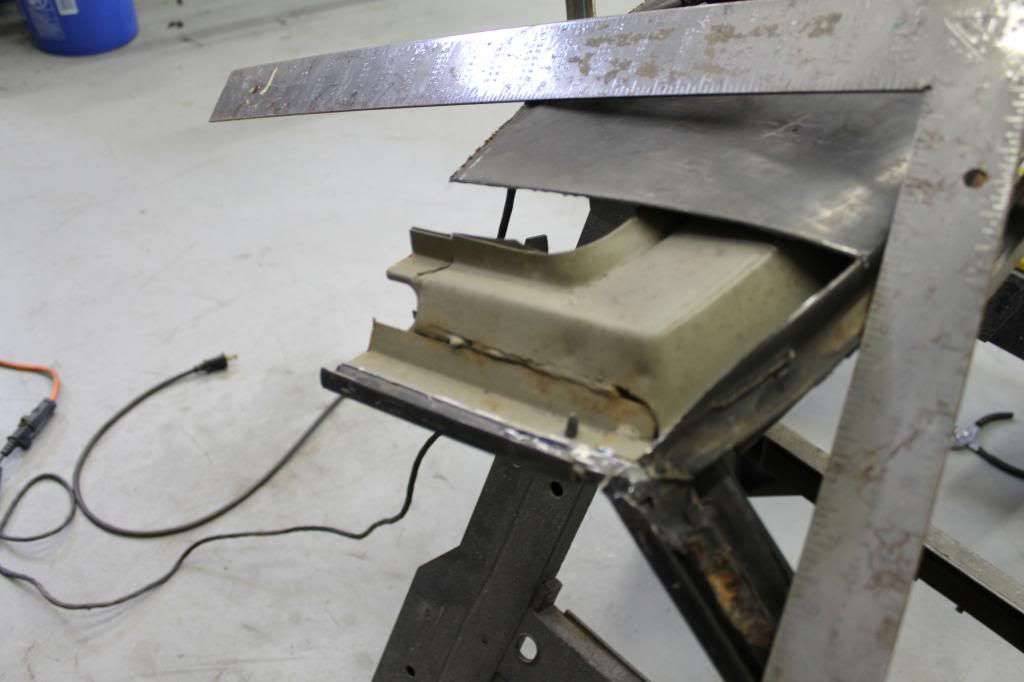
So off the top came and boy was this rust nasty!

The next step was to remove the corner. I used a cut off wheel. A sawzall and bimetal blade would work as well but I have a better feel with the grinder so its just a personal preferece.
The donor corner was measure off the original and the bandsaw helped insure my cuts were nice and even.
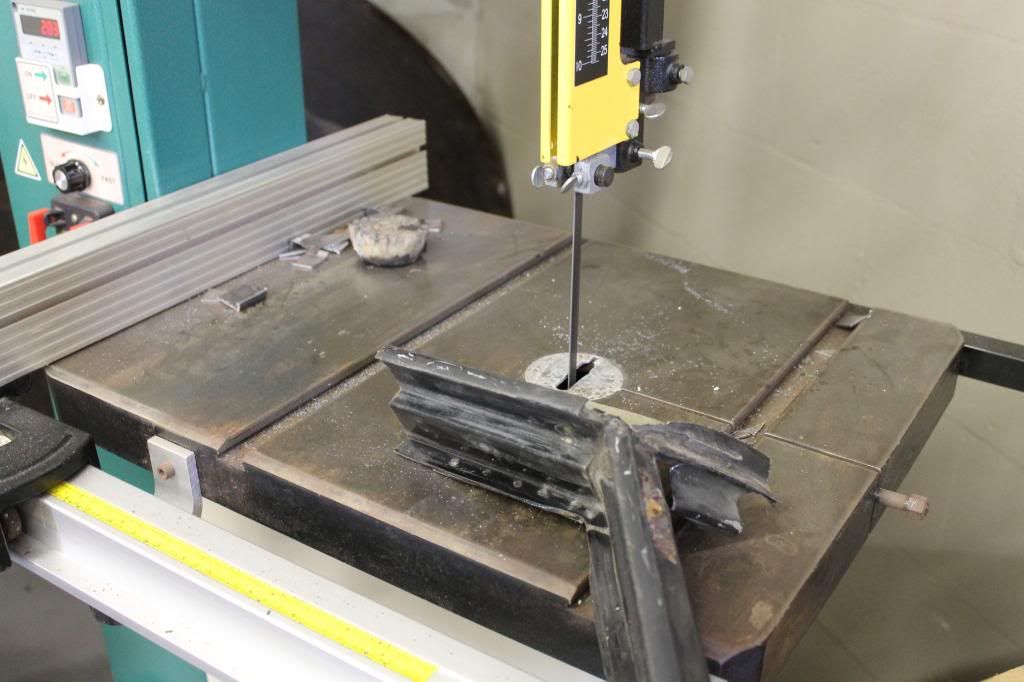
As much as I wish it would have dropped right in the replacement needed to be tweaked since my on the truck cutting job was not perfect like the band saws...
Well... part of yesterday and today were spent with the repair of the rusted out A-pillar/ windsheld /cab corner. In all this repair took about 10 hours to complete so keep that in mind when working on your DD's.
The upper corner was more of the same as far as my rust issues were concerned. All three layers of the pillar were toast and the cab corner also had a hole through it. The windshield gasket frame was weakend and had some breakthoughs from rust. So not to long untill it to would have been consumed.
Here are some recaps of the upper corners rust:


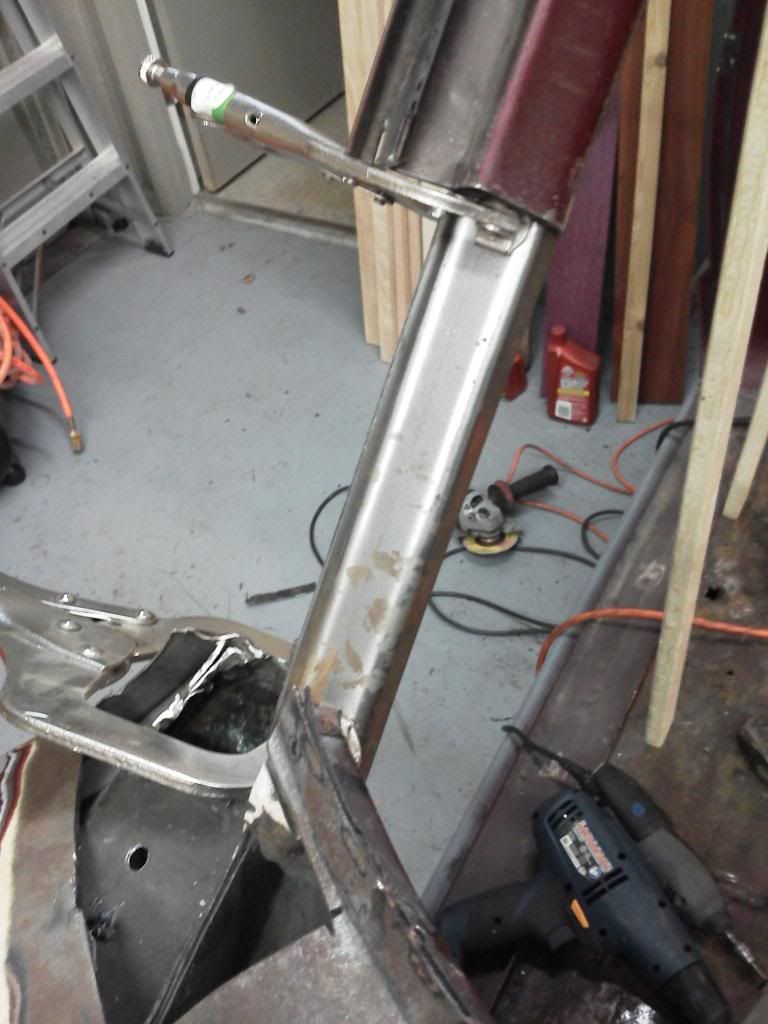
In order to replace this section the main junctions between the three main supports will have to be cut away. This obviously causes the problem of realignment, and since the windshield isnt very forgiving something needed to be done to maintain the current angles and levels. It needed to hold while the old metal was removed and the new replacement was being trimmed to size and welded in place.
To accomplish this a piece of 3/8"x7/8" bar stock was cut and welded in the same angle as the lower door frame. It was then clamped in place below and behind the repair area. With it locked in the upper cab rails and a-pillar measurements should not chage. That leaves the center windshield frame section, and my efforts at forming a brace to support it were wasted by the roundness of the metal brace and the curve of the windshield countour.
So high tech was abandoned for two sticks.
Seriously though, I measured the boards and inserted them into the frame untill the were under pressure and slightly loaded. To ensure this could be reproduced in the case of myself knocking it out on accident during the repair(very possible) I marked the locations of the board on the floor and on the windshield frame. If I was to knock it out aligning the marks should put it back in the same spot.


With the support in place the donor roof was measured for clearence of the rusted areas it was replacing. Its important to realize that this 3 way joint has a double wall and inorder to weld in the upper frame connections you have to cut away an access panel above it.
This panel was measured, cut , and then used to template the roof for its cut. The roof was cut to the inside of my mark to ensure that I have enough metal to trim the patch and have a nice tight! fit for welding it in later.


So off the top came and boy was this rust nasty!

The next step was to remove the corner. I used a cut off wheel. A sawzall and bimetal blade would work as well but I have a better feel with the grinder so its just a personal preferece.


The donor corner was measure off the original and the bandsaw helped insure my cuts were nice and even.

As much as I wish it would have dropped right in the replacement needed to be tweaked since my on the truck cutting job was not perfect like the band saws...

Education through restoration thread link:
http://www.fsjnetwork.com/forum/viewtop ... =12&t=1366
Blacksmithing thread link:
http://www.fsjnetwork.com/forum/viewtop ... f=6&t=1381
http://www.fsjnetwork.com/forum/viewtop ... =12&t=1366
Blacksmithing thread link:
http://www.fsjnetwork.com/forum/viewtop ... f=6&t=1381
-
Florida83FSJCherokee
Topic author - Posts: 196
- Joined: Sat Mar 09, 2013 7:53 pm
- Location: Lakeland , Central Florida
Re: 83 Cherokee education through restoration
So after several!!! trips to the belt sander and some tweaking fom the flap disc the fit was finesed and I did a rather happy jig around the shop to celebrate!
So i dont like Butt welds for structual stuff. My friends ( who build trucks from scratch) tell me that they are fine, but since Im over cautious I went a step further and shaped some cross braces for aas many off the joints as i could. This also helped me get good welds across the gapped areas. My stick welder doesnt like gaps so every little bit helps.
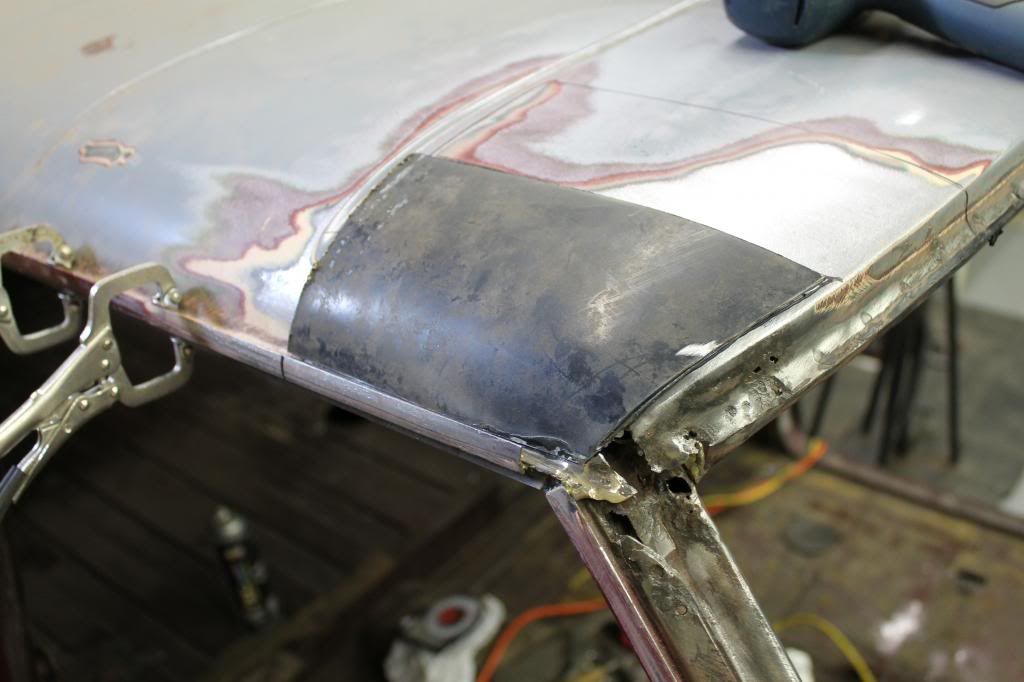
So the rest is... weld a little here...weld a little there...repeat...repeat...repeat...

I didnt want to overheat my joints and warp the fit so I had to force myself to stop after welding a bit and let the area cool. One thing I filled the time with was salvaging the clean dip rails off of the original and donor cut aways... Im glad I did this because for the first time I can actually see what it looks like with all the pieces.
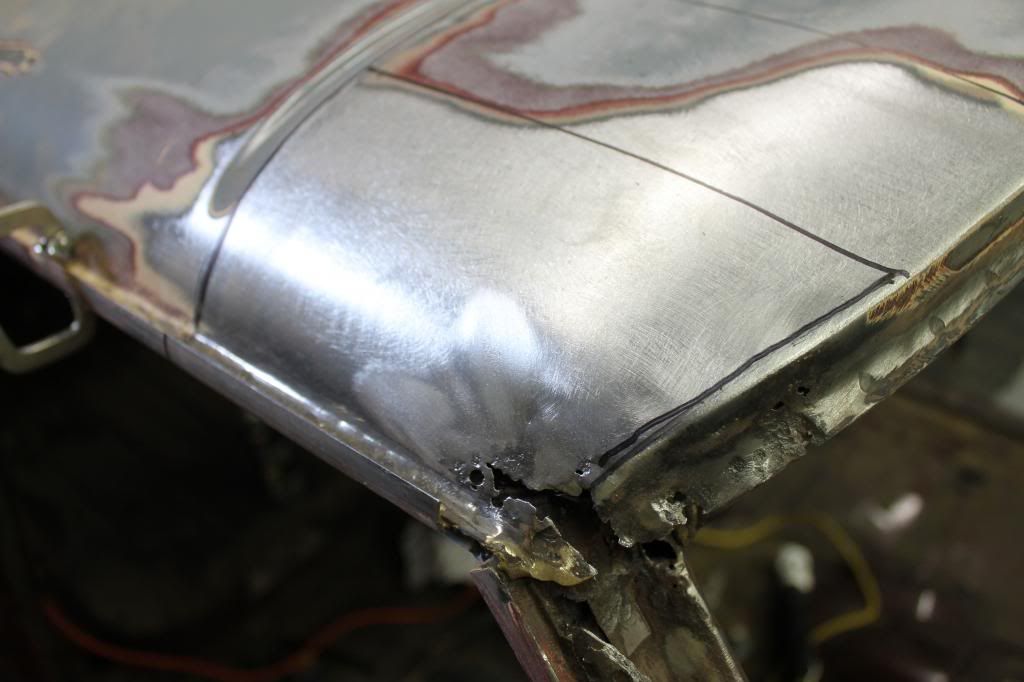
Alright! finsihed the welding, grinded everything flush, welded the holes, grinded flush, welded a third time, and then grinded evrything as flush as possible... Ive accepted the fact that im going to have to use a little filler once all the weld work is finished, and Im ok with that. My original intent was to be a bad Great Googley MoogleyGreat Googley MoogleyGreat Googley MoogleyGreat Googley MoogleyGreat Googley Moogley and do it all with weld, but im just not good enough at it nor is my machiene focused on being tidy. The lead filer option is still out there but Ive had zero experience with it and if the filler needed stays as minimal as it is so far I think Im going to stay with what I know..
3 down 1 to go...
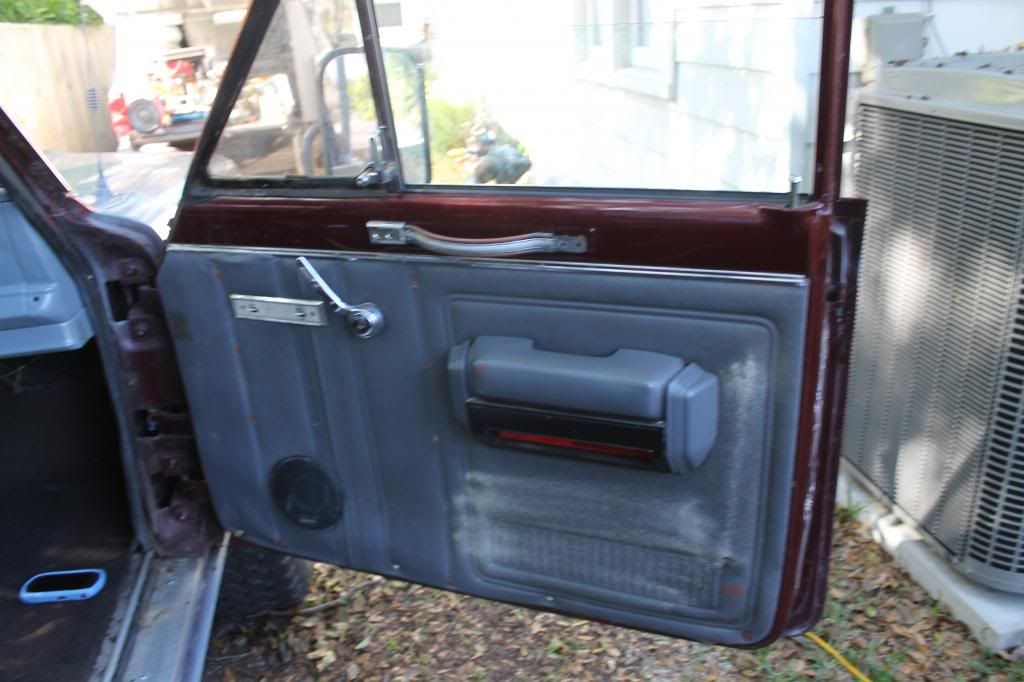
I saved the corners of my door seals when they were removed. they made a nice test to see how the fit was and went on perfectly. Kinda cool to see it with a seal, and kinda eye opening to realize that 80% of the work im doing wont we seen at all by the time the gaskets, seals, dash, and chrome trim are in place. Not to mention the seam sealer that will be applied...
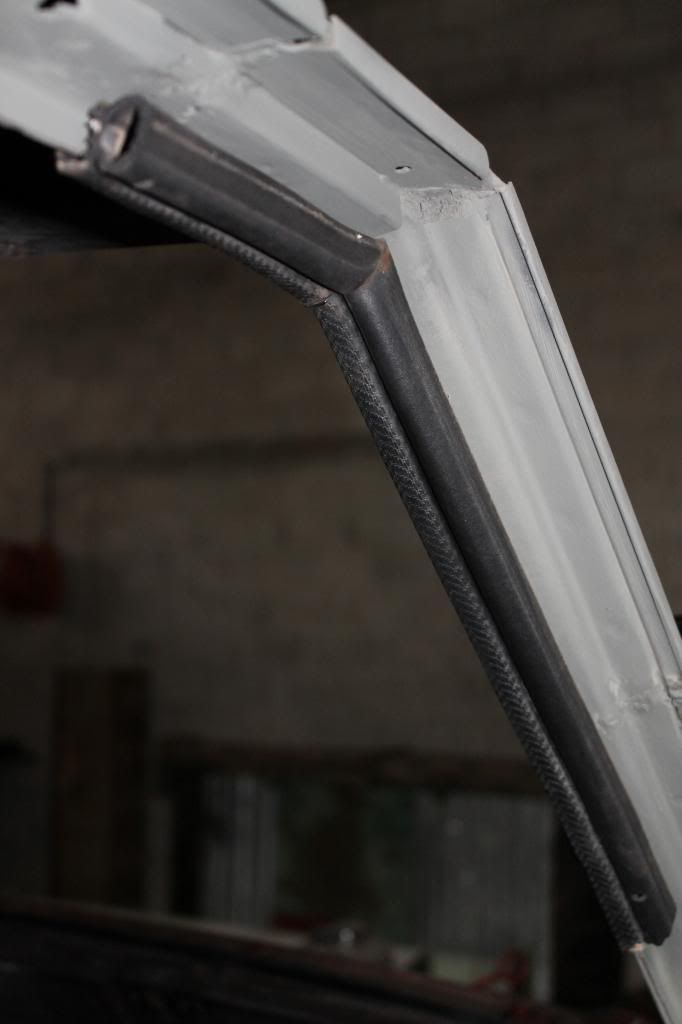
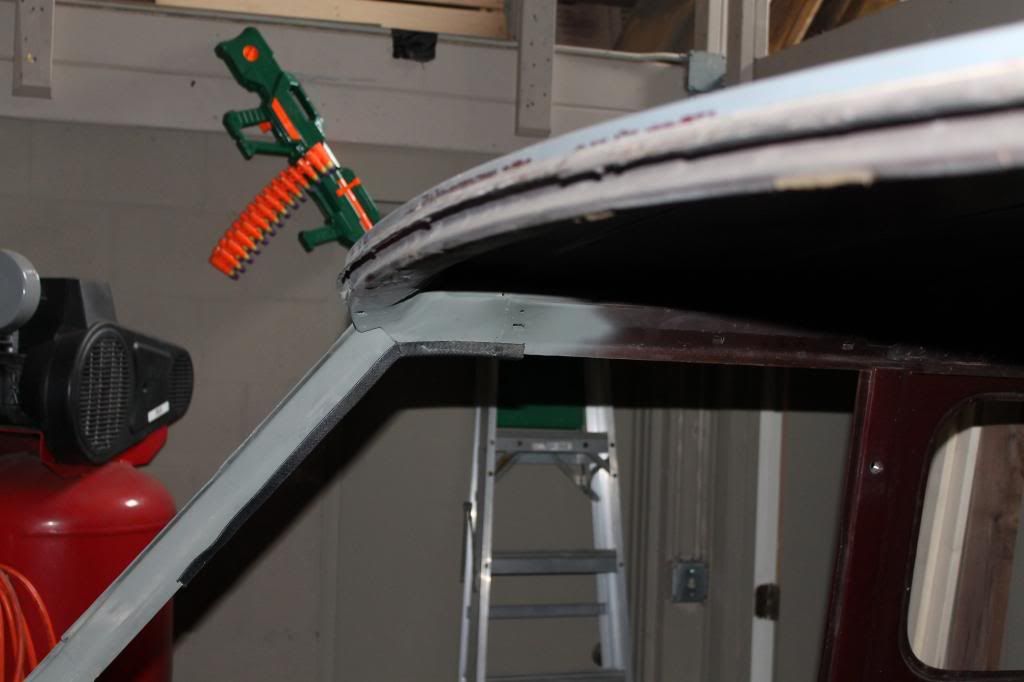

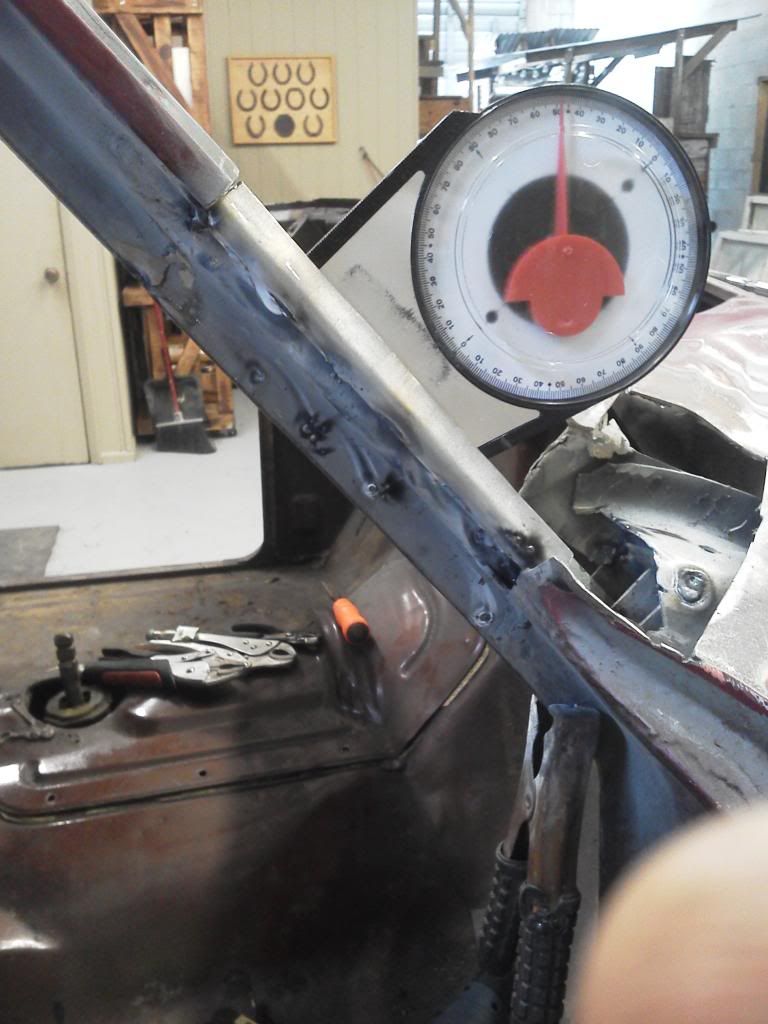
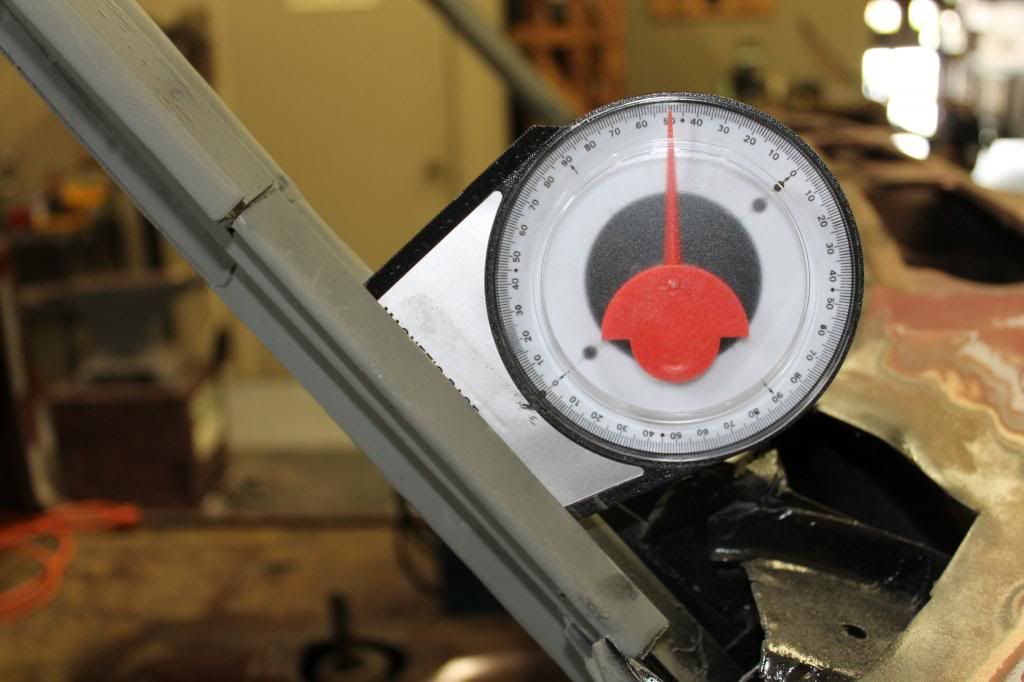
the final test was the ever daunting angle of the pillar...50deg is the majic number... and I am proud to say its fifty from top to bottom!

Sundays mean work is near so tomorrow Im gonna have to switch back to horseshoeing mode and away from body work... Im hesitant!
However, as much as I wanted to spend the rest of today doing the final corner, its just not worth rushing and not really something I would recommend leaving apart for a week either. So instead I organized all the hardware from the tear down into marked ziplocks, wrote in my restoration journal all the stuff I needed to remember in a year when Im wondering "what the Heck" , and cleaned up my mess in the shop.
Feels go to know that next weekend everything is in its place and ready for another round!
Have a great week and thanks for checking it out.
JP


So i dont like Butt welds for structual stuff. My friends ( who build trucks from scratch) tell me that they are fine, but since Im over cautious I went a step further and shaped some cross braces for aas many off the joints as i could. This also helped me get good welds across the gapped areas. My stick welder doesnt like gaps so every little bit helps.

So the rest is... weld a little here...weld a little there...repeat...repeat...repeat...


I didnt want to overheat my joints and warp the fit so I had to force myself to stop after welding a bit and let the area cool. One thing I filled the time with was salvaging the clean dip rails off of the original and donor cut aways... Im glad I did this because for the first time I can actually see what it looks like with all the pieces.


Alright! finsihed the welding, grinded everything flush, welded the holes, grinded flush, welded a third time, and then grinded evrything as flush as possible... Ive accepted the fact that im going to have to use a little filler once all the weld work is finished, and Im ok with that. My original intent was to be a bad Great Googley MoogleyGreat Googley MoogleyGreat Googley MoogleyGreat Googley MoogleyGreat Googley Moogley and do it all with weld, but im just not good enough at it nor is my machiene focused on being tidy. The lead filer option is still out there but Ive had zero experience with it and if the filler needed stays as minimal as it is so far I think Im going to stay with what I know..


3 down 1 to go...
I saved the corners of my door seals when they were removed. they made a nice test to see how the fit was and went on perfectly. Kinda cool to see it with a seal, and kinda eye opening to realize that 80% of the work im doing wont we seen at all by the time the gaskets, seals, dash, and chrome trim are in place. Not to mention the seam sealer that will be applied...


the final test was the ever daunting angle of the pillar...50deg is the majic number... and I am proud to say its fifty from top to bottom!


Sundays mean work is near so tomorrow Im gonna have to switch back to horseshoeing mode and away from body work... Im hesitant!
However, as much as I wanted to spend the rest of today doing the final corner, its just not worth rushing and not really something I would recommend leaving apart for a week either. So instead I organized all the hardware from the tear down into marked ziplocks, wrote in my restoration journal all the stuff I needed to remember in a year when Im wondering "what the Heck" , and cleaned up my mess in the shop.

Feels go to know that next weekend everything is in its place and ready for another round!
Have a great week and thanks for checking it out.
JP
Education through restoration thread link:
http://www.fsjnetwork.com/forum/viewtop ... =12&t=1366
Blacksmithing thread link:
http://www.fsjnetwork.com/forum/viewtop ... f=6&t=1381
http://www.fsjnetwork.com/forum/viewtop ... =12&t=1366
Blacksmithing thread link:
http://www.fsjnetwork.com/forum/viewtop ... f=6&t=1381
-
bwwhaler
- Posts: 224
- Joined: Thu Oct 04, 2012 6:33 am
- Location: Wilmington NC

Re: 83 Cherokee education through restoration
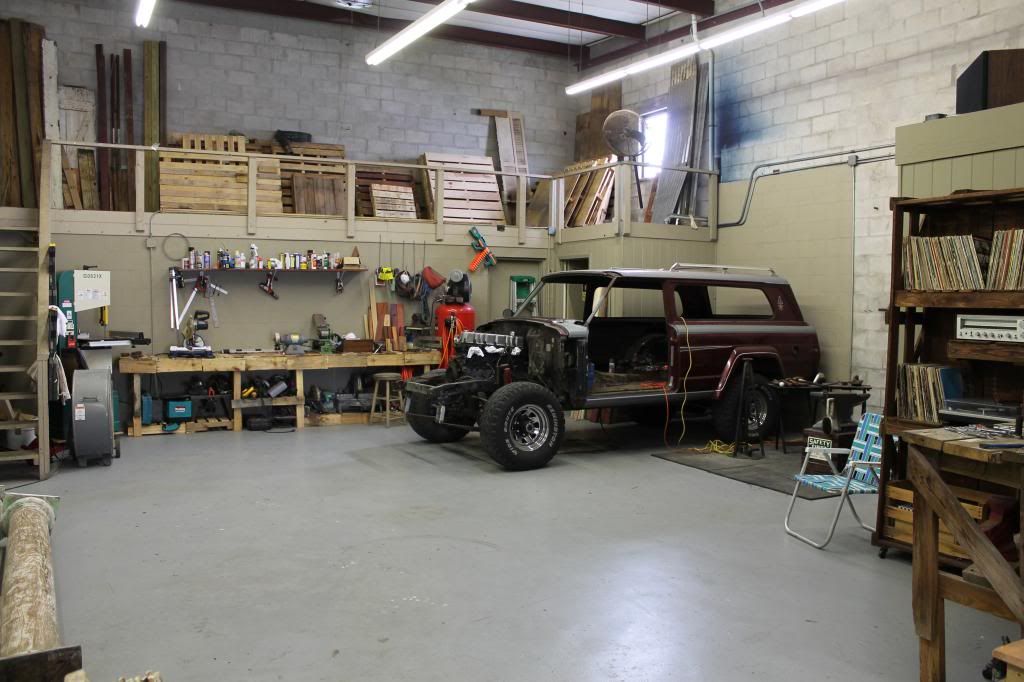
Wow, this has got to be one of the best restorations I have ever seen... I am really hoping mine is not that bad, but I feel it may be close. Awesome work, your fabrication skills are definitely high, by the amount of work you have done. I just wish I had a garage to put her in to do it.
1987 GW 360/727/229 Performer intake Holley 670 32's 4" BJ's Springs CS-144 Serehill's light and tailgate harness
-
Florida83FSJCherokee
Topic author - Posts: 196
- Joined: Sat Mar 09, 2013 7:53 pm
- Location: Lakeland , Central Florida
Re: 83 Cherokee education through restoration
Thanks!bwwhaler wrote:Wow, this has got to be one of the best restorations I have ever seen... I am really hoping mine is not that bad, but I feel it may be close. Awesome work, your fabrication skills are definitely high, by the amount of work you have done. I just wish I had a garage to put her in to do it.
My fab skill are ok but not high
I got your message tonight... Not positive yet so dont hold me to it, but I think kevin and I are going to put together an "FSJ - A-pillar replacement kit". It would have 1 or 2 pillars. all indvidual like mine were so people can do the repair in layers. Probably gonna do a nicer version of the inner bracket to go with it. A pre cut inner panle patch might be a possibility as well. There will be some various spare brace pieces,and color photo based instructions on a CD... We literally just talked about doing it today so I have no idea if its even cost effective or reasonable. However, I will let you know what we decide.
Thanks again for the compliment,
JP
Education through restoration thread link:
http://www.fsjnetwork.com/forum/viewtop ... =12&t=1366
Blacksmithing thread link:
http://www.fsjnetwork.com/forum/viewtop ... f=6&t=1381
http://www.fsjnetwork.com/forum/viewtop ... =12&t=1366
Blacksmithing thread link:
http://www.fsjnetwork.com/forum/viewtop ... f=6&t=1381
-
 cma
cma
- Posts: 119
- Joined: Wed Sep 12, 2012 12:55 pm
Re: 83 Cherokee education through restoration
Again: hats off! you do a perfect job! You grow up with the target 
Markus!
Member, FSJ Prissy Restoration Association
Jeep Cherokee Chief Laredo, 12/1982, AMC 360, black/black
Picture Story: https://picasaweb.google.com/1019823415 ... directlink
Part II:
https://picasaweb.google.com/1019823415 ... directlink
Member, FSJ Prissy Restoration Association
Jeep Cherokee Chief Laredo, 12/1982, AMC 360, black/black
Picture Story: https://picasaweb.google.com/1019823415 ... directlink
Part II:
https://picasaweb.google.com/1019823415 ... directlink
-
Florida83FSJCherokee
Topic author - Posts: 196
- Joined: Sat Mar 09, 2013 7:53 pm
- Location: Lakeland , Central Florida
Re: 83 Cherokee education through restoration
cma wrote:Again: hats off! you do a perfect job! You grow up with the target
my CMA translator is usually pretty good, but what is... " you grow up with the target?"
Jp
Education through restoration thread link:
http://www.fsjnetwork.com/forum/viewtop ... =12&t=1366
Blacksmithing thread link:
http://www.fsjnetwork.com/forum/viewtop ... f=6&t=1381
http://www.fsjnetwork.com/forum/viewtop ... =12&t=1366
Blacksmithing thread link:
http://www.fsjnetwork.com/forum/viewtop ... f=6&t=1381
-
 Strode182
- Posts: 374
- Joined: Sat Jun 09, 2012 8:38 am
- Location: Littleton, Co
Re: 83 Cherokee education through restoration
I'm not sure what Marcus means, but it brought this to my mind....

Amazing job, JP. You're getting 'er done.
Amazing job, JP. You're getting 'er done.
-
whsii
- Posts: 354
- Joined: Thu Sep 15, 2011 4:01 pm
- Location: Frankfort, KY
Re: 83 Cherokee education through restoration
Florida83FSJCherokee wrote:cma wrote:Again: hats off! you do a perfect job! You grow up with the target
my CMA translator is usually pretty good, but what is... " you grow up with the target?"
Jp
LOLOL!!
Markus is saying, " you rise to the challenge!"
You have got to love Markus, a scholar and a gentlemen, a real FSJ enthusiast, and almost bi lingual.
( he probably is bi lingual, but not fluent in English quite yet, but trying...) Salute Sir!
WH
Dad's J10
https://picasaweb.google.com/BBQ.WartHog/JeepJ10Honcho
Herbina
https://plus.google.com/photos/11307276 ... ZrslNCo3gE
Member FSJ Prissy Restoration Association
https://picasaweb.google.com/BBQ.WartHog/JeepJ10Honcho
Herbina
https://plus.google.com/photos/11307276 ... ZrslNCo3gE
Member FSJ Prissy Restoration Association
-
 Mars
Mars
- Posts: 397
- Joined: Thu Aug 23, 2012 12:33 am
- Location: Cincinnati Ohio
Re: 83 Cherokee education through restoration
Man.. just when I think I have it rough with my continual mechanical issues I see stuff like that door pillar. Amazing work man. and inspirational! 
Jeep: making ordinary people mechanics for more than 70 years.
1981 J-10 Laredo.
http://www.fsjnetwork.com/forum/viewtop ... =15&t=1409
1981 J-10 Laredo.
http://www.fsjnetwork.com/forum/viewtop ... =15&t=1409
-
 Jerry Blair
- Posts: 93
- Joined: Sat Aug 25, 2012 6:58 am
- Location: Batavia, OH
Re: 83 Cherokee education through restoration
Isn't that the truth? If I had found that rust I'd have punted. Next time I think I have a tough challenge on my build I'm going to remember the work that has been done here.Mars wrote:Man.. just when I think I have it rough with my continual mechanical issues I see stuff like that door pillar. Amazing work man. and inspirational!
-
cma
- Posts: 119
- Joined: Wed Sep 12, 2012 12:55 pm
Re: 83 Cherokee education through restoration
thanks WH! maybe this translation is better? "You grow with the size of your project "
whsii wrote:Florida83FSJCherokee wrote:cma wrote:Again: hats off! you do a perfect job! You grow up with the target
my CMA translator is usually pretty good, but what is... " you grow up with the target?"
Jp
LOLOL!!
Markus is saying, " you rise to the challenge!"
You have got to love Markus, a scholar and a gentlemen, a real FSJ enthusiast, and almost bi lingual.
( he probably is bi lingual, but not fluent in English quite yet, but trying...) Salute Sir!
WH
Markus!
Member, FSJ Prissy Restoration Association
Jeep Cherokee Chief Laredo, 12/1982, AMC 360, black/black
Picture Story: https://picasaweb.google.com/1019823415 ... directlink
Part II:
https://picasaweb.google.com/1019823415 ... directlink
Member, FSJ Prissy Restoration Association
Jeep Cherokee Chief Laredo, 12/1982, AMC 360, black/black
Picture Story: https://picasaweb.google.com/1019823415 ... directlink
Part II:
https://picasaweb.google.com/1019823415 ... directlink
-
 TUDrewser
- Posts: 1306
- Joined: Mon Aug 12, 2013 9:40 pm
- Location: Mesa, AZ
Re: 83 Cherokee education through restoration
I like that...it's very true!cma wrote: "You grow with the size of your project "
1990 GW "saved by Jerry" edition
will e wrote:I guess life is better if you are not moving too fast.
-
Florida83FSJCherokee
Topic author - Posts: 196
- Joined: Sat Mar 09, 2013 7:53 pm
- Location: Lakeland , Central Florida
Re: 83 Cherokee education through restoration
cma wrote:
thanks WH! maybe this translation is better? "You grow with the size of your project "
Vielen Dank Markus,
Sie haben Recht, mit jede vollendete Herausforderung, der wir uns selbst besser. Die unbekannten oder wenig gefestigten und Erfolg werden zu lassen, ist eine der größten Gefühle in der Welt!
Danke für die Weisheit
JP
I really hope this wasnt the translator from "MP's Flying Circus"... If I accidently asked you where your boobs are I apologize...
Education through restoration thread link:
http://www.fsjnetwork.com/forum/viewtop ... =12&t=1366
Blacksmithing thread link:
http://www.fsjnetwork.com/forum/viewtop ... f=6&t=1381
http://www.fsjnetwork.com/forum/viewtop ... =12&t=1366
Blacksmithing thread link:
http://www.fsjnetwork.com/forum/viewtop ... f=6&t=1381
-
 243
243
- Posts: 740
- Joined: Sat Mar 16, 2013 7:32 am
- Location: Texas
Re: 83 Cherokee education through restoration
Outstanding restoration on the panel!
1978 Cherokee NT, 5.3/4L60/NP241 in Progress
-
bwwhaler
- Posts: 224
- Joined: Thu Oct 04, 2012 6:33 am
- Location: Wilmington NC
Re: 83 Cherokee education through restoration
Not wanting to hijack your awesome thread, but wanted to show you what mine looks like right now thanks for all the great info and help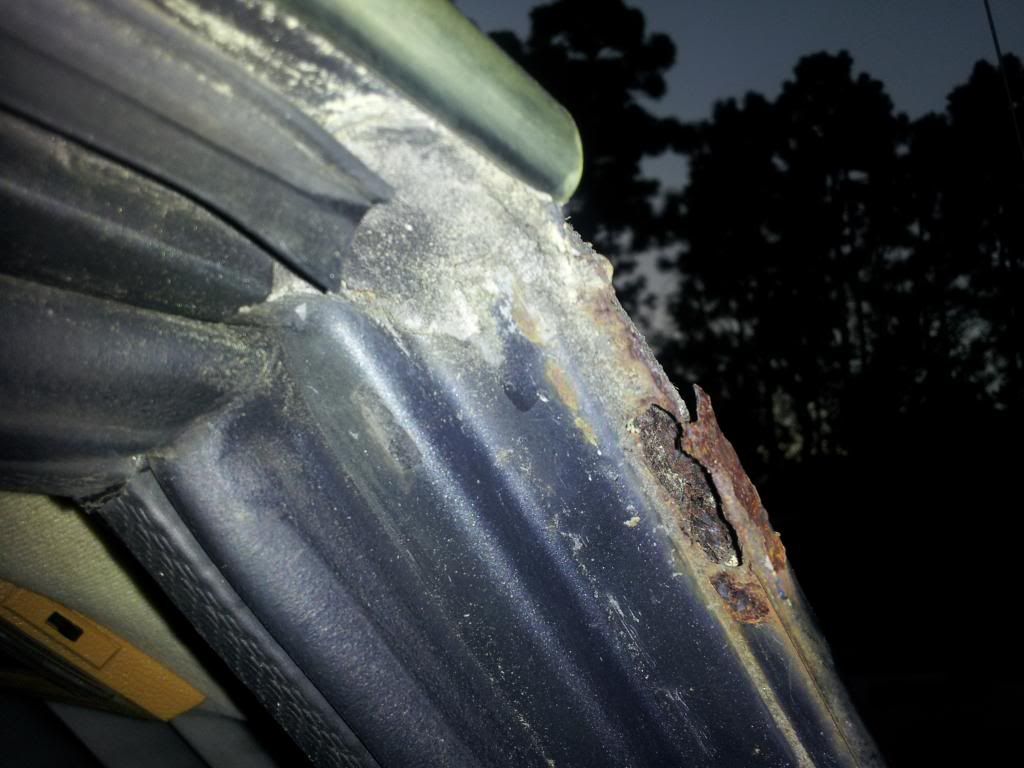 lp.
lp. 
 lp.
lp. 


1987 GW 360/727/229 Performer intake Holley 670 32's 4" BJ's Springs CS-144 Serehill's light and tailgate harness