Wife's Waggy "Walter"...

Area to show off your Custom Build threads.
Post Reply
User avatar

Topic author
tedlovesjeeps71
Posts: 2905
Joined: Fri Jul 22, 2016 4:39 pm

Re: Wife's Waggy "Walter"...

Post by tedlovesjeeps71 »

candymancan wrote:Yea you are lucky you have access to those tools. Ima have to do mine this year to repair the frame, thankfully my skid plate is mint but the frame is horrible in a 6 inch long section... not going to be fun !
Yeah, having the shop is a blessing. Not cheap but a huge help. I'd never make this happen with my back without a lift.
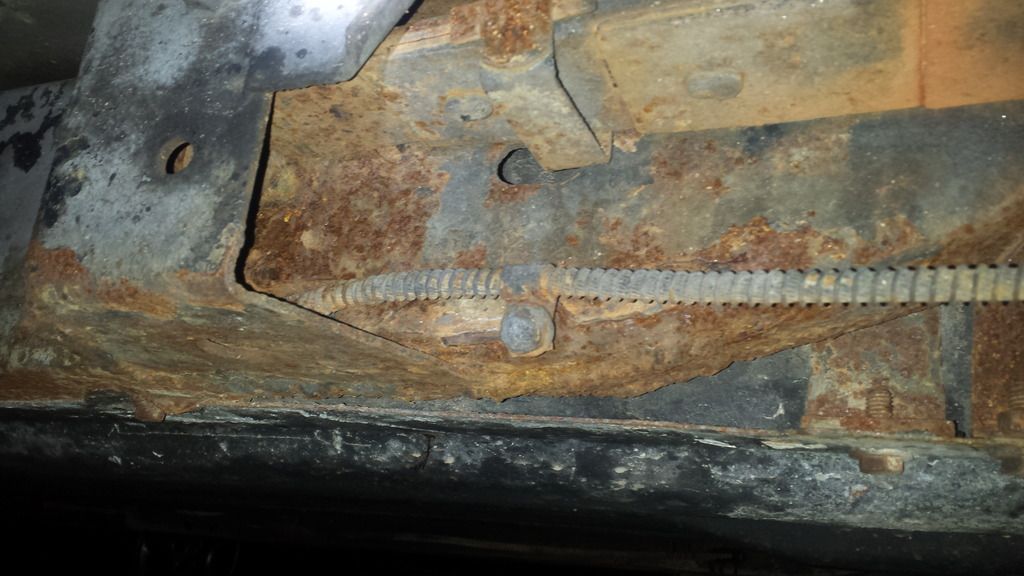
I was amazed that my frame is almost perfect but the skid and triangle support is toast. Also odd is the fuel lines are in amazing shape but both the original and the previous "repaired" rear brake line are bad. Really bad.


Sent from my iPhone using Tapatalk

candymancan
Posts: 3684
Joined: Tue Mar 22, 2016 11:32 pm

Re: Wife's Waggy

Post by candymancan »

Weird how that BEEP works... I have seen GW in the JY with bodies that are completetly rotten, im talking quarter panels half way gone, roofs rusted through and BEEP interiors and no paint left almost.. Yet the frames are 100% mint. And here is mine, mint body (minus floors i had to repair) mint interior and new paint job.. but the frame is like at 70% smh.
1998 Jeep Grand Cherokee 5.9L Limited 219k
1998 Jeep Grand Cherokee 4.0 I6 laredo 430k
1990 Jeep Grand Wagoneer 155k
1976 Jeep J10.. 85k(repaired)

candymancan
Posts: 3684
Joined: Tue Mar 22, 2016 11:32 pm

Re: Wife's Waggy

Post by candymancan »

Like here is my Jeep, see how beautiful that looks, sitting on top of this frame, and now that i look at it the fuel tanks strap looks rusted too


Image


Image

Image

Image
1998 Jeep Grand Cherokee 5.9L Limited 219k
1998 Jeep Grand Cherokee 4.0 I6 laredo 430k
1990 Jeep Grand Wagoneer 155k
1976 Jeep J10.. 85k(repaired)

ferrum
Posts: 131
Joined: Sun Jun 19, 2016 1:49 pm

Re: Wife's Waggy

Post by ferrum »

tedlovesjeeps71 wrote:All I did was shoot some self etching primer and bedliner on the gas tank skid in preparation for changing it this weekend. This is supposed to be the "fun" weekend. Walter will finally grow into a big boy. My buddy is coming down again Saturday and we will do the lift. I'll probably start Friday by doing the tires and getting the tank removed.
Any updates on the lift progress? Just wondering if you got it done.
'76 Cherokee Chief
User avatar

Topic author
tedlovesjeeps71
Posts: 2905
Joined: Fri Jul 22, 2016 4:39 pm

Re: Wife's Waggy "Walter"...

Post by tedlovesjeeps71 »

ferrum wrote:
tedlovesjeeps71 wrote:All I did was shoot some self etching primer and bedliner on the gas tank skid in preparation for changing it this weekend. This is supposed to be the "fun" weekend. Walter will finally grow into a big boy. My buddy is coming down again Saturday and we will do the lift. I'll probably start Friday by doing the tires and getting the tank removed.
Any updates on the lift progress? Just wondering if you got it done.
Funny you ask... just got home from the shop and in a nutshell... got my ass handed to me in a way no Jeep has ever done.
Today started out fine, my buddy and I split up. He attacked the rear springs while I broke down the old tires and got the new ones mounted and balanced. By the time I finished he had the shocks and trac bar disconnected and had started on the passenger leaf. That's where things came to a screeching halt. Despite my efforts to soak everything with magic fluid (ATF&acetone) for weeks... the bolt going through the frame and lower shackle was fused. My buddy Dave is 6'6 and about 225. Despite both our combined strength it took almost an hour just to get the bolt to budge. At one point we had so much leverage going that we lifted the Jeep off the rear arms of the lift. Image
Turns out the bolt had fused to the steel spacer inside the spring bushing. It took us hours to finally get that one damn bolt out. Cleaned up the shackle and installed the new spring.... only to discover we put the upper shackle bolt in backwards. Image It can't go with the bolt head towards the outside of the truck because the nut and end of the bolt would contact the shackle box. So once again, pull it apart and then run into the same issue of getting the lower shackle bolt to line up with the inner hole. First install took about 40 minutes. Second try took almost an hour.
So most of the day to mount one freaking spring. FML!
Move over to the drivers side rear and it started all over. Only this side was worse. Try as we may we could not force the bolt to come out of the shackle. Same lower bolt, just not coming out. As the day neared its end I had to get brutal. Broke out the angle grinder and cut the outer portion of the shackle box off. Got the spring out and ran out of time. Will do what I can tomorrow but it's not looking good.
ImageImageImageImage


Sent from my iPhone using Tapatalk

ferrum
Posts: 131
Joined: Sun Jun 19, 2016 1:49 pm

Re: Wife's Waggy

Post by ferrum »

I feel your pain. When I did my lift, front was easy. Then got to the back side it was not easy at all. Plan was to get it done by 10:00pm but ended up working on it till 4:00am. It was bear to remove and installation even took longer. You may have frustration during install. It can be done.
'76 Cherokee Chief
User avatar

REDONE
Posts: 2678
Joined: Tue Sep 13, 2011 5:48 pm
Location: Lakewood and Bailey, CO

Re: Wife's Waggy

Post by REDONE »

Totally! Fortunately my lift involved removing the spring hangers entirely, but I did start by trying to take it all apart in a neat and professional manner. After failing to get the bolts loose, I wound up grinding the heads off, drilling significant portions out, and still ultimately cut it all apart. Another huge hassle was finding replacement bolts! Nobody any where near me at the time stocked 9/16" grade 8 anything (even the Fastenals). I wound up having to drive all the way down to tacoma screw from Everett for them.

EDIT>>> because pictures are nice:
Image
79 J-10 (Honcho Mucho) KE0LSU
304/Performance Fuel Injection TBI/MTA1/SP2P/Magnum rockers
T18/D20/D44s&4.10s/33" Mud Claws
Grizzly Locker Rear
4" front spring drop, 5" rear shackle flip
Chevy style HEI (ECM controlled)
Dolphin "Shark" gauges in a fancy homemade oak bezel
3/4 resto, rotting faster than I've been fixing it.

ferrum
Posts: 131
Joined: Sun Jun 19, 2016 1:49 pm

Re: Wife's Waggy

Post by ferrum »

I also wanted to point out that it is easy to put the right side spring on the left side. Make sure you lay it out so that nut side towards the frame. Don't do what I did. If done wrong, threaded end will rub on frame for quite a while. It only matters on rear springs.
'76 Cherokee Chief
User avatar

Topic author
tedlovesjeeps71
Posts: 2905
Joined: Fri Jul 22, 2016 4:39 pm

Re: Wife's Waggy "Walter"...

Post by tedlovesjeeps71 »

ferrum wrote:I also wanted to point out that it is easy to put the right side spring on the left side. Make sure you lay it out so that nut side towards the frame. Don't do what I did. If done wrong, threaded end will rub on frame for quite a while. It only matters on rear springs.
There's a right and left side rear?? Weird.
I'm making slow but steady progress. Got the shackle box welded back together. Now fighting to get the bolt to line up... fun fun.
ImageImage


Sent from my iPhone using Tapatalk

ShagWagon
Posts: 702
Joined: Tue Apr 19, 2016 8:13 pm

Re: Wife's Waggy

Post by ShagWagon »

I used a bottle jack to flatten the spring and make the bolt eyes reach, but mine was on the floor.
87 Grand Wagoneer Rebuilt 360 by S&J, Fitech GO EFI 600, Novak in-tank fuel pump, Skyjacker Hydro 4" lift, BFG AT KO2 30", Dynamax Muffler, MSD distributor, MSD ignition, Edlebrock perf 4bbl intake, Elgin perf cam, Oil tube mod, Roller rockers, chrome molly lifters, HD alum radiator, Powermaster 150/100 alt, Alum HD water pump, Serhills tailgate harness, Cowl screen mod, Evil Twin grab handles, Rstep's custom AMC door lock knobs, all electrical works.

ShagWagon
Posts: 702
Joined: Tue Apr 19, 2016 8:13 pm

Re: Wife's Waggy

Post by ShagWagon »

Also when you get the bolt holes close enough, use a sturdy screwdriver or punch to put through holes and pry to line them up better then pull it out and shove the bolt in easy.
87 Grand Wagoneer Rebuilt 360 by S&J, Fitech GO EFI 600, Novak in-tank fuel pump, Skyjacker Hydro 4" lift, BFG AT KO2 30", Dynamax Muffler, MSD distributor, MSD ignition, Edlebrock perf 4bbl intake, Elgin perf cam, Oil tube mod, Roller rockers, chrome molly lifters, HD alum radiator, Powermaster 150/100 alt, Alum HD water pump, Serhills tailgate harness, Cowl screen mod, Evil Twin grab handles, Rstep's custom AMC door lock knobs, all electrical works.
User avatar

Topic author
tedlovesjeeps71
Posts: 2905
Joined: Fri Jul 22, 2016 4:39 pm

Re: Wife's Waggy "Walter"...

Post by tedlovesjeeps71 »

Thanks ShagWagon, I managed to get it squared away. The front shackles were about 70-80% as bad as the rears. Hopefully the liberal dose of anti-sieze I applied will help any future efforts.
Today was productive but I'm nowhere near drivable yet. The front went much faster but I still have some to do. Not even counting the fuel tank, brake line, various hoses, and swapping the alternator and fixing the wiring. I'll be back at it on Wednesday before school. Hopefully I can make him functional by the weekend.
A couple short thoughts on the skyjacker kit so far. I noticed the trac bar brackets are labeled as YJ ones. Guess they are the same? I'll find out Wednesday.
Also, while the U bolts were pretty being all painted and stuff, they sent me a wrong one. It should have been 7 of one size and one slightly larger to fit over the front diff. Instead I got 6 and 2. Thankfully the original Ubolts up front came out fine. I reused one until I can go to storage and see if I have a new replacement. I don't like reusing them but did so just so I could put him on the ground and look at the stance.
So that's it for now folks. Shops closed Monday and Tuesday so I'll get a little break.


Sent from my iPhone using Tapatalk

ShagWagon
Posts: 702
Joined: Tue Apr 19, 2016 8:13 pm

Re: Wife's Waggy

Post by ShagWagon »

I had same problems, I was sent the wrong u bolt. One had to be bigger iirc. I told skyjacker and they sent the right one out pronto. Seems you got the same kit and they never fixed that problem.

Also the YJ extender bracket is slightly bigger in the backside. I had to bend mine in my vise, pound it in, and pull it back flat with the bolt just to get it in. Way tight but it goes.
87 Grand Wagoneer Rebuilt 360 by S&J, Fitech GO EFI 600, Novak in-tank fuel pump, Skyjacker Hydro 4" lift, BFG AT KO2 30", Dynamax Muffler, MSD distributor, MSD ignition, Edlebrock perf 4bbl intake, Elgin perf cam, Oil tube mod, Roller rockers, chrome molly lifters, HD alum radiator, Powermaster 150/100 alt, Alum HD water pump, Serhills tailgate harness, Cowl screen mod, Evil Twin grab handles, Rstep's custom AMC door lock knobs, all electrical works.
User avatar

Topic author
tedlovesjeeps71
Posts: 2905
Joined: Fri Jul 22, 2016 4:39 pm

Re: Wife's Waggy "Walter"...

Post by tedlovesjeeps71 »

Damn OCD. Just couldn't let myself start putting the gas tank stuff back in without trying to clean some of the decades worth of goo and grunge. Tried a paint scraper and wire brush but it was taking far too long. Got permission from the shop manager to use the steam cleaning-pressure washer. Unfortunately the heating portion didn't work so all I got was a cold bath. It does look better now though. Before:
Image
After:
Image


Sent from my iPhone using Tapatalk
User avatar

Topic author
tedlovesjeeps71
Posts: 2905
Joined: Fri Jul 22, 2016 4:39 pm

Re: Wife's Waggy "Walter"...

Post by tedlovesjeeps71 »

So the Hamilton fuel injection arrived today.WootWoot! I'm super excited and a little intimidated. Also a wee bit overwhelmed as I look at what all still needs doin'. Today was mostly a wash (pun intended) and I went to school pretty soaked and with goop and grunge in my hair. All I really managed today was swapping the bypass hose (hopefully doesn't leak now), getting about 2/3 of the front trac bar reinstalled, and of course cleaning some of the underside. Hopefully it's good and dry tomorrow so I can throw some paint at it and make some progress. My buddy is coming down Saturday but I'm not sure if he's gonna help or just go look at either a waggy or scout for his own.
So for you guys who installed a TBI kit... how long does it usually take?


Sent from my iPhone using Tapatalk

Nikkormat
Posts: 3623
Joined: Sun Jun 29, 2014 11:45 pm
Location: Salt Lake City

Re: Wife's Waggy

Post by Nikkormat »

Oh no! You washed off the protective layer of grease!

Blake and I TBI'd my Cherokee in about ten hours including breaks for food. That includes burning chips and tuning, but I had already done the fuel system so that saved time.

Installing a ready made system, you should be able to get it done pretty fast. Hardest part will be the fuel pump and O2 bung. I'd say six hours if something goes wrong.
Gabe, "reformed" Jeep hoarder.
User avatar

REDONE
Posts: 2678
Joined: Tue Sep 13, 2011 5:48 pm
Location: Lakewood and Bailey, CO

Re: Wife's Waggy

Post by REDONE »

Gabe and Blake made good time! With my OCD, and making brackets for the MAF and such, I spent a week's worth of afternoons plus a full weekend on mine (spread out over a month and a half).

How long it takes is pretty subjective, but 20 man hours minus breaks is a reasonable low-end estimate. Making sure you have everything before starting as well as a plan of attack probably contributes to keeping the time down. Mine is PFI, not Hamilton, so I don't know if Bills includes a fuel pump block off plate, MAF bracket, or fuel lines (off the top of my head). As for strategy, decide where you're going to mount the ECM and how you'll route the harness. Blake has done this several times so he's got what works for him figured out, which I bet saves time.

Good luck!
79 J-10 (Honcho Mucho) KE0LSU
304/Performance Fuel Injection TBI/MTA1/SP2P/Magnum rockers
T18/D20/D44s&4.10s/33" Mud Claws
Grizzly Locker Rear
4" front spring drop, 5" rear shackle flip
Chevy style HEI (ECM controlled)
Dolphin "Shark" gauges in a fancy homemade oak bezel
3/4 resto, rotting faster than I've been fixing it.
User avatar

Topic author
tedlovesjeeps71
Posts: 2905
Joined: Fri Jul 22, 2016 4:39 pm

Re: Wife's Waggy "Walter"...

Post by tedlovesjeeps71 »

Thanks guys. I'll try and lay it all out and see what I'm working with. I have a pile still to do and Reserves next weekend (over my birthday ) so I may have to wait before starting this install.


Sent from my iPhone using Tapatalk

Nikkormat
Posts: 3623
Joined: Sun Jun 29, 2014 11:45 pm
Location: Salt Lake City

Re: Wife's Waggy

Post by Nikkormat »

There is a block off plate low on the firewall near where the AC lines come through that will work if bills harness is long enough. If not be careful​ where you drill the hole. Don't drill into the cowl vent area!
Gabe, "reformed" Jeep hoarder.
User avatar

Topic author
tedlovesjeeps71
Posts: 2905
Joined: Fri Jul 22, 2016 4:39 pm

Re: Wife's Waggy "Walter"...

Post by tedlovesjeeps71 »

I had Bill make the harness longer (80"s) so I could run it inside. I will build a new center console and mount it under that. Not sure if I will run the wiring inside the firewall and along the carpet inside or under the body and have it pop up inside about where the transfer case is. Need to lay it out and see in real world.


Sent from my iPhone using Tapatalk
Post Reply