Meet Road Trip

Area to show off your Custom Build threads.
Post Reply

Topic author
Road Trip
Posts: 313
Joined: Mon Jun 11, 2012 8:46 am
Location: Bryan, Texas

Re: Meet Road Trip

Post by Road Trip »

I think I found the new home for the door relay box.

Image

First let's see who can tell where it is mounted.

Notice all the little blue tags. Masking tape labels for every wire coming out of that thing!

Testing switches begins today.
Robert
User avatar

Dusty
Posts: 486
Joined: Wed Apr 18, 2012 11:41 pm

Re: Meet Road Trip

Post by Dusty »

RT is looking so good!


Passenger side firewall close to the top?
If God is your co-pilot, you need to switch seats!

Topic author
Road Trip
Posts: 313
Joined: Mon Jun 11, 2012 8:46 am
Location: Bryan, Texas

Re: Meet Road Trip

Post by Road Trip »

Dusty wins the prize. Yep, but after looking at it without the dash installed, or the AC, I realized that if I put it there the only way to change out a relay, should one go bad, would be to pull the AC. So I'm back to thinking about where to put it.

I like the mini relays and that box ties them all together nicely, but I may have to go to another way to secure them.

Once the move to the new place is done and I get the shop set up there, I'll move RT and get back on it, but for now I'll have to live vicariously through other's projects. Till then...
Robert

NachoJeep
Posts: 10
Joined: Sat May 31, 2014 6:02 am

Re: Meet Road Trip

Post by NachoJeep »

I recognize that fuse panel... :)

How is the build going?


Sent from my iPhone

Topic author
Road Trip
Posts: 313
Joined: Mon Jun 11, 2012 8:46 am
Location: Bryan, Texas

Re: Meet Road Trip

Post by Road Trip »

Life has gotten in the way again. We finished the new house WITH my shop and moved in late November. Some time later we actually got the house finished, so we are finally all in, with no more "hone do's".

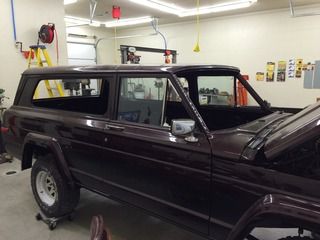
RT is safely in the new shop
Image

Image

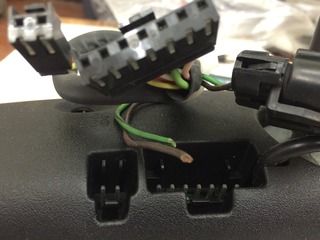
This will be the rear view, these are the connectors I had to figure out. It will have auto dimmer, outside temp and compass function.
Image

Not RT related, but I rebuilt the 1 ton gantry crane so I can back the trailer under it. With the larger beam it now spans 12' 6"!
Image

Yes, I know, I was not working on RT, but I sure like the crane better now!!

Next up is, or should I say I've been doing little bits of wiring as I can figure it out. As you recall, I'm mating the PSI Conversions PCM with the new 21 circuit Painless wiring harness and some of the old Jeep wiring harness. Now some Jeep stuff is from the 79, some from the 82 and some from an 89, thanks Todd. The 89 is the column that I rebuilt, 6 times before I got it right, I think. I have been testing the various functions with the Fluke and I think I have "most" of them figured out. Yes, I have the wiring diagram for the 79, 82 and I've even looked at Tom Collins page at the 89 to try and figure this out. Rick has been very kind to keep answering questions, even when he has answered them before. I can be taught, I'm just a little slow on this electrical stuff.

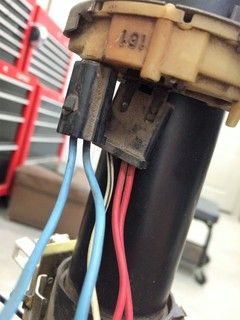
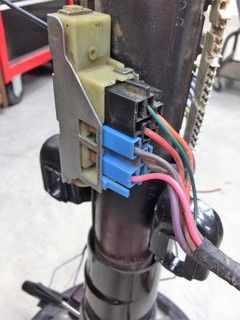
Anyway, here is where we are. The park neutral/back up light switch on the 89 column. I think the blue wires go one to the ignition and one to the tranny. Now if I can just figure out where and or what they connect to. The White with black trace is to the back up lights - again, where it connects is a mystery so far. The 2 red wiress go to the same connector, one comes in from the fuse box for power and the other is really a splice out to the cigar lighter (or power point in RT).

Image

Now this mess of wires are the turn signals, flashers, etc. I think I mostly got this one figured out except for the a couple. They have a complete circuit when the key is turned on, but I don't know where they go. So this is a work in progress.
Image

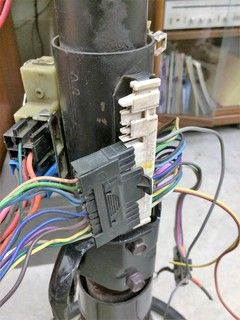
In this picture there is a dark green wire on the top connector. I don't know where that wire goes or what it is for. Could it be where the park/neutral wire from the switch below connects? Maybe not. Any help on this one would be appreciated. The others are for the ignition and I think I have them figured out.
Image

I just got the front light wiring installed and grounded. The rear are next, and I'll go over them when I am sure they are done. The wiring is going really slow, because once again I'm having to learn a little at a time. It seems like it's one step forward, but by the time I get to work on RT again, I have to repeat the last thing I did before I can move on to make sure I get it right. The only good news is that I think I'm getting it, just VERY SLOWLY, and with a lot of help from others.
Robert

Topic author
Road Trip
Posts: 313
Joined: Mon Jun 11, 2012 8:46 am
Location: Bryan, Texas

Re: Meet Road Trip

Post by Road Trip »

Saturday, March 28th was a VERY GOOD DAY!

I got up early and went out to the shop to take a look at what needed to be done, becauase today Santa was coming. Or at least it was close.

At about 8:30 am Serehill showed up. He drove over 3 hours to get here by 8:30 and help teach me a little more about electrical. I guess I whined long enough that he felt sorry for me.

Image

I'm the one grinning like a kid in a candy store.

We worked on Jeep diagrams, actual Jeep wiring, the Painless wiring harness, the PSI harness, the fuse/relay boxes I had already built, and even melding them all together.

About 5:30 my brain was smoking from the download, but I have pages of notes and a lot of work to do now.

As he climbed into his sleigh, he was heard to say "when you get the column in and all the stuff we talked about today done, I'll be back to check out your work."

Not quite as good as "Merry Christmas to all and to all a good night", but it works for me.

Thanks Rick!
Robert

Topic author
Road Trip
Posts: 313
Joined: Mon Jun 11, 2012 8:46 am
Location: Bryan, Texas

Re: Meet Road Trip

Post by Road Trip »

Well, slow weekend. As noted in another thread, I'm having difficulty getting the steering column in. I have to go check the other two body tubs to see if the 84 is different. I got some pics from Mdcptman of how his was installed, and my tub is different from his. So no column yet.

I did set the mock up of the Vintage Air in what I think is it's new home. I think I need to get the full unit so I can see how it sets and what little room is left to see if I can do the relay box in there with it, and all of it's hoses and tubes. I also need to do the holes in the bulkhead for the heater/hvac lines. So I guess I'll be ordering that so I can "test fit" more stuff.

I did get the tailgate, taillights, and both fuel pumps wired up and the wires run into the cab. I put the wires are in some of the ribbed wire loom protectors, and that runs from the tail end up to the back side of the fuse box. So the back/underneath is now done, and it's the inside and under the hood that needs attention. Soon as I figure out that steering column installed.
Robert

Topic author
Road Trip
Posts: 313
Joined: Mon Jun 11, 2012 8:46 am
Location: Bryan, Texas

Re: Meet Road Trip

Post by Road Trip »

Well, the 6 mini-relay box has found a new home, thanks to Serehill.
Image
Inside the drivers door. I'll use the 2 bolts holding the window stop to the door as mounting bolts for a bracket. This will reduce the number of wires going into and coming out of both doors.

Good call Rick.
Robert

serehill
Vendor
Posts: 1953
Joined: Sun Nov 20, 2011 4:00 pm
Location: Mesquite Texas

Re: Meet Road Trip

Post by serehill »

That looks great Robert It's a great place. You might consider a piece of plastic or something just to deflect dust & water. it should be ok without it but it wouldn't hurt. It will sure clean up the wiring. Maybe getting to be time to discuss another trip??

I'm really surprised no one has photos of the column set up.
1980 Honcho 258 4 speed mostly stock with 4 " lift.

WIP

You know the rude dude from IFSJA


1980 Cherokee wrangled & mangled
MSD complete system
Eddy intake
Holley 650
Comp cam 270H
4" Rusty's
Ramsey 12K winch
208
Built to drive not sit in the garage.


No longer strangled. I didn't build it for anyone else.
If you can't improve it why waste your time?

Topic author
Road Trip
Posts: 313
Joined: Mon Jun 11, 2012 8:46 am
Location: Bryan, Texas

Re: Meet Road Trip

Post by Road Trip »

I liked the location of the relay box enough I have built a bracket to hold it. It will bolt to the window stop, using two bolts through that stop.

First, I found a piece of steel that was about the right size, but it had a little bit of a Z shape to it. So,
Image
I flattened it out. Then
Image
I bent it to fit the contour of the relay box. Then I had to have a way to tighten it up, so
Image
A little plumbers tape to tighten it up, it will be pulled tight when the bolts are tightened down. Now it shouldn't move about making noise. I've got to treat the rust and paint it, then install it so I can start making the connections in the door.

If you look at picture 2, you will see the 30 wires coming out. Well, I soldered the 12 ground wires into one to exit the door and the 6 power wires into one wire so I can bring 20A power into the door and then run all six relays. Reduces the work (soldering) I have to do inside the door where space is a little tight.
Robert

ShawnQ
Posts: 355
Joined: Wed Feb 06, 2013 4:09 pm
Location: Bayou Vista, TX (Galveston area)

Re: Meet Road Trip

Post by ShawnQ »

Pics aren't working - can you reupload?
1988 Grand Wagoneer, , 6" on 33x12.5 BFG M/Ts & Mickey Thompson Classic wheels
Currently undergoing a 5.3/6L80E/NP241C swap!
You can view my Build/Work In Progress thread by clicking HERE!

Topic author
Road Trip
Posts: 313
Joined: Mon Jun 11, 2012 8:46 am
Location: Bryan, Texas

Re: Meet Road Trip

Post by Road Trip »

Shawn, try again, they work when I open it.
Robert

Topic author
Road Trip
Posts: 313
Joined: Mon Jun 11, 2012 8:46 am
Location: Bryan, Texas

Re: Meet Road Trip

Post by Road Trip »

Good weekend! Not only did familial duties allow for me to work on the Jeep, I actually accomplished some stuff!

First, as you know I've been working on the relay box that will control windows and door locks. Well, I got the drivers door done, sort of.

Image
If you look closely at the top of the relay box, you can see the double bracket. I painted it black before installation, so it is hard to see, but it really did go into place easily, and more importantly it is secure and doesn't bounce around, so it shouldn't be a problem from a noise standpoint.

Here is a picture of the door "sort of" buttoned up.

Image
I say "sort of" because I don't like all the wires laying around like that. I'm thinking about doing a old school electrical tape wrap to bind them together and protect them.

I also created a chart showing the wire from the switch to the relay, from the relay to the window motor, etc. The fun part was labeling all the wires that got through the bulkhead so I can hook them up correctly, but I got that done.

I hooked up a 50 amp battery charger and the window works, but I have a "sick" switch. Push it down and it works somewhere in the middle of the move, same when you push it to the upside. So I'm going to have to replace the switch. Fortunately I have several lying around.

The door lock worked on the battery charger before I buttoned up the door. Now it doesn't work. The only think I did to it was splice the wires that will run over to the riders door switch to the wires to the drivers door wires so they all can go to Pin 86 on the relay. That shouldn't be a problem. So I'll have to figure that out next weekend if I get the time - family coming to our house, Mothers Day, and a little work I'll have to do.

I also got a brake bracket from a member. I've got it painted and will install it once I get the two doors working properly.

Next up, riders door hooked to relays and get the riders door window to work from both switches and the door locks to work from both switches.
Robert

Topic author
Road Trip
Posts: 313
Joined: Mon Jun 11, 2012 8:46 am
Location: Bryan, Texas

Re: Meet Road Trip

Post by Road Trip »

Ok, I got to spend 4 hours on RT today. I spent the first 3 trying to get the driver's side switches to work consistently. I tried 3 different door lock switches and 3 different pairs of window switches. I never did get the door lock to work, and I've had it working in the past. I got the driver's window to work, but only if I plugged the right switch (in the pair) to the left side (the drivers side), leaving the left switch hanging out in the air. Then and only then will the drivers window work.

So I took one set completely apart and cleaned and lubed them. They still didn't work properly. The right switch in the left plug would work the drivers window, but not plugged in properly. This is frustrating because I had continuity on all but 3 of the switches to start with. The fact that I was butting my head against a wall caused me to start on the riders door.

So I wired up the riders door to the wires coming out of the bulkhead from the drivers door. I hooked it all up to power and ground, and wonder of wonders, the door lock switch on the riders door locks and unlocks BOTH doors, just like it's supposed to. Then I checked the window switch, and it operated the window just like it's supposed to. So I spent the next hour soldering wires so I could button up the riders side. Man did it feel good to accomplish something electrical! The riders side wiring is temporarily taped up and sitting inside the lower lip of the dash.

Image

So I guess I'm in need of a door lock switch and a pair of window switches that work. Then I'll try again to get the drivers side to work.
Robert

Topic author
Road Trip
Posts: 313
Joined: Mon Jun 11, 2012 8:46 am
Location: Bryan, Texas

Re: Meet Road Trip

Post by Road Trip »

Well Saturday was a very good day for Road Trip. Serehill made the 3+ hour drive down to help out, and it worked.

First we started re-checking all the stuff I had done. We discovered that the little Ford relays that fit in the 2000 Focus relay box do not hook up exactly like a Bosch relay.

Image

Once Rick showed me how to check the relay, we realized that I had hooked up the 87 pin and the 87A backwards. So we fixed that problem.

Then we moved on to the switches. I found I had several sets of window switches. It was a good thing, because we had a little switch carnage trying to figure out the issue.

Image

If you look closely at the most right hand side single switch, you will notice that one of the pins has been cut off. That was necessary to keep it from getting power to that pin when hooked into the Jeep plug. You see the switch just to the left of it, that is what they look like when not "modified".

So with our switches checked out and all working, we had the drivers window working fine. However, we still had a problem with the door locks and the riders window. The next thing we checked out was the plugs.

The Jeep has 2 kinds of plugs, the plug set up for three wire switches and the plug set up for 5 wire switches. The door locks and the riders side plugs are all 5 wire plugs.

Image

This is the 5 wire plug. There are two grounds, black and brown, as well as the power in wire, red with a white trace and the up/down pins being the pink and blue. As it turned out, the 2 extra grounds were causing the problems.

We then opened the plugs and removed the two ground wire pins, reassembled the plug and everything worked just as planned! The three wire plugs look like this,

Image

All the plugs now look like this, both the double plug on the drivers side for the two windows and the door lock on the drivers and the door lock and the single window switch on the riders side.

So with the switches finally working correctly, I was able to button up both doors.

Image

Now to move on to more electrical issues.

Thanks again Rick.
Robert
User avatar

Dusty
Posts: 486
Joined: Wed Apr 18, 2012 11:41 pm

Re: Meet Road Trip

Post by Dusty »

Puts a whole new meaning to R&R.
Glad Rick has been able to help you. Heck you are gonna have that thing on the road before the Muck Duck. :-?

Hows the Vintage air going on your rig?

Dusty
If God is your co-pilot, you need to switch seats!

Topic author
Road Trip
Posts: 313
Joined: Mon Jun 11, 2012 8:46 am
Location: Bryan, Texas

Re: Meet Road Trip

Post by Road Trip »

Dusty, so far I have bolted the mock up to the firewall so I can see that it is going to fit. Past that I have not even begun on the Vintage Air unit. That will be another interesting endeavor!
Robert

Topic author
Road Trip
Posts: 313
Joined: Mon Jun 11, 2012 8:46 am
Location: Bryan, Texas

Re: Meet Road Trip

Post by Road Trip »

I can shift the transmission! Used the Shiftworks shift kit with the 4L60E kit.

Image
Lower end at the tranny.

Image
Upper end on the column shifter.
Robert

GaJeep94YJ
Posts: 313
Joined: Fri Dec 18, 2015 12:00 pm

Re: Meet Road Trip

Post by GaJeep94YJ »

Why couldn't you use the factory column shifter?

Don't all the jeep linkage hook up? The shift detent in the column didn't include an over drive but you can swap in the Chevy van column to get the extra detent.

Or did I miss something earlier in the thread stating why?

Sent from my Nexus 5 using Tapatalk

GaJeep94YJ
Posts: 313
Joined: Fri Dec 18, 2015 12:00 pm

Re: Meet Road Trip

Post by GaJeep94YJ »

Btw I just put a LM7, 4l60e, Dana 300 in my 79 chief


Sent from my Nexus 5 using Tapatalk
Post Reply