Repro glove box
-
 swampedge
Topic author - Posts: 341
- Joined: Mon Jun 11, 2012 5:21 pm
- Location: Melbourne,Fl.
Repro glove box
Got a new repro plastic glove box insert and it's to narrow across the top. Going to have to get my heat gun ahold of it. I bought it from TGW. Everyone I've seen has this problem.
You really are judged by the dogs you have!
-
 tedlovesjeeps71
- Posts: 2905
- Joined: Fri Jul 22, 2016 4:39 pm
Re: Repro glove box
Sounds like TGW needs to have a chat with their manufacturer and fix it??
Sent from my iPhone using Tapatalk
Sent from my iPhone using Tapatalk
-
swampedge
Topic author - Posts: 341
- Joined: Mon Jun 11, 2012 5:21 pm
- Location: Melbourne,Fl.
Re: Repro glove box
I only really work on and collect Kaiser era Jeeps but it would be nice if others with AMC units could chime in with any mods if required to get proper fit meant in theirs.
Sent from my iPhone using Tapatalk
Sent from my iPhone using Tapatalk
You really are judged by the dogs you have!
-
 tgreese
- Posts: 7191
- Joined: Fri Jun 08, 2012 6:31 am
- Location: Medford MA USA
Re: Repro glove box
Mmm. I bought a piece of black poster board at the art supply store and repaired both of mine - both the J10 and J20. Contact cement to join the new pieces to the old. A little gaffer tape to cover the seams.
Tim Reese
Maine beekeeper's truck: '77 J10 LWB, 258/T15/D20/3.54 bone stock, low options (delete radio), PS/PDB, hubcaps.
Browless and proud: '82 J20 360/T18/NP208/3.73, Destination A/Ts, 7600 GVWR
Copper Polly: '75 CJ-6, 304/T15, PS, BFG KM2s, soft top
GTI without the badges: '95 VW Golf Sport 2000cc 2D
Dual Everything: '15 Chryco Jeep Cherokee KL Trailhawk, ECO Green
Blockchain the vote.
-
weeegoneeer
- Posts: 230
- Joined: Wed Apr 26, 2017 10:34 am
Re: Repro glove box
I just have made mine completely malleable by ripping it out, adding tears, and putting it back in a dozen times. It's like cloth now! (not a bad idea, waxed canvas with a few supports).
I do have a BJ's cardboard insert I'm saving for when I decide to tackle the dash harness. I'll be pretty deep at that point and may just drop the AC to see if it's possible to install from underneath, seems like even with the stock box I'm needing to crease it too much.
If anyone has any tips for installation through the front, am all ears!
~j
1984 GW
-
 66stepside
- Posts: 3793
- Joined: Sat Oct 13, 2012 9:59 pm
- Location: Spokane Valley, WA.
Re: Repro glove box
I have a glove box from the same place. The first installation attempt did not go well.
So I put it off- I'll be getting to it soon, though. I'd also like to hear some tips from someone who's installed one.
I wish I would have installed it when the dash was out of the truck for painting.
Sent from my iPhone using Tapatalk
So I put it off- I'll be getting to it soon, though. I'd also like to hear some tips from someone who's installed one.
I wish I would have installed it when the dash was out of the truck for painting.
Sent from my iPhone using Tapatalk
1960 FC170 DRW 401/TH400/D20
1966 J3000 401/T18/D300
19?? Quadcab Thriftside, 5.3, 4L60-E, NP261XHD
1968 M715, 454, sm465, np205, 14 bolt rear, 60 front
1966 J3000 401/T18/D300
19?? Quadcab Thriftside, 5.3, 4L60-E, NP261XHD
1968 M715, 454, sm465, np205, 14 bolt rear, 60 front
-
RamJetFSJ
- Posts: 431
- Joined: Fri Mar 22, 2013 12:36 pm
- Location: Carpinteria, CA
Re: Repro glove box
I tried installing from the front, which some said was possible, but I didnt see a way to make it work, so I put it off until my AC was out. It was much easier to install from the back, and while it didnt fit perfect (I got mine from BJs), it did fit, and once in is really nice.
80 Wag in 73 attire, Ram Jet 350 power
-
swampedge
Topic author - Posts: 341
- Joined: Mon Jun 11, 2012 5:21 pm
- Location: Melbourne,Fl.
Re: Repro glove box
Having to make it fit is not what I wanted. It's a simple design even for injection or vacuum forming. It would probably cost 10k to fix the mold if it's injection molded. Maybe I'll make a vacuum forming mold and make them so they slide right in. One day in the very far future. I'm going to heat gun it this weekend. That will fix it.
You really are judged by the dogs you have!
-
66stepside
- Posts: 3793
- Joined: Sat Oct 13, 2012 9:59 pm
- Location: Spokane Valley, WA.
Re: Repro glove box
Having it slide in would make the most sense.swampedge wrote:Having to make it fit is not what I wanted. It's a simple design even for injection or vacuum forming. It would probably cost 10k to fix the mold if it's injection molded. Maybe I'll make a vacuum forming mold and make them so they slide right in. One day in the very far future. I'm going to heat gun it this weekend. That will fix it.
Maybe 3, or 4 "factory" creases in the right spots would allow minor bending origami-style so it can be tucked in from the front and once you release it, the box expands and you screw it in place?
Sent from my iPhone using Tapatalk
1960 FC170 DRW 401/TH400/D20
1966 J3000 401/T18/D300
19?? Quadcab Thriftside, 5.3, 4L60-E, NP261XHD
1968 M715, 454, sm465, np205, 14 bolt rear, 60 front
1966 J3000 401/T18/D300
19?? Quadcab Thriftside, 5.3, 4L60-E, NP261XHD
1968 M715, 454, sm465, np205, 14 bolt rear, 60 front
-
michael.bohn
- Posts: 24
- Joined: Fri Oct 07, 2016 7:06 pm
Re: Repro glove box
I recently put the plastic reproduction in my J10, I strategically cut along the two top corners from front to back making it easier to compress and twist the box such that the top left corner could be forced into the opening. It took quite a bit of force to hold it somewhat twisted and flattened to accomplish this. Don't forget to remove both the latch and the spindle to give yo more room. BTW, these cuts don't allow anything to escape from the box.
Sent from my iPad using Tapatalk
Sent from my iPad using Tapatalk
-
swampedge
Topic author - Posts: 341
- Joined: Mon Jun 11, 2012 5:21 pm
- Location: Melbourne,Fl.
Re: Repro glove box
My problem is that the box is to narrow side to side to cup around the metal the screws are supposed to pass through before screwing in to the box.
Sent from my iPhone using Tapatalk
Sent from my iPhone using Tapatalk
You really are judged by the dogs you have!
-
 fulsizjeep
- Moderator
- Posts: 5012
- Joined: Sun Nov 06, 2011 7:21 am
- Location: Fruitville, FL
- Contact:
Re: Repro glove box
We have one in the 77 Wag. Installed with AC pulled out. It fit OK. I can't imagine inserting it from the front though.
Flint Boardman
88 GW, 401/727/208, 5" lift, D44s/4.10s/locked up, 35s
https://jubileejeeps.org/quadratrac
88 GW, 401/727/208, 5" lift, D44s/4.10s/locked up, 35s
https://jubileejeeps.org/quadratrac
-
swampedge
Topic author - Posts: 341
- Joined: Mon Jun 11, 2012 5:21 pm
- Location: Melbourne,Fl.
Re: Repro glove box
I inserted mine from the back. And slid it over into position.
Sent from my iPhone using Tapatalk
Sent from my iPhone using Tapatalk
You really are judged by the dogs you have!
-
ferrum
- Posts: 131
- Joined: Sun Jun 19, 2016 1:49 pm
Re: Repro glove box
One from TGW different than one from BJ's? I bought mine from BJ's and it was pain in the neck to insert it into position but I was able to get it in from front. It is larger and deeper than original cardboard version. I had the compartment door off to make it work. Also had to drill holes for door hinges and cut out sections so that door can be closed. I can take photo of installed insert if you want.swampedge wrote:Got a new repro plastic glove box insert and it's to narrow across the top. Going to have to get my heat gun ahold of it. I bought it from TGW. Everyone I've seen has this problem.
'76 Cherokee Chief
-
 MadMax78
- Posts: 452
- Joined: Tue Mar 26, 2013 12:40 pm
- Location: Guin, AL
Re: Repro glove box
Ferrum
Post some pics of how you did yours please. I'm thinking of cutting a pie shape out of each side and squeezing it together to slide it in from the front.
Post some pics of how you did yours please. I'm thinking of cutting a pie shape out of each side and squeezing it together to slide it in from the front.
MadMax78
78 Cherokee S, Wide Track, 360, TH400, Quadra Trac, TAD's SOA, 35" BFG KM2, Edelbrock Carb & Intake, MSD Coil & Ignition
78 Cherokee S, Wide Track, 360, TH400, Quadra Trac, TAD's SOA, 35" BFG KM2, Edelbrock Carb & Intake, MSD Coil & Ignition
-
ferrum
- Posts: 131
- Joined: Sun Jun 19, 2016 1:49 pm
Re: Repro glove box
I hope you can see how it is mounted by looking at the photo... My door was completely off when I installed the glovebox. It was tight squeeze to get it in but I was able to get it in. Once you get it in, you will see that you do have to cut out some corners and such to make it fit.
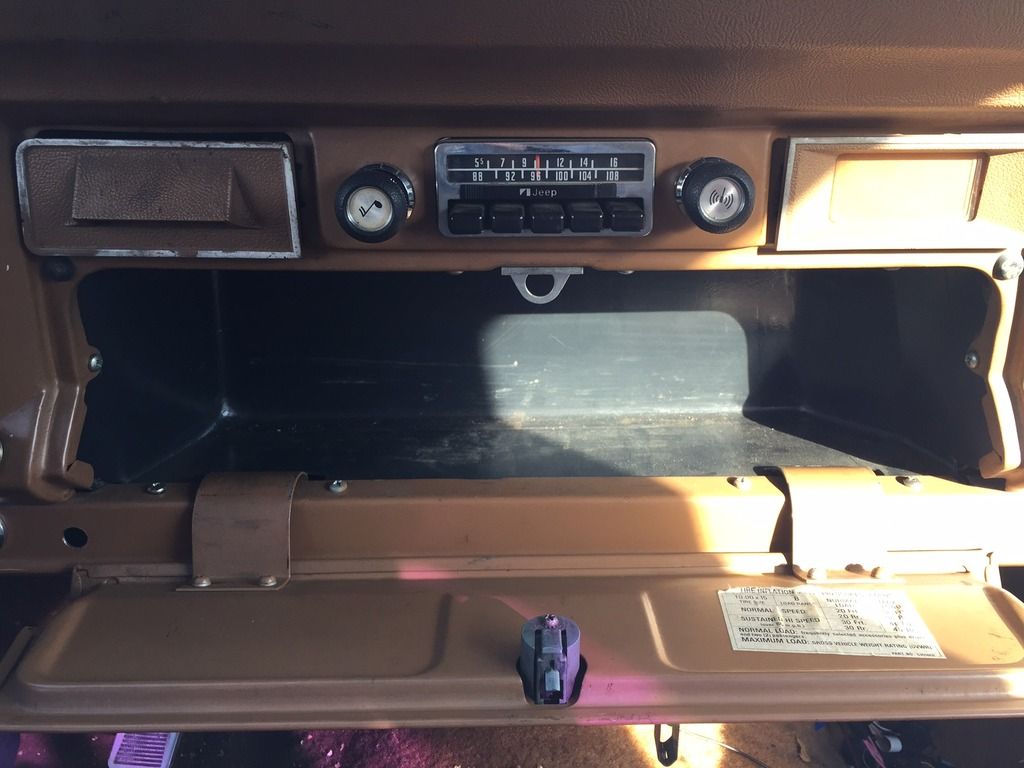
Overview of the installed glovebox.
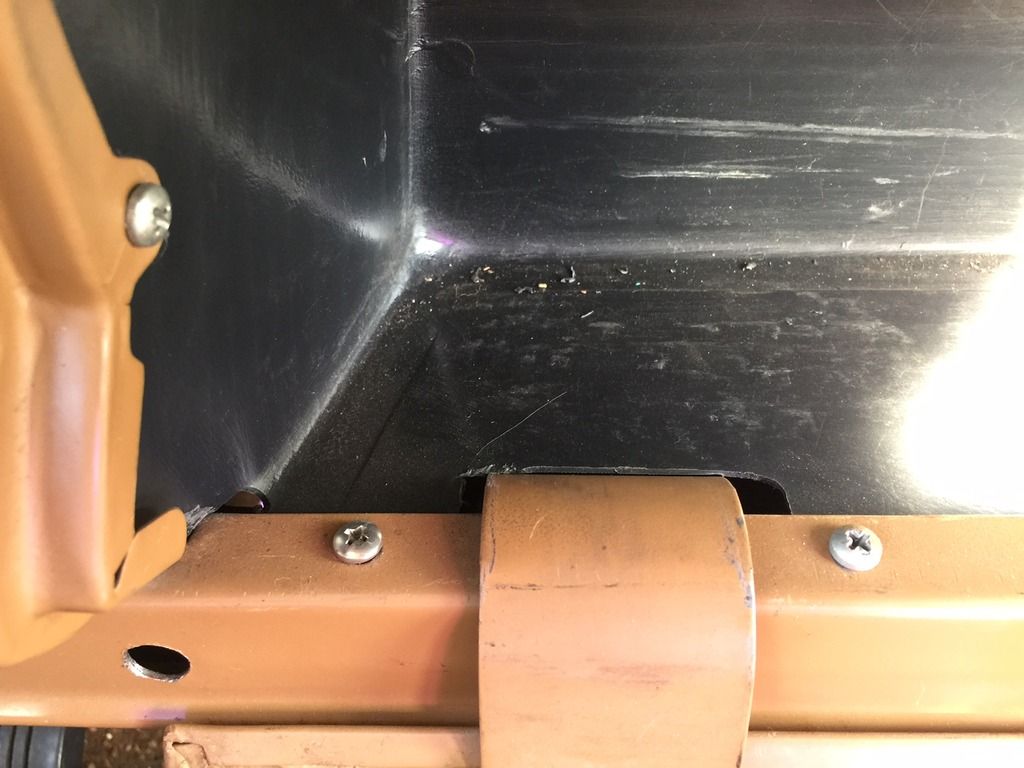
Lower left corner. I had to cut more plastic out of existing cutout due to hinge hitting it.
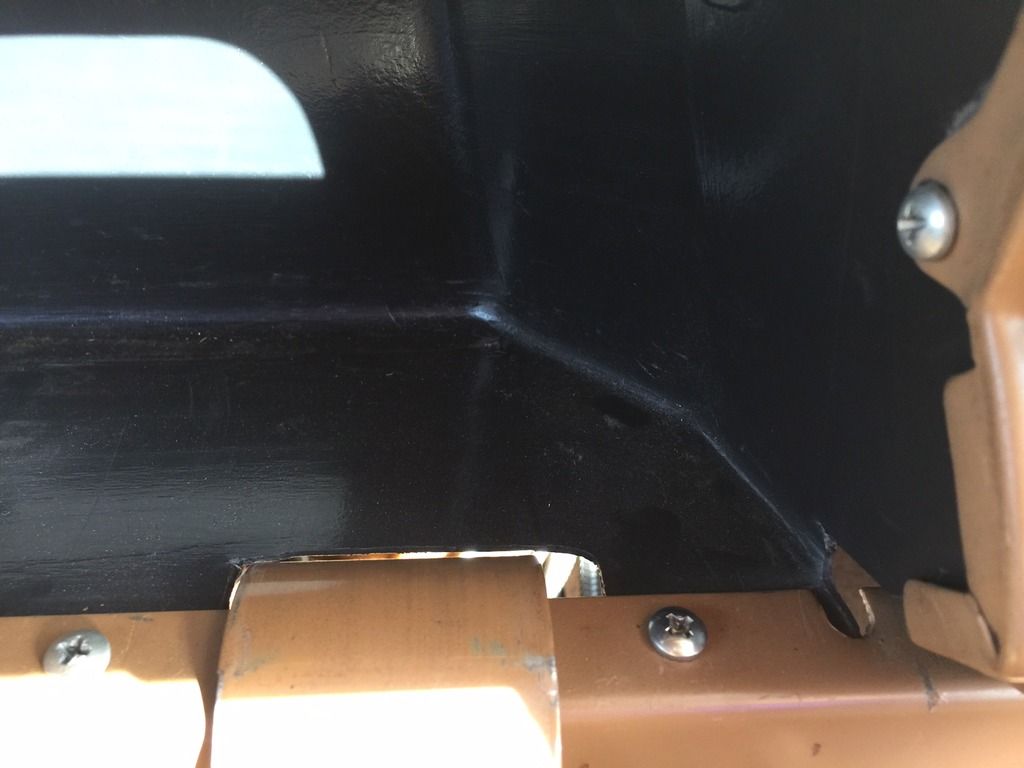
Lower right corner.
Upper right corner. I used angle drill to make pilot hole before screwing it in.
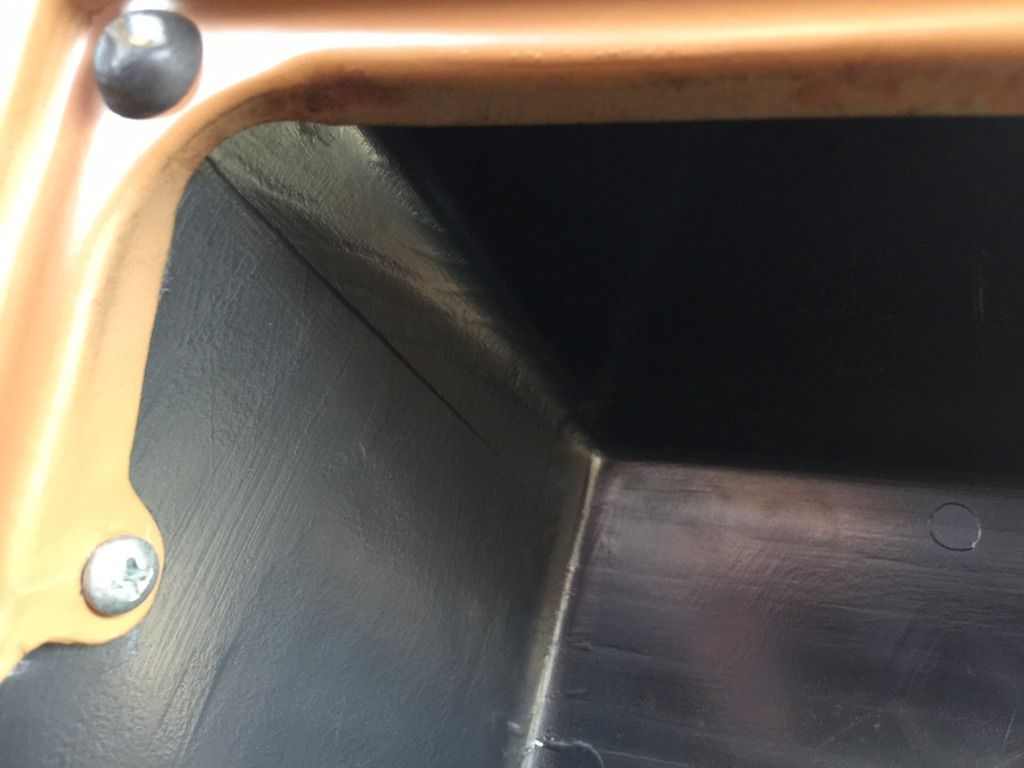
Upper left corner. Ash tray is above this corner.
Good luck with your install.
'76 Cherokee Chief
-
tedlovesjeeps71
- Posts: 2905
- Joined: Fri Jul 22, 2016 4:39 pm
Re: Repro glove box
Could you guys dealing with this, trying to put it in from the front, not cut it significantly and then plastic weld it back together along your cuts when it's in?
Sent from my iPhone using Tapatalk
Sent from my iPhone using Tapatalk
-
 az chip
- Posts: 1433
- Joined: Tue Jul 14, 2015 8:59 pm
- Location: Mesa, AZ
Re: Repro glove box
Ted, Just rub some acetone and atf on it.... 

'81 Cherokee Chief 81 WT Chief/MSD 6/Holley Sniper/ Rusty 4" Spring lift/ Bulltear oil adapter/K&P Engineering Oil Filter/ NP 208/ Serehill Light Harness/KC LED Headlights/ Evil Twin Fab Roof Rack and sliders/ Ross mirror mounts.
-
tedlovesjeeps71
- Posts: 2905
- Joined: Fri Jul 22, 2016 4:39 pm
Re: Repro glove box
az chip wrote:Ted, Just rub some acetone and atf on it....

Sent from my iPhone using Tapatalk
-
az chip
- Posts: 1433
- Joined: Tue Jul 14, 2015 8:59 pm
- Location: Mesa, AZ
Re: Repro glove box
LOL
'81 Cherokee Chief 81 WT Chief/MSD 6/Holley Sniper/ Rusty 4" Spring lift/ Bulltear oil adapter/K&P Engineering Oil Filter/ NP 208/ Serehill Light Harness/KC LED Headlights/ Evil Twin Fab Roof Rack and sliders/ Ross mirror mounts.